Tag Archives: TensorFlow

Introducing TensorFlow Recorder

When training computer vision machine learning models, data loading can often be a performance bottleneck, causing your GPU or TPU resources to be underutilized while waiting for data to be loaded into the model. Storing your dataset in the efficient TensorFlow Record (TFRecord) format is a great way to solve these problems, but creating TFRecords can unfortunately often require a great deal of complex code.

Last week we open sourced the TensorFlow Recorder project (also known as TFRecorder), which makes it possible for data scientists, data engineers, or AI/ML engineers to create image based TFRecords with just a few lines of code. Using TFRecords is incredibly important for creating efficient TensorFlow ML pipelines, but until now they haven’t been so easy to create. Before TFRecorder, in order to create TFRecords at scale you would have had to write a data pipeline that parsed your structured data, loaded images from storage, and serialized the results into the TFRecord format. TFRecorder allows you to write TFRecords directly from a Pandas dataframe or CSV without writing any complicated code.

You can see an example of TFRecoder below, but first let’s talk about some of the specific advantages of TFRecords.

How TFRecords Can Help

Using the TFRecord file format allows you to store your data in sets of files, each containing a sequence of protocol buffers serialized as a binary record that can be read very efficiently, which will help reduce the data loading bottleneck mentioned above.

Data loading performance can be further improved by implementing prefetching and parallel interleave along with using the TFRecord format. Prefetching reduces the time of each model training step(s) by fetching the data for the next training step while your model is executing training on the current step. Parallel interleave allows you to read from multiple TFRecords shards (pieces of a TFRecord file) and apply preprocessing of those interleaved data streams. This reduces the latency required to read a training batch and is especially helpful when reading data from the network.

Using TensorFlow Recorder

Creating a TFRecord using TFRecorder requires only a few lines of code. Here’s how it works.
import pandas as pd
import tfrecorder
df = pd.read_csv(...)
df.tensorflow.to_tfrecord(output_dir="gs://my/bucket")

TFRecorder currently expects data to be in the same format as Google AutoML Vision.

This format looks like a pandas dataframe or CSV formatted as:
splitimage_urilabel
TRAIN
gs://my/bucket/image1.jpgcat

Where:
  • split can take on the values TRAIN, VALIDATION, and TEST
  • image_uri specifies a local or google cloud storage location for the image file.
  • label can be either a text-based label that will be integerized or an integer
In the future, we hope to extend TensorFlow Recorder to work with data in any format.

While this example would work well to convert a few thousand images into TFRecords, it probably wouldn’t scale well if you have millions of images. To scale up to huge datasets, TensorFlow Recorder provides connectivity with Google Cloud Dataflow, which is a serverless Apache Beam pipeline runner. Scaling up to DataFlow requires only a little bit more configuration.
df.tensorflow.to_tfrecord(
output_dir="gs://my/bucket",
runner="DataFlowRunner",
project="my-project",
region="us-central1)

What’s next?

We’d love for you to try out TensorFlow Recorder. You can get it from GitHub or simply pip install tfrecorder. Tensorflow Recorder is very new and we’d greatly appreciate your feedback, suggestions, and pull requests.

By Mike Bernico and Carlos Ezequiel, Google Cloud AI Engineers

Calling everyone across the country to participate in a one-of-a-kind AI musical experience for India’s Independence Day

We all remember standing to attention during our daily school assembly, and that unmistakable sense of pride when singing the strains of ‘Jana Gana Mana’. And it’s something we all remember singing with fervour -- whether we were the ones who were comfortable only belting out our favorite songs in the shower, or whether we were capable of giving professional singers a run for their money. No matter which category you belong to, we’ve got something special for you.


We invite you to participate in a unique AI experiment, which involves two key ingredients: the most cutting-edge AI work we’re doing in music, and… your voice! We are bringing together these two elements to produce a song that you would know all too well -- the Indian national anthem. All you need to do is sing the national anthem, then using the power of AI your voice will get converted into one of three traditional Indian instruments -- the shehnai, sarangi, or bansuri -- effectively rendering your performance of the national anthem in the instrument of your choice.
Taking part in this experiment is simple. Using a smartphone, head over to g.co/SoundsofIndia and you will see an interactive web app that steps you through the process. You will first be able to hear the national anthem, giving you a sense of the pitch and tempo. Next, you’ll see a screen with the lyrics of the national anthem, which get highlighted to help you sing in rhythm -- much like you would with a karaoke track. After you’ve sung, pick your favourite Indian instrument and in a few moments you’ll have your own version of the national anthem -- as sung by you but in the sound of your favourite Indian instrument -- downloaded and ready to share. Finally, you can join scores of others and submit your rendition to this experiment.


Note that the computation for this experience runs completely in your browser and on-device using TensorFlow, and no personally identifiable information is collected or stored. We can’t wait to bring to you the culmination of this experience, so look out for something very special coming your way on 15th August 2020 -- the 73rd anniversary of India’s Independence.


We look forward to your joining us in creating a one-of-a-kind cultural experience that is inspired by tradition, and powered by AI.

Posted by Sanjay Gupta, Vice President and Country Manager, Google India

Summer updates from Coral

Posted by the Coral Team

Summer has arrived along with a number of Coral updates. We're happy to announce a new partnership with balena that helps customers build, manage, and deploy IoT applications at scale on Coral devices. In addition, we've released a series of updates to expand platform compatibility, make development easier, and improve the ML capabilities of our devices.

Open-source Edge TPU runtime now available on GitHub

First up, our Edge TPU runtime is now open-source and available on GitHub, including scripts and instructions for building the library for Linux and Windows. Customers running a platform that is not officially supported by Coral, including ARMv7 and RISC-V can now compile the Edge TPU runtime themselves and start experimenting. An open source runtime is easier to integrate into your customized build pipeline, enabling support for creating Yocto-based images as well as other distributions.

Windows drivers now available for the Mini PCIe and M.2 accelerators

Coral customers can now also use the Mini PCIe and M.2 accelerators on the Microsoft Windows platform. New Windows drivers for these products complement the previously released Windows drivers for the USB accelerator and make it possible to start prototyping with the Coral USB Accelerator on Windows and then to move into production with our Mini PCIe and M.2 products.

New fresh bits on the Coral ML software stack

We’ve also made a number of new updates to our ML tools:

  • The Edge TPU compiler is now version 14.1. It can be updated by running sudo apt-get update && sudo apt-get install edgetpu, or follow the instructions here
  • Our new Model Pipelining API allows you to divide your model across multiple Edge TPUs. The C++ version is currently in beta and the source is on GitHub
  • New embedding extractor models for EfficientNet, for use with on-device backpropagation. Embedding extractor models are compiled with the last fully-connected layer removed, allowing you to retrain for classification. Previously, only Inception and MobileNet were available and now retraining can also be done on EfficientNet
  • New Colab notebooks to retrain a classification model with TensorFlow 2.0 and build C++ examples

Balena partners with Coral to enable AI at the edge

We are excited to share that the Balena fleet management platform now supports Coral products!

Companies running a fleet of ML-enabled devices on the edge need to keep their systems up-to-date with the latest security patches in order to protect data, model IP and hardware from being compromised. Additionally, ML applications benefit from being consistently retrained to recognize new use cases with maximum accuracy. Coral + balena together, bring simplicity and ease to the provisioning, deployment, updating, and monitoring of your ML project at the edge, moving early prototyping seamlessly towards production environments with many thousands of devices.

Read more about all the benefits of Coral devices combined with balena container technology or get started deploying container images to your Coral fleet with this demo project.

New version of Mendel Linux

Mendel Linux (5.0 release Eagle) is now available for the Coral Dev Board and SoM and includes a more stable package repository that provides a smoother updating experience. It also brings compatibility improvements and a new version of the GPU driver.

New models

Last but not least, we’ve recently released BodyPix, a Google person-segmentation model that was previously only available for TensorFlow.JS, as a Coral model. This enables real-time privacy preserving understanding of where people (and body parts) are on a camera frame. We first demoed this at CES 2020 and it was one of our most popular demos. Using BodyPix we can remove people from the frame, display only their outline, and aggregate over time to see heat maps of population flow.

Here are two possible applications of BodyPix: Body-part segmentation and anonymous population flow. Both are running on the Dev Board.

We’re excited to add BodyPix to the portfolio of projects the community is using to extend our models far beyond our demos—including tackling today’s biggest challenges. For example, Neuralet has taken our MobileNet V2 SSD Detection model and used it to implement Smart Social Distancing. Using the bounding box of person detection, they can compute a region for safe distancing and let a user know if social distance isn’t being maintained. The best part is this is done without any sort of facial recognition or tracking, with Coral we can accomplish this in real-time in a privacy preserving manner.

We can’t wait to see more projects that the community can make with BodyPix. Beyond anonymous population flow there’s endless possibilities with background and body part manipulation. Let us know what you come up with at our community channels, including GitHub and StackOverflow.

________________________

We are excited to share all that Coral has to offer as we continue to evolve our platform. For a list of worldwide distributors, system integrators and partners, including balena, visit the Coral partnerships page. Please visit Coral.ai to discover more about our edge ML platform and share your feedback at [email protected].

Full spectrum of on-device machine learning tools on Android

Posted by Hoi Lam, Android Machine Learning


This blog post is part of a weekly series for #11WeeksOfAndroid. Each week we’re diving into a key area of Android so you don’t miss anything. Throughout this week, we covered various aspects of Android on-device machine learning (ML). Whichever stage of development be it starting out or an established app; whatever role you play in design, product and engineering; whatever your skill level from beginner to experts, we have a wide range of ML tools for you.

Design - ML as a differentiator

“Focus on the user and all else will follow” is a Google mantra that becomes even more relevant in our machine learning age. Our Design Advocate, Di Dang, highlighted the importance of finding the unique intersection of user problems and ML strengths. Too often, teams are so keen on the idea of machine learning that they lose sight of their user needs.


Di outlined how the People + AI Guidebook can help you make ML product decisions and used the example of the Read Along app to illustrate topics like precision and recall, which are unique to ML design and development. Check out her interview with the Read Along team together with your team for more inspiration.

New ML Kit fully focused on on-device

When you decide that on-device machine learning is the solution, the easiest way to implement it will be through turnkey SDKs like ML Kit. Sophisticated Google-trained models and processing pipelines are offered through an easy to use interface in Kotlin / Java. ML Kit is designed and built for on-device ML: it works offline, offers enhanced privacy, unlocks high performance for real-time use cases and it is free. We recently made ML Kit a standalone SDK and it no longer requires a Firebase account. Just one line in your build.gradle file and you can start bringing ML functionality into your app.


The team has also added new functionalities such as Jetpack lifecycle support and the option to use the face contour models via Google Play Services saving as much as 20MB in app size. Another much anticipated addition is the support for swapping Google models with your own for both Image Labeling as well as Object Detection and Tracking. This provides one of the easiest ways to add TensorFlow Lite models to your applications without interacting with ByteArray!

Customise with TensorFlow Lite and Android tools

If the base model provided by ML Kit doesn’t quite fit the bill, what should developers do? The first port of call should be TensorFlow Hub where ready-to-use TensorFlow Lite models from both Google and the wider community can be downloaded. From 100,000 US Supermarket products to tomato plant diseases classifiers, the choice is yours.


In addition to Firebase AutoML Vision Edge, you can also build your own model using TensorFlow Model Maker (image classification / text classification) with just a few lines of Python. Once you have a TensorFlow Lite model from either TensorFlow Hub, or the Model Maker, you can easily integrate it with your Android app using ML Kit Image Labelling or Object Detection and Tracking. If you prefer an open source solution, Android Studio 4.1 beta introduces ML model binding that helps wrap around the TensorFlow Lite model with an easy to use Kotlin / Java wrapper. Adding a custom model to your Android app has never been easier. Check out this blog for more details.

Time for on-device ML is now

From the examples of the Android Developer Challenge winners, it is obvious that on-device machine learning has come of age and ML functionalities once reserved for the cloud or supercomputers are now available on your Android phone. Take a step forward with us by trying out our codelabs of the day:

Also checkout the ML Week learning pathway and take the quiz to get your very own ML badge.

Android on-device machine learning is a rapidly evolving platform, if you have any enhancement requests or feedback on how it could be improved, please let us know together with your use-case (TensorFlow Lite / ML Kit). Time for on-device ML is now.

Resources

You can find the entire playlist of #11WeeksOfAndroid video content here, and learn more about each week here. We’ll continue to spotlight new areas each week, so keep an eye out and follow us on Twitter and YouTube. Thanks so much for letting us be a part of this experience with you!

New tools for finding, training, and using custom machine learning models on Android

Posted by Hoi Lam, Android Machine Learning

Yesterday, we talked about turnkey machine learning (ML) solutions with ML Kit. But what if that doesn’t completely address your needs and you need to tweak it a little? Today, we will discuss how to find alternative models, and how to train and use custom ML models in your Android app.

Find alternative ML models

Crop disease models from the wider research community available on tfhub.dev

If the turnkey ML solutions don't suit your needs, TensorFlow Hub should be your first port of call. It is a repository of ML models from Google and the wider research community. The models on the site are ready for use in the cloud, in a web-browser or in an app on-device. For Android developers, the most exciting models are the TensorFlow Lite (TFLite) models that are optimized for mobile.

In addition to key vision models such as MobileNet and EfficientNet, the repository also boast models powered by the latest research such as:

Many of these solutions were previously only available in the cloud, as the models are too large and too power intensive to run on-device. Today, you can run them on Android on-device, offline and live.

Train your own custom model

Besides the large repository of base models, developers can also train their own models. Developer-friendly tools are available for many common use cases. In addition to Firebase’s AutoML Vision Edge, the TensorFlow team launched TensorFlow Lite Model Maker earlier this year to give developers more choices over the base model that support more use cases. TensorFlow Lite Model Maker currently supports two common ML tasks:

The TensorFlow Lite Model Maker can run on your own developer machine or in Google Colab online machine learning notebooks. Going forward, the team plans to improve the existing offerings and to add new use cases.

Using custom model in your Android app

New TFLite Model import screen in Android Studio 4.1 beta

Once you have selected a model or trained your model there are new easy-to-use tools to help you integrate them into your Android app without having to convert everything into ByteArrays. The first new tool is ML Model binding with Android Studio 4.1. This lets developers import any TFLite model, read the input / output signature of the model, and use it with just a few lines of code that calls the open source TensorFlow Lite Android Support Library.

Another way to implement a TensorFlow Lite model is via ML Kit. Starting in June, ML Kit no longer requires a Firebase project for on-device functionality. In addition, the image classification and object detection and tracking (ODT) APIs support custom models. The latter ODT offering is especially useful in use-cases where you need to separate out objects from a busy scene.

So how should you choose between these three solutions? If you are trying to detect a product on a busy supermarket shelf, ML Kit object detection and tracking can help your user select a specific product for processing. The API then performs image classification on just the part of the image that contains the product, which results in better detection performance. On the other hand, if the scene or the object you are trying to detect takes up most of the input image, for example, a landmark such as Big Ben, using ML Model binding or the ML Kit image classification API might be more appropriate.

TensorFlow Hub bird detection model with ML Kit Object Detection & Tracking AP

Two examples of how these tools can fit together

Here are some resources to help you get started:

Customizing your model is easier than ever

Finding, building and using custom models on Android has never been easier. As both Android and TensorFlow teams increase the coverage of machine learning use cases, please let us know how we can improve these tools for your use cases by filing an enhancement request with TensorFlow Lite or ML Kit.

Tomorrow, we will take a step back and focus on how to appropriately use and design for a machine learning first Android app. The content will be appropriate for the entire development team, so bring your product manager and designers along. See you next time.

On-device machine learning solutions with ML Kit, now even easier to use

Posted by Christiaan Prins, Product Manager, ML Kit and Shiyu Hu, Tech Lead Manager, ML Kit

ML Kit logo

Two years ago at I/O 2018 we introduced ML Kit, making it easier for mobile developers to integrate machine learning into your apps. Today, more than 25,000 applications on Android and iOS make use of ML Kit’s features. Now, we are introducing some changes that will make it even easier to use ML Kit. In addition, we have a new feature and a set of improvements we’d like to discuss.

A new ML Kit SDK, fully focused on on-device ML

ML Kit API Overview

ML Kit's APIs are built to help you tackle common challenges in the Vision and Natural Language domains. We make it easy to recognize text, scan barcodes, track and classify objects in real-time, do translation of text, and more.

The original version of ML Kit was tightly integrated with Firebase, and we heard from many of you that you wanted more flexibility when implementing it in your apps. As a result, we are now making all the on-device APIs available in a new standalone ML Kit SDK that no longer requires a Firebase project. You can still use both ML Kit and Firebase to get the best of both products if you choose to.

With this change, ML Kit is now fully focused on on-device machine learning, giving you access to the unique benefits that on-device versus cloud ML offers:

  • It’s fast, unlocking real-time use cases- since processing happens on the device, there is no network latency. This means, we can do inference on a stream of images / video or multiple times a second on text strings.
  • Works offline - you can rely on our APIs even when the network is spotty or your app’s end-user is in an area without connectivity.
  • Privacy is retained: since all processing is performed locally, there is no need to send sensitive user data over the network to a server.

Naturally, you still get access to Google’s on-device models and processing pipelines, all accessible through easy-to-use APIs, and offered at no cost.

All ML Kit resources can now be found on our new website where we made it a lot easier to access sample apps, API reference docs and our community channels that are there to help you if you have questions.

Object detection & tracking gif Text recognition + Language ID + Translate gif

What does this mean if I already use ML Kit today?

If you are using ML Kit for Firebase’s on-device APIs in your app today, we recommend you to migrate to the new standalone ML Kit SDK to benefit from new features and updates. For more information and step-by-step instructions to update your app, please follow our Migration guide. The cloud-based APIs, model deployment and AutoML Vision Edge remain available through Firebase Machine Learning.

Shrink your app footprint with Google Play Services

Apart from making ML Kit easier to use, developers also asked if we can ship ML Kit through Google Play Services resulting in a smaller app footprint and the model can be reused between apps. Apart from Barcode scanning and Text recognition, we have now added Face detection / contour (model size: 20MB) to the list of APIs that support this functionality.

// Face detection / Face contour model
// Delivered via Google Play Services outside your app's APK…
implementation 'com.google.android.gms:play-services-mlkit-face-detection:16.0.0'

// …or bundled with your app's APK
implementation 'com.google.mlkit:face-detection:16.0.0'

Jetpack Lifecycle / CameraX support

Android Jetpack Lifecycle support has been added to all APIs. Developers can use addObserver to automatically manage teardown of ML Kit APIs as the app goes through screen rotation or closure by the user / system. This makes CameraX integration easier. With this release, we are also recommending that developers adopt CameraX in their apps due to the ease of integration and image quality improvements (compared to Camera1) on a wide range of devices.

// ML Kit now supports Lifecycle
val recognizer = TextRecognizer.newInstance()
lifecycle.addObserver(recognizer)

// ...

// Just like CameraX
val camera = cameraProvider.bindToLifecycle( /* lifecycleOwner= */this,
    cameraSelector, previewUseCase, analysisUseCase)

For an overview of all recent changes, check out the release notes for the new SDK.

Codelab of the day - ML Kit x CameraX

To help you get started with the new ML Kit and its support for CameraX, we have created this code lab to Recognize, Identify Language and Translate text. If you have any questions regarding this code lab, please raise them at StackOverflow and tag it with [google-mlkit]. Our team will monitor this.

screenshot of app running

Early access program

Through our early access program, developers have an opportunity to partner with the ML Kit team and get access to upcoming features. Two new APIs are now available as part of this program:

  • Entity Extraction - Detect entities in text & make them actionable. We have support for phone numbers, addresses, payment numbers, tracking numbers, date/time and more.
  • Pose Detection - Low-latency pose detection supporting 33 skeletal points, including hands and feet tracking.

If you are interested, head over to our early access page for details.

pose detection on man jumping rope

Tomorrow - Support for custom models

ML Kit's turn-key solutions are built to help you take common challenges. However, if you needed to have a more tailored solution, one that required custom models, you typically needed to build an implementation from scratch. To help, we are now providing the option to swap out the default Google models with a custom TensorFlow Lite model. We’re starting with the Image Labeling and Object Detection and Tracking APIs, that now support custom image classification models.

Tomorrow, we will dive a bit deeper into how to find or train a TensorFlow Lite model and use it either with ML Kit, or with Android Studio’s new ML binding functionality.

Building a more resilient world together

Posted by Billy Rutledge, Director of the Coral team

UNDP Hackster.io COVID19 Detect Protect Poster

Recently, we’ve seen communities respond to the challenges of the coronavirus pandemic by using technology in new ways to effect positive change. It’s increasingly important that our systems are able to adapt to new contexts, handle disruptions, and remain efficient.

At Coral, we believe intelligence at the edge is a key ingredient towards building a more resilient future. By making the latest machine learning tools easy-to-use and accessible, innovators can collaborate to create solutions that are most needed in their communities. Developers are already using Coral to build solutions that can understand and react in real-time, while maintaining privacy for everyone present.

Helping our communities stay safe, together

As mandatory isolation measures begin to relax, compliance with safe social distancing protocol has become a topic of primary concern for experts across the globe. Businesses and individuals have been stepping up to find ways to use technology to help reduce the risk and spread. Many efforts are employing the benefits of edge AI—here are a few early stage examples that have inspired us.

woman and child crossing the street

In Belgium, engineers at Edgise recently used Coral to develop an occupancy monitor to aid businesses in managing capacity. With the privacy preserving properties of edge AI, businesses can anonymously count how many customers enter and exit a space, signaling when the area is too full.

A research group at the Sathyabama Institute of Science and Technology in India are using Coral to develop a wearable device to serve as a COVID-19 cough counter and health monitor, allowing medical professionals to better care for low risk patients in an outpatient capacity. Coral's Edge TPU enables biometric data to be processed efficiently, without draining the limited power resources available in wearable devices.

All across the US, hospitals are seeking solutions to ensure adherence to hygiene policy amongst hospital staff. In one example, a device incorporates the compact, affordable and offline benefits of the Coral modules to aid in handwashing practices at numerous stations throughout a facility.

And around the world, members of the PyImageSearch community are exploring how to train a COVID-19: Face Mask Detector model using TensorFlow that can be used to identify whether people are wearing a mask. Open source frameworks can empower anyone to develop solutions, and with Coral components we can help bring those benefits to everyone.

Eliciting a global response

In an effort to rally greater community involvement, Coral has joined The United Nations Development Programme and Hackster.io, as a sponsor of the COVID-19 Detect and Protect Challenge. The initiative calls on developers to build affordable and reproducible solutions that support response efforts in developing countries. All ideas are welcome—whether they use ML or not—and we encourage you to participate.

To make edge ML capabilities even easier to integrate, we’re also announcing a price reduction for the Coral products widely used for experimentation and prototyping. Our Dev Board will now be offered at $129.99, the USB Accelerator at $59.99, the Camera Module at $19.99, and the Enviro Board at $14.99. Additionally, we are introducing the USB Accelerator into 10 new markets: Ghana, Thailand, Singapore, Oman, Philippines, Indonesia, Kenya, Malaysia, Israel, and Vietnam. For more details, visit Coral.ai/products.

We’re excited to see the solutions developers will bring forward with Coral. And as always, please keep sending us feedback at [email protected].

MediaPipe KNIFT: Template-based Feature Matching

Posted by Zhicheng Wang and Genzhi Ye, MediaPipe team

Image Feature Correspondence with KNIFT

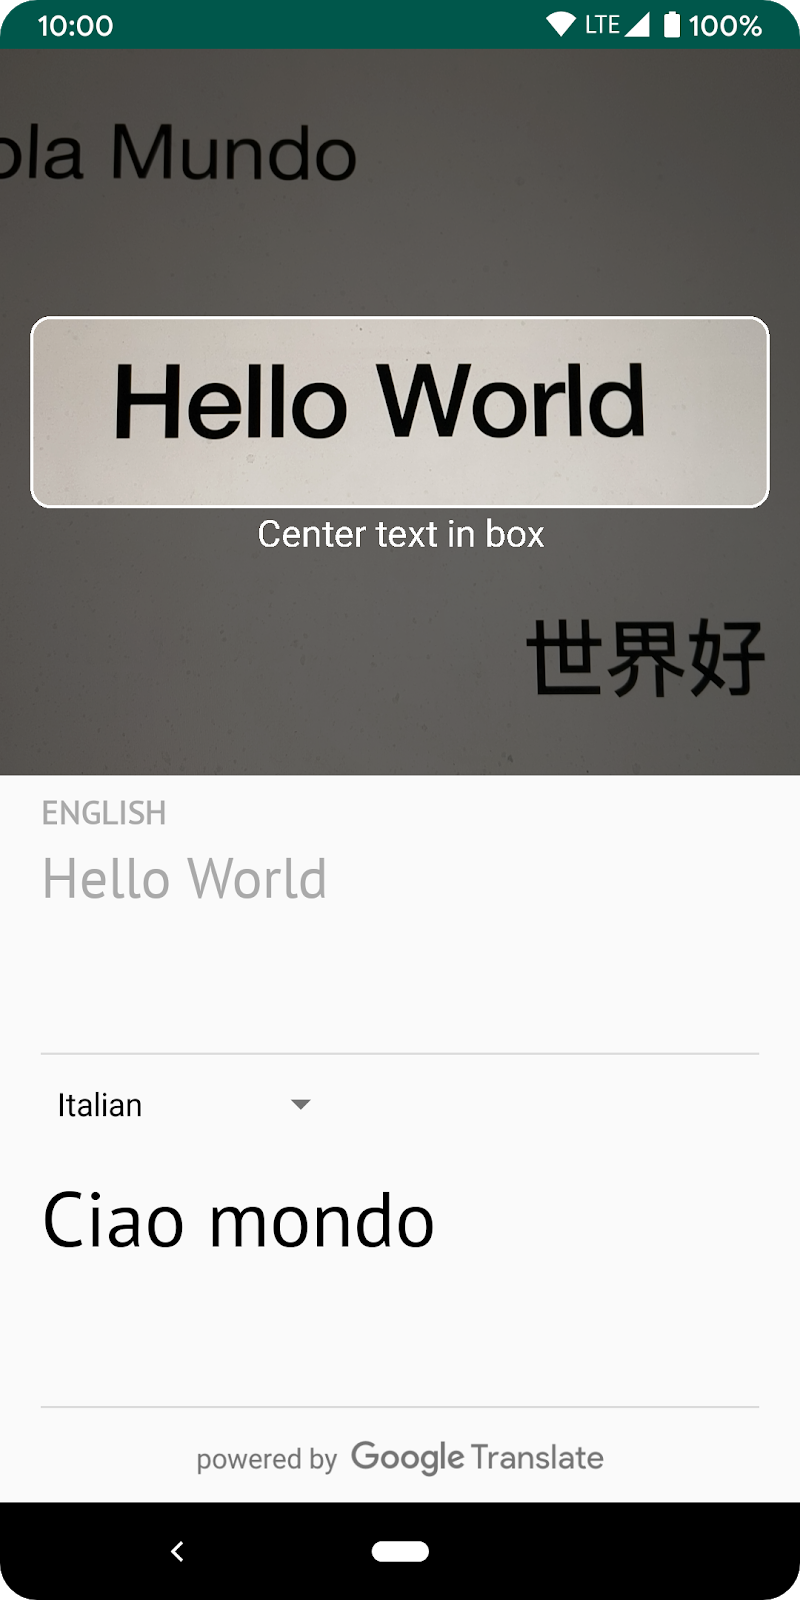
In many computer vision applications, a crucial building block is to establish reliable correspondences between different views of an object or scene, forming the foundation for approaches like template matching, image retrieval and structure from motion. Correspondences are usually computed by extracting distinctive view-invariant features such as SIFT or ORB from images. The ability to reliably establish such correspondences enables applications like image stitching to create panoramas or template matching for object recognition in videos (see Figure 1).

Today, we are announcing KNIFT (Keypoint Neural Invariant Feature Transform), a general purpose local feature descriptor similar to SIFT or ORB. Likewise, KNIFT is also a compact vector representation of local image patches that is invariant to uniform scaling, orientation, and illumination changes. However unlike SIFT or ORB, which were engineered with heuristics, KNIFT is an embedding learned directly from a large number of corresponding local patches extracted from nearby video frames. This data driven approach implicitly encodes complex, real-world spatial transformations and lighting changes in the embedding. As a result, the KNIFT feature descriptor appears to be more robust, not only to affine distortions, but to some degree of perspective distortions as well. We are releasing an implementation of KNIFT in MediaPipe and a KNIFT-based template matching demo in the next section to get you started.

Figure 1: Matching a real Stop Sign with a Stop Sign template using KNIFT.

Training Method

In Machine Learning, loosely speaking, training an embedding means finding a mapping that can translate a high dimensional vector, such as an image patch, to a relatively lower dimensional vector, such as a feature descriptor. Ideally, this mapping should have the following property: image patches around a real-world point should have the same or very similar descriptors across different views or illumination changes. We have found real world videos a good source of such corresponding image patches as training data (See Figure 3 and 4) and we use the well-established Triplet Loss (see Figure 2) to train such an embedding. Each triplet consists of an anchor (denoted by a), a positive (p), and a negative (n) feature vector extracted from the corresponding image patches, and d() denotes the Euclidean distance in the feature space.

Figure 2: Triplet Loss Function.

Figure 2: Triplet Loss Function.

Training Data

The training triplets are extracted from all ~1500 video clips in the publicly available YouTube UGC Dataset. We first use an existing heuristically-engineered local feature detector to detect keypoints and compute the affine transform between two frames with a high accuracy (see Figure 4). Then we use this correspondence to find keypoint pairs and extract the patches around these keypoints. Note that the newly identified keypoints may include those that were detected but rejected by geometric verification in the first step. For each pair of matched patches, we randomly apply some form of data augmentation (e.g. random rotation or brightness adjustment) to construct the anchor-positive pair. Finally, we randomly pick an arbitrary patch from another video as the negative to finish the construction of this triplet (see Figure 5).

Figure 3: An example video clip from which we extract training triplets.

Figure 4: Finding frame correspondence using existing local features.

Figure 5: (Top to bottom) Anchor, positive and negative patches.

Hard-negative Triplet Mining

To improve model quality, we use the same hard-negative triplet mining method used by FaceNet training. We first train a base model with randomly selected triplets. Then we implement a pipeline that uses the base model to find semi-hard-negative samples (d(a,p) < d(a,n) < d(a,p)+margin) for each anchor-positive pair (Figure 6). After mixing the randomly selected triplets and hard-negative triplets, we re-train the model with this improved data.

Figure 6: (Top to bottom) Anchor, positive and semi-hard negative patches.

Model Architecture

From model architecture exploration, we have found that a relatively small architecture is sufficient to achieve decent quality, so we use a lightweight version of the Inception architecture as the KNIFT model backbone. The resulting KNIFT descriptor is a 40-dimensional float vector. For more model details, please refer to the KNIFT model card.

Benchmark

We benchmark the KNIFT model inference speed on various devices (computing 200 features) and list them in Table 1.

Table 1: KNIFT performance benchmark.

Table 1: KNIFT performance benchmark.

Quality-wise, we compare the average number of keypoints matched by KNIFT and by ORB (OpenCV implementation) respectively on an in-house benchmark (Table 2). There are many publicly available image matching benchmarks, e.g. 2020 Image Matching Benchmark, but most of them focus on matching landmarks across large perspective changes in relatively high resolution images, and the tasks often require computing thousands of keypoints. In contrast, since we designed KNIFT for matching objects in large scale (i.e. billions of images) online image retrieval tasks, we devised our benchmark to focus on low cost and high precision driven use cases, i.e. 100-200 keypoints computed per image and only ~10 matching keypoints needed for reliably determining a match. In addition, to illustrate the fine-grained performance characteristics of a feature descriptor, we divide and categorize the benchmark set by object types (e.g. 2D planar surface) and image pair relations (e.g. large size difference). In table 2, we compare the average number of keypoints matched by KNIFT and by ORB respectively in each category, based on the same 200 keypoint locations detected in each image by the oFast detector that comes with the ORB implementation in OpenCV.

Table 2: KNIFT vs ORB average number of matched keypoints.

From Table 2, we can see that KNIFT consistently matches more keypoints than ORB by a large margin in every category. Here we acknowledge the fact that KNIFT (40-d float) is considerably larger than ORB (32-d char) and this can have an effort on matching quality. Nevertheless, most local feature benchmarks do not take descriptor size into account so we will follow the convention here.

To make it easy for developers to try KNIFT in MediaPIpe, we have built a local-feature-based template matching solution (see implementation details using MediaPipe in the next section). As a side effect, we can demonstrate the matching quality between KNIFT and ORB visually in side-by-side comparisons like Figure 7 and 9.

Figure 7: Example of “matching 2D planar surface”. (Left) KNIFT 183/240, (Right) ORB 133/240.

In Figure 7, we choose a typical U.S. Stop Sign image from Google Image Search as the template and attempt to match it with the Stop Sign in this video. This example falls into the “matching 2D planar surface” category in Table 2. Using the same 200 keypoint locations detected by oFast and the same RANSAC setting, we show that KNIFT is successful at matching the Stop Sign in 183 frames out of a total of 240 frames. In comparison, ORB matches 133 frames.

Figure 8: Example of “matching 3D untextured object”. Two template images from different views.

Figure 9: Example of “matching 3D untextured object”. (Left) KNIFT 89/150, (Right) ORB 37/150.

Figure 9 shows another matching performance comparison on an example from the “matching 3D untextured object” category in Table 2. Since this example involves large perspective changes of untextured surfaces, which is known to be challenging for local feature descriptors, we use template images from two different views (shown in Figure 8) to improve the matching performance. Again, using the same keypoint locations and RANSAC setting, we show that KNIFT is successful at matching 89 frames out of a total of 150 frames while ORB matches 37 frames.

KNIFT-based Template Matching in MediaPipe

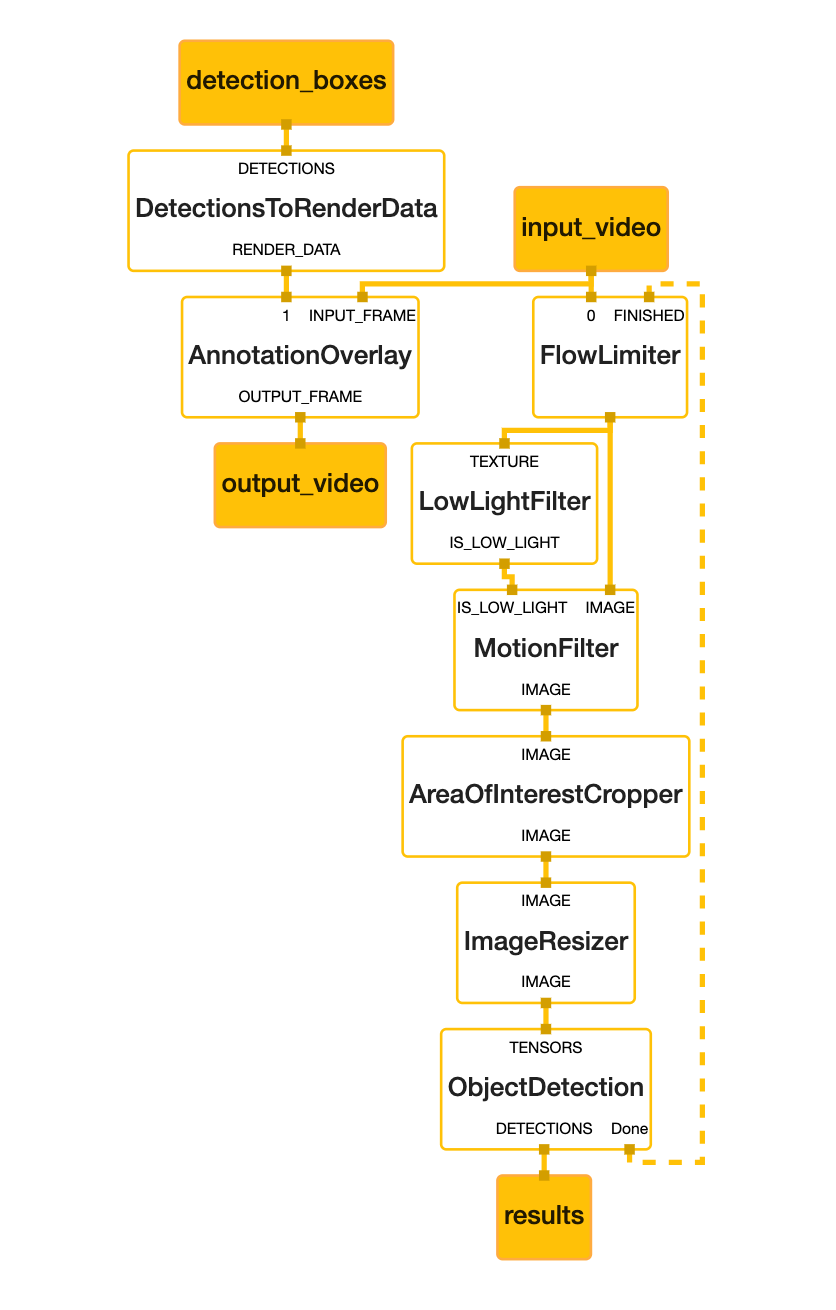
We are releasing the aforementioned template matching solution based on KNIFT in MediaPipe, which is capable of identifying pre-defined image templates and precisely localizing recognized templates on the camera image. There are 3 major components in the template-matching MediaPipe graph shown below:

  • FeatureDetectorCalculator: a calculator that consumes image frames and performs OpenCV oFast detector on the input image and outputs keypoint locations. Moreover, this calculator is also responsible for cropping patches around each keypoint with rotation and scale info and stacking them into a vector for the downstream calculator to process.
  • TfLiteInferenceCalculator with KNIFT model: a calculator that loads the KNIFT tflite model and performs model inference. The input tensor shape is (200, 32, 32, 1), indicating 200 32x32 local patches. The output tensor shape is (200, 40), indicating 200 40-dimensional feature descriptors. By default, the calculator runs the TFLite XNNPACK delegate, but users have the option to select the regular CPU delegate to run at a reduced speed.
  • BoxDetectorCalculator: a calculator that takes pre-computed keypoint locations and KNIFT descriptors and performs feature matching between the current frame and multiple template images. The output of this calculator is a list of TimedBoxProto, which contains the unique id and location of each box as a quadrilateral on the image. Aside from the classic homography RANSAC algorithm, we also apply a perspective transform verification step to ensure that the output quadrilateral does not result in too much skew or a weird shape.

Figure 10: MediaPipe graph of the demo

Demo

In this demo, we chose three different denominations ($1, $5, $20) of U.S. dollar bills as templates and attempted to match them to various real world dollar bills in videos. We resized each input frame to 640x480 pixels, ran the oFast detector to detect 200 keypoints, and used KNIFT to extract feature descriptors from each 32x32 local image patch surrounding these keypoints. We then performed template matching between these video frames and the KNIFT features extracted from the dollar bill templates. This demo runs at 20 FPS on a Pixel 2 Phone CPU with XNNPACK.

Figure 11: Matching different U.S. dollar bills using KNIFT.

Build Your Own Templates

We have provided a set of built-in planar templates in our demo. To make it easy for users to try their own templates, we also provide a tool to build such an index with user generated templates. index_building.pbtxt is a MediaPipe graph that accepts as its input a directory path containing a set of template images. Users can use this graph to compute KNIFT descriptors for all template images (which will be stored in a single file) by 1) replacing the index_proto_filename field in the main graph and the BUILD file and 2) rebuilding the APK file. For step-by-step instructions on how we created the dollar bill demo shown above, please refer to this documentation.

Acknowledgements

We would like to thank Jiuqiang Tang, Chuo-Ling Chang, Dan Gnanapragasam‎, Howard Zhou, Jianing Wei and Ming Guang Yong for contributing to this blog post.

Alfred Camera: Smart camera features using MediaPipe

Guest post by the Engineering team at Alfred Camera

Please note that the information, uses, and applications expressed in the below post are solely those of our guest author, Alfred Camera.

In this article, we’d like to give you a short overview of Alfred Camera and our experience of using MediaPipe to transform our moving object feature, and how MediaPipe has helped to get things easier to achieve our goals.

What is Alfred Camera?

AlfredCamera logo

Fig.1 Alfred Camera Logo

Alfred Camera is a smart home app for both Android and iOS devices, with over 15 million downloads worldwide. By downloading the app, users are able to turn their spare phones into security cameras and monitors directly, which allows them to watch their homes, shops, pets anytime. The mission of Alfred Camera is to provide affordable home security so that everyone can find peace of mind in this busy world.

The Alfred Camera team is composed of professionals in various fields, including an engineering team with several machine learning and computer vision experts. Our aim is to integrate AI technology into devices that are accessible to everyone.

Machine Learning in Alfred Camera

Alfred Camera currently has a feature called Moving Object Detection, which continuously uses the device’s camera to monitor a target scene. Once it identifies a moving object in the area, the app will begin recording the video and send notifications to the device owner. The machine learning models for detection are hand-crafted and trained by our team using TensorFlow, and run on TensorFlow Lite with good performance even on mid-tier devices. This is important because the app is leveraging old phones and we'd like the feature to reach as many users as possible.

The Challenges

We had started building our AI features at Alfred Camera since 2017. In order to have a solid foundation to support our AI feature requirements for the coming years, we decided to rebuild our real-time video analysis pipeline. At the beginning of the project, the goals were to create a new pipeline which should be 1) modular enough so we could swap core algorithms easily with minimal changes in other parts of the pipeline, 2) having GPU acceleration designed in place, 3) cross-platform as much as possible so there’s no need to create/maintain separate implementations for different platforms. Based on the goals, we had surveyed several open source projects that had the potential but we ended up using none of them as they either fell short on the features or were not providing the readiness/stabilities that we were looking for.

We started a small team to prototype on those goals first for the Android platform. What came later were some tough challenges way above what we originally anticipated. We ran into several major design changes as some key design basics were overlooked. We needed to implement some utilities to do things that sounded trivial but required significant effort to make it right and fast. Dealing with asynchronous processing also led us into a bunch of timing issues, which took the team quite some effort to address. Not to mention debugging on real devices was extremely inefficient and painful.

Things didn't just stop here. Our product is also on iOS and we had to tackle these challenges once again. Moreover, discrepancies in the behavior between the platform-specific implementations introduced additional issues that we needed to resolve.

Even though we finally managed to get the implementations to the confidence level we wanted, that was not a very pleasant experience and we have never stopped thinking if there is a better option.

MediaPipe - A Game Changer

Google open sourced MediaPipe project in June 2019 and it immediately caught our attention. We were surprised by how it is perfectly aligned with the previous goals we set, and has functionalities that could not have been developed with the amount of engineering resources we had as a small company.

We immediately decided to start an evaluation project by building a new product feature directly using MediaPipe to see if it could live up to all the promises.

Migrating to MediaPipe

To start the evaluation, we decided to migrate our existing moving object feature to see what exactly MediaPipe can do.

Our current Moving Object Detection pipeline consists of the following main components:

  • (Moving) Object Detection Model
    As explained earlier, a TensorFlow Lite model trained by our team, tailored to run on mid-tier devices.
  • Low-light Detection and Low-light Filter
    Calculate the average luminance of the scene, and based on the result conditionally process the incoming frames to intensify the brightness of the pixels to let our users see things in the dark. We are also controlling whether we should run the detection or not as the moving object detection model does not work properly when the frame has been processed by the filter.
  • Motion Detection
    Sending frames through Moving Object Detection still consumes a significant amount of power even with a small model like the one we created. Running inferences continuously does not seem to be a good idea as most of the time there may not be any moving object in front of the camera. We decided to implement a gating mechanism where the frames are only being sent to the Moving Object Detection model based on the movements detected from the scene. The detection is done mainly by calculating the differences between two frames with some additional tricks that take the movements detected in a few frames before into consideration.
  • Area of Interest
    This is a mechanism to let users manually mask out the area where they do not want the camera to see. It can also be done automatically based on regional luminance that can be generated by the aforementioned low-light detection component.

Our current implementation has taken GPU into consideration as much as we can. A series of shaders are created to perform the tasks above and the pipeline is designed to avoid moving pixels between CPU/GPU frequently to eliminate the potential performance hits.

The pipeline involves multiple ML models that are conditionally executed, mixed CPU/GPU processing, etc. All the challenges here make it a perfect showcase for how MediaPipe could help develop a complicated pipeline.

Playing with MediaPipe

MediaPipe provides a lot of code samples for any developer to bootstrap with. We took the Object Detection on Android sample that comes with the project to start with because of the similarity with the back-end part of our pipeline. It did take us sometimes to fully understand the design concepts of MediaPipe and all the tools associated. But with the complete documentation and the great responsiveness from the MediaPipe team, we got up to speed soon to do most of the things we wanted.

That being said, there were a few challenges we needed to overcome on the road to full migration. Our original pipeline of Moving Object Detection takes the input frame asynchronously, but MediaPipe has timestamp bound limitations such that we cannot just show the result in an allochronic way. Meanwhile, we need to gather data through JNI in a specific data format. We came up with a workaround that conquered all the issues under the circumstances, which will be mentioned later.

After wrapping our models and the processing logics into calculators and wired them up, we have successfully transformed our existing implementation and created our first MediaPipe Moving Object Detection pipeline like the figure below, running on Android devices:

Fig.2 Moving Object Detection Graph

Fig.2 Moving Object Detection Graph

We do not block the video frame in the main calculation loop, and set the detection result as an input stream to show the annotation on the screen. The whole graph is designed as a multi-functioned process, the left chunk is the debug annotation and video frame output module, and the rest of the calculation occurs in the rest of the graph, e.g., low light detection, motion triggered detection, cropping of the area of interest and the detection process. In this way, the graph process will naturally separate into real-time display and asynchronous calculation.

As a result, we are able to complete a full processing for detection in under 40ms on a device with Snapdragon 660 chipset. MediaPipe’s tight integration with TensorFlow Lite provides us the flexibility to get even more performance gain by leveraging whatever acceleration techniques available (GPU or DSP) on the device.

The following figure shows the current implementation working in action:

Fig.3 Moving Object Detection running in Alfred Camera

Fig.3 Moving Object Detection running in Alfred Camera

After getting things to run on Android, Desktop GPU (OpenGL-ES) emulation was our next target to evaluate. We are already using OpenGL-ES shaders for some computer vision operations in our pipeline. Having the capability to develop the algorithm on desktop, seeing it work in action before deployment onto mobile platforms is a huge benefit to us. The feature was not ready at the time when the project was first released, but MediaPipe team had soon added Desktop GPU emulation support for Linux in follow-up releases to make this possible. We have used the capability to detect and fix some issues in the graphs we created even before we put things on the mobile devices. Although it currently only works on Linux, it is still a big leap forward for us.

Testing the algorithms and making sure they behave as expected is also a challenge for a camera application. MediaPipe helps us simplify this by using pre-recorded MP4 files as input so we could verify the behavior simply by replaying the files. There is also built-in profiling support that makes it easy for us to locate potential performance bottlenecks.

MediaPipe - Exactly What We Were Looking For

The result of the evaluation and the feedback from our engineering team were very positive and promising:

  1. We are able to design/verify the algorithm and complete core implementations directly on the desktop emulation environment, and then migrate to the target platforms with minimum efforts. As a result, complexities of debugging on real devices are greatly reduced.
  2. MediaPipe’s modular design of graphs/calculators enables us to better split up the development into different engineers/teams, try out new pipeline design easily by rewiring the graph, and test the building blocks independently to ensure quality before we put things together.
  3. MediaPipe’s cross-platform design maximizes the reusability and minimizes fragmentation of the implementations we created. Not only are the efforts required to support a new platform greatly reduced, but we are also less worried about the behavior discrepancies on different platforms due to different interpretations of the spec from platform engineers.
  4. Built-in graphics utilities and profiling support saved us a lot of time creating those common facilities and making them right, and we could be more focused on the key designs.
  5. Tight integration with TensorFlow Lite really saves lots of effort for a company like us that heavily depends on TensorFlow, and it still gives us the flexibility to easily interface with other solutions.

With just a few weeks working with MediaPipe, it has shown strong capabilities to fundamentally transform how we develop our products. Without MediaPipe we could have spent months creating the same features without the same level of performance.

Summary

Alfred Camera is designed to bring home security with AI to everyone, and MediaPipe has significantly made achieving that goal easier for our team. From Moving Object Detection to future AI-powered features, we are focusing on transforming a basic security camera use case into a smart housekeeper that can help provide even more context that our users care about. With the support of MediaPipe, we have been able to accelerate our development process and bring the features to the market at an unprecedented speed. Our team is really excited about how MediaPipe could help us progress and discover new possibilities, and is looking forward to the enhancements that are yet to come to the project.