Tag Archives: Performance

Game Performance: Geometry Instancing

Posted by Shanee Nishry, Games Developer Advocate

Imagine a beautiful virtual forest with countless trees, plants and vegetation, or a stadium with countless people in the crowd cheering. If you are heroic you might like the idea of an epic battle between armies.

Rendering a lot of meshes is desired to create a beautiful scene like a forest, a cheering crowd or an army, but doing so is quite costly and reduces the frame rate. Fortunately this is possible using a simple technique called Geometry Instancing.

Geometry instancing can be used in 2D games for rendering a large number of sprites, or in 3D for things like particles, characters and environment.

The NDK code sample More Teapots demoing the content of this article can be found with the ndk inside the samples folder and in the git repository.

Support and Extensions

Geometry instancing is available from OpenGL ES 3.0 and to OpenGL 2.0 devices which support the GL_NV_draw_instanced or GL_EXT_draw_instanced extensions. More information on how to using the extensions is shown in the More Teapots demo.

Overview

Submitting draw calls causes OpenGL to queue commands to be sent to the GPU, this has an expensive overhead which may affect performance. This overhead grows when changing states such as alpha blending function, active shader, textures and buffers.

Geometry Instancing is a technique that combines multiple draws of the same mesh into a single draw call, resulting in reduced overhead and potentially increased performance. This works even when different transformations are required.

The algorithm

To explain how Geometry Instancing works let’s quickly overview traditional drawing.

Traditional Drawing

To a draw a mesh you’d usually prepare a vertex buffer and an index buffer, bind your shader and buffers, set your uniforms such as a World View Projection matrix and make a draw call.

To draw multiple instances using the same mesh you set new uniform values for the transformations and other data and call draw again. This is repeated for every instance.

Drawing with Geometry Instancing

Geometry Instancing reduces CPU overhead by reducing the sequence described above into a single buffer and draw call.

It works by using an additional buffer which contains custom per-instance data needed by your shader, such as transformations, color, light data.

The first change to your workflow is to create the additional buffer on initialization stage.

To put it into code let’s define an example per-instance data that includes a world view projection matrix and a color:

C++

struct PerInstanceData
{
 Mat4x4 WorldViewProj;
 Vector4 Color;
};

You also need to the structure to your shader. The easiest way is by creating a Uniform Block with an array:

GLSL

#define MAX_INSTANCES 512

layout(std140) uniform PerInstanceData {
    struct
    {
        mat4      uMVP;
        vec4      uColor;
    } Data[ MAX_INSTANCES ];
};

Note that uniform blocks have limited sizes. You can find the maximum number of bytes you can use by querying for GL_MAX_UNIFORM_BLOCK_SIZE using glGetIntegerv.

Example:

GLint max_block_size = 0;
glGetIntegerv( GL_MAX_UNIFORM_BLOCK_SIZE, &max_block_size );

Bind the uniform block on the CPU in your program’s initialization stage:

C++

#define MAX_INSTANCES 512
#define BINDING_POINT 1
GLuint shaderProgram; // Compiled shader program

// Bind Uniform Block
GLuint blockIndex = glGetUniformBlockIndex( shaderProgram, "PerInstanceData" );
glUniformBlockBinding( shaderProgram, blockIndex, BINDING_POINT );

And create a corresponding uniform buffer object:

C++

// Create Instance Buffer
GLuint instanceBuffer;

glGenBuffers( 1, &instanceBuffer );
glBindBuffer( GL_UNIFORM_BUFFER, instanceBuffer );
glBindBufferBase( GL_UNIFORM_BUFFER, BINDING_POINT, instanceBuffer );

// Initialize buffer size
glBufferData( GL_UNIFORM_BUFFER, MAX_INSTANCES * sizeof( PerInstanceData ), NULL, GL_DYNAMIC_DRAW );

The next step is to update the instance data every frame to reflect changes to the visible objects you are going to draw. Once you have your new instance buffer you can draw everything with a single call to glDrawElementsInstanced.

You update the instance buffer using glMapBufferRange. This function locks the buffer and retrieves a pointer to the byte data allowing you to copy your per-instance data. Unlock your buffer using glUnmapBuffer when you are done.

Here is a simple example for updating the instance data:

const int NUM_SCENE_OBJECTS = …; // number of objects visible in your scene which share the same mesh

// Bind the buffer
glBindBuffer( GL_UNIFORM_BUFFER, instanceBuffer );

// Retrieve pointer to map the data
PerInstanceData* pBuffer = (PerInstanceData*) glMapBufferRange( GL_UNIFORM_BUFFER, 0,
                NUM_SCENE_OBJECTS * sizeof( PerInstanceData ),
                GL_MAP_WRITE_BIT | GL_MAP_INVALIDATE_RANGE_BIT );

// Iterate the scene objects
for ( int i = 0; i < NUM_SCENE_OBJECTS; ++i )
{
    pBuffer[ i ].WorldViewProj = ... // Copy World View Projection matrix
    pBuffer[ i ].Color = …               // Copy color
}

glUnmapBuffer( GL_UNIFORM_BUFFER ); // Unmap the buffer

And finally you can draw everything with a single call to glDrawElementsInstanced or glDrawArraysInstanced (depending if you are using an index buffer):

glDrawElementsInstanced( GL_TRIANGLES, NUM_INDICES, GL_UNSIGNED_SHORT, 0,
                NUM_SCENE_OBJECTS );

You are almost done! There is just one more step to do. In your shader you need to make use of the new uniform buffer object for your transformations and colors. In your shader main program:

void main()
{
    …
    gl_Position = PerInstanceData.Data[ gl_InstanceID ].uMVP * inPosition;
    outColor = PerInstanceData.Data[ gl_InstanceID ].uColor;
}

You might have noticed the use gl_InstanceID. This is a predefined OpenGL vertex shader variable that tells your program which instance it is currently drawing. Using this variable your shader can properly iterate the instance data and match the correct transformation and color for every vertex.

That’s it! You are now ready to use Geometry Instancing. If you are drawing the same mesh multiple times in a frame make sure to implement Geometry Instancing in your pipeline! This can greatly reduce overhead and improve performance.

New course: Take Android app performance to the next level

Posted by Jocelyn Becker, Developer Advocate

Building the next great Android app isn't enough. You can have the most amazing social integration, best API coverage, and coolest photo filters, but none of that matters if your app is slow and frustrating to use.

That's why we've launched our new online training course at Udacity, focusing entirely on improving Android performance. This course complements the Android Performance Patterns video series, focused on giving you the resources to help make fast, smooth, and awesome experiences for users.

Created by Android Performance guru Colt McAnlis, this course reviews the main pillars of performance (rendering, compute, and battery). You'll work through tutorials on how to use the tools in Android Studio to find and fix performance problems.

By the end of the course, you'll understand how common performance problems arise from your hardware, OS, and application code. Using profiling tools to gather data, you'll learn to identify and fix performance bottlenecks so users can have that smooth 60 FPS experience that will keep them coming back for more.

Take the course: https://www.udacity.com/course/ud825. Join the conversation and follow along on social at #PERFMATTERS.

Using the Hardware Scaler for Performance and Efficiency

Posted by Hak Matsuda and Dirk Dougherty, Android Developer Relations team

If you develop a performance-intensive 3D game, you’re always looking for ways to give users richer graphics, higher frame rates, and better responsiveness. You also want to conserve the user’s battery and keep the device from getting too warm during play. To help you optimize in all of these areas, consider taking advantage of the hardware scaler that’s available on almost all Android devices in the market today.

How it works and why you should use it

Virtually all modern Android devices use a CPU/GPU chipset that includes a hardware video scaler. Android provides the higher-level integration and makes the scaler available to apps through standard Android APIs, from Java or native (C++) code. To take advantage of the hardware scaler, all you have to do is render to a fixed-size graphics buffer, rather than using the system-provided default buffers, which are sized to the device's full screen resolution.

When you render to a fixed-size buffer, the device hardware does the work of scaling your scene up (or down) to match the device's screen resolution, including making any adjustments to aspect ratio. Typically, you would create a fixed-size buffer that's smaller than the device's full screen resolution, which lets you render more efficiently — especially on today's high-resolution screens.

Using the hardware scaler is more efficient for several reasons. First, hardware scalers are extremely fast and can produce great visual results through multi-tap and other algorithms that reduce artifacts. Second, because your app is rendering to a smaller buffer, the computation load on the GPU is reduced and performance improves. Third, with less computation work to do, the GPU runs cooler and uses less battery. And finally, you can choose what size rendering buffer you want to use, and that buffer can be the same on all devices, regardless of the actual screen resolution.

Optimizing the fill rate

In a mobile GPU, the pixel fill rate is one of the major sources of performance bottlenecks for performance game applications. With newer phones and tablets offering higher and higher screen resolutions, rendering your 2D or 3D graphics on those those devices can significantly reduce your frame rate. The GPU hits its maximum fill rate, and with so many pixels to fill, your frame rate drops.

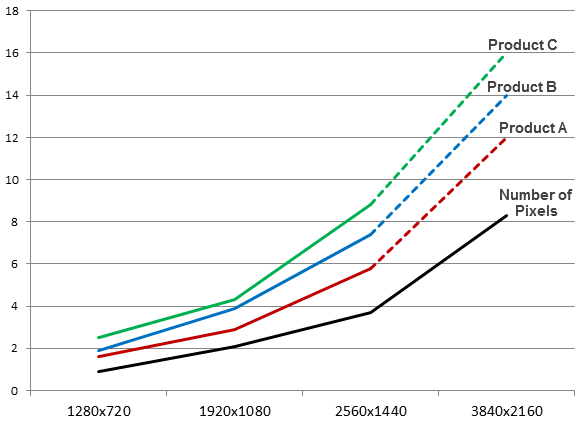
Power consumed in the GPU at different rendering resolutions, across several popular chipsets in use on Android devices. (Data provided by Qualcomm).

To avoid these bottlenecks, you need to reduce the number of pixels that your game is drawing in each frame. There are several techniques for achieving that, such as using depth-prepass optimizations and others, but a really simple and effective way is making use of the hardware scaler.

Instead of rendering to a full-size buffer that could be as large as 2560x1600, your game can instead render to a smaller buffer — for example 1280x720 or 1920x1080 — and let the hardware scaler expand your scene without any additional cost and minimal loss in visual quality.

Reducing power consumption and thermal effects

A performance-intensive game can tend to consume too much battery and generate too much heat. The game’s power consumption and thermal conditions are important to users, and they are important considerations to developers as well.

As shown in the diagram, the power consumed in the device GPU increases significantly as rendering resolution rises. In most cases, any heavy use of power in GPU will end up reducing battery life in the device.

In addition, as CPU/GPU rendering load increases, heat is generated that can make the device uncomfortable to hold. The heat can even trigger CPU/GPU speed adjustments designed to cool the CPU/GPU, and these in turn can throttle the processing power that’s available to your game.

For both minimizing power consumption and thermal effects, using the hardware scaler can be very useful. Because you are rendering to a smaller buffer, the GPU spends less energy rendering and generates less heat.

Accessing the hardware scaler from Android APIs

Android gives you easy access to the hardware scaler through standard APIs, available from your Java code or from your native (C++) code through the Android NDK.

All you need to do is use the APIs to create a fixed-size buffer and render into it. You don’t need to consider the actual size of the device screen, however in cases where you want to preserve the original aspect ratio, you can either match the aspect ratio of the buffer to that of the screen, or you can adjust your rendering into the buffer.

From your Java code, you access the scaler through SurfaceView, introduced in API level 1. Here’s how you would create a fixed-size buffer at 1280x720 resolution:

surfaceView = new GLSurfaceView(this);
surfaceView.getHolder().setFixedSize(1280, 720);

If you want to use the scaler from native code, you can do so through the NativeActivity class, introduced in Android 2.3 (API level 9). Here’s how you would create a fixed-size buffer at 1280x720 resolution using NativeActivity:

int32_t ret = ANativeWindow_setBuffersGeometry(window, 1280, 720, 0);

By specifying a size for the buffer, the hardware scaler is enabled and you benefit in your rendering to the specified window.

Choosing a size for your graphics buffer

If you will use a fixed-size graphics buffer, it's important to choose a size that balances visual quality across targeted devices with performance and efficiency gains.

For most performance 3D games that use the hardware scaler, the recommended size for rendering is 1080p. As illustrated in the diagram, 1080p is a sweet spot that balances a visual quality, frame rate, and power consumption. If you are satisfied with 720p, of course you can use that size for even more efficient operations.

More information

If you’d like to take advantage of the hardware scaler in your app, take a look at the class documentation for SurfaceView or NativeActivity, depending on whether you are rendering through the Android framework or native APIs.

Watch for sample code on using the hardware scaler coming soon!