Posted by Don Turner - Developer Advocate - Android Media
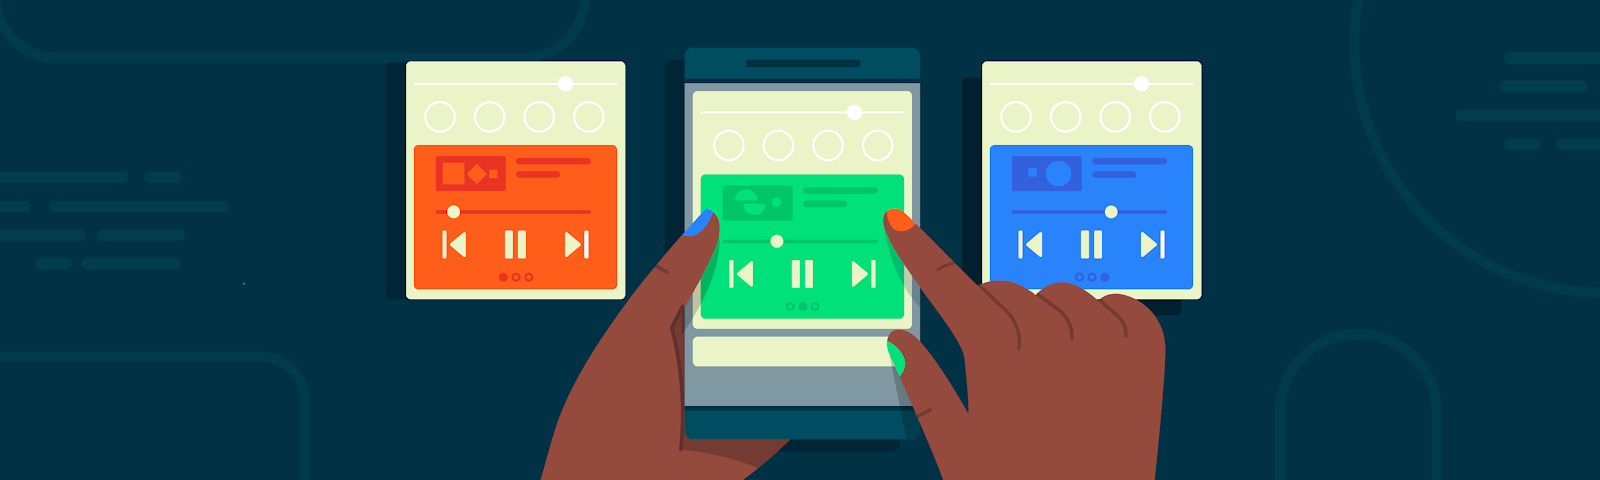
In Android 11 we've made it easier than ever for users to control media playback. This is achieved with three related features: media controls, playback resumption and seamless transfer.
This article will explain what these features are, how they work together and how you can take advantage of them in your apps.
Media Controls
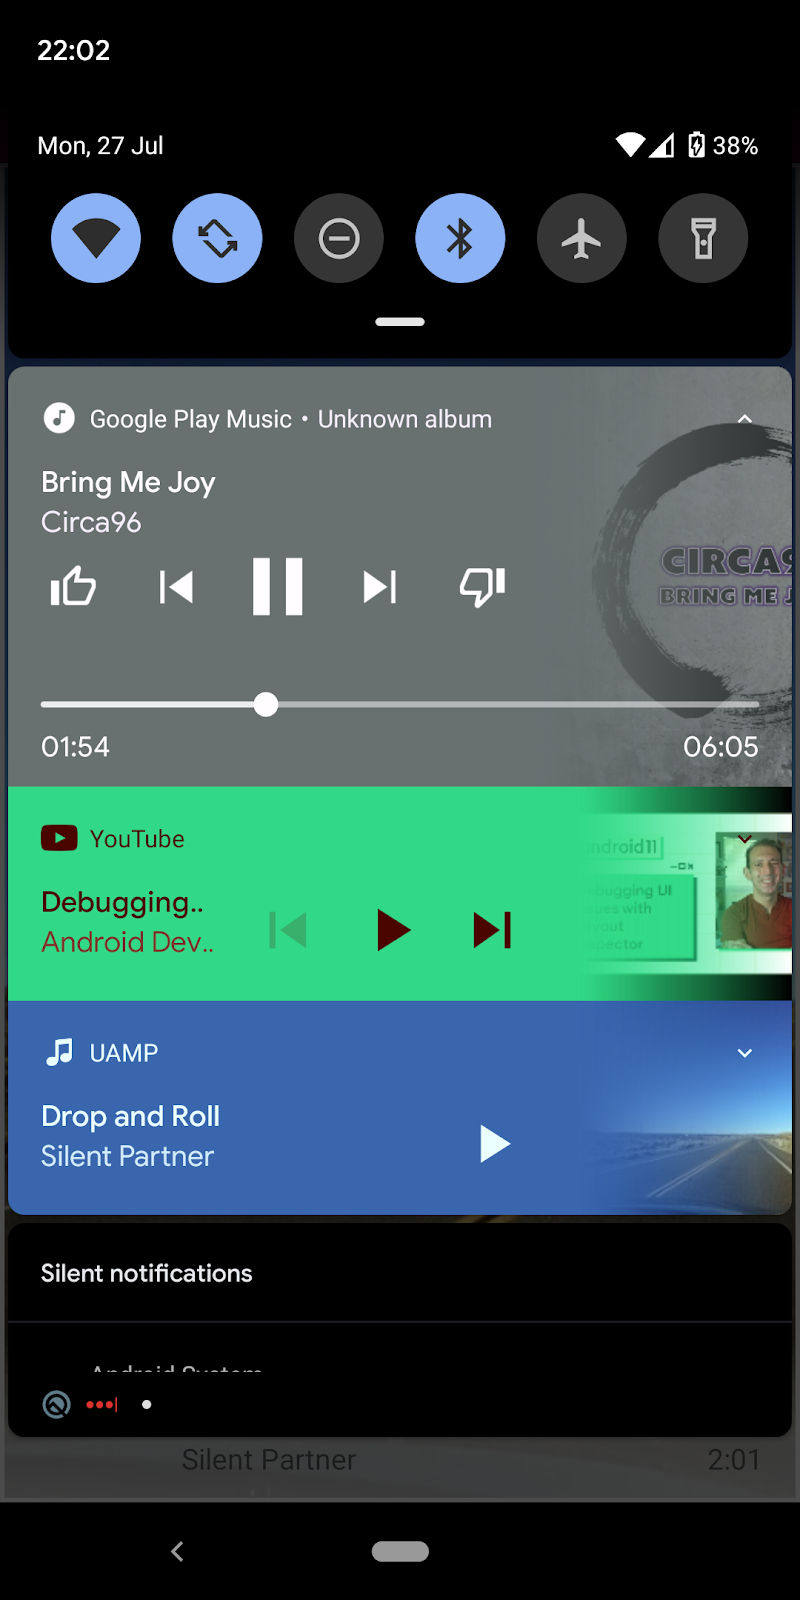
Android 11's media controls are found below the Quick Settings panel and represent a dedicated persistent space for controlling media playback.
Media controls in Android 11
Part of the motivation for media controls is that users often have multiple media apps (music player, podcasts, video player etc) and regularly switch between them. Media controls display up to five current and recent media sessions in a carousel allowing the user to swipe between them.
On Android 10 and earlier, media notifications for multiple apps can occupy most of the notification area. All those control buttons can also be confusing. Moving the controls into a dedicated space means that there's more room for other notifications, and provides a more consistent user experience for controlling media apps.
Here's the comparison:

Android 10 media notifications (left) Android 11 media controls (right)
Displaying media controls for your app
Now, the really good news. As long as you're using MediaStyle with a valid MediaSession token (both available since Lollipop API 21), media controls will be displayed for your app automatically - no extra work for you!
In case you're not using a MediaStyle and MediaSession here's a quick recap in code:
// Create a media session. NotificationCompat.MediaStyle
// PlayerService is your own Service or Activity responsible for media playback.
val mediaSession = MediaSessionCompat(this, "PlayerService")

// Create a MediaStyle object and supply your media session token to it.
val mediaStyle = Notification.MediaStyle().setMediaSession(mediaSession.sessionToken)

// Create a Notification which is styled by your MediaStyle object.
// This connects your media session to the media controls.
// Don't forget to include a small icon.
val notification = Notification.Builder(this@PlayerService, CHANNEL_ID)
            .setStyle(mediaStyle)
            .setSmallIcon(R.drawable.ic_app_logo)
            .build()

// Specify any actions which your users can perform, such as pausing and skipping to the next track.
val pauseAction: Notification.Action = Notification.Action.Builder(
            pauseIcon, "Pause", pauseIntent
        ).build()
notification.addAction(pauseAction)
The small icon and app name are shown in the upper left of the media controls. The actions are shown in the bottom center.
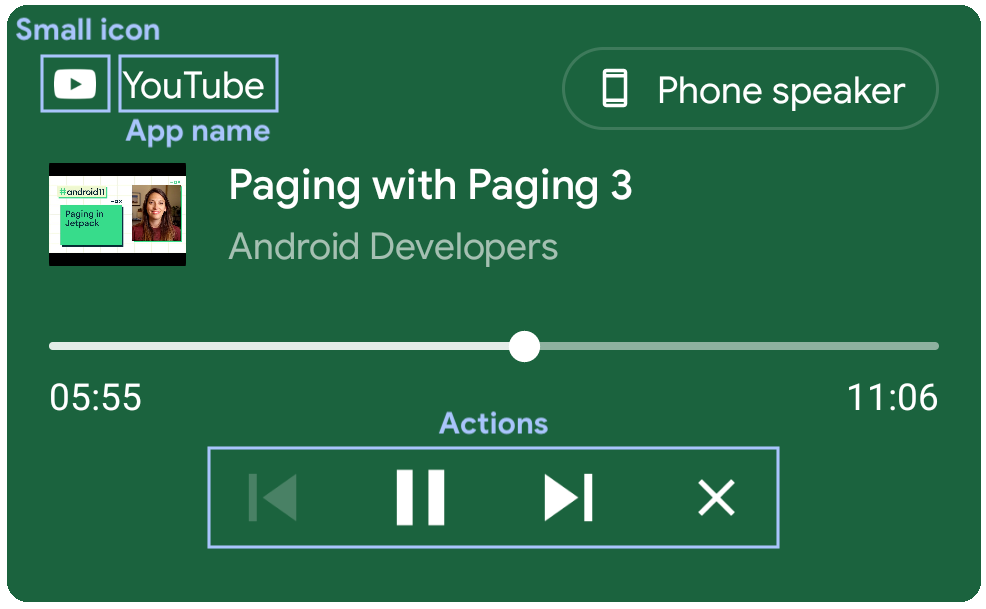
Media controls UI and corresponding Notification fields
The remaining UI fields, such as track title and playback position, are obtained from the media session's metadata and playback state.
Here's how the metadata fields map to the UI.
mediaSession.setMetadata(
    MediaMetadataCompat.Builder()

        // Title.
        .putString(MediaMetadata.METADATA_KEY_TITLE, currentTrack.title)

        // Artist.
        // Could also be the channel name or TV series.
        .putString(MediaMetadata.METADATA_KEY_ARTIST, currentTrack.artist)

        // Album art.
        // Could also be a screenshot or hero image for video content
        // The URI scheme needs to be "content", "file", or "android.resource".
        .putString(
            MediaMetadata.METADATA_KEY_ALBUM_ART_URI, currentTrack.albumArtUri)
        )

        // Duration.
        // If duration isn't set, such as for live broadcasts, then the progress
        // indicator won't be shown on the seekbar.
        .putLong(MediaMetadata.METADATA_KEY_DURATION, currentTrack.duration) // 4

        .build()
)
This screenshot shows how these metadata fields are displayed in the media controls.
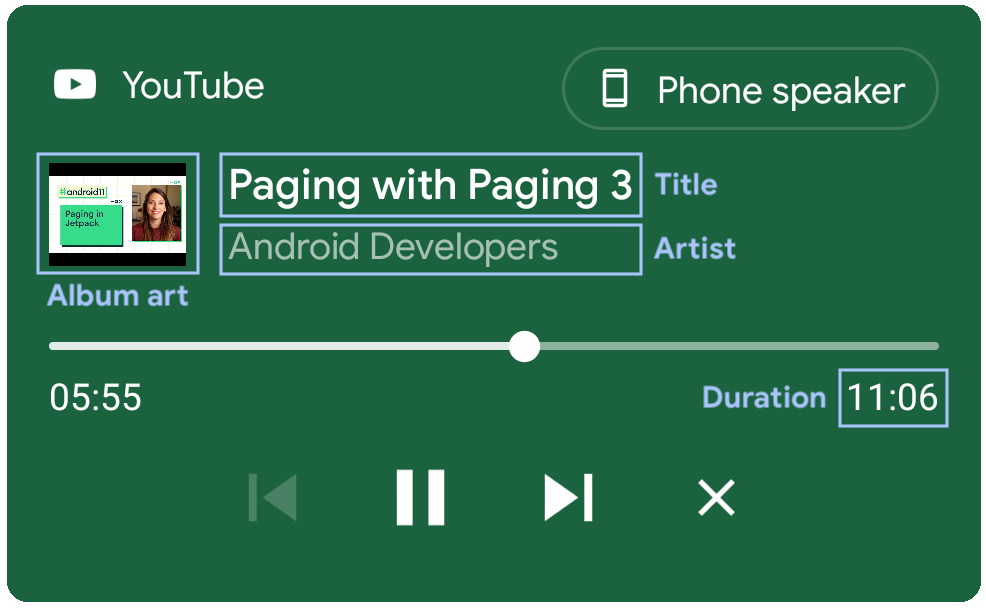
Media controls UI and corresponding metadata fields
The seek bar is updated using the media session's playback state in a similar way:
mediaSession.setPlaybackState(
    PlaybackStateCompat.Builder()
        .setState(
            PlaybackStateCompat.STATE_PLAYING,

            // Playback position.
            // Used to update the elapsed time and the progress bar.
            mediaPlayer.currentPosition.toLong(),

            // Playback speed.
            // Determines the rate at which the elapsed time changes.
            playbackSpeed
        )

        // isSeekable.
        // Adding the SEEK_TO action indicates that seeking is supported
        // and makes the seekbar position marker draggable. If this is not
        // supplied seek will be disabled but progress will still be shown.
        .setActions(PlaybackStateCompat.ACTION_SEEK_TO)
        .build()
)
This screenshot shows how these playback state fields are displayed in the media controls.
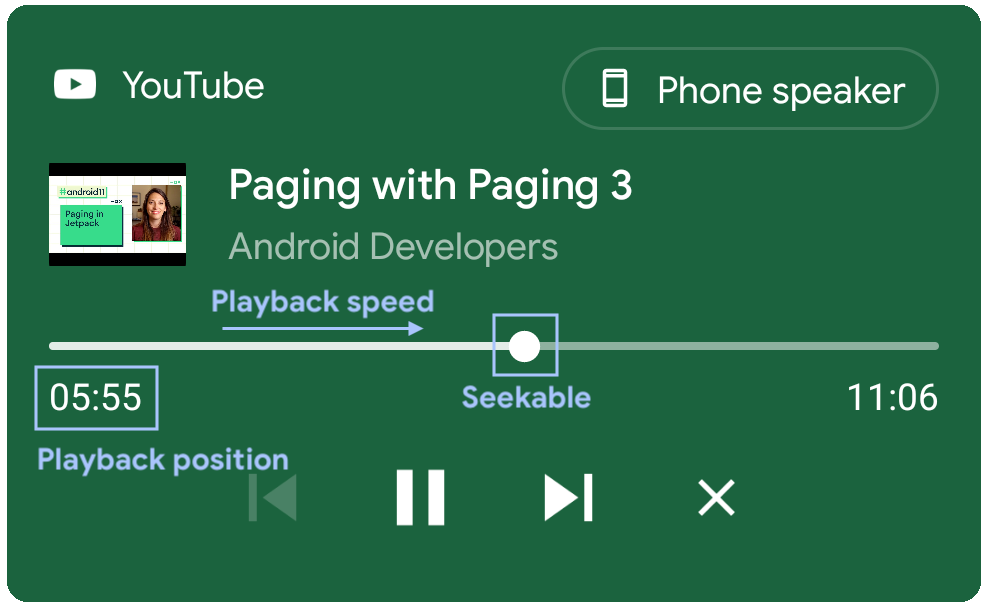
Media controls UI and corresponding playback state fields
Your media controls should now look and function perfectly!
Media resumption
Ever wanted to continue listening to a podcast, TV episode or DJ set but couldn't remember where you left off, or even the app that was playing it? Media resumption solves this problem.
There are two stages to media resumption: discovering recent media apps and resuming playback.
Discovering recent media apps
After booting, Android will look for recent media apps and ask them what their most recently played content was. It will then create media controls for that content.
To be discoverable your app must provide a MediaBrowserService, typically using the MediaBrowserServiceCompat library from Android Jetpack.
On boot, Android will call your MediaBrowserServiceCompat's onGetRoot method, so it's imperative that you return quickly. Usually you would return the root of your media tree from this method but the system also specifies the EXTRA_RECENT hint.
You should treat EXTRA_RECENT as a special case and instead return the root of a media tree that contains the most recently played media item as the first element.
The system will call your onLoadChildren method to obtain this media tree, which is a list of MediaItem objects.
Here's a diagram showing how the system and a media app interact to retrieve the most recently played item.
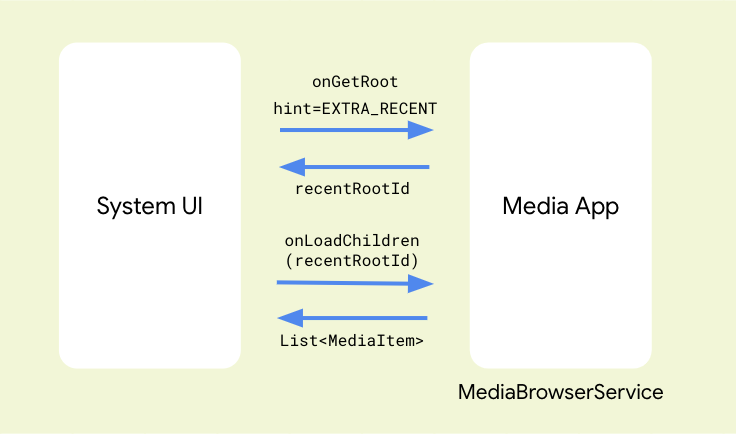
How the system retrieves the most recently played item from the MediaBrowserService
For the first playable media item in this list the system will create static media controls with just a play button.
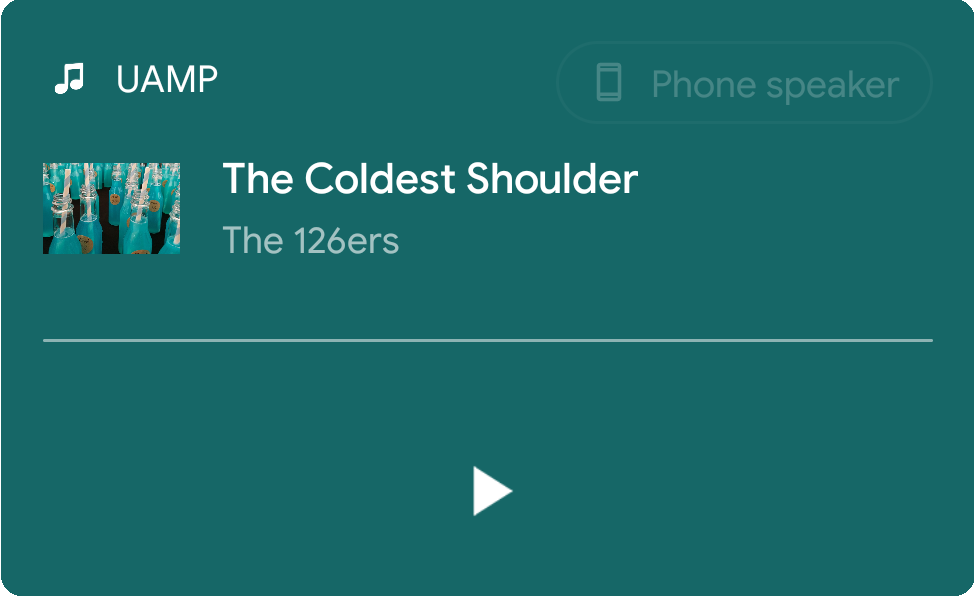
Static media controls
At this point no media session has been created. This is to save resources - the system doesn't know whether the user actually wants to resume playing that content yet.
Resuming playback
If the user taps the play button the system will make another call to onGetRoot with the EXTRA_RECENT hint. This is so you can prepare your previously played content as before, just in case anything has changed since the static controls were created.
Android will then connect to your media session and issue a play command to it. You should override the media session onPlay callback in order to start playback of your media content and create your MediaStyle notification.
Once you post the notification the static media controls will be swapped with the media controls created from your notification.
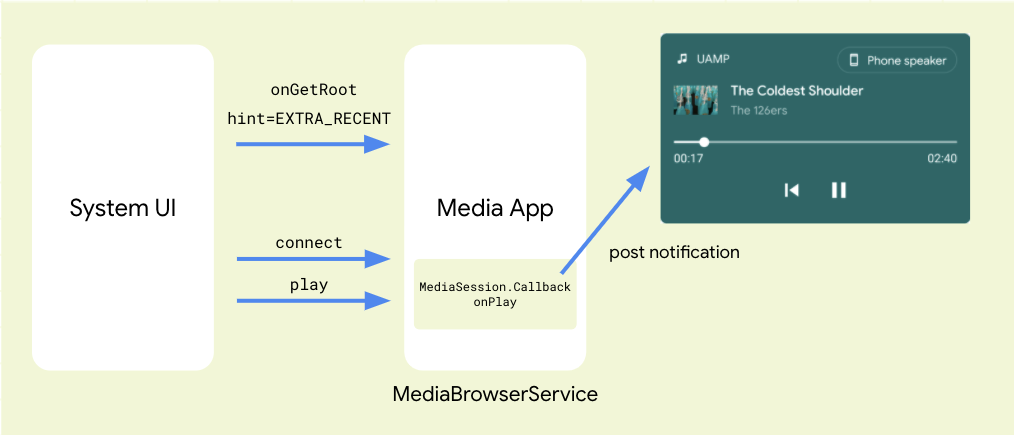
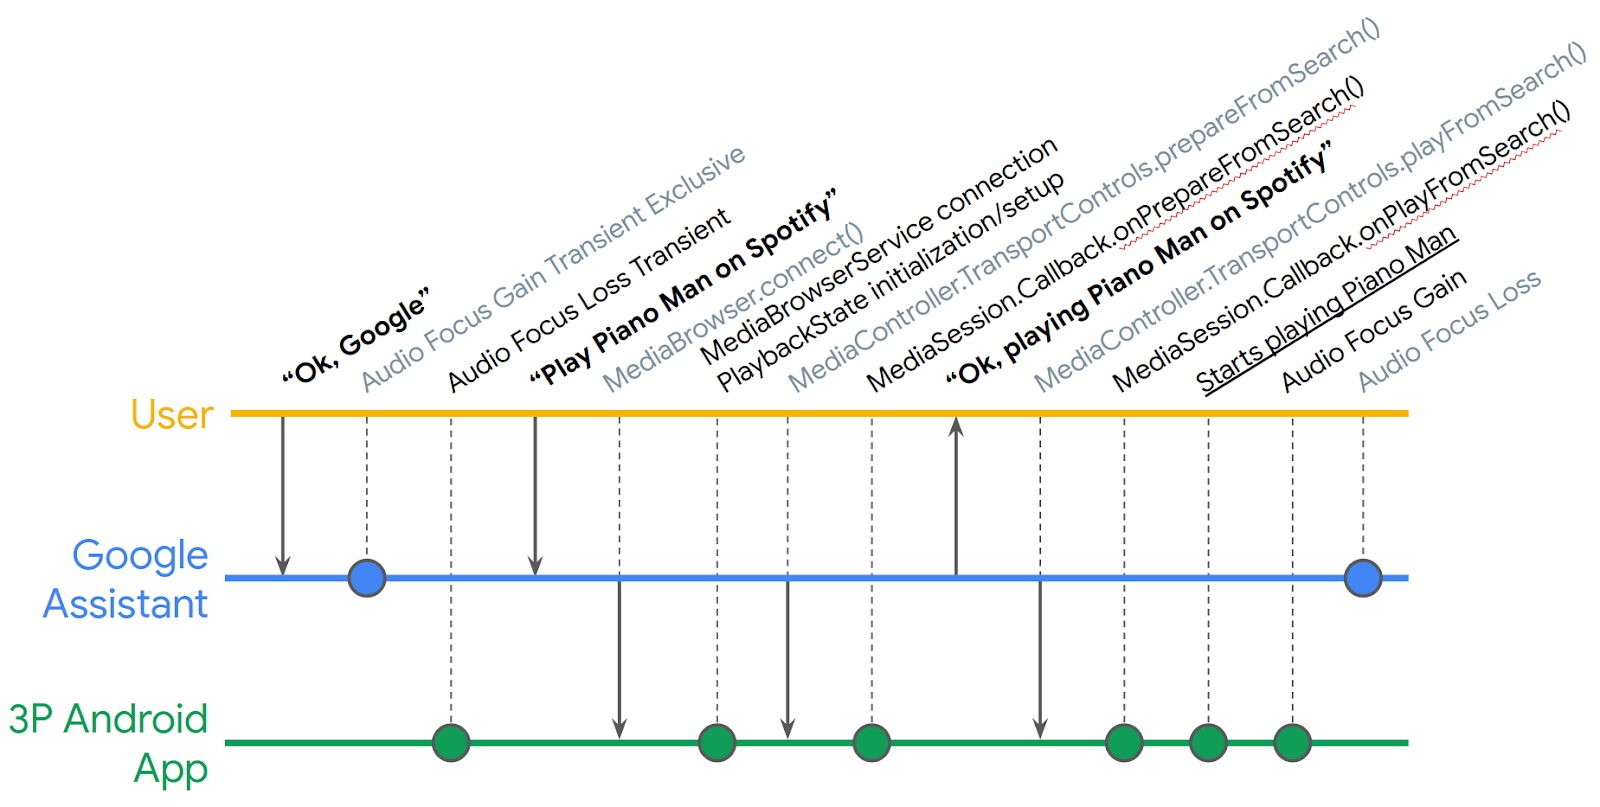
Figure 7: Diagram showing interaction between System UI and media app when resuming playback
Seamless media transfer
As well as being able to resume media sessions, Android 11 also allows you to easily transfer playback from one device to another. This is known as "seamless media transfer", and is done through the output switcher. The output switcher is shown in the upper right corner of the media notification that appears below.
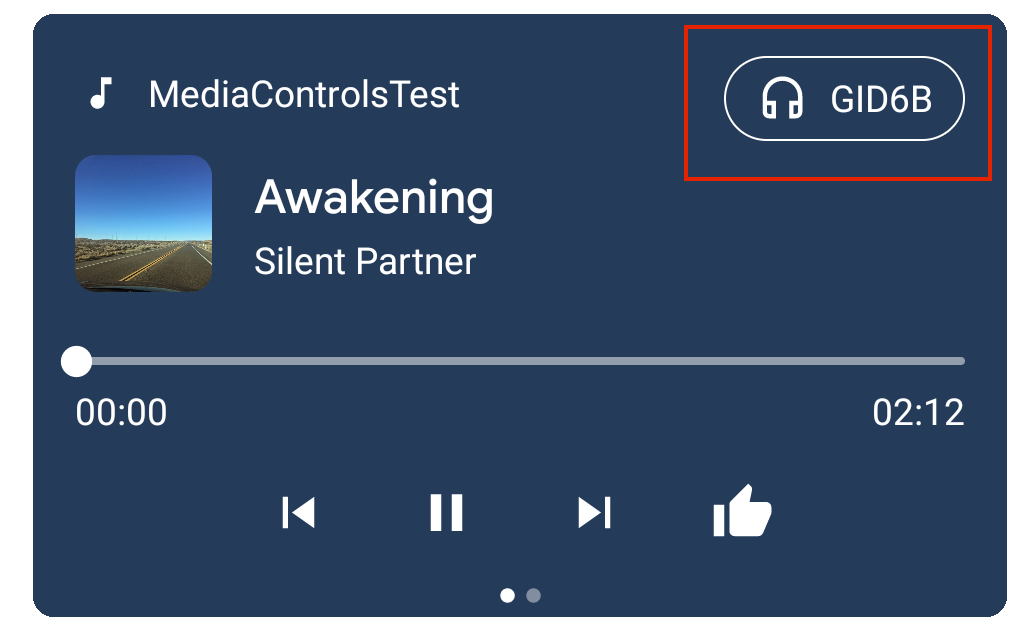
Output Switcher (upper right corner)
The output switcher shows the name and icon of the current media route; and when you tap on it you'll see a list of media routes which this app supports.
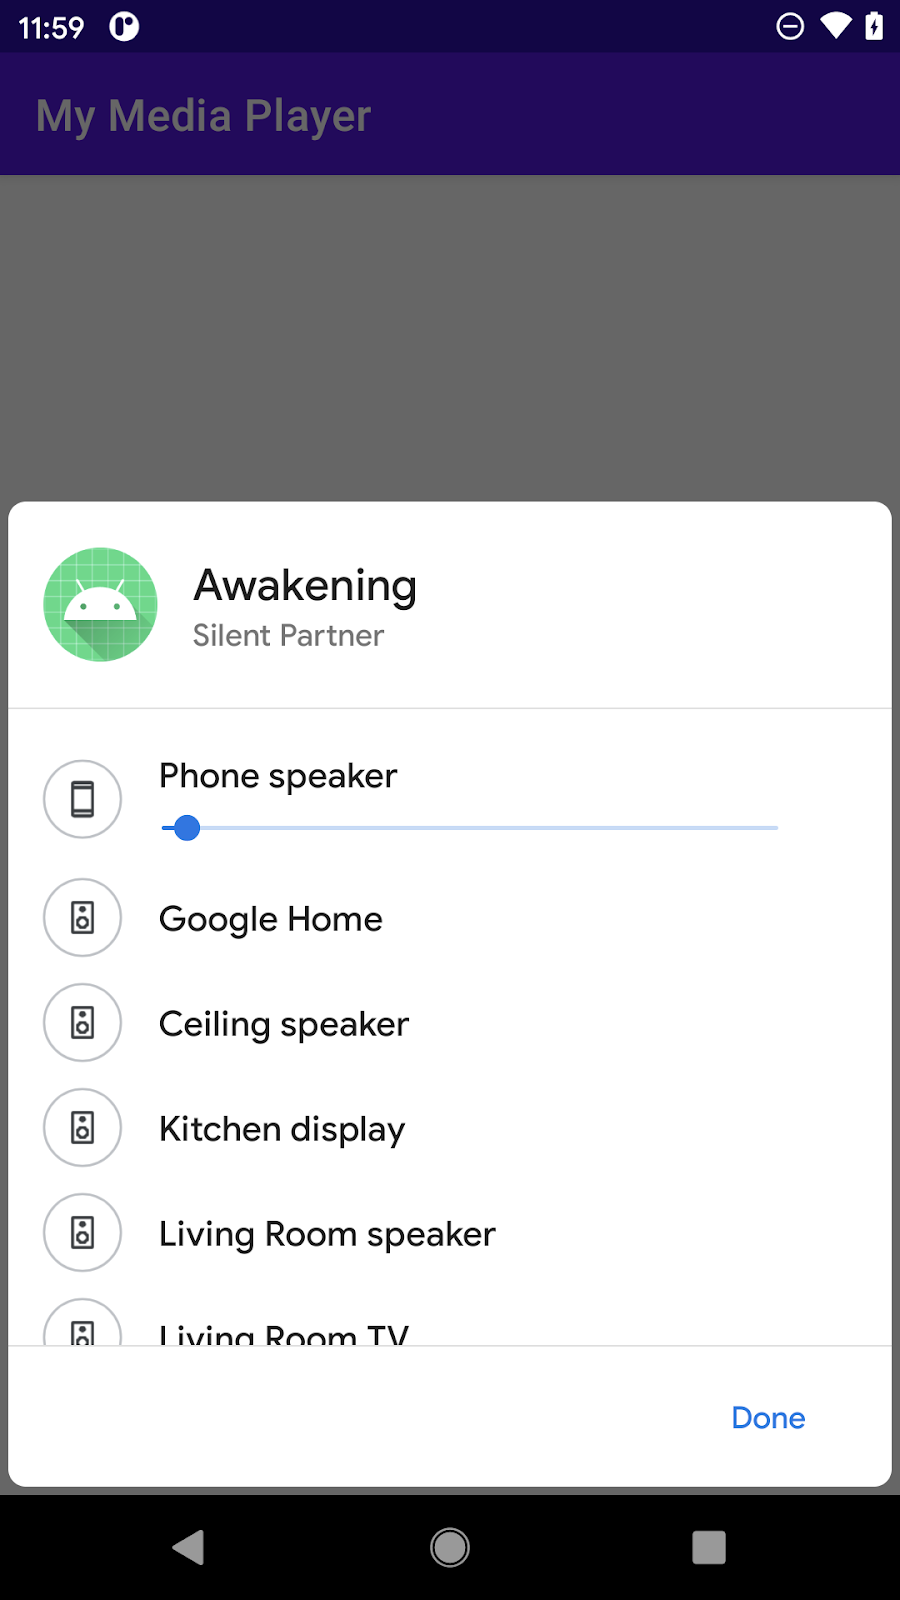
Media routes available to the current app
By default, only local media routes are shown. If your app supports other media routes, such as remote playback you'll need to let the system know.
To do this add the MediaRouter jetpack library to your app.
dependencies {
    implementation 'androidx.mediarouter:mediarouter:1.2.0-alpha02'`
}
Seamless media transfer is supported from 1.2.0-alpha02.
Then, add the MediaTransferReceiver class to your Android manifest.
<receiver android:name="androidx.mediarouter.media.MediaTransferReceiver" />
Now in your app, obtain the MediaRouter singleton - this is an object that maintains the state of all currently available media routes.
router = MediaRouter.getInstance(this)
Create a MediaRouteSelector and specify the route categories which your app supports. The categories you define here determine the routes which are displayed in the output switcher.
Here we'll just specify the "remote playback" category which is used for Cast devices.
routeSelector = MediaRouteSelector.Builder() // Add control categories that this media app is interested in.
            .addControlCategory(MediaControlIntent.CATEGORY_REMOTE_PLAYBACK)
            .build()
If you want to support transfer from remote to local devices, you need to explicitly enable this using setTransferToLocalEnabled:
router.routerParams = MediaRouterParams.Builder().setTransferToLocalEnabled(true).build()
We can now use our selector when adding a media router callback.
router.addCallback(routeSelector, MediaRouterCallback(),
             MediaRouter.CALLBACK_FLAG_REQUEST_DISCOVERY);
We also supply a callback object so we can be informed of changes to media routes.
Here's the callback class:
    private class MediaRouterCallback : MediaRouter.Callback() {
        override fun onRouteSelected(
            router: MediaRouter,
            route: MediaRouter.RouteInfo,
            reason: Int
        ) {
            if (reason == MediaRouter.UNSELECT_REASON_ROUTE_CHANGED) {
                Timber.d("Unselected because route changed, continue playback")
            } else if (reason == MediaRouter.UNSELECT_REASON_STOPPED) {
                Timber.d("Unselected because route was stopped, stop playback")
            }
        }
    }
The method we override is onRouteSelected which will be called whenever a new media route has been selected.
When this happens we need to take into account the reason why it was selected.
If the existing route was disconnected (for example, bluetooth headphones were switched off) we should pause or stop playback.
If the route was actively changed, for example when switching from a phone to a Cast device, then we should continue playing the media from its previous playback position - this is the "seamless" part of "seamless media transfer" :)
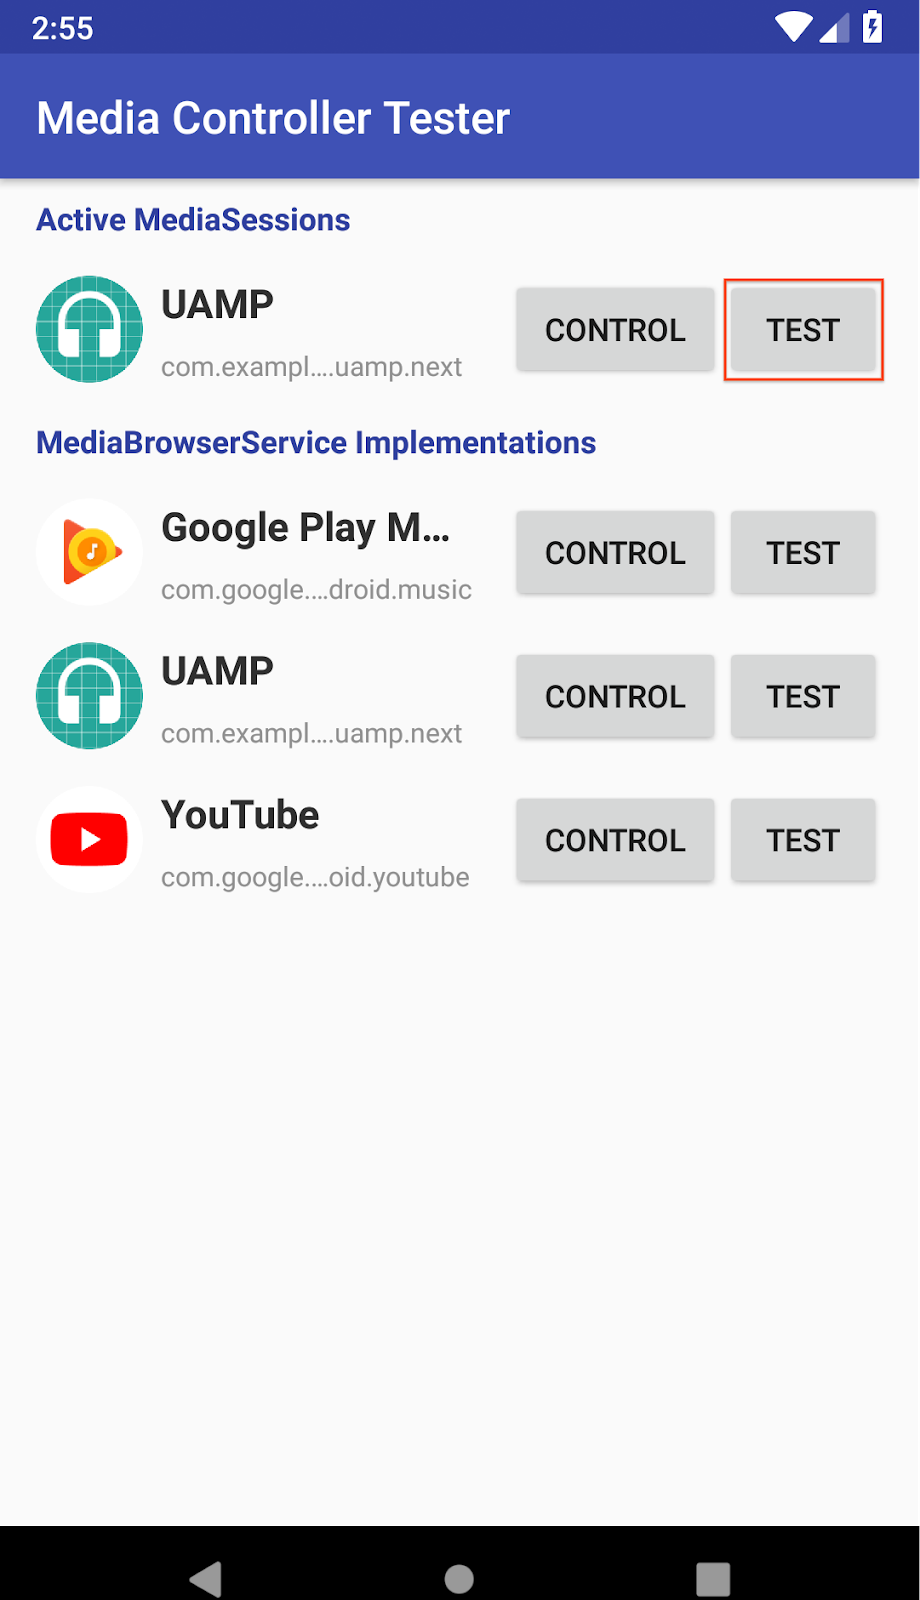
Get started
To get started with media controls and related features on Android 11 take a look at the official documentation. Also be sure to check out UAMP which contains a reference implementation for many of the features mentioned in this article.
Good luck and remember to play nicely!


 Posted by Nevin Mital, Partner Developer Relations