Tag Archives: Management Tools

Google Cloud Platform for data center professionals: what you need to know


At Google Cloud, we love seeing customers migrate to our platform. Companies move to us for a variety of reasons, from low costs to our machine learning offerings. Some of our customers, like Spotify and Evernote, have described the various reasons that motivated them to migrate to Google Cloud.

However, we recognize that a migration of any size can be a challenging project, so today we're happy to announce the first part of a new resource to help our customers as they migrate. Google Cloud Platform for Data Center Professionals is a guide for customers who are looking to move to Google Cloud Platform (GCP) and are coming from non-cloud environments. We cover the basics of running IT  Compute, Networking, Storage, and Management. We've tried to write this from the point of view of someone with minimal cloud experience, so we hope you find this guide a useful starting point.

This is the first part of an ongoing series. We'll add more content over time, to help describe the differences in various aspects of running your company's IT infrastructure.

We hope you find this useful in learning about GCP. Please tell us what you think and what else you would like to add, and be sure to follow along with our free trial when you sign up!

How to enable Google Stackdriver Logging, Monitoring and Error Reporting for .NET apps


A critical part of creating a great cloud application is making sure it runs today, tomorrow and every day thereafter. Google Stackdriver offers industrial-strength logging, monitoring and error reporting tools for Windows and .NET, so that your applications are consistently available. And companies of all sizes, such as Khan Academy and Wix, are already using Stackdriver to simplify ops.

With Stackdriver Logging and Stackdriver Monitoring, Google Cloud Platform (GCP) now has several excellent tools for .NET developers to stay on top of what's happening with their applications: a Logging agent and client library, a Monitoring agent and a Stackdriver Diagnostics library for error reporting. Let's take a look at these new options available for .NET developers deploying and running applications on GCP.

Logging agent


Google Compute Engine virtual machines (VMs) running .NET applications can now automatically collect request and application logs. This is similar to the logging information provided by VMs running in Google App Engine standard and flexible environments. To start logging to Stackdriver, install the Logging agent on your Compute Engine VMs, following these instructions. To confirm things are working, look for a test log entry that reads textPayload: "Successfully sent to Google Cloud Logging API" in the Stackdriver Logs Viewer.

Once the Logging agent is installed in a VM, it starts emitting logs, and you'll have a "log's-eye-view’" of what's happening via auto-generated logs that reflect the events collected by Windows Event Viewer. No matter how many VMs your application requires, the Logs Viewer provides a consolidated view of the Windows logs being generated across your application.

Monitoring agent


Automated logging of warnings and errors from your apps are just the beginning. Monitoring also lets you track specific metrics about your Windows VMs and receive an alert when they cross a predefined threshold. For example, imagine you want to know when a Windows VM's memory usage exceeds 80%. Monitoring agent to the rescue, an optional agent for your Windows VMs that collects CPU and memory utilization, pagefile and volume usage metrics for Monitoring. If the VM is running Microsoft IIS or SQL server, the agent also collects metrics from those services. See the Metrics List page for the full list of metrics it can collect, including metrics from third-party apps, and follow these installation instructions to install it.

Once the Monitoring agent is up and running, it's time to explore the real power of monitoring alerting! You can create a policy to alert you when a specific threshold value is crossed. For example, here's how to create a policy that sends a notification when a VM's CPU utilization stays above 80% for more than 15 minutes:

Step 1. Add a metric threshold condition. From the Monitoring main menu select "Alerting > Create a policy." Click "Add Condition." Select a condition type and appropriate threshold.

Step 2. Complete the details of the alerting policy. Under "Notification" enter an optional email address to receive alerts via email. Add any other details to the optional "Documentation" field. Finally, name the policy and click "Save Policy."
After creating a monitoring policy, you'll see the policy details page along with the status of any incidents:
To monitor web servers, Monitoring has a built-in "Uptime check" alert that continuously pings your VM over HTTP, HTTPS or TCP at a custom interval, helping you ensure that your web server is responding and serving pages as expected.

Here's how to create an Uptime check that pings the webserver at the specified hostname every 5 minutes:
  1. From the Monitoring dashboard click "Create Check" under "Uptime checks."
  2. Enter the details for the new Uptime check including Name, Check Type, Resource Type, Hostname and Path and specify how often to run the Uptime check under the "Check every" field.
  3. Click "Save."
The new Uptime checks page lists the geographic locations from where the checks are being run along with a status indicator:

Logging custom events for .NET Applications


Not only can you monitor resources, but you can also log important events specific to your application. "Google.Cloud.Logging.V2" is a beta .NET client library for Logging that provides an easy way to generate custom event logs using Stackdriver integration with Log4Net.

Step 1: Add the Logging client's Nuget packages to your Visual Studio project.

Right click your solution in Visual Studio and choose "Manage Nuget packages for solution." In the Visual Studio NuGet user interface, check the "Include prerelease" box, search for the package named "Google.Cloud.Logging.V2" and install it. Then install the "Google.Cloud.Logging.Log4Net" package in the same way.

Step 2: Add a Log4Net XML configuration section to your web application's Web.config file containing the following code:

<configuration>
  <configSections>
    <section name="log4net" type="log4net.Config.Log4NetConfigurationSectionHandler, log4net" />
  </configSections>
  <log4net>
   <appender name="CloudLogger" type="Google.Cloud.Logging.Log4Net.GoogleStackdriverAppender,Google.Cloud.Logging.Log4Net">
     <layout type="log4net.Layout.PatternLayout">
       <conversionPattern value="%-4timestamp [%thread] %-5level %logger %ndc - %message" />
      </layout>
      <projectId value="YOUR-PROJECT-ID" />
      <logId value="mySampleLog" />
    </appender>
    <root>
     <level value="ALL" />
     <appender-ref ref="CloudLogger" />
    </root>
  </log4net>


Step 3: Configure Log4net to use Logging by adding the following line of code to your application’s Global.asax.cs file:
log4net.Config.XmlConfigurator.Configure();

. The Application_Start() method in Global.asax.cs should look like this:

  protected void Application_Start()
{
    GlobalConfiguration.Configure(WebApiConfig.Register);

    // Configure log4net to use Stackdriver logging from the XML configuration file.
    log4net.Config.XmlConfigurator.Configure();
}

Step 4: Add this statement to your application code to include the client libraries:
using log4net;

Step 5: To write logs that will appear in the Stackdriver Logs Viewer, add the following code to your application:

// Retrieve a logger for this context.
ILog log = LogManager.GetLogger(typeof(WebApiConfig));

// Log some information to Google Stackdriver Logging.
log.Info("Hello World.");

Once you build and run this code, you'll get log entries that look like this:
See the "How-To" documentation for installing and using the Logging client Nuget package for .NET applications.

Error Reporting for .NET Applications


Even if your VMs are running perfectly, your application may encounter runtime exceptions due to things like unexpected usage patterns. Good news! We recently released the beta Stackdriver Diagnostics ASP.NET NuGet package for Compute Engine VMs running .NET. With it, all exception errors from your application are automatically logged to Error Reporting.

Step 1: Enable the Error Reporting API.

Step 2: Right-click your solution in Visual Studio, choose "Manage Nuget packages for solution."
Check the "Include prerelease" checkbox. Search for the package named "Google.Cloud.Diagnostics.AspNet" and then install the package.

Step 3: Add the library to your application code:
using Google.Cloud.Diagnostics.AspNet;

Step 4: Add the following code to the "Register" method of your .NET web app:
public static void Register(HttpConfiguration config)
{
    // Add a catch all for the uncaught exceptions.
    string projectId = "YOUR-PROJECT-ID";
    string serviceName = "NAME-OF-YOUR-SERVICE";
    string version = "VERSION-OF-YOUR-SERVICE";
    // Add a catch all for the uncaught exceptions.
    config.Services.Add(typeof(IExceptionLogger), 
        ErrorReportingExceptionLogger.Create(projectId, serviceName, version));
}


Here's an example of the exceptions you'll see in Error Reporting:

Click on an exception to see its details:
See the "How-To" documentation for installing and using the Stackdriver Diagnostics ASP.NET NuGet package for .NET applications.

Try it out


Now that you know how easy it is to log, monitor and enable error reporting for .NET applications on Google Cloud, go ahead and deploy a .NET application to Google Cloud for yourself. Next install the Logging and Monitoring agents on your VM(s) and add the Stackdriver Diagnostics and Logging client packages to your application. You can rest easier knowing that you're logging exactly what's going on with your application and that you'll be notified whenever something goes bump in the night.

What is Google Cloud Deployment Manager and how to use it


Using Google Cloud Deployment Manager is a great way to manage and automate your cloud environment. By creating a set of declarative templates, Deployment Manager lets you consistently deploy, update and delete resources like Google Compute Engine, Google Container Engine, Google BigQuery, Google Cloud Storage and Google Cloud SQL. As one of the less well known features of Google Cloud Platform (GCP), let’s talk about how to use Deployment Manager.

Deployment Manager uses three types of files:
Using templates is the recommended method of using Deployment Manager, and requires a configuration file as a minimum. The configuration file defines the resources you wish to deploy and their configuration properties such as zone and machine type.

Deployment manager supports a wide array of GCP resources. Here's a complete list of supported resources and associated properties, which you can also retrieve with this gcloud command:

$ gcloud deployment-manager types list


Deployment Manager is often used alongside a version control system into which you can check in the definition of your infrastructure. This approach is commonly referred to as "infrastructure as code" It’s also possible to pass properties to Deployment Manager directly using gcloud command, but that's not a very scalable approach.

Anatomy of a Deployment Manager configuration

To understand how things fit together, let’s look at the set of files that are used to create a simple network with two subnets and a single deployed instance.

The configuration consists of three files:
  • net-config.yaml - configuration file
  • network.jinja - template file
  • instance.jinja - template file
You can use template files as logical units that break down the configuration into smaller and reusable parts. Templates can then be composed into a larger deployment. In this example, network configuration and instance deployment have been broken out into their own templates.


Understanding templates

Templates provide the following benefits and functionality:

  • Composability, making it easier to manage, maintain and reuse the definitions of the cloud resources declared in the templates. In some cases you may not want to recreate the end-to-end configuration as defined in the configuration file. In that case, you can just reuse one or more templates to help ensure consistency in the way in which you create resources.
  • Templates written in your choice of Python or Jinja2. Jinja2 is a simpler but less powerful templating language than Python. It uses the same syntax as YAML but also allows the use of conditionals and loops. Python templates are more powerful and allow you to programmatically generate the contents of your templates.
  • Template variables – an easy way to reuse templates by allowing you to declare the value to be passed to the template in the configuration file. This means that you can change a specific value for each configuration without having to update the template. For example, you may wish to deploy your test instances in a different zone to your production instances. In that case, simply declare within the template a variable that inherits the zone value from the master configuration file.
  • Environment variables, which also help you reuse templates across different projects and deployments. Examples of an environment variable include things like the Project ID or deployment name, rather than resources you want to deploy.
Here’s how to understand the distinction between the template and environment variables. Imagine you have two projects where you wish to deploy identical instances, but to different zones. In this case, name your instances based on the Project ID and Deployment name found from the environment variables, and set the zone through a template variable.

A Sample Deployment Manager configuration

For this example, we’ve decided to keep things simple and use templates written in Jinja2.

The network file

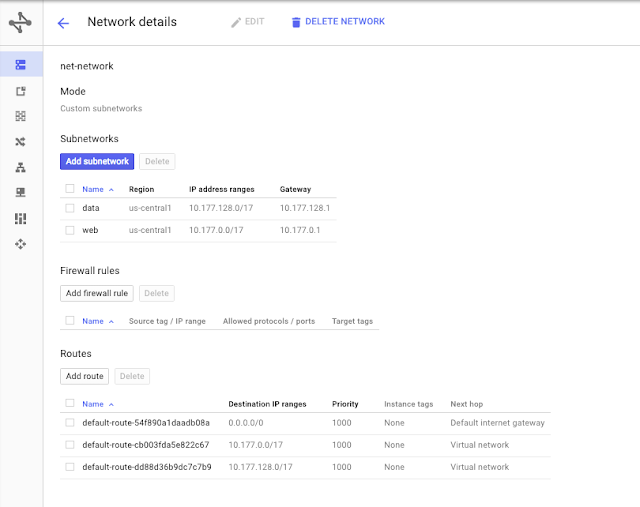
This file creates a network and its subnets whose name and range are passed through from the variable declaration in net-config.yaml, the calling configuration file.
The “for” subnet loop repeats until it has read all the values in the subnets properties. The config file below declares two subnets with the following values:

Subnet name
IP range
web
10.177.0.0/17
data
10.178.128.0/17

The deployment will be deployed into the us-central1 region. You can easily change this by changing the value of the “region” property in the configuration file without having to modify the network template itself.

The instance file

The instance file, in this case "instance.jinja," defines the template for an instance whose machine type, zone and subnet are defined in the top level configuration file’s property values.

The configuration file

This file, called net-config.yaml, is the main configuration file that marshals the templates that we defined above to create a network with a single VM.
To include templates as part of your configuration, use the imports property in the configuration file that calls the template (going forward, the master configuration file). In our example the master configuration file is called net-config.yaml and imports two templates at lines 15 - 17:
The resource network is defined by the imported template network.jinja.
The resource web-instance is defined by the imported template instance.jinja.

Template variables are declared that are passed to each template. In our example, lines 19 - 27 define the network values that are passed through to the network.ninja template.
Lines 28 to 33 define the instance values.
To deploy a configuration, pass the configuration file to Deployment Manager via the gcloud command or the API. Using gcloud command, type the following command:

$ gcloud deployment-manager deployments create net --configuration net-config.yaml

You'll see a message indicating that the deployment has been successful
You can see the deployment from Cloud Console.
Note that the instance is named after the deployment specified in instance.jinja.
The value for the variable “deployment” was passed in via the gcloud command “create net” where “net” is the name of the deployment

You can explore the configuration by looking at the network and Compute Engine menus:
You can delete a deployment from Cloud Console by clicking the delete button or with the following gcloud command:

$ gcloud deployment-manager deployments delete net

You'll be prompted for verification that you want to proceed.

Next steps

Once you understand the basics of Deployment Manager, there’s a lot more you can do. You can take the example code snippets that we walked through here and build more complicated scenarios, for example, implementing a VPN that connects back to your on premises environment. There are also many Deployment Manager example configurations on Github.

Then, go ahead and start thinking about advanced Deployment Manager features such as template modules and schemas. And be sure to let us know how it goes.


Exploring your application’s latency profile using Stackdriver Trace


Google Cloud Platform customers can now analyze changes to their applications’ latency profiles through Google Cloud Console and on their Android devices, with iOS support coming soon.

Using the latency reports feature, developers can:

  • View the latency profiles of their application’s endpoints
  • Compare the latency profile of their application between different times or versions
  • Observe if a report is flagged as having a major or minor latency shift

This functionality, along with the full suite of Stackdriver Trace features on the web-based Cloud Console, is available for all projects hosted on Google App Engine and any projects on Google Compute Engine and Google Container Engine that use the Stackdriver Trace SDKs (currently available for Node.js and Java). The latency reports can be accessed through the Analysis Reports tab within the Stackdriver Trace section of Cloud Console, or from the Trace tab of the Cloud Console mobile app. Links to endpoint-specific reports are found in the analysis report column of the Trace List page and under the Reports heading on individual traces in the Cloud Console.

Here’s an example of what you’ll see in Cloud Console for a project that's capturing trace data:
(click to enlarge)

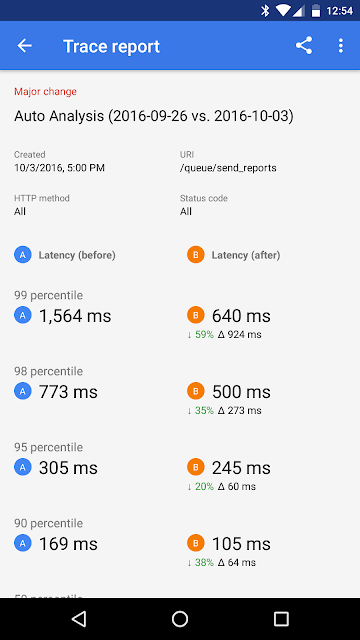
You’ll observe the following in the mobile app:
Latency reports are automatically generated for the endpoints with the highest traffic in each project; each of these reports compares each endpoint’s current latency profile to the prior week’s.

In the web-based console, selecting New Report allows you to create custom reports to observe the latency profile of a particular endpoint, or to compare the performance of an endpoint between different times and versions (see here for more details).

Some reports are flagged as having major or minor changes, which indicates that the latency distribution across percentiles is substantially different between the two versions or times being compared. These are often worth investigating, as they can represent changes in a service’s underlying performance characteristics.
(click to enlarge)

Each web-based report contains a graph of the endpoint’s latency distribution across percentiles. The auto analysis example above compares the latency profiles of a given endpoint over one week. As indicated by the graph and the “major change” text, the endpoint’s latency distribution has changed significantly over this time period.

The table at the bottom of the report shows that the application’s latency has increased in the 90th percentile and lower, while it has decreased in the higher percentile cases. This distinction is important: a simple comparison of the mean latencies between times A and B shows little change, but the report correctly identifies that the service is now considerably faster for the worst 10% of requests.

Here’s an example of a similar report in the mobile app, with a similar percentile comparison grid:
This feature will be available for the iOS Cloud Console app shortly.

For more information on how to create and understand latency reports, see this page. Let us know what you think about this feature, either by commenting here or through the send feedback button in Cloud Console.

Production debugging the easy way, with Stackdriver Debugger GA


When it comes to cloud-based applications, traditional debugging tools are slow and cumbersome for production systems. When an issue occurs in production, engineers inspect the logs and try to reproduce the problem in a non-production environment. Once they successfully reproduce the problem, they attach a traditional debugger, set breakpoints, step through the code and inspect application state in an attempt to understand the issue. This is often followed up by adding log statements, rebuilding and redeploying code to production and sifting through logs again until the issue's resolved.

Google's been a cloud company for a long time, and over the years, we've built developer tools optimized for cloud development. Today we're happy to announce that one such tool, Stackdriver Debugger, is generally available.

Stackdriver Debugger allows engineers to inspect an application's state, its variables and call stack at any line of code without stopping the application or impacting the customer. Being able to debug production code cuts short the many hours engineers invest in finding and reproducing a bug.

Since our beta launch, we've added a number of new features including support for multiple source repositories, logs integration and dynamic log point insertion.

Stackdriver’s Debug page uses source code from repositories such as Github and Bitbucket or local source to display and take debug snapshots. You can also use the debugger without any source files at all, simply by typing in the filename and line number.

The debug snapshot allows you to examine the call-stack and variables and view the raw logs associated with your Google App Engine projects — all on one page.
Out of the box, Stackdriver Debugger supports the following languages and platforms:

Google App Engine (Standard and Flexible): Java, Python, Node
Google Compute Engine and Google Container Engine: Java, Python, Node (experimental), Go

All of this functionality is backed by a publicly accessible Stackdriver Debugger API with which applications interact with the Google Stackdriver Debugger backends. The API enables you to implement your own agent to capture debug data for your favorite programming language. It also allows you to implement a Stackdriver Debugger UI integrated into your favorite IDE to directly set and view debug snapshots and logpoints. Just for fun, we used the same API to integrate the Stackdriver Debugger into the gcloud debug command line.

We're always looking for feedback and suggestions to improve Stackdriver Debugger. Please send us your requests and feedback. If you're interested in contributing to creating additional agents or extending our existing agents, please connect with the Debugger team.

Google Stackdriver is now generally available for hybrid cloud monitoring, logging and diagnostics


Google Stackdriver is now generally available.

Since its inception, Stackdriver was designed to make ops easier by reducing the burden associated with keeping applications fast, error-free and available in the cloud.

We started with a single pane of glass to monitor and alert on metrics from Google Cloud Platform (GCP), Amazon Web Services1 and common application components such as Tomcat, Nginx, Cassandra and MySQL. We added Stackdriver Logging, Error Reporting, Trace and Debugger to help you get to the root cause of issues quickly. And we introduced a simple pricing model that bundles advanced monitoring and logging into a single low-cost package in Stackdriver Premium. Finally, we migrated the service to the same infrastructure that powers the rest of Google so that you can expect world-class reliability and scalability.

Companies of all sizes are already using Stackdriver to simplify ops. For example:
  • Uber uses Stackdriver Monitoring to monitor Google Compute Engine, Cloud VPN and other aspects of GCP. It uses Stackdriver alerts to notify on-call engineers when issues occur.
  • Khan Academy uses Stackdriver Monitoring dashboards to quickly identify issues within its online learning platform. It troubleshoots issues with our integrated Logging, Error Reporting and Tracing tools.
  • Wix uses Stackdriver Logging and Google BigQuery to analyze large volumes of logs from Compute Engine auto-scaled deployments. They get intelligence on system health state and error rates that provides essential insight for them to run their operations.

If you’d like to learn more about Google Stackdriver, please check out our website or documentation. If you’re running on GCP or Amazon Web Services and want to join us on the journey to easier ops, sign up for a 30-day free trial of Stackdriver Premium today.

Happy Monitoring!


1 "Amazon Web Services" and "AWS" are trademarks of Amazon.com, Inc. or its affiliates in the United States