Tag Archives: Machine Perception

Behind the Motion Photos Technology in Pixel 2


One of the most compelling things about smartphones today is the ability to capture a moment on the fly. With motion photos, a new camera feature available on the Pixel 2 and Pixel 2 XL phones, you no longer have to choose between a photo and a video so every photo you take captures more of the moment. When you take a photo with motion enabled, your phone also records and trims up to 3 seconds of video. Using advanced stabilization built upon technology we pioneered in Motion Stills for Android, these pictures come to life in Google Photos. Let’s take a look behind the technology that makes this possible!
Motion photos on the Pixel 2 in Google Photos. With the camera frozen in place the focus is put directly on the subjects. For more examples, check out this Google Photos album.
Camera Motion Estimation by Combining Hardware and Software
The image and video pair that is captured every time you hit the shutter button is a full resolution JPEG with an embedded 3 second video clip. On the Pixel 2, the video portion also contains motion metadata that is derived from the gyroscope and optical image stabilization (OIS) sensors to aid the trimming and stabilization of the motion photo. By combining software based visual tracking with the motion metadata from the hardware sensors, we built a new hybrid motion estimation for motion photos on the Pixel 2.

Our approach aligns the background more precisely than the technique used in Motion Stills or the purely hardware sensor based approach. Based on Fused Video Stabilization technology, it reduces the artifacts from the visual analysis due to a complex scene with many depth layers or when a foreground object occupies a large portion of the field of view. It also improves the hardware sensor based approach by refining the motion estimation to be more accurate, especially at close distances.
Motion photo as captured (left) and after freezing the camera by combining hardware and software For more comparisons, check out this Google Photos album.
The purely software-based technique we introduced in Motion Stills uses the visual data from the video frames, detecting and tracking features over consecutive frames yielding motion vectors. It then classifies the motion vectors into foreground and background using motion models such as an affine transformation or a homography. However, this classification is not perfect and can be misled, e.g. by a complex scene or dominant foreground.
Feature classification into background (green) and foreground (orange) by using the motion metadata from the hardware sensors of the Pixel 2. Notice how the new approach not only labels the skateboarder accurately as foreground but also the half-pipe that is at roughly the same depth.
For motion photos on Pixel 2 we improved this classification by using the motion metadata derived from the gyroscope and the OIS. This accurately captures the camera motion with respect to the scene at infinity, which one can think of as the background in the distance. However, for pictures taken at closer range, parallax is introduced for scene elements at different depth layers, which is not accounted for by the gyroscope and OIS. Specifically, we mark motion vectors that deviate too much from the motion metadata as foreground. This results in a significantly more accurate classification of foreground and background, which also enables us to use a more complex motion model known as mixture homographies that can account for rolling shutter and undo the distortions it causes.
Background motion estimation in motion photos. By using the motion metadata from Gyro and OIS we are able to accurately classify features from the visual analysis into foreground and background.
Motion Photo Stabilization and Playback
Once we have accurately estimated the background motion for the video, we determine an optimally stable camera path to align the background using linear programming techniques outlined in our earlier posts. Further, we automatically trim the video to remove any accidental motion caused by putting the phone away. All of this processing happens on your phone and produces a small amount of metadata per frame that is used to render the stabilized video in real-time using a GPU shader when you tap the Motion button in Google Photos. In addition, we play the video starting at the exact timestamp as the HDR+ photo, producing a seamless transition from still image to video.
Motion photos stabilize even complex scenes with large foreground motions.
Motion Photo Sharing
Using Google Photos, you can share motion photos with your friends and as videos and GIFs, watch them on the web, or view them on any phone. This is another example of combining hardware, software and machine learning to create new features for Pixel 2.

Acknowledgements
Motion photos is a result of a collaboration across several Google Research teams, Google Pixel and Google Photos. We especially want to acknowledge the work of Karthik Raveendran, Suril Shah, Marius Renn, Alex Hong, Radford Juang, Fares Alhassen, Emily Chang, Isaac Reynolds, and Dave Loxton.

Source: Google AI Blog


Behind the Motion Photos Technology in Pixel 2


One of the most compelling things about smartphones today is the ability to capture a moment on the fly. With motion photos, a new camera feature available on the Pixel 2 and Pixel 2 XL phones, you no longer have to choose between a photo and a video so every photo you take captures more of the moment. When you take a photo with motion enabled, your phone also records and trims up to 3 seconds of video. Using advanced stabilization built upon technology we pioneered in Motion Stills for Android, these pictures come to life in Google Photos. Let’s take a look behind the technology that makes this possible!
Motion photos on the Pixel 2 in Google Photos. With the camera frozen in place the focus is put directly on the subjects. For more examples, check out this Google Photos album.
Camera Motion Estimation by Combining Hardware and Software
The image and video pair that is captured every time you hit the shutter button is a full resolution JPEG with an embedded 3 second video clip. On the Pixel 2, the video portion also contains motion metadata that is derived from the gyroscope and optical image stabilization (OIS) sensors to aid the trimming and stabilization of the motion photo. By combining software based visual tracking with the motion metadata from the hardware sensors, we built a new hybrid motion estimation for motion photos on the Pixel 2.

Our approach aligns the background more precisely than the technique used in Motion Stills or the purely hardware sensor based approach. Based on Fused Video Stabilization technology, it reduces the artifacts from the visual analysis due to a complex scene with many depth layers or when a foreground object occupies a large portion of the field of view. It also improves the hardware sensor based approach by refining the motion estimation to be more accurate, especially at close distances.
Motion photo as captured (left) and after freezing the camera by combining hardware and software For more comparisons, check out this Google Photos album.
The purely software-based technique we introduced in Motion Stills uses the visual data from the video frames, detecting and tracking features over consecutive frames yielding motion vectors. It then classifies the motion vectors into foreground and background using motion models such as an affine transformation or a homography. However, this classification is not perfect and can be misled, e.g. by a complex scene or dominant foreground.
Feature classification into background (green) and foreground (orange) by using the motion metadata from the hardware sensors of the Pixel 2. Notice how the new approach not only labels the skateboarder accurately as foreground but also the half-pipe that is at roughly the same depth.
For motion photos on Pixel 2 we improved this classification by using the motion metadata derived from the gyroscope and the OIS. This accurately captures the camera motion with respect to the scene at infinity, which one can think of as the background in the distance. However, for pictures taken at closer range, parallax is introduced for scene elements at different depth layers, which is not accounted for by the gyroscope and OIS. Specifically, we mark motion vectors that deviate too much from the motion metadata as foreground. This results in a significantly more accurate classification of foreground and background, which also enables us to use a more complex motion model known as mixture homographies that can account for rolling shutter and undo the distortions it causes.
Background motion estimation in motion photos. By using the motion metadata from Gyro and OIS we are able to accurately classify features from the visual analysis into foreground and background.
Motion Photo Stabilization and Playback
Once we have accurately estimated the background motion for the video, we determine an optimally stable camera path to align the background using linear programming techniques outlined in our earlier posts. Further, we automatically trim the video to remove any accidental motion caused by putting the phone away. All of this processing happens on your phone and produces a small amount of metadata per frame that is used to render the stabilized video in real-time using a GPU shader when you tap the Motion button in Google Photos. In addition, we play the video starting at the exact timestamp as the HDR+ photo, producing a seamless transition from still image to video.
Motion photos stabilize even complex scenes with large foreground motions.
Motion Photo Sharing
Using Google Photos, you can share motion photos with your friends and as videos and GIFs, watch them on the web, or view them on any phone. This is another example of combining hardware, software and Machine Learning to create new features for Pixel 2.

Acknowledgements
Motion photos is a result of a collaboration across several Google Research teams, Google Pixel and Google Photos. We especially want to acknowledge the work of Karthik Raveendran, Suril Shah, Marius Renn, Alex Hong, Radford Juang, Fares Alhassen, Emily Chang, Isaac Reynolds, and Dave Loxton.

The Instant Motion Tracking Behind Motion Stills AR


Last summer, we launched Motion Stills on Android, which delivered a great video capture and viewing experience on a wide range of Android phones. Then, we refined our Motion Stills technology further to enable the new motion photos feature in Pixel 2.

Today, we are excited to announce the new Augmented Reality (AR) mode in Motion Stills for Android. With the new AR mode, a user simply touches the viewfinder to place fun, virtual 3D objects on static or moving horizontal surfaces (e.g. tables, floors, or hands), allowing them to seamlessly interact with a dynamic real-world environment. You can also record and share the clips as GIFs and videos.
Motion Stills with instant motion tracking in action
AR mode is powered by instant motion tracking, a six degree of freedom tracking system built upon the technology that powers Motion Text in Motion Stills iOS and the privacy blur on YouTube to accurately track static and moving objects. We refined and enhanced this technology to enable fun AR experiences that can run on any Android device with a gyroscope.

When you touch the viewfinder, Motion Stills AR “sticks” a 3D virtual object to that location, making it look as if it’s part of the real-world scene. By assuming that the tracked surface is parallel to the ground plane, and using the device’s accelerometer sensor to provide the initial orientation of the phone with respect to the ground plane, one can track the six degrees of freedom of the camera (3 for translation and 3 for rotation). This allows us to accurately transform and render the virtual object within the scene.
When the phone is approximately steady, the accelerometer sensor provides the acceleration due to the Earth’s gravity. For horizontal planes the gravity vector is parallel to normal of the tracked plane and can accurately provide the initial orientation of phone.
Instant Motion Tracking
The core idea behind instant motion tracking is to decouple the camera’s translation and rotation estimation, treating them instead as independent optimization problems. First, we determine the 3D camera translation solely from the visual signal of the camera. To do this, we observe the target region's apparent 2D translation and relative scale across frames. A simple pinhole camera model relates both translation and scale of a box in the image plane with the final 3D translation of the camera.
The translation and the change in size (relative scale) of the box in the image plane can be used to determine 3D translation between two camera position C1 and C2. However, as our camera model doesn’t assume the focal length of the camera lens, we do not know the true distance/depth of the tracked plane.
To account for this, we added scale estimation to our existing tracker (the one used in Motion Text) as well as region tracking outside the field of view of the camera. When the camera gets closer to the tracked surface, the virtual content scales accurately, which is consistent with perception of real-world objects. When you pan outside the field of view of the target region and back the virtual object will reappear in approximately the same spot.
Independent translation (from visual signal only as shown by red box) and rotation tracking (from gyro; not shown)
After all this, we obtain the device’s 3D rotation (roll, pitch and yaw) using the phone’s built-in gyroscope. The estimated 3D translation combined with the 3D rotation provides us with the ability to render the virtual content correctly in the viewfinder. And because we treat rotation and translation separately, our instant motion tracking approach is calibration free and works on any Android device with a gyroscope.
Augmented chicken family with Motion Stills AR mode
We are excited to bring this new mode to Motion Stills for Android, and we hope you’ll enjoy it. Please download the new release of Motion Stills and keep sending us feedback with #motionstills on your favorite social media.

Acknowledgements
For rendering, we are thankful we were able to leverage Google’s Lullaby engine using animated Poly models. A thank you to our team members who worked on the tech and this launch with us: John Nack, Suril Shah, Igor Kibalchich, Siarhei Kazakou, and Matthias Grundmann.

Introducing the CVPR 2018 Learned Image Compression Challenge


Image compression is critical to digital photography — without it, a 12 megapixel image would take 36 megabytes of storage, making most websites prohibitively large. While the signal-processing community has significantly improved image compression beyond JPEG (which was introduced in the 1980’s) with modern image codecs (e.g., BPG, WebP), many of the techniques used in these modern codecs still use the same family of pixel transforms as are used in JPEG. Multiple recent Google projects improve the field of image compression with end-to-end with machine learning, compression through superresolution and creating perceptually improved JPEG images, but we believe that even greater improvements to image compression can be obtained by bringing this research challenge to the attention of the larger machine learning community.

To encourage progress in this field, Google, in collaboration with ETH and Twitter, is sponsoring the Workshop and Challenge on Learned Image Compression (CLIC) at the upcoming 2018 Computer Vision and Pattern Recognition conference (CVPR 2018). The workshop will bring together established contributors to traditional image compression with early contributors to the emerging field of learning-based image compression systems. Our invited speakers include image and video compression experts Jim Bankoski (Google) and Jens Ohm (RWTH Aachen University), as well as computer vision and machine learning experts with experience in video and image compression, Oren Rippel (WaveOne) and Ramin Zabih (Google, on leave from Cornell).
Training set of 1,633 uncompressed images from both the Mobile and Professional datasets, available on compression.cc
A database of copyright-free, high-quality images will be made available both for this challenge and in an effort to accelerate research in this area: Dataset P (“professional”) and Dataset M (“mobile”). The datasets are collected to be representative for images commonly used in the wild, containing thousands of images. While the challenge will allow participants to train neural networks or other methods on any amount of data (but we expect participants to have access to additional data, such as ImageNet and the Open Images Dataset), it should be possible to train on the datasets provided.

The first large-image compression systems using neural networks were published in 2016 [Toderici2016, Ballé2016] and were only just matching JPEG performance. More recent systems have made rapid advances, to the point that they match or exceed the performance of modern industry-standard image compression [Ballé2017, Theis2017, Agustsson2017, Santurkar2017, Rippel2017]. This rapid advance in the quality of neural-network-based compression systems, based on the work of a comparatively small number of research labs, leads us to expect even more impressive results when the area is explored by a larger portion of the machine-learning community.

We hope to get your help advancing the state-of-the-art in this important application area, and we encourage you to participate if you are planning to attend CVPR this year! Please see compression.cc for more details about the new datasets and important workshop deadlines. Training data is already available on that site. The test set will be released on February 15 and the deadline for submitting the compressed versions of the test set is February 22.

Tacotron 2: Generating Human-like Speech from Text


Generating very natural sounding speech from text (text-to-speech, TTS) has been a research goal for decades. There has been great progress in TTS research over the last few years and many individual pieces of a complete TTS system have greatly improved. Incorporating ideas from past work such as Tacotron and WaveNet, we added more improvements to end up with our new system, Tacotron 2. Our approach does not use complex linguistic and acoustic features as input. Instead, we generate human-like speech from text using neural networks trained using only speech examples and corresponding text transcripts.

A full description of our new system can be found in our paper “Natural TTS Synthesis by Conditioning WaveNet on Mel Spectrogram Predictions.” In a nutshell it works like this: We use a sequence-to-sequence model optimized for TTS to map a sequence of letters to a sequence of features that encode the audio. These features, an 80-dimensional audio spectrogram with frames computed every 12.5 milliseconds, capture not only pronunciation of words, but also various subtleties of human speech, including volume, speed and intonation. Finally these features are converted to a 24 kHz waveform using a WaveNet-like architecture.
A detailed look at Tacotron 2's model architecture. The lower half of the image describes the sequence-to-sequence model that maps a sequence of letters to a spectrogram. For technical details, please refer to the paper.
You can listen to some of the Tacotron 2 audio samples that demonstrate the results of our state-of-the-art TTS system. In an evaluation where we asked human listeners to rate the naturalness of the generated speech, we obtained a score that was comparable to that of professional recordings.

While our samples sound great, there are still some difficult problems to be tackled. For example, our system has difficulties pronouncing complex words (such as “decorum” and “merlot”), and in extreme cases it can even randomly generate strange noises. Also, our system cannot yet generate audio in realtime. Furthermore, we cannot yet control the generated speech, such as directing it to sound happy or sad. Each of these is an interesting research problem on its own.

Acknowledgements
Jonathan Shen, Ruoming Pang, Ron J. Weiss, Mike Schuster, Navdeep Jaitly, Zongheng Yang, Zhifeng Chen, Yu Zhang, Yuxuan Wang, RJ Skerry-Ryan, Rif A. Saurous, Yannis Agiomyrgiannakis, Yonghui Wu, Sound Understanding team, TTS Research team, and TensorFlow team.

Introducing Appsperiments: Exploring the Potentials of Mobile Photography


Each of the world's approximately two billion smartphone owners is carrying a camera capable of capturing photos and video of a tonal richness and quality unimaginable even five years ago. Until recently, those cameras behaved mostly as optical sensors, capturing light and operating on the resulting image's pixels. The next generation of cameras, however, will have the capability to blend hardware and computer vision algorithms that operate as well on an image's semantic content, enabling radically new creative mobile photo and video applications.

Today, we're launching the first installment of a series of photography appsperiments: usable and useful mobile photography experiences built on experimental technology. Our "appsperimental" approach was inspired in part by Motion Stills, an app developed by researchers at Google that converts short videos into cinemagraphs and time lapses using experimental stabilization and rendering technologies. Our appsperiments replicate this approach by building on other technologies in development at Google. They rely on object recognition, person segmentation, stylization algorithms, efficient image encoding and decoding technologies, and perhaps most importantly, fun!

Storyboard
Storyboard (Android) transforms your videos into single-page comic layouts, entirely on device. Simply shoot a video and load it in Storyboard. The app automatically selects interesting video frames, lays them out, and applies one of six visual styles. Save the comic or pull down to refresh and instantly produce a new one. There are approximately 1.6 trillion different possibilities!

Selfissimo!
Selfissimo! (iOS, Android) is an automated selfie photographer that snaps a stylish black and white photo each time you pose. Tap the screen to start a photoshoot. The app encourages you to pose and captures a photo whenever you stop moving. Tap the screen to end the session and review the resulting contact sheet, saving individual images or the entire shoot.

Scrubbies
Scrubbies (iOS) lets you easily manipulate the speed and direction of video playback to produce delightful video loops that highlight actions, capture funny faces, and replay moments. Shoot a video in the app and then remix it by scratching it like a DJ. Scrubbing with one finger plays the video. Scrubbing with two fingers captures the playback so you can save or share it.

Try them out and tell us what you think using the in-app feedback links. The feedback and ideas we get from the new and creative ways people use our appsperiments will help guide some of the technology we develop next.

Acknowledgements
These appsperiments represent a collaboration across many teams at Google. We would like to thank the core contributors Andy Dahley, Ashley Ma, Dexter Allen, Ignacio Garcia Dorado, Madison Le, Mark Bowers, Pascal Getreuer, Robin Debreuil, Suhong Jin, and William Lindmeier. We also wish to give special thanks to Buck Bourdon, Hossein Talebi, Kanstantsin Sokal, Karthik Raveendran, Matthias Grundmann, Peyman Milanfar, Suril Shah, Tomas Izo, Tyler Mullen, and Zheng Sun.

Portrait mode on the Pixel 2 and Pixel 2 XL smartphones


Portrait mode, a major feature of the new Pixel 2 and Pixel 2 XL smartphones, allows anyone to take professional-looking shallow depth-of-field images. This feature helped both devices earn DxO's highest mobile camera ranking, and works with both the rear-facing and front-facing cameras, even though neither is dual-camera (normally required to obtain this effect). Today we discuss the machine learning and computational photography techniques behind this feature.
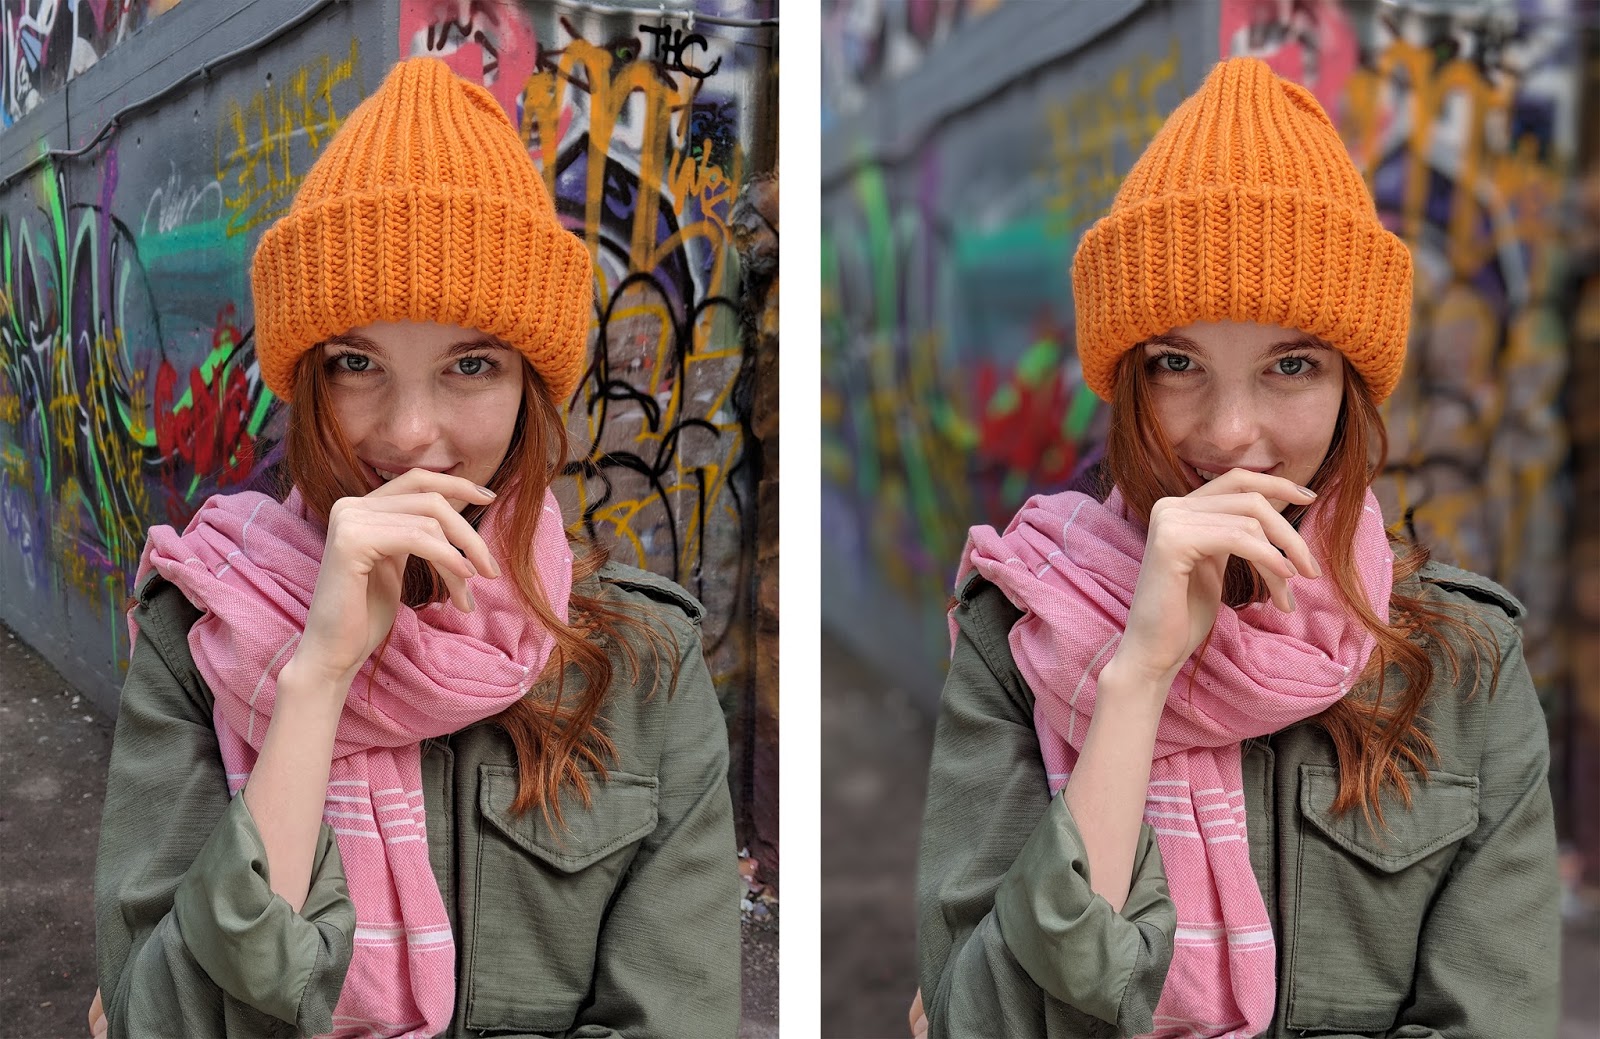
HDR+ picture without (left) and with (right) portrait mode. Note how portrait mode’s synthetic shallow depth of field helps suppress the cluttered background and focus attention on the main subject. Click on these links in the caption to see full resolution versions. Photo by Matt Jones
What is a shallow depth-of-field image?
A single-lens reflex (SLR) camera with a big lens has a shallow depth of field, meaning that objects at one distance from the camera are sharp, while objects in front of or behind that "in-focus plane" are blurry. Shallow depth of field is a good way to draw the viewer's attention to a subject, or to suppress a cluttered background. Shallow depth of field is what gives portraits captured using SLRs their characteristic artistic look.

The amount of blur in a shallow depth-of-field image depends on depth; the farther objects are from the in-focus plane, the blurrier they appear. The amount of blur also depends on the size of the lens opening. A 50mm lens with an f/2.0 aperture has an opening 50mm/2 = 25mm in diameter. With such a lens, objects that are even a few inches away from the in-focus plane will appear soft.

One other parameter worth knowing about depth of field is the shape taken on by blurred points of light. This shape is called bokeh, and it depends on the physical structure of the lens's aperture. Is the bokeh circular? Or is it a hexagon, due to the six metal leaves that form the aperture inside some lenses? Photographers debate tirelessly about what constitutes good or bad bokeh.

Synthetic shallow depth of field images
Unlike SLR cameras, mobile phone cameras have a small, fixed-size aperture, which produces pictures with everything more or less in focus. But if we knew the distance from the camera to points in the scene, we could replace each pixel in the picture with a blur. This blur would be an average of the pixel's color with its neighbors, where the amount of blur depends on distance of that scene point from the in-focus plane. We could also control the shape of this blur, meaning the bokeh.

How can a cell phone estimate the distance to every point in the scene? The most common method is to place two cameras close to one another – so-called dual-camera phones. Then, for each patch in the left camera's image, we look for a matching patch in the right camera's image. The position in the two images where this match is found gives the depth of that scene feature through a process of triangulation. This search for matching features is called a stereo algorithm, and it works pretty much the same way our two eyes do.

A simpler version of this idea, used by some single-camera smartphone apps, involves separating the image into two layers – pixels that are part of the foreground (typically a person) and pixels that are part of the background. This separation, sometimes called semantic segmentation, lets you blur the background, but it has no notion of depth, so it can't tell you how much to blur it. Also, if there is an object in front of the person, i.e. very close to the camera, it won't be blurred out, even though a real camera would do this.

Whether done using stereo or segmentation, artificially blurring pixels that belong to the background is called synthetic shallow depth of field or synthetic background defocusing. Synthetic defocus is not the same as the optical blur you would get from an SLR, but it looks similar to most people.

How portrait mode works on the Pixel 2
The Google Pixel 2 offers portrait mode on both its rear-facing and front-facing cameras. For the front-facing (selfie) camera, it uses only segmentation. For the rear-facing camera it uses both stereo and segmentation. But wait, the Pixel 2 has only one rear facing camera; how can it see in stereo? Let's go through the process step by step.
Step 1: Generate an HDR+ image.
Portrait mode starts with a picture where everything is sharp. For this we use HDR+, Google's computational photography technique for improving the quality of captured
photographs, which runs on all recent Nexus/Pixel phones. It operates by capturing a burst of images that are underexposed to avoid blowing out highlights, aligning and averaging these frames to reduce noise in the shadows, and boosting these shadows in a way that preserves local contrast while judiciously reducing global contrast. The result is a picture with high dynamic range, low noise, and sharp details, even in dim lighting.
The idea of aligning and averaging frames to reduce noise has been known in astrophotography for decades. Google's implementation is a bit different, because we do it on bursts captured by a handheld camera, and we need to be careful not to produce ghosts (double images) if the photographer is not steady or if objects in the scene move. Below is an example of a scene with high dynamic range, captured using HDR+.
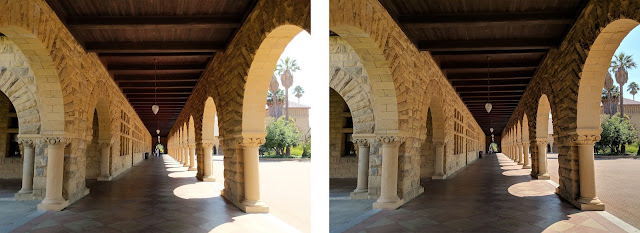
Photographs from the Pixel 2 without (left) and with (right) HDR+ enabled.
Notice how HDR+ avoids blowing out the sky and courtyard while retaining detail in the dark arcade ceiling.
Photo by Marc Levoy
Step 2:  Machine learning-based foreground-background segmentation.
Starting from an HDR+ picture, we next decide which pixels belong to the foreground (typically aperson) and which belong to the background. This is a tricky problem, because unlike chroma keying (a.k.a. green-screening) in the movie industry, we can't assume that the background is green (or blue, or any other color) Instead, we apply machine learning.  
In particular, we have trained a neural network, written in TensorFlow, that looks at the picture, and produces an estimate of which pixels are people and which aren't. The specific network we use is a convolutional neural network (CNN) with skip connections. "Convolutional" means that the learned components of the network are in the form of filters (a weighted sum of the neighbors around each pixel), so you can think of the network as just filtering the image, then filtering the filtered image, etc. The "skip connections" allow information to easily flow from the early stages in the network where it reasons about low-level features (color and edges) up to later stages of the network where it reasons about high-level features (faces and body parts). Combining stages like this is important when you need to not just determine if a photo has a person in it, but to identify exactly which pixels belong to that person. Our CNN was trained on almost a million pictures of people (and their hats, sunglasses, and ice cream cones). Inference to produce the mask runs on the phone using TensorFlow Mobile. Here’s an example:
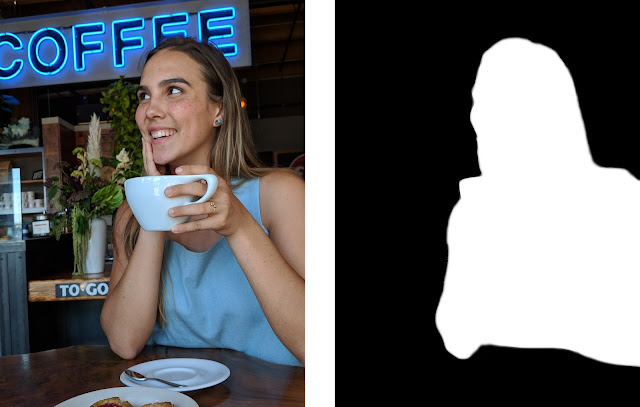
At left is a picture produced by our HDR+ pipeline, and at right is the smoothed output of our neural network. White parts of this mask are thought by the network to be part of the foreground, and black parts are thought to be background.
Photo by Sam Kweskin
How good is this mask? Not too bad; our neural network recognizes the woman's hair and her teacup as being part of the foreground, so it can keep them sharp. If we blur the photograph based on this mask, we would produce this image:
Synthetic shallow depth-of-field image generated using a mask.
There are several things to notice about this result. First, the amount of blur is uniform, even though the background contains objects at varying depths. Second, an SLR would also blur out the pastry on her plate (and the plate itself), since it's close to the camera. Our neural network knows the pastry isn't part of her (note that it's black in the mask image), but being below her it’s not likely to be part of the background. We explicitly detect this situation and keep these pixels relatively sharp. Unfortunately, this solution isn’t always correct, and in this situation we should have blurred these pixels more.
Step 3. From dual pixels to a depth map
To improve on this result, it helps to know the depth at each point in the scene. To compute depth we can use a stereo algorithm. The Pixel 2 doesn't have dual cameras, but it does have a technology called Phase-Detect Auto-Focus (PDAF) pixels, sometimes called dual-pixel autofocus (DPAF). That's a mouthful, but the idea is pretty simple. If one imagines splitting the (tiny) lens of the phone's rear-facing camera into two halves, the view of the world as seen through the left side of the lens and the view through the right side are slightly different. These two viewpoints are less than 1mm apart (roughly the diameter of the lens), but they're different enough to compute stereo and produce a depth map. The way the optics of the camera works, this is equivalent to splitting every pixel on the image sensor chip into two smaller side-by-side pixels and reading them from the chip separately, as shown here:
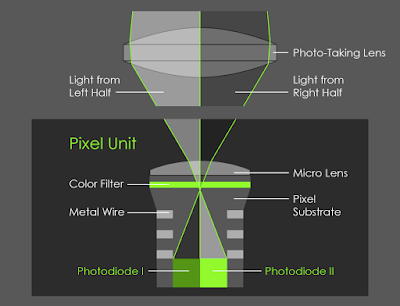
On the rear-facing camera of the Pixel 2, the right side of every pixel looks at the world through the left side of the lens, and the left side of every pixel looks at the world through the right side of the lens.
Figure by Markus Kohlpaintner, reproduced with permission.
As the diagram shows, PDAF pixels give you views through the left and right sides of the lens in a single snapshot. Or, if you're holding your phone in portrait orientation, then it's the upper and lower halves of the lens. Here's what the upper image and lower image look like for our example scene (below). These images are monochrome because we only use the green pixels of our Bayer color filter sensor in our stereo algorithm, not the red or blue pixels. Having trouble telling the two images apart? Maybe the animated gif at right (below) will help. Look closely; the differences are very small indeed!
Views of our test scene through the upper half and lower half of the lens of a Pixel 2. In the animated gif at right,
notice that she holds nearly still, because the camera is focused on her, while the background moves up and down.
Objects in front of her, if we could see any, would move down when the background moves up (and vice versa).
PDAF technology can be found in many cameras, including SLRs to help them focus faster when recording video. In our application, this technology is being used instead to compute a depth map.  Specifically, we use our left-side and right-side images (or top and bottom) as input to a stereo algorithm similar to that used in Google's Jump system panorama stitcher (called the Jump Assembler). This algorithm first performs subpixel-accurate tile-based alignment to produce a low-resolution depth map, then interpolates it to high resolution using a bilateral solver. This is similar to the technology formerly used in Google's Lens Blur feature.    
One more detail: because the left-side and right-side views captured by the Pixel 2 camera are so close together, the depth information we get is inaccurate, especially in low light, due to the high noise in the images. To reduce this noise and improve depth accuracy we capture a burst of left-side and right-side images, then align and average them before applying our stereo algorithm. Of course we need to be careful during this step to avoid wrong matches, just as in HDR+, or we'll get ghosts in our depth map (but that's the subject of another blog post). On the left below is a depth map generated from the example shown above using our stereo algorithm.
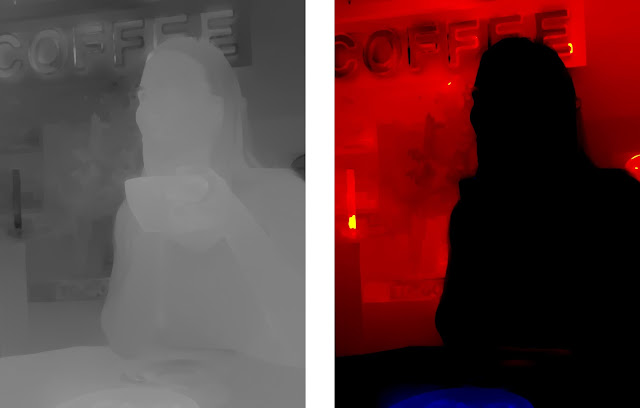
Left: depth map computed using stereo from the foregoing upper-half-of-lens and lower-half-of-lens images. Lighter means closer to the camera. 
Right: visualization of how much blur we apply to each pixel in the original. Black means don't blur at all, red denotes scene features behind the in-focus plane (which is her face), the brighter the red the more we blur, and blue denotes features in front of the in-focus plane (the pastry).
Step 4. Putting it all together to render the final image
The last step is to combine the segmentation mask we computed in step 2 with the depth map we computed in step 3 to decide how much to blur each pixel in the HDR+ picture from step 1.  The way we combine the depth and mask is a bit of secret sauce, but the rough idea is that we want scene features we think belong to a person (white parts of the mask) to stay sharp, and features we think belong to the background (black parts of the mask) to be blurred in proportion to how far they are from the in-focus plane, where these distances are taken from the depth map. The red-colored image above is a visualization of how much to blur each pixel.
Actually applying the blur is conceptually the simplest part; each pixel is replaced with a translucent disk of the same color but varying size. If we composite all these disks in depth order, it's like the averaging we described earlier, and we get a nice approximation to real optical blur.  One of the benefits of defocusing synthetically is that because we're using software, we can get a perfect disk-shaped bokeh without lugging around several pounds of glass camera lenses.  Interestingly, in software there's no particular reason we need to stick to realism; we could make the bokeh shape anything we want! For our example scene, here is the final portrait mode output. If you compare this
result to the the rightmost result in step 2, you'll see that the pastry is now slightly blurred, much as you would expect from an SLR.
Final synthetic shallow depth-of-field image, generated by combining our HDR+
picture, segmentation mask, and depth map. Click for a full-resolution image.
Ways to use portrait mode
Portrait mode on the Pixel 2 runs in 4 seconds, is fully automatic (as opposed to Lens Blur mode on
previous devices, which required a special up-down motion of the phone), and is robust enough to
be used by non-experts. Here is an album of examples, including some hard cases, like people with frizzy hair, people holding flower bouquets, etc. Below is a list of a few ways you can use Portrait Mode on the new Pixel 2.
Taking macro shots
If you're in portrait mode and you point the camera at a small object instead of a person (like a flower or food), then our neural network can't find a face and won't produce a useful segmentation mask. In other words, step 2 of our pipeline doesn't apply. Fortunately, we still have a depth map from PDAF data (step 3), so we can compute a shallow depth-of-field image based on the depth map alone. Because the baseline between the left and right sides of the lens is so small, this works well only for objects that are roughly less than a meter away. But for such scenes it produces nice pictures. You can think of this as a synthetic macro mode. Below are example straight and portrait mode shots of a macro-sized object, and here's an album with more macro shots, including more hard cases, like a water fountain with a thin wire fence behind it. Just be careful not to get too close; the Pixel 2 can’t focus sharply on objects closer than about 10cm from the camera.
Macro picture without (left) and with (right) portrait mode. There’s no person here, so background pixels are identified solely using the depth map. Photo by Marc Levoy
The selfie camera
The Pixel 2 offers portrait mode on the front-facing (selfie) as well as rear-facing camera. This camera is 8Mpix instead of 12Mpix, and it doesn't have PDAF pixels, meaning that its pixels aren't split into left and right halves. In this case, step 3 of our pipeline doesn't apply, but if we can find a face, then we can still use our neural network (step 2) to produce a segmentation mask. This allows us to still generate a shallow depth-of-field image, but because we don't know how far away objects are, we can't vary the amount of blur with depth. Nevertheless, the effect looks pretty good, especially for selfies shot against a cluttered background, where blurring helps suppress the clutter. Here are example straight and portrait mode selfies taken with the Pixel 2's selfie camera:
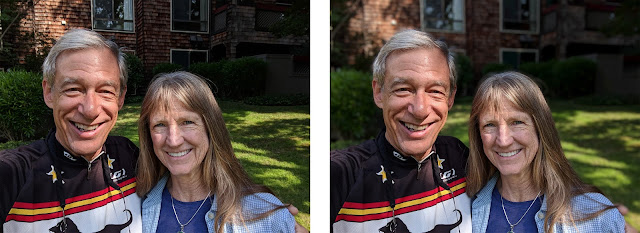
Selfie without (left) and with (right) portrait mode. The front-facing camera lacks PDAF pixels,so background pixels are identified using only machine learning. Photo by Marc Levoy

How To Get the Most Out of Portrait Mode
The portraits produced by the Pixel 2 depend on the underlying HDR+ image, segmentation mask, and depth map; problems in these inputs can produce artifacts in the result. For example, if a feature is overexposed in the HDR+ image (blown out to white), then it's unlikely the left-half and right-half images will have useful information in them, leading to errors in the depth map. What can go wrong with segmentation? It's a neural network, which has been trained on nearly a million images, but we bet it has never seen a photograph of a person kissing a crocodile, so it will probably omit the crocodile from the mask, causing it to be blurred out. How about the depth map? Our stereo algorithm may fail on textureless features (like blank walls) because there are no features for the stereo algorithm to latch onto, or repeating textures (like plaid shirts) or horizontal or vertical lines, because the stereo algorithm might match the wrong part of the image, thus triangulating to produce the wrong depth.

While any complex technology includes tradeoffs, here are some tips for producing great portrait mode shots:
  • Stand close enough to your subjects that their head (or head and shoulders) fill the frame.
  • For a group shot where you want everyone sharp, place them at the same distance from the camera.
  • For a more pleasing blur, put some distance between your subjects and the background.
  • Remove dark sunglasses, floppy hats, giant scarves, and crocodiles.
  • For macro shots, tap to focus to ensure that the object you care about stays sharp.
By the way, you'll notice that in portrait mode the camera zooms a bit (1.5x for the rear-facing camera, and 1.2x for the selfie camera).  This is deliberate, because narrower fields of view encourage you to stand back further, which in turn reduces perspective distortion,
leading to better portraits.

Is it time to put aside your SLR (forever)?
When we started working at Google 5 years ago, the number of pixels in a cell phone picture hadn't
caught up to SLRs, but it was high enough for most people's needs. Even on a big home computer
screen, you couldn't see the individual pixels in pictures you took using your cell phone.
Nevertheless, mobile phone cameras weren't as powerful as SLRs, in four ways:
  1. Dynamic range in bright scenes (blown-out skies)
  2. Signal-to-noise ratio (SNR) in low light (noisy pictures, loss of detail)
  3. Zoom (for those wildlife shots)
  4. Shallow depth of field
Google's HDR+ and similar technologies by our competitors have made great strides on #1 and #2. In fact, in challenging lighting we'll often put away our SLRs, because we can get a better picture from a phone without painful bracketing and post-processing. For zoom, the modest telephoto lenses being added to some smartphones (typically 2x) help, but for that grizzly bear in the streambed there's no substitute for a 400mm lens (much safer too!). For shallow depth-of-field, synthetic defocusing is not the same as real optical defocusing, but the visual effect is similar enough to achieve the same goal, of directing your attention towards the main subject.

Will SLRs (or their mirrorless interchangeable lens (MIL) cousins) with big sensors and big lenses disappear? Doubtful, but they will occupy a smaller niche in the market. Both of us travel with a big camera and a Pixel 2. At the beginning of our trips we dutifully take out our SLRs, but by the end, it mostly stays in our luggage. Welcome to the new world of software-defined cameras and computational photography!
For more about portrait mode on the Pixel 2, check out this video by Nat & Friends.
Here is another album of pictures (portrait and not) and videos taken by the Pixel 2.

Expressions in Virtual Reality


Recently Google Machine Perception researchers, in collaboration with Daydream Labs and YouTube Spaces, presented a solution for virtual headset ‘removal’ for mixed reality in order to create a more rich and engaging VR experience. While that work could infer eye-gaze directions and blinks, enabled by a headset modified with eye-tracking technology, a richer set of facial expressions — which are key to understanding a person's experience in VR, as well as conveying important social engagement cues — were missing.

Today we present an approach to infer select facial action units and expressions entirely by analyzing a small part of the face while the user is engaged in a virtual reality experience. Specifically, we show that images of the user’s eyes captured from an infrared (IR) gaze-tracking camera within a VR headset are sufficient to infer at least a subset of facial expressions without the use of any external cameras or additional sensors.
Left: A user wearing a VR HMD modified with eye-tracking used for expression classification (Note that no external camera is used in our method; this is just for visualization). Right: inferred expression from eye images using our model. A video demonstrating the work can be seen here.
We use supervised deep learning to classify facial expressions from images of the eyes and surrounding areas, which typically contain the iris, sclera, eyelids and may include parts of the eyebrows and top of cheeks. Obtaining large scale annotated data from such novel sensors is a challenging task, hence we collected training data by capturing 46 subjects while performing a set of facial expressions.

To perform expression classification, we fine-tuned a variant of the widespread Inception architecture with TensorFlow using weights from a model trained to convergence on Imagenet. We attempted to partially remove variance due to differences in participant appearance (i.e., individual differences that do not depend on expression), inspired by the standard practice of mean image subtraction. Since this variance removal occurs within-subject, it is effectively personalization. Further details, along with examples of eye-images, and results are presented in our accompanying paper.

Results and Extensions
We demonstrate that the information required to classify a variety of facial expressions is reliably present in IR eye images captured by a commercial HMD sensor, and that this information can be decoded using a CNN-based method, even though classifying facial expressions from eye-images alone is non-trivial even for humans. Our model inference can be performed in real-time, and we show this can be used to generate expressive avatars in real-time, which can function as an expressive surrogate for users engaged in VR. This interaction mechanism also yields a more intuitive interface for sharing expression in VR as opposed to gestures or keyboard inputs.

The ability to capture a user’s facial expressions using existing eye-tracking cameras enables a fully mobile solution to facial performance capture in VR, without additional external cameras. This technology extends beyond animating cartoon avatars; it could be used to provide a richer headset removal experience, enhancing communication and social interaction in VR by transmitting far more authentic and emotionally textured information.

Acknowledgements
The research described in this post was performed by Steven Hickson (as an intern), Nick Dufour, Avneesh Sud, Vivek Kwatra and Irfan Essa. We also thank Hayes Raffle and Alex Wong from Daydream, and Chris Bregler, Sergey Ioffe and authors of TF-Slim from Google Research for their guidance and suggestions.

This technology, along with headset removal, will be demonstrated at Siggraph 2017 Emerging Technologies.

Motion Stills — Now on Android


Last year, we launched Motion Stills, an iOS app that stabilizes your Live Photos and lets you view and share them as looping GIFs and videos. Since then, Motion Stills has been well received, being listed as one of the top apps of 2016 by The Verge and Mashable. However, from its initial release, the community has been asking us to also make Motion Stills available for Android. We listened to your feedback and today, we're excited to announce that we’re bringing this technology, and more, to devices running Android 5.1 and later!
Motion Stills on Android: Instant stabilization on your device.
With Motion Stills on Android we built a new recording experience where everything you capture is instantly transformed into delightful short clips that are easy to watch and share. You can capture a short Motion Still with a single tap like a photo, or condense a longer recording into a new feature we call Fast Forward. In addition to stabilizing your recordings, Motion Stills on Android comes with an improved trimming algorithm that guards against pocket shots and accidental camera shakes. All of this is done during capture on your Android device, no internet connection required!

New streaming pipeline
For this release, we redesigned our existing iOS video processing pipeline to use a streaming approach that processes each frame of a video as it is being recorded. By computing intermediate motion metadata, we are able to immediately stabilize the recording while still performing loop optimization over the full sequence. All this leads to instant results after recording — no waiting required to share your new GIF.
Capture using our streaming pipeline gives you instant results.
In order to display your Motion Stills stream immediately, our algorithm computes and stores the necessary stabilizing transformation as a low resolution texture map. We leverage this texture to apply the stabilization transform using the GPU in real-time during playback, instead of writing a new, stabilized video that would tax your mobile hardware and battery.

Fast Forward
Fast Forward allows you to speed up and condense a longer recording into a short, easy to share clip. The same pipeline described above allows Fast Forward to process up to a full minute of video, right on your phone. You can even change the speed of playback (from 1x to 8x) after recording. To make this possible, we encode videos with a denser I-frame spacing to enable efficient seeking and playback. We also employ additional optimizations in the Fast Forward mode. For instance, we apply adaptive temporal downsampling in the linear solver and long-range stabilization for smooth results over the whole sequence.
Fast Forward condenses your recordings into easy to share clips.
Try out Motion Stills
Motion Stills is an app for us to experiment and iterate quickly with short-form video technology, gathering valuable feedback along the way. The tools our users find most fun and useful may be integrated later on into existing products like Google Photos. Download Motion Stills for Android from the Google Play store—available for mobile phones running Android 5.1 and later—and share your favorite clips on social media with hashtag #motionstills.

Acknowledgements
Motion Stills would not have been possible without the help of many Googlers. We want to especially acknowledge the work of Matthias Grundmann in advancing our stabilization technology, as well as our UX and interaction designers Jacob Zukerman, Ashley Ma and Mark Bowers.

Supercharge your Computer Vision models with the TensorFlow Object Detection API


(Cross-posted on the Google Open Source Blog)

At Google, we develop flexible state-of-the-art machine learning (ML) systems for computer vision that not only can be used to improve our products and services, but also spur progress in the research community. Creating accurate ML models capable of localizing and identifying multiple objects in a single image remains a core challenge in the field, and we invest a significant amount of time training and experimenting with these systems.
Detected objects in a sample image (from the COCO dataset) made by one of our models. Image credit: Michael Miley, original image.
Last October, our in-house object detection system achieved new state-of-the-art results, and placed first in the COCO detection challenge. Since then, this system has generated results for a number of research publications1,2,3,4,5,6,7 and has been put to work in Google products such as NestCam, the similar items and style ideas feature in Image Search and street number and name detection in Street View.

Today we are happy to make this system available to the broader research community via the TensorFlow Object Detection API. This codebase is an open-source framework built on top of TensorFlow that makes it easy to construct, train and deploy object detection models. Our goals in designing this system was to support state-of-the-art models while allowing for rapid exploration and research. Our first release contains the following:
The SSD models that use MobileNet are lightweight, so that they can be comfortably run in real time on mobile devices. Our winning COCO submission in 2016 used an ensemble of the Faster RCNN models, which are are more computationally intensive but significantly more accurate. For more details on the performance of these models, see our CVPR 2017 paper.

Are you ready to get started?
We’ve certainly found this code to be useful for our computer vision needs, and we hope that you will as well. Contributions to the codebase are welcome and please stay tuned for our own further updates to the framework. To get started, download the code here and try detecting objects in some of your own images using the Jupyter notebook, or training your own pet detector on Cloud ML engine!

Acknowledgements
The release of the Tensorflow Object Detection API and the pre-trained model zoo has been the result of widespread collaboration among Google researchers with feedback and testing from product groups. In particular we want to highlight the contributions of the following individuals:

Core Contributors: Derek Chow, Chen Sun, Menglong Zhu, Matthew Tang, Anoop Korattikara, Alireza Fathi, Ian Fischer, Zbigniew Wojna, Yang Song, Sergio Guadarrama, Jasper Uijlings, Viacheslav Kovalevskyi, Kevin Murphy

Also special thanks to: Andrew Howard, Rahul Sukthankar, Vittorio Ferrari, Tom Duerig, Chuck Rosenberg, Hartwig Adam, Jing Jing Long, Victor Gomes, George Papandreou, Tyler Zhu

References
  1. Speed/accuracy trade-offs for modern convolutional object detectors, Huang et al., CVPR 2017 (paper describing this framework)
  2. Towards Accurate Multi-person Pose Estimation in the Wild, Papandreou et al., CVPR 2017
  3. YouTube-BoundingBoxes: A Large High-Precision Human-Annotated Data Set for Object Detection in Video, Real et al., CVPR 2017 (see also our blog post)
  4. Beyond Skip Connections: Top-Down Modulation for Object Detection, Shrivastava et al., arXiv preprint arXiv:1612.06851, 2016
  5. Spatially Adaptive Computation Time for Residual Networks, Figurnov et al., CVPR 2017
  6. AVA: A Video Dataset of Spatio-temporally Localized Atomic Visual Actions, Gu et al., arXiv preprint arXiv:1705.08421, 2017
  7. MobileNets: Efficient convolutional neural networks for mobile vision applications, Howard et al., arXiv preprint arXiv:1704.04861, 2017