Tag Archives: Jetpack

Decrease startup time with Jetpack App Startup

Posted by Yacine Rezgui, Developer Advocate and Rahul Ravikumar, Software Engineer

Jetpack image

Application startup time is a critical metric for any application. Users expect apps to be responsive and fast to load. When an application does not meet this expectation, it can be disappointing to users. This poor experience may cause a user to rate your app badly on the Play store, or even abandon your app altogether.

Jetpack App Startup is a library that provides a straightforward, performant way to initialize components at application startup. Both library developers and app developers can use App Startup to streamline startup sequences and explicitly set the order of initialization.

Apps and libraries often rely on having components (WorkManager, ProcessLifecycleObserver, FirebaseApp etc.) initialized before Application.onCreate(). This is usually achieved by using content providers to initialize each dependency. Instead of defining separate content providers for each component that needs to be initialized, App Startup lets you define initializers that share a single content provider. This significantly improves app startup time, usually by ~2ms per content provider. App Startup also helps you further improve startup performance by making it really easy to initialize components lazily. When App Startup goes stable, we will be updating our libraries like `WorkManager` and `ProcessLifecycle` to benefit from this as well.

App Startup supports API level 14 and above.

How to use it

Gradle setup

To use App Startup in your library or app, add the following dependency to your gradle file:

repositories {
    google()
    maven()
}

dependencies {
  implementation "androidx.startup:startup-runtime:1.0.0-alpha02"
}
Define an Initializer

To be able to use App Startup in your application, you need to define an Initializer. This is where you define how to initialize and specify your dependencies. Here’s the interface you need to implement:

interface Initializer<out T: Any> {
    fun create(context: Context): T
    fun dependencies(): List<Class<out Initializer<*>>>
}

As a practical example, here’s what an Initializer that initializes WorkManager might look like:

class WorkManagerInitializer : Initializer<WorkManager> {
    override fun create(context: Context): WorkManager {
        val configuration = Configuration.Builder()
            .setMinimumLoggingLevel(Log.DEBUG)
            .build()

        WorkManager.initialize(context, configuration)
        return WorkManager.getInstance(context)
    }
   
    // This component does not have any dependencies
    override fun dependencies() = emptyList<Class<out Initializer<*>>>()
}

Note: This example is purely illustrative. This Initializer should actually be defined by the WorkManager library.

Lastly, we need to add an entry for WorkManagerInitializer in the AndroidManifest.xml:

<provider
    android:name="androidx.startup.InitializationProvider"
    android:authorities="${applicationId}.androidx-startup"
    android:exported="false"
    tools:node="merge">
    <!-- This entry makes WorkManagerInitializer discoverable. -->
    <meta-data android:name="com.example.WorkManagerInitializer"
          android:value="androidx.startup" />
</provider>

How it works

App Startup uses a single content provider called InitializationProvider. This content provider discovers initializers by introspecting the <meta-data> entries in the merged AndroidManifest.xml file. This happens before Application.onCreate().

After the discovery phase, it subsequently initializes a component after having initialized all its dependencies. Therefore, a component is only initialized after all its dependencies have been initialized.

Lazy initialization

We highly recommend using lazy initialization to further improve startup performance. To make initialization of a component lazy, you need to do the following:

Add a tools:node="remove" attribute to the <meta-data> entry for the Initializer. This disables eager initialization.

<provider
    android:name="androidx.startup.InitializationProvider"
    android:authorities="${applicationId}.androidx-startup"
    android:exported="false"
    tools:node="merge">
    <!-- disables eager initialization -->
    <meta-data android:name="com.example.WorkManagerInitializer"
              tools:node="remove" />
</provider>

To lazily initialize WorkManagerInitializer you can then use:

// This returns an instance of WorkManager
AppInitializer.getInstance(context)
    .initializeComponent(WorkManagerInitializer.class);

Your app now initializes the component lazily. For more information, please read our detailed documentation here.

Final thoughts

App Startup is currently in alpha-02. Find out more about how to use it from our documentation. Once you try it out, help us make it better by giving us feedback on the issue tracker.

What’s New in Navigation 2020

Posted by Jeremy Woods, Software Engineer, Android UI Toolkit

Navigation image

The latest versions of the Jetpack Navigation library (2.2.0 and 2.3.0) added a lot of requested features and functionality, including dynamic navigation, navigation back stack entries, a library for navigation testing, additional features for deep linking, and more. Let’s go over the most important changes, see what problems they solve, and learn how to use them!

Dynamic Navigation

We’ve updated Navigation to simplify adding dynamic feature modules for your application.

Previously, implementing navigation between destinations defined in dynamic feature modules required a lot of work. Before you could navigate to the first dynamic destination, you needed to add the Play Core library and the Split Install API to your app. You also needed to check for and download the dynamic module. Once downloaded, you could then finally navigate to the destination. On top of this, if you wanted to have an on-screen progress bar for the module being downloaded, you needed to implement a SplitInstallManager listener.

To address this complexity, we created the Dynamic Navigator library. This library extends the functionality of the Jetpack Navigation library to provide seamless installation of on-demand dynamic feature modules when navigating. The library handles all Play Store interaction for you, and it even includes a progress screen that provides the download status of your dynamic module.
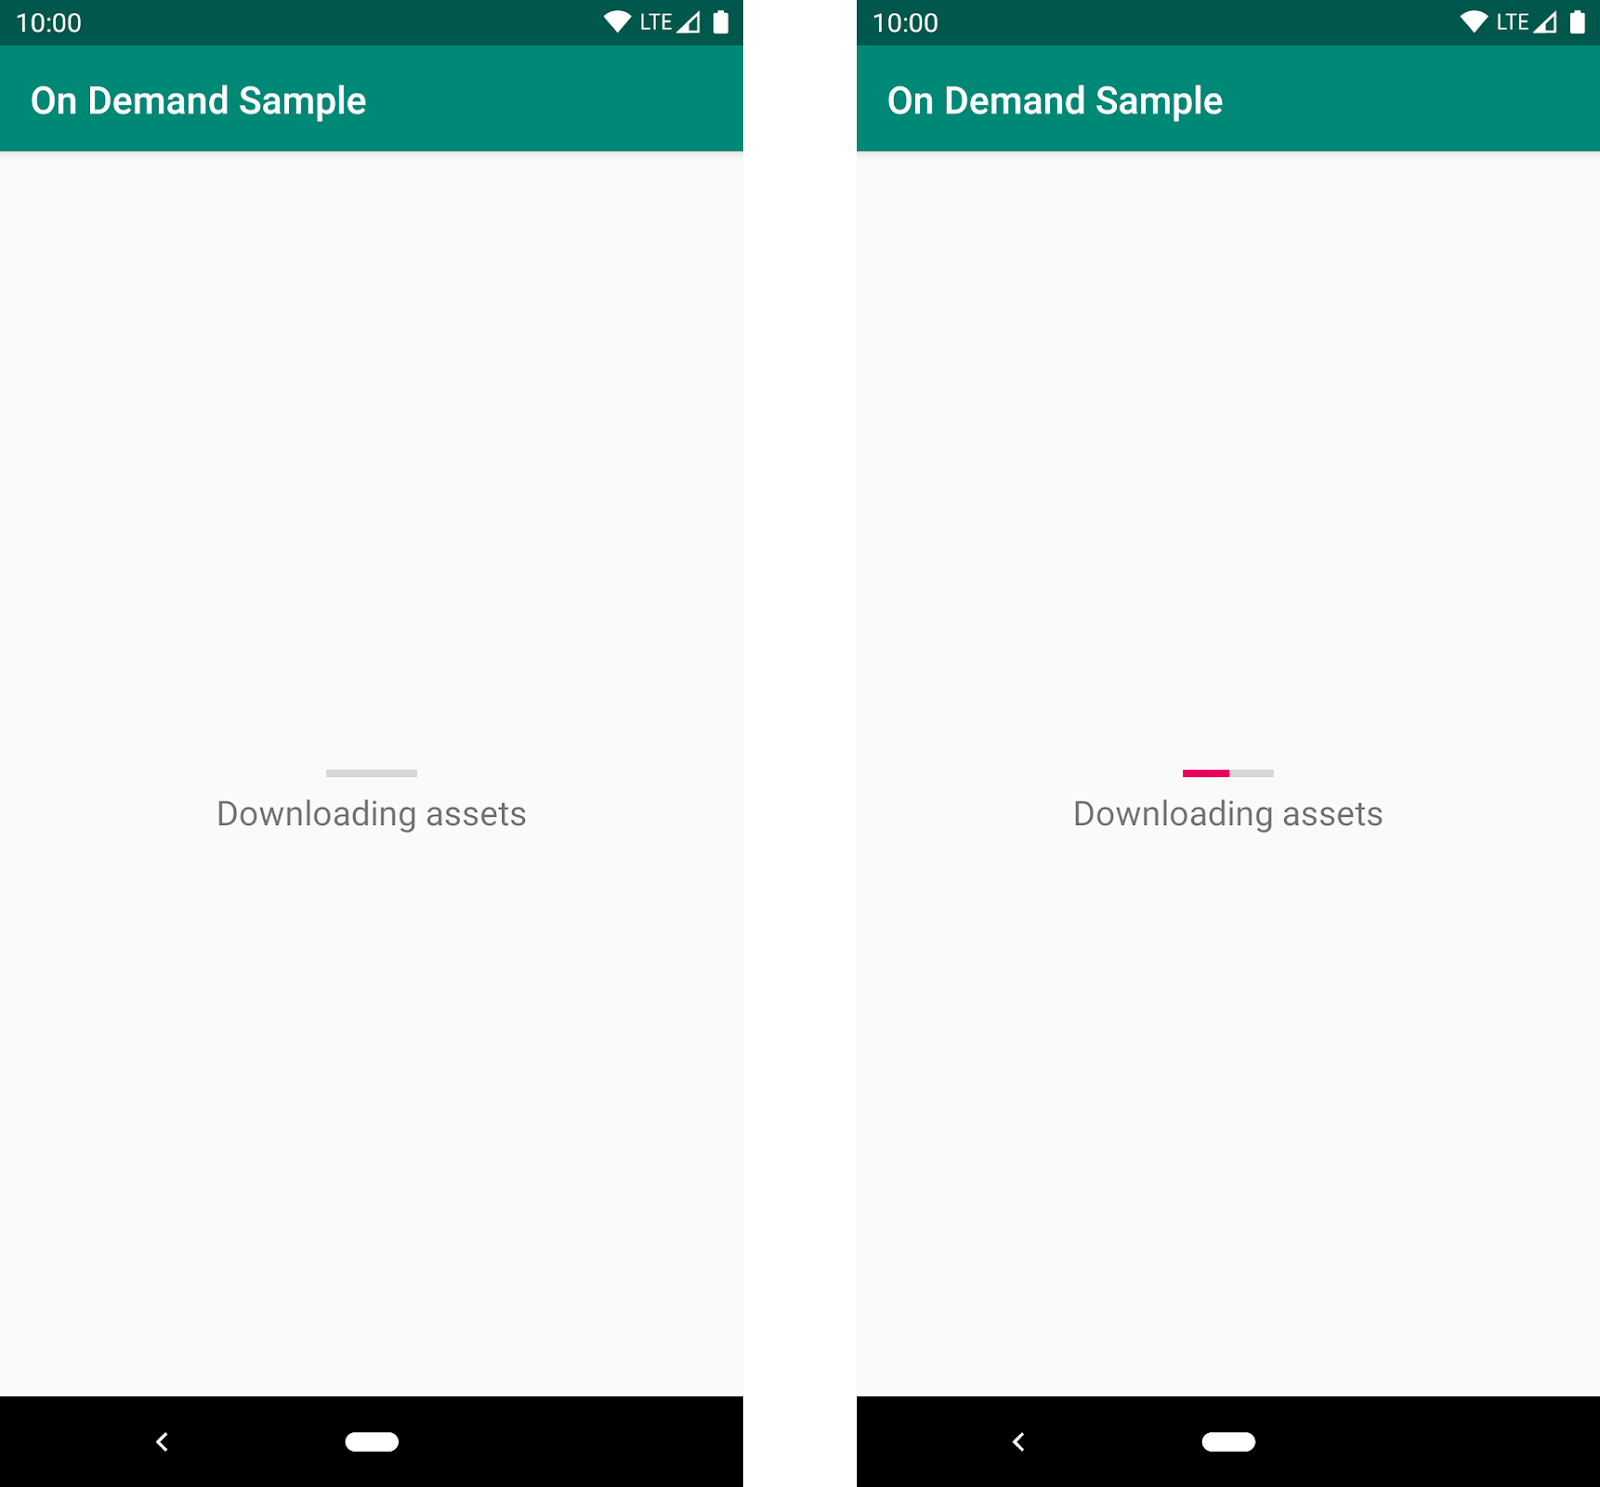
The default UI for showing a progress bar when a user navigates to a dynamic feature for the first time.

The default UI for showing a progress bar when a user navigates to a dynamic feature for the first time. The app displays this screen as the corresponding module downloads

To use dynamic navigation, all you need to do is:

  1. Change instances of NavHostFragment to DynamicNavHostFragment
  2. Add an app:moduleName attribute to the destinations associated with a DynamicNavHostFragment

For more information on dynamic navigation, see Navigate with dynamic feature modules and check out the samples.

NavBackStackEntry: Unlocked

When you navigate from one destination to the next, the previous destination and its latest state is placed on the Navigation back stack. If you return to the previous destination by using navController.popBackBack(), the top back stack entry is removed from the back stack with its state still intact and the NavDestination is restored. The Navigation back stack contains all of the previous destinations that were needed to arrive at the current NavDestination.

We manage the destinations on the Navigation back stack by encapsulating them into the NavBackStackEntry class. NavBackStackEntry is now public. This means that users can go a level deeper than just NavDestinations and gain access to navigation-specific ViewModels, Lifecycles, and SavedStateRegistries. You can now properly scope data sharing or ensure it is destroyed at the appropriate time.

See Navigation and the back stack for more information.

NavGraph ViewModels

Since a NavBackStackEntry is a ViewModelProvider, you can create a ViewModel to share data between destinations at the NavGraph level. Each parent navigation graph of all NavDestinations are on the back stack, so your view model can be scoped appropriately:

val viewModel: MyViewModel by navGraphViewModels(R.id.my_graph)

For more information on navGraph scoped view models, see Share UI-related data between destinations with ViewModel

Returning a Result from a destination

By combining ViewModel and Lifecycle, you can share data between two specific destinations. To do this, NavBackStackEntry provides a SavedStateHandle, a key-value map that can be used to store and retrieve data, even across configuration changes. By using the given SavedStateHandle, you can access and pass data between destinations. For example to pass data from destination A to destination B:

In destination A:

override fun onViewCreated(view: View, savedInstanceState: Bundle?) {
    val navController = findNavController();
    // We use a String here, but any type that can be put in a Bundle is supported
    navController.currentBackStackEntry?.savedStateHandle?.getLiveData<String>("key")?.observe(
        viewLifecycleOwner) { result ->
        // Do something with the result.
    }
}

And in destination B:

navController.previousBackStackEntry?.savedStateHandle?.set("key", result)

See Returning a result to the previous Destination for more details.

Testing your Navigation Flow

Previously, the recommended testing solution for Navigation was Mockito. You would create a mock NavController and verify that navigate() was called at the appropriate time with the correct parameters. Unfortunately, this solution was not enough to test certain areas of Navigation flow, such as ViewModel interaction or the Navigation back stack. The Navigation Library now offers a well-integrated solution for these areas with the Navigation Testing library.

The Navigation Testing library adds TestNavHostController, which gives access to the Navigation back stack in a test environment. This means that you can now verify the state of the entire back stack. When using the TestNavHostController, you can set your own LifecycleOwner, ViewModelStoreOwner, and OnBackPressDispatcher by using the APIs given by NavHostController. By setting these components, you can test them in the context of navigation.

For example, here's how to test a destination that uses a nav graph-scoped ViewModel:

val navController = TestNavHostController(ApplicationProvider.getApplicationContext())

// This allows fragments to use by navGraphViewModels()
navController.setViewModelStore(ViewModelStore())
navController.setGraph(R.navigation.main_nav)

The TestNavHostController also lets you set the current destination. You can move the test directly to the use case being tested without the need to set it up using navigate() calls. This is extremely convenient for writing tests for different navigation scenarios.

When setting the current destination, you might do something like the following:

val navController = TestNavHostController(ApplicationProvider.getApplicationContext())

navController.setGraph(R.navigation.main_nav)
navController.setCurrentDestination(R.id.destination_1)

Remember that when setting the current destination, that destination must be part of your nav graph.

For more information about TestNavHostController, see the Test Navigation docs.

Nav Deep Linking

Deep linking allows you to navigate directly to any destination no matter where you currently are in the NavGraph. This can be very useful for launching your app to a specific destination or jumping between destinations that would otherwise be inaccessible to one another.

When navigating using a deep link, you can now provide deep link query parameters in any order and even leave them out altogether if they have been given a default value or have been made nullable. This means that if you have provided default values for all of the query parameters on a deep link, the deep link can match a URL pattern without including any query parameters.

For example, www.example.com?arg1={arg1}&arg2={arg2} will now match with www.example.com as long as arg1 and arg2 have default values and/or are nullable.

Deep links can also be matched using intent actions and MIME types. Instead of requiring destinations to match by URI, you can provide the deep link with an action or MIME type and match with that instead. You can specify multiple match types for a single deep link, but note that URI argument matching is prioritized first, followed by action, and then mimeType.

You create a deep link by adding it to a destination in XML, using the Kotlin DSL, or by using the Navigation Editor in Android Studio.

Here's how to add a deep link to a destination using XML:

<fragment android:id="@+id/a"
          android:name="com.example.myapplication.FragmentA"
          tools:layout="@layout/a">
        <deeplink app:url="www.example.com"
                app:action="android.intent.action.MY_ACTION"
                app:mimeType="type/subtype"/>
    </fragment>

Here's how to add the same deep link using the Kotlin DSL:

val baseUri = "http://www.example.com/"

fragment<MyFragment>(nav_graph.dest.a) {
   deepLink(navDeepLink {
    uriPattern = "${baseUri}"
    action = "android.intent.action.MY_ACTION"
    mimeType = "type/subtype"
   })
}

You can also add the same deep link using the Navigation Editor in Android Studio versions 4.1 and higher. Note that you must also be using the Navigation 2.3.0-alpha06 dependency or later.
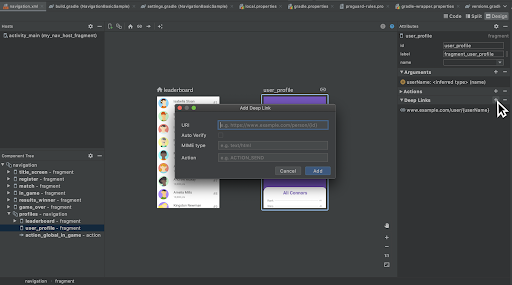
An open dialog in the Navigation Editor for adding a deep link to a destination. There are options to add an URI, a MIME type, and an action, along with a checkBox to Auto Verify

Adding a deep link to a destination in the Navigation Editor

To navigate to a destination using a deep link, you must first build a NavDeepLinkRequest and then pass that deep link request into the Navigation controller's call to navigate():

val deepLinkRequest = NavDeepLinkRequest.Builder
        .fromUri(Uri.parse("http://www.example.com"))
        .setAction("android.intent.action.MY_ACTION")
        .setMimeType("type/subtype")
        .build()
navController.navigate(deeplinkRequest)

For more information on deep links, visit Create a deep link for a destination, as well as the deep linking sections in Navigate to a destination and Kotlin DSL.

Navigation Editor

Android Studio 4.0 includes new features for the Navigation Editor. You can now edit your destinations using a split pane view. This means you can edit the XML or design and see the changes in real time.
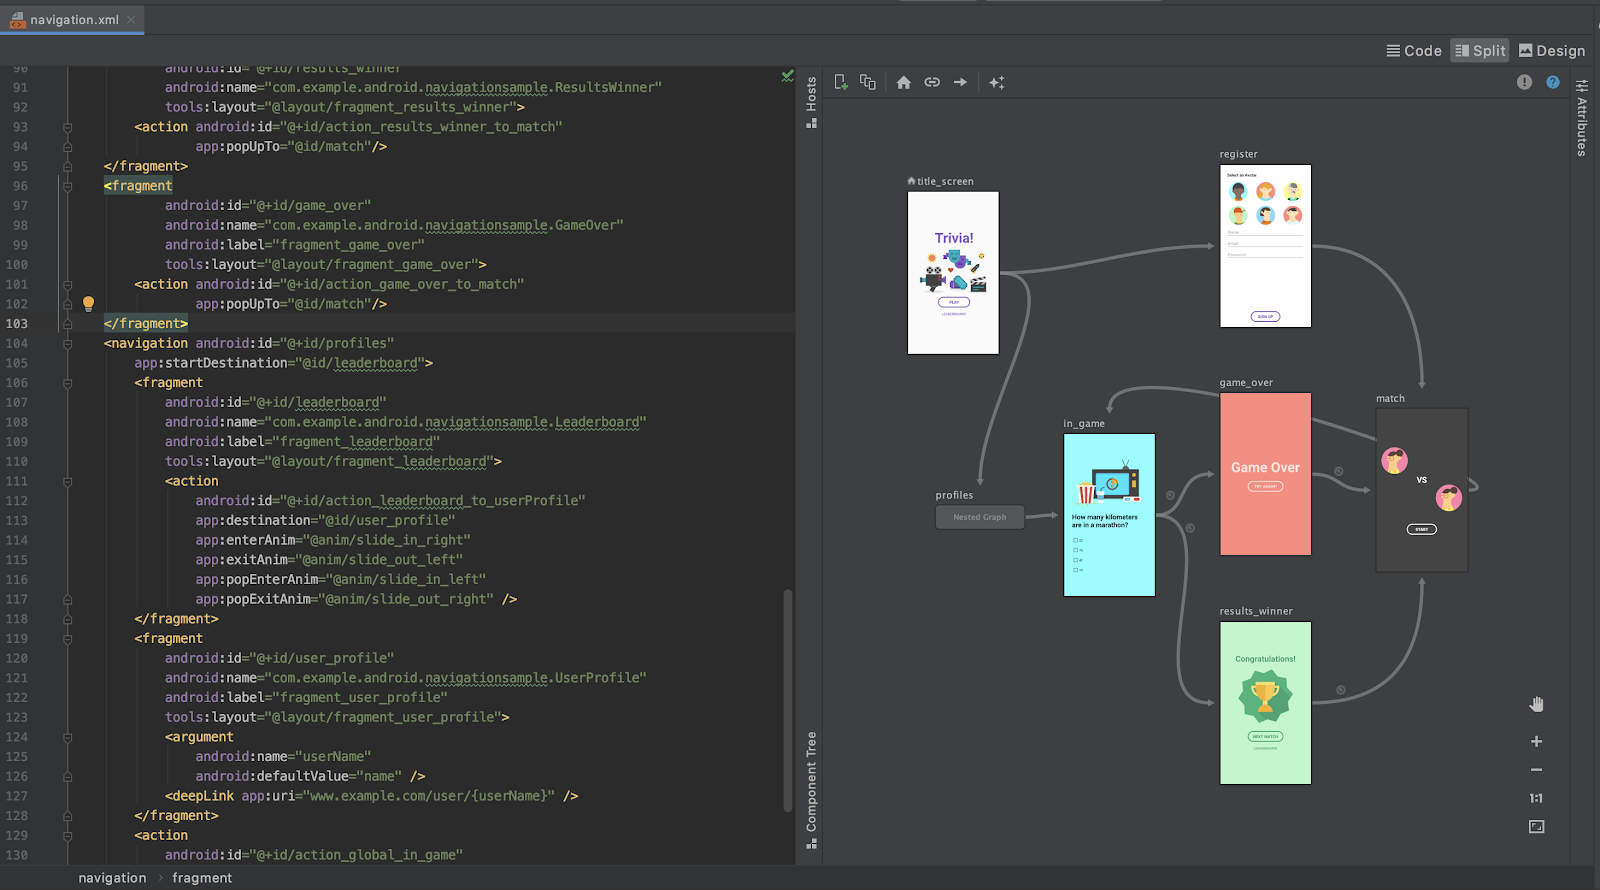
The Navigation Editor opened in split pane mode with the navigation.xml file on the left and the corresponding nav graph on the right. The nav graph has 6 destination, and a nested graph

Viewing a navigation.xml file in split view mode

In Android Studio 4.1, the Navigation Editor introduced the component tree. This allows you to traverse the entire nav graph, freely going in and out of nested graphs.
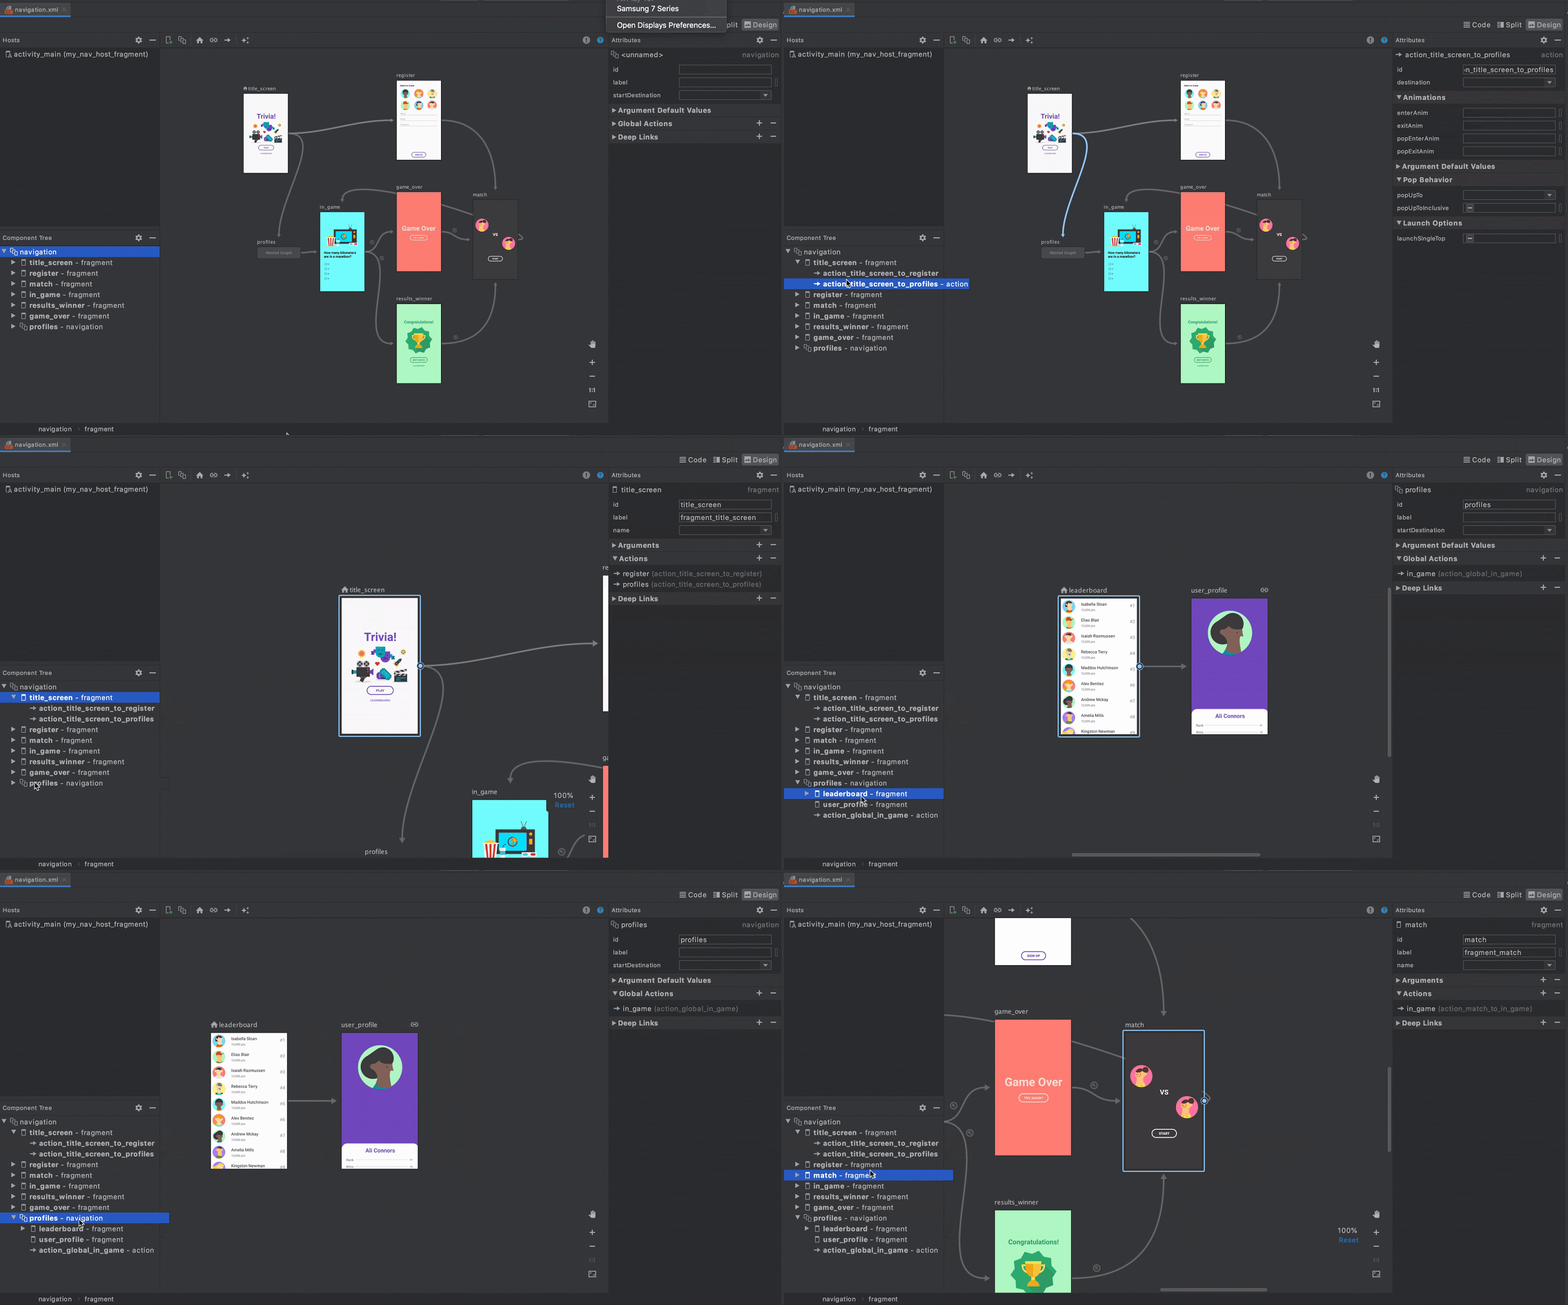
An open component tree of a nav graph in the Navigation Editor. It starts viewing the entire graph, then moves to the title screen before going into the nested profiles graph. After cycling through the destinations in the profiles graph, it goes back to fragments in the original graph

Navigating through a graph in the Navigation Editor

Additional Changes

NavigationUI can now use any layout that uses the Openable interface. This means that it is no longer limited to DrawerLayout and allows for customization of the AppBarConfiguration. You can provide your Openable and use it as the layout instead.

Navigation also provides support for Kotlin DSL. Kotlin DSL can be used to create different destinations, actions, or deep links. For more information see the documentation for Kotlin DSL.

Wrap up

Navigation added lots of useful features over the past year. You can simplify your dynamic feature modules by taking advantage of the Dynamic Navigator library, use a NavBackStackEntry to help correctly scope your data, easily test your navigation flow using the TestNavHostController, or even match your deep link using intent actions and/or MIME types.

For more information about the Jetpack Navigation library, check out the documentation at https://developer.android.com/guide/navigation

Please provide feedback (or file bugs) using the Navigation issuetracker component.

Getting on the same page with Paging 3

Posted by Florina Muntenescu, Android Developer Advocate

Android graphic

Getting on the same page with Paging 3

The Paging library enables you to load large sets of data gradually and gracefully, reducing network usage and system resources. You told us that the Paging 2.0 API was not enough - that you wanted easier error handling, more flexibility to implement list transformations like map or filter, and support for list separators, headers, and footers. So we launched Paging 3.0 (now in alpha02), a complete rewrite of the library using Kotlin coroutines (still supporting Java users) and offering the features you asked for.

Paging 3 highlights

The Paging 3 API provides support for common functionality that you would otherwise need to implement yourself when loading data in pages:

  • Keeps track of the keys to be used for retrieving the next and previous page.
  • Automatically requests the correct next page when the user scrolls to the end of the loaded data.
  • Ensures that multiple requests aren’t triggered at the same time.
  • Tracks loading state and allows you to display it in a RecyclerView list item or elsewhere in your UI, and provides easy retry functionality for failed loads.
  • Enables common operations like map or filter on the list to be displayed, independently of whether you’re using Flow, LiveData, or RxJava Flowable or Observable.
  • Provides an easy way of implementing list separators.
  • Simplifies data caching, ensuring that you’re not executing data transformations at every configuration change.

We also made several Paging 3 components backwards compatible with Paging 2.0; so if you already use Paging in your app, you can migrate incrementally.

Adopting Paging 3 in your app

Let’s say that we’re implementing an app that displays all the good doggos. We get the doggos from a GoodDoggos API that supports index-based pagination. Let’s go over the Paging components we need to implement and how they fit into your app architecture. The following examples will be in Kotlin, using coroutines. For examples in the Java programming language using LiveData/RxJava, check out the documentation.

The Paging library integrates directly into the recommended Android app architecture in each layer of your app:

Paging components

Paging components and their integration in the app architecture"

Defining the data source

Depending on where you’re loading data from, implement only a PagingSource or a PagingSource and a RemoteMediator:

  • If you’re loading data from a single source, like network, local database, a file, etc, implement the PagingSource (if you’re using Room, it implements the PagingSource for you starting in Room 2.3.0-alpha).
  • If you’re loading data from a layered source, like a network data source with a local database cache, implement the RemoteMediator to merge the two sources and a PagingSource for the local database cache.

PagingSource

A PagingSource defines the source of paging data and how to retrieve data from that single source. The PagingSource should be part of the repository layer. Implement load() to retrieve paged data from your data source and return the loaded data together with information about next and previous keys. This is a suspend function, so you can call other suspend functions here, such as the network call:

class DoggosRemotePagingSource(
    val backend: GoodDoggosService
) : PagingSource<Int, Dog>() {
  override suspend fun load(
    params: LoadParams<Int>
  ): LoadResult<Int, Dog> {
    try {
      // Load page 1 if undefined.
      val nextPageNumber = params.key ?: 1
      val response = backend.getDoggos(nextPageNumber)
      return LoadResult.Page(
        data = response.doggos,
        prevKey = null, // Only paging forward.
        nextKey = response.nextPageNumber + 1
      )
    } catch (e: Exception) {
        // Handle errors in this block
        return LoadResult.Error(exception)
    }
  }
}

PagingData and Pager

The container for paginated data is called PagingData. A new instance of PagingData is created every time your data is refreshed. To build a stream of PagingData create a Pager instance, using a PagingConfig configuration object and a function that tells the Pager how to get an instance of your PagingSource implementation.

In your ViewModel you construct the Pager object and expose a Flow<PagingData> to the UI. Flow<PagingData> has a handy cachedIn() method that makes the data stream shareable and allows you to cache the content of a Flow<PagingData> in a CoroutineScope. That way if you implement any transformations on the data stream, they will not be triggered again each time you collect the flow after Activity recreation. The caching should be done as close to the UI layer as possible, but not in the UI layer, as we want to make sure it persists beyond configuration change. The best place for this would be in a ViewModel, using the viewModelScope:

val doggosPagingFlow = Pager(PagingConfig(pageSize = 10)) {
  DogRemotePagingSource(goodDoggosService)
}.flow.cachedIn(viewModelScope)

PagingDataAdapter

To connect a RecyclerView to the PagingData, implement a PagingDataAdapter:

class DogAdapter(diffCallback: DiffUtil.ItemCallback<Dog>) :
  PagingDataAdapter<Dog, DogViewHolder>(diffCallback) {
  override fun onCreateViewHolder(
    parent: ViewGroup,
    viewType: Int
  ): DogViewHolder {
    return DogViewHolder(parent)
  }

  override fun onBindViewHolder(holder: DogViewHolder, position: Int) {
    val item = getItem(position)
    if(item == null) {
      holder.bindPlaceholder()
    } else {
      holder.bind(item)
    }
  }
}

Then, in your Activity/Fragment you’ll have to collect the Flow<PagingData> and submit it to the PagingDataAdapter. This is what the implementation would look like in an Activity onCreate():

val viewModel by viewModels<DoggosViewModel>()

val pagingAdapter = DogAdapter(DogComparator)
val recyclerView = findViewById<RecyclerView>(R.id.recycler_view)
recyclerView.adapter = pagingAdapter

lifecycleScope.launch {
  viewModel.doggosPagingFlow.collectLatest { pagingData ->
    pagingAdapter.submitData(pagingData)
  }
}

Paged data transformations

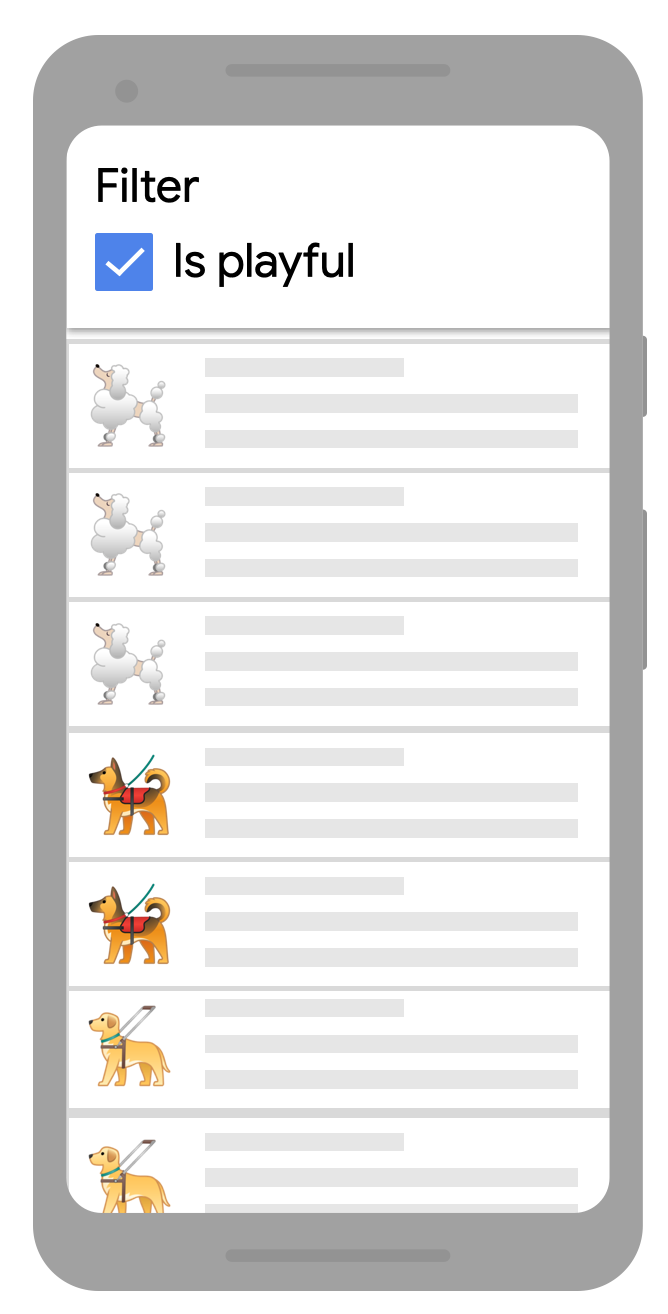
A filtered list

Displaying a filtered list

Transforming PagingData streams is very similar to the way you would any other data stream. For example, if we only want to display playful doggos from our Flow<PagingData<Dog>> we would need to map the Flow object and then filter the PagingData:

doggosPagingFlow.map { pagingData ->
        pagingData.filter { dog -> dog.isPlayful }
    }
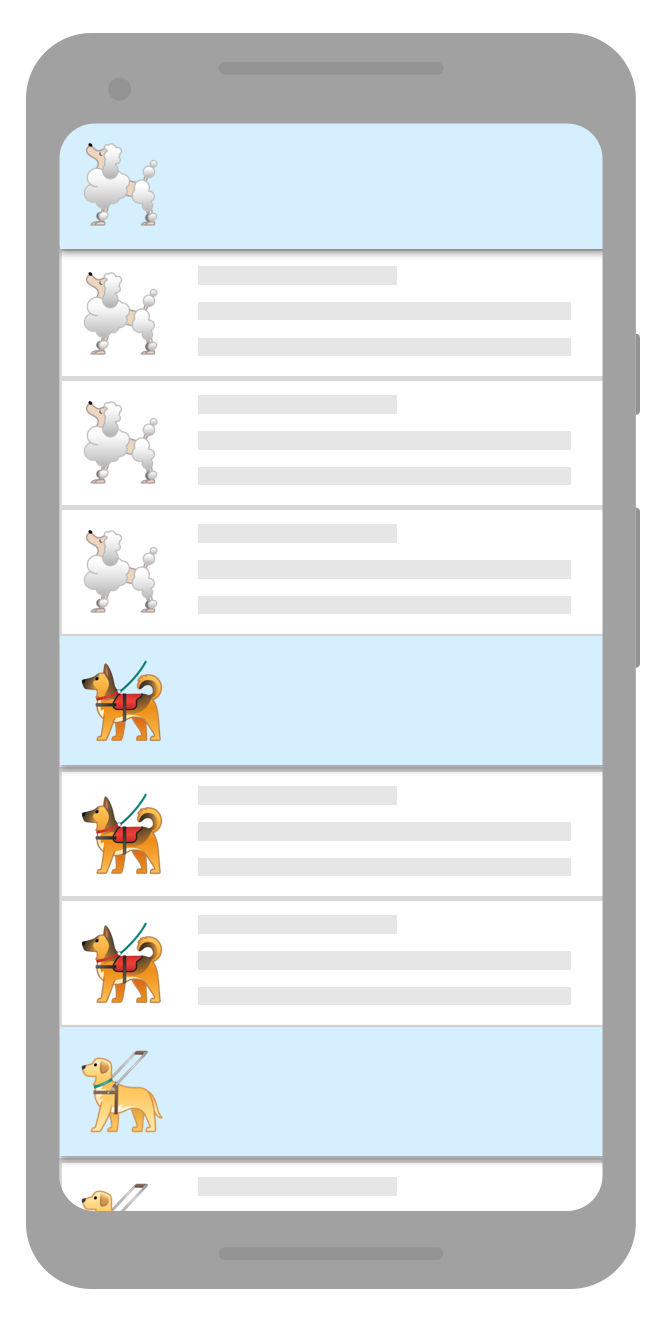
list with separators

List with separators

Adding list separators is also a paged data transformation where we transform the PagingData to insert separator objects into the list. For example, we can insert letter separators for our doggos’ names. When using separators, you will need to implement your own UI model class that supports the new separator items. To modify your PagingData to add separators, you will use the insertSeparators transformation:

pager.flow.map { pagingData: PagingData<Dog> ->
  pagingData.map { doggo ->
    // Convert items in stream to UiModel.DogModel.
    UiModel.DogModel(doggo)
  }
  .insertSeparators<UiModel.DogModel, UiModel> { before: Dog, after: Dog ->
      return if(after == null) {
          // we're at the end of the list
          null
      }  
      if (before == null || before.breed != after.breed) {
          // breed above and below different, show separator
          UiModel.SeparatorItem(after.breed)
       } else {
           // no separator
           null
       }
    }
  }
}.cachedIn(viewModelScope)

Just as before, we're using cachedIn right before the UI layer. This ensures that loaded data and the results of any transformations can be cached and reused after a configuration change.

Advanced Paging work with RemoteMediator

If you’re paging data from a layered source, you should implement a RemoteMediator. For example, in the implementation of this class you need to request data from the network and save it in the database. The load() method will be triggered whenever there is no more data in the database to be displayed. Based on the PagingState and the LoadType we can construct the next page request.

It’s your responsibility to define how the previous and next remote page keys are constructed and retained as the Paging library doesn’t know what your API looks like. For example, you can associate remote keys to every item you receive from the network and save them in the database.

override suspend fun load(loadType: LoadType, state: PagingState<Int, Dog>): MediatorResult {

   val page = ... // computed based on loadType and state

   try {
       val doggos = backend.getDoggos(page)
       doggosDatabase.doggosDao().insertAll(doggos)
       
       val endOfPaginationReached = emails.isEmpty()
       return MediatorResult.Success(endOfPaginationReached = endOfPaginationReached)
   } catch (exception: Exception) {
       return MediatorResult.Error(exception)
   } 
}

When you’re loading data from the network and saving it to the database, the database is the source of truth for the data displayed on the screen. This means that the UI will be displaying data from your database, so you’ll have to implement a PagingSource for your database. If you’re using Room, you’ll just need to add a new query in your DAO that returns a PagingSource:

@Query("SELECT * FROM doggos")
fun getDoggos(): PagingSource<Int, Dog>

The Pager implementation changes slightly in this case, as you need to pass the RemoteMediator instance as well:

val pagingSourceFactory = { database.doggosDao().getDoggos() }

return Pager(
     config = PagingConfig(pageSize = NETWORK_PAGE_SIZE),
     remoteMediator = DoggosRemoteMediator(service, database),
     pagingSourceFactory = pagingSourceFactory
).flow

Check out the docs to find out more about working with RemoteMediator. For a complete implementation of RemoteMediator in an app, check out step 15 of the Paging codelab and the accompanying code.


We’ve designed the Paging 3 library to help you accommodate both simple and complex uses of Paging. It makes it easier to work with large sets of data whether it’s being loaded from the network, a database, in-memory cache, or some combination of these sources. The library is built on coroutines and Flow, making it easy to call suspend functions and work with streams of data.

As Paging 3 is still in alpha, we need your help to make it better! To get started, find out more about Paging in our documentation and try it out by taking our codelab or checking out the sample. Then, let us know how we can improve the library by creating issues on the Issue Tracker.

Unifying Background Task Scheduling on Android

Posted by Caren Chang, Developer Programs Engineer

Android users care a lot about the battery life on their phones. In particular, how your app schedules deferrable background tasks play an important role in battery life. To help you build more battery-friendly apps, we introduced WorkManager as the unified solution for all deferrable background processing needs.

Starting November 1, 2020, we are unifying deferrable background tasks on Android around WorkManager, and GCMNetworkManager will be deprecated and no longer supported.

Why WorkManager

The WorkManager API incorporates the features of Firebase Job Dispatcher (FJD) and GcmNetworkManager solutions, providing a consistent job scheduling service back to API level 14 while being conscious of battery life. For example, if your app needs to send log files up to the server, it would be more efficient to wait until the device is both charging and connected to WiFi. In this case, WorkManager will ensure that the sync will execute when the given constraints (charging and connected to WiFi) are met. Additionally, it does not require Google Play Services, unlike FJD and GcmNetworkManager.

Some of the other key features of WorkManager include:

  • Persist scheduled work across app updates and device restarts
  • Schedule one-off or periodic tasks
  • Monitor and manage tasks
  • Chain tasks together

What it means for developers

Now that the WorkManager library has reached maturity, we have decided to deprecate alternative solutions to simplify the developer story and focus on WorkManager stability and features.

  • We announced the deprecation of the FirebaseJobDispatcher library in April 2019. In April 2020 the library will be archived and we will no longer provide support for issues filed on the library.
  • In addition, we are now announcing the deprecation of GCMNetworkManager. The library is no longer receiving any new features and starting in November 2020, we will no longer provide support for issues relating to the library.
  • Furthermore, once your app updates the target API level (targetSdkVersion) to above Android 10 (API level 29), FirebaseJobDispatcher and GcmNetworkManager API calls will no longer work on devices running Android Marshmallow (6.0) and above.

Migrating to WorkManager

Now is the time to migrate your apps to WorkManager if you haven't already done so! You can start by reading the official documentation for WorkManager.

If your app is still using FirebaseJobDispatcher, you can migrate your app to WorkManager by following the migration guide. A similar migration guide from GCMNetworkManager to WorkManager is also available.

YouTube recently moved over to WorkManager for their background scheduling needs and has reported improvements in app startup time as well as an 8% drop in crash rates.

Going forward

The team is dedicated to improving and continuing feature development on WorkManager. If you encounter issues using the library, have proposals for features you would like to see, or have any feedback about the library, please file an issue.

One Biometric API Over all Android

Posted by Isai Damier, Android Developer Platform Engineering (@isaidamier)

Kevin Chyn, Android Framework

Curtis Belmonte, Android Framework

With the launch of Android 10 (API level 29), developers can now use the Biometric API, part of the AndroidX Biometric Library, for all their on-device user authentication needs. The Android Framework and Security team has added a number of significant features to the AndroidX Biometric Library, which makes all of the biometric behavior from Android 10 available to all devices that run Android 6.0 (API level 23) or higher. In addition to supporting multiple biometric authentication form factors, the API has made it much easier for developers to check whether a given device has biometric sensors. And if there are no biometric sensors present, the API allows developers to specify whether they want to use device credentials in their apps.

The features do not just benefit developers. Device manufacturers and OEMs have a lot to celebrate as well. The framework is now providing a friendly, standardized API for OEMs to integrate support for all types of biometric sensors on their devices. In addition, the framework has built-in support for facial authentication in Android 10 so that vendors don’t need to create a custom implementation.

A bit of background

The FingerprintManager class was introduced in Android 6.0 (API level 23). At the time -- and up until Android 9 (API level 28) -- the API provided support only for fingerprint sensors, and with no UI. Developers needed to build their own fingerprint UI.

Based on developer feedback, Android 9 introduced a standardized fingerprint UI policy. In addition, BiometricPrompt was introduced to encompass more sensors than just fingerprint. In addition to providing a safe, familiar UI for user authentication, it enabled a small, maintainable API surface for developers to access the variety of biometric hardware available on OEM devices. OEMs can now customize the UI with necessary affordances and iconography to expose new biometrics, such as outlines for in-display sensors. With this, app developers don’t need to worry about implementing customized, device-specific implementations for biometric authentication.

Then, in Android 10, the team introduced some pivotal features to turn the biometric API into a one-stop-shop for in-app user authentication. BiometricManager enables developers to check whether a device supports biometric authentication. Furthermore, the setDeviceCredentialAllowed() method was added to allow developers the option to use a device’s PIN/pattern/password instead of biometric credentials, if it makes sense for their app.

The team has now packaged every biometric feature you get in Android 10 into the androidx.biometric Gradle dependency so that a single, consistent, interface is available all the way back to Android 6.0 (API level 23).

How it works

The androidx.biometric Gradle dependency is a support library for the Android framework Biometric classes. On API 29 and above, the library uses the classes under android.hardware.biometrics, FingerprintManager back to API 23, and Confirm Credential all the way back to API 21. Because of the variety of APIs, we strongly recommend using the androidx support library regardless of which API level your app targets.

To use the Biometric API in your app, do the following.

1. Add the Gradle dependency to your app module

$biometric_version is the latest release of the library

def biometric_version= '1.0.0-rc02'
implementation "androidx.biometric:biometric:$biometric_version"

2. Check whether the device supports biometric authentication

The BiometricPrompt needs to be recreated every time the Activity/Fragment is created; this should be done inside onCreate() or onCreateView() so that BiometricPrompt.AuthenticationCallback can start receiving callbacks properly.

To check whether the device supports biometric authentication, add the following logic:

val biometricManager = BiometricManager.from(context)
if (biometricManager.canAuthenticate() == BiometricManager.BIOMETRIC_SUCCESS){
   // TODO: show in-app settings, make authentication calls.
}

3. Create an instance of BiometricPrompt

The BiometricPrompt constructor requires both an Executor and an AuthenticationCallback object. The Executor allows you to specify a thread on which your callbacks should be run.

The AuthenticationCallback has three methods:

  1. onAuthenticationSucceeded() is called when the user has been authenticated using a credential that the device recognizes.
  2. onAuthenticationError() is called when an unrecoverable error occurs.
  3. onAuthenticationFailed() is called when the user is rejected, for example when a non-enrolled fingerprint is placed on the sensor, but unlike with onAuthenticationError(), the user can continue trying to authenticate.

The following snippet shows one way of implementing the Executor and how to instantiate the BiometricPrompt:

private fun instanceOfBiometricPrompt(): BiometricPrompt {
   val executor = ContextCompat.getmainExecutor(context)

   val callback = object: BiometricPrompt.AuthenticationCallback() {
       override fun onAuthenticationError(errorCode: Int, errString: CharSequence) {
           super.onAuthenticationError(errorCode, errString)
           showMessage("$errorCode :: $errString")
       }

       override fun onAuthenticationFailed() {
           super.onAuthenticationFailed()
           showMessage("Authentication failed for an unknown reason")
       }

       override fun onAuthenticationSucceeded(result: BiometricPrompt.AuthenticationResult) {
           super.onAuthenticationSucceeded(result)
           showMessage("Authentication was successful")
       }
   }

   val biometricPrompt = BiometricPrompt(context, executor, callback)
   return biometricPrompt
}

Instantiating the BiometricPrompt should be done early in the lifecycle of your fragment or activity (e.g., in onCreate or onCreateView). This ensures that the current instance will always properly receive authentication callbacks.

4. Build a PromptInfo object

Once you have a BiometricPrompt object, you ask the user to authenticate by calling biometricPrompt.authenticate(promptInfo). If your app requires the user to authenticate using a Strong biometric or needs to perform cryptographic operations in KeyStore, you should use authenticate(PromptInfo, CryptoObject) instead.

This call will show the user the appropriate UI, based on the type of biometric credential being used for authentication – such as fingerprint, face, or iris. As a developer you don’t need to know which type of credential is being used for authentication; the API handles all of that for you.

This call requires a BiometricPrompt.PromptInfo object. A PromptInfo is where you define the text that appears in the prompt: such as title, subtitle, description. Without a PromptInfo, it is not clear to the end user which app is asking for their biometric credentials. PromptInfo also allows you to specify whether it’s OK for devices that do not support biometric authentication to grant access through the device credentials, such as password, PIN, or pattern that are used to unlock the device.

Here is an example of a PromptInfo declaration:

private fun getPromptInfo(): BiometricPrompt.PromptInfo {
   val promptInfo = BiometricPrompt.PromptInfo.Builder()
       .setTitle("My App's Authentication")
       .setSubtitle("Please login to get access")
       .setDescription("My App is using Android biometric authentication")
              .setDeviceCredentialAllowed(true)
       .build()
   return promptInfo
}

For actions that require a confirmation step, such as transactions and payments, we recommend using the default option -- setConfirmationRequired(true) -- which will add a confirmation button to the UI, as shown in Figure 2.

Figure 1. Example face authentication flow using BiometricPrompt with setConfirmationRequired(false).

Figure 2. Example face authentication flow using BiometricPrompt with setConfirmationRequired(true) (default behavior).

5. Ask the user to authenticate

Now that you have all the required pieces, you can ask the user to authenticate.

val canAuthenticate = biometricManager.canAuthenticate()
if (canAuthenticate == BiometricManager.BIOMETRIC_SUCCESS) {
   biometricPrompt.authenticate(promptInfo)
} else {
   Log.d(TAG, "could not authenticate because: $canAuthenticate")
}

And that’s it! You should now be able to perform authentication, using biometric credentials, on any device that runs Android 6.0 (API level 23) or higher.

Going forward

Because the ecosystem continues to evolve rapidly, the Android Framework team is constantly thinking about how to provide long-term support for both OEMs and developers. Given the biometric library’s consistent, system-themed UI, developers don’t need to worry about device-specific requirements, and users get a more trustworthy experience.

We welcome any feedback from developers and OEMs on how to make it more robust, easier to use, and supportive of a wider range of use cases.

For in-depth examples that showcase additional use cases and demonstrate how you might integrate this library into your app, check out our repo, which contains functional sample apps that make use of the library. You can also read the associated developer guide and API reference for more information.

Google Play services and Firebase migrating to AndroidX

Posted by Doug Stevenson, Developer Advocate

Later this year, the Google Play services and Firebase SDKs will migrate from the Android Support libraries to androidx-packaged library artifacts. We are targeting this change for June/July of 2019. This will not only make our SDKs better, but make it easier for you to use the latest Jetpack features in your app.

If your app depends on any com.google.android.gms or com.google.firebase libraries, you should prepare for this migration. To quickly test your build with androidx-packaged library artifacts, add the following two lines to your gradle.properties file:

android.useAndroidX=true
android.enableJetifier=true

If your build still works, then you're done! You will be ready to use the new Google Play services and Firebase SDKs when they arrive. If you experience any new build issues or want more information on this migration, visit the official Jetpack migration guide. We will communicate when the androidx migration is complete in the near future, stay tuned!

What’s New with Android Jetpack

Posted by Karen Ng, Group Product Manager and Jisha Abubaker, Product Manager, Android

Last year, we launched Android Jetpack, a collection of software components designed to accelerate Android development and make writing high-quality apps easier. Jetpack was built with you in mind -- to take the hardest, most common developer problems on Android and make your lives easier.

Jetpack has seen incredible adoption and momentum. Today, 80% of the top 1,000 apps in the Play store are using Jetpack. We’ve also heard feedback from so many of you across our early access developer programs and user studies, as well as Reddit, Stack Overflow, and Slack, that has helped shape these APIs. Very humbly, thank you.

What’s New in Jetpack

Today, we are excited to share with you 11 Jetpack libraries that can be used in development now and an early-development, open-source project called Jetpack Compose to simplify UI development.

Now in Alpha

CameraX

We've heard from many of you that developing camera apps or integrating camera functionality within your existing apps is hard. With the new CameraX library, we want to enable you to create great camera-driven experiences in your application without worrying about the underlying device behavior. This API is backwards compatible to Android 5.0 (API 21) or higher, ensuring that the same code works on most devices in the market. While it leverages the capabilities of camera2, it uses a simpler, use case-based approach that is lifecycle-aware eliminating significant amount of boilerplate code vs camera2. Finally, it enables you to access the same functionality as the native camera app on supported devices. These optional Extensions enable features like Portrait, Night, HDR, and Beauty.

LiveData and Lifecycles w/ coroutines

We heard you loud and clear and agree that LiveData must support your common one-shot asynchronous operations. With Lifecycle & LiveData KTX, you can do so with Kotlin coroutines that are lifecycle-aware. Kotlin coroutines have been well received by the developer community for how they simplify the way concurrency is handled within Android apps. We want to simplify it even further and enabling you to use them safely by offering coroutine scopes tied to lifecycles, coroutine dispatchers that are lifecycle-aware, and support for simple asynchronous chains with the new liveData builder.

Benchmark

The Benchmark library provides you a quick way to benchmark your app code, whether it is written in Kotlin, the Java programming language or native code. We use this library to continuously benchmark Jetpack libraries we release to ensure we do not introduce any latency into your code. You can now do the same right within your development environment in Android Studio, easily measuring database queries, view inflation, or a RecyclerView scroll. The library takes care of what is needed to provide reliable and consistent results like handling warm-up periods, removing outliers, and locking CPU clocks.

Security

To maximize security of an application’s data at-rest, the new Security library implements security best practices for you. It provides strong security that balances encryption with performance for consumer apps like banking and chat. It also provides a maximum level of security for apps that require a hardware-backed keystore with user presence and simplifies many operations including key generation and validation.

ViewModel with SavedState

ViewModel provided you an easy way to save your UI data in the event of a configuration change. It did not save your app state in the event of process death, and many of you have been relying on SavedInstanceState alongside ViewModel. With the ViewModel with SavedState module, you can eliminate boilerplate code and gain the benefits of using both ViewModel and SavedState with simple APIs to save and retrieve data right from your ViewModel.

ViewPager2

ViewPager2, the next generation of ViewPager, is now based on RecyclerView and supports vertical scrolling and RTL (Right-to-Left) layouts. It also provides a much easier way to listen for page data changes with registerOnPageChangeCallback.

Now in Beta

ConstraintLayout 2.0

ConstraintLayout 2.0 brings up new optimizations, and new way of customizing layouts, with the addition of helper classes. As part of ConstraintLayout 2.0, MotionLayout provides an easy way to manage motion and widget animation in your applications. You can easily describe transitions between layouts and animation of properties. MotionLayout is fully declarative in XML, allowing you to describe even complex transitions without requiring any code.

Biometrics Prompt

Users are accustomed to biometric credentials on their phones, but if your app requires a biometric login, it is important to make sure that users are provided a consistent and safe way to enter their credentials. The Biometrics library provides a simple system prompt giving the user a trustworthy experience.

Enterprise

With the Jetpack Enterprise library, your managed enterprise apps can send feedback back to Enterprise Mobility Management providers in the form of keyed app states, while taking advantage of backwards compatibility with managed configurations.

Android for Cars

With the Android for Cars libraries, you can provide your users a driver-optimized version of your app that will be automatically installed onto the vehicle’s infotainment system in vehicles equipped with the Android Automotive OS. It also allows your apps to work with the Android Auto app, providing the driver-optimized version anytime on their device.

Now in Stable

And in case you missed it, we announced stable releases of Jetpack WorkManager (background processing) and Jetpack Navigation (in-app navigation) just a few months ago.

Jetpack Compose

Today, we open-sourced an early preview of Jetpack Compose, a new unbundled toolkit designed to simplify UI development by combining a reactive programming model with the conciseness and ease-of-use of Kotlin. We have always done our best work when we did it with you - our developer community. That’s why we decided to develop Jetpack Compose in the open, starting today.

In that vein, we took a step back and chatted with many of you. We heard strong feedback from developers that they like the modern, reactive APIs that Flutter, React Native, Litho, and Vue.js represent. We also heard that developers love Kotlin, with over 53% of professional Android developers using it and with 20% higher language satisfaction ratings than the Java programming language. Kotlin has become the fastest-growing language in terms of number of contributors on GitHub.

So, we decided to invest in the reactive approach to declarative programming and create an easier way to build UIs with Kotlin.

We are building Compose with a few core principles:

  • Build with the benefits that Kotlin brings -- concise, safe, and fully interoperable with the Java programming language. Designed to drastically reduce the amount of boilerplate code you have to write, so you can focus on your app code, and help avoid entire classes of errors.
  • Fully declarative for defining UI components, including drawing and creating custom layouts. Simply describe your UI as a set of composable functions, and the framework handles UI optimizations and updates to the view hierarchy under the hood.
  • Provide reusable building blocks that let you build custom widgets easier, and without starting from scratch.
  • Compatible with existing views so you can mix and match and adopt at your own pace with direct access to all of the Android and Jetpack APIs.
  • Material Design out of the box and animations from the start, so it’s easy to create beautiful apps that are full of motion.
  • Accelerate development with tools like live preview and apply changes.

A Compose application is made up of composable functions that transform application data into a UI hierarchy. A function is all you need to create a new UI component. To create a composable function just add the @Composable annotation to the function name. Under the hood, Compose uses a custom Kotlin compiler plug-in so when the underlying data changes, the composable functions can be re-invoked to generate an updated UI hierarchy. The simple example below prints a string to the screen.

We know that adopting any new framework is a big change for existing projects and codebases, which is why we’ve designed Compose like all of Jetpack -- with individual components that you can adopt at your own pace and are compatible with existing views.

If you want to learn more about Jetpack Compose or download its source to try it for yourself, check out http://d.android.com/jetpackcompose

We'd love to hear from you as we iterate on this exciting future together. Send us feedback by posting comments below, and please file any bugs you run into on AOSP or directly through the feedback buttons in the Android Studio Jetpack Compose build in AOSP. Since this is an early preview, we do not recommend trying this on any production projects.

Happy Jetpacking!

Hello World, AndroidX

Posted by Alan Viverette (/u/alanviverette), Kathy Kam (@kathykam) , Lukas Bergstrom (@lukasb)

Today, we launch an early preview of the new Android extension libraries (AndroidX) which represents a new era for the Support Library. Please preview the change and give us your feedback. Since this is an early preview, we do not recommend trying this on any production projects as there are some known issues.

The Support Library started over 7+ years ago to provide backwards compatibility to framework APIs. Over the years, the library has grown to include device-specific UX, debugging, testing and other utilities. The adoption of the Support Library has been phenomenal; most Android apps use the Support Library today. We want to increase our investment in this area, and it is critical that we lay a solid foundation.

In that vein, we took a step back and chatted with many of you. The feedback has been consistent and unanimous; the organic growth of the library has become confusing. There are components and packages named "v7" when the minimal SDK level we support is 14! We want to make it clear for you to understand the division between APIs that are bundled with the platform and which are static libraries for app developers that work across different versions of Android.

With that in mind, say "Hello World" to "AndroidX". As previously noted in the Android KTX announcement, we are adding new features under this package, and updating some existing ones.

android.* vs androidx.* namespaces

Writing Android apps means depending on two kinds of classes:

  • Classes like PackageManager, which are bundled with the operating system and can have different APIs and behavior for different Android versions
  • Classes like AppCompatActivity or ViewModel, which are unbundled from the operating system and ship in your apk. These libraries are written to provide a single API surface with behavior that's as consistent as possible across Android versions.

Many times, unbundled libraries can be a better choice, since they provide a single API surface across different Android versions. This refactor moves the unbundled libraries - including all of the Support Library and Architecture Components - into the AndroidX package, to make it clear to know which dependencies to include.

Revised naming for packages and Maven artifacts

We redesigned the package structure to encourage smaller, more focused libraries that relieve pressure on apps and tests that aren't using Proguard or Multidex. Maven groupIds and artifactIds have been updated to better reflect library contents, and we have moved to prefixing library packages with their groupId to create an obvious link between the class that you are using and the Maven artifact from which it came.

Generally, you can expect the following mapping from old to new packages:

Old New
android.support.** androidx.@
android.databinding.** androidx.databinding.@
android.design.** com.google.android.material.@
android.support.test.** (in a future release) androidx.test.@

The Architecture Components libraries have also been moved under androidx and their package names simplified to reflect their integration with core libraries. A sample of changes to these libraries:

Old New
android.arch.** androidx.@
android.arch.persistence.room.** androidx.room.@
android.arch.persistence.** androidx.sqlite.@

Additionally, following the introduction in 28.0.0-alpha1 of Material Components for Android as a drop-in replacement for Design Library, we have refactored the design package to reflect its new direction.

For a complete listing of mappings from 28.0.0-alpha1 (android.support) to 1.0.0-alpha1 (androidx), please see the full AndroidX refactoring map. Please note that there may be minor changes to this map during the alpha phase.

Per-artifact strict semantic versioning

Starting with the AndroidX refactor, library versions have been reset from 28.0.0 to 1.0.0. Future updates will be versioned on a per-library basis, following strict semantic versioning rules where the major version indicates binary compatibility. This means, for example, that a feature may be added to RecyclerView and used in your app without requiring an update to every other library used by your app. This also means that libraries depending on androidx may provide reasonable guarantees about binary compatibility with future releases of AndroidX -- that a dependency on a 1.5.0 revision will still work when run against 1.7.0 but will likely not work against 2.0.0.

Migration from 28.0.0-alpha1

Moving your app from android.support to androidx-packaged dependencies has two major parts: source refactoring and dependency translation.

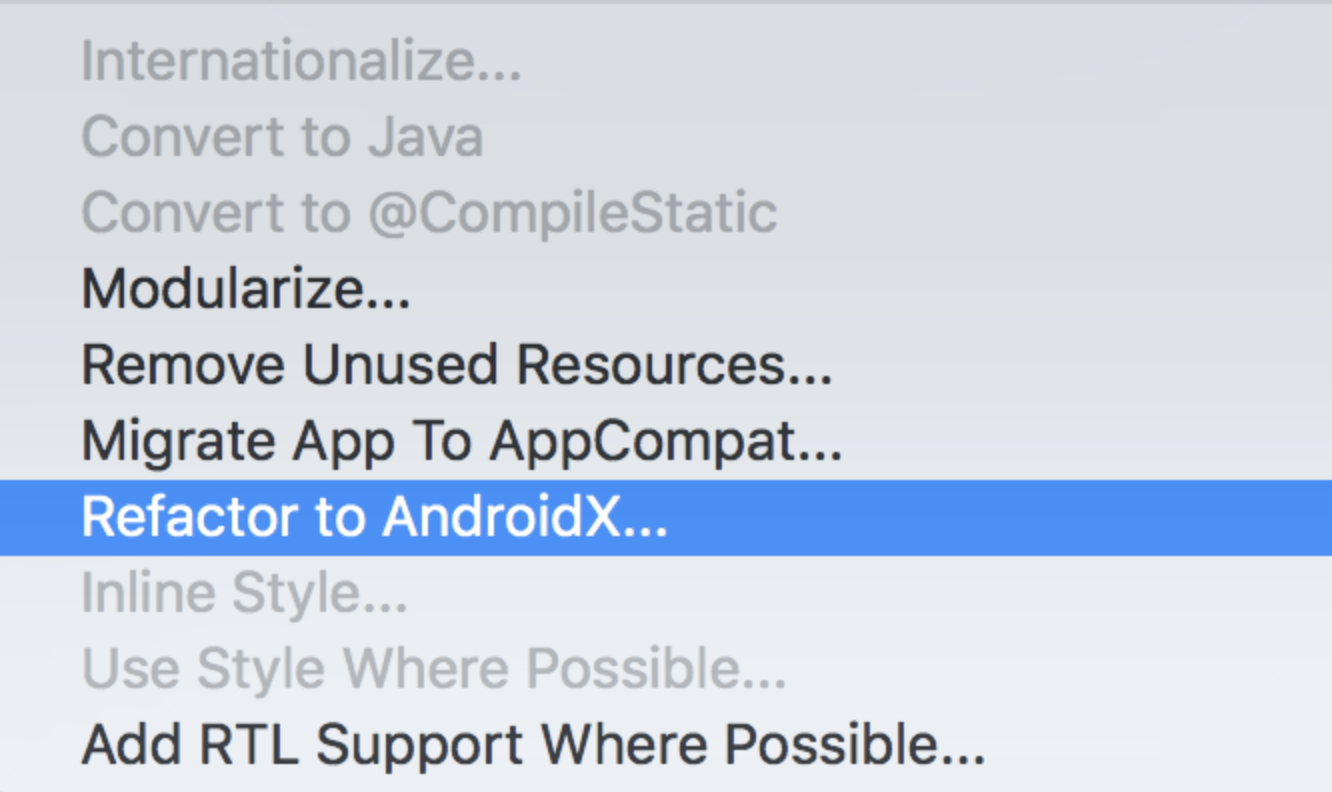
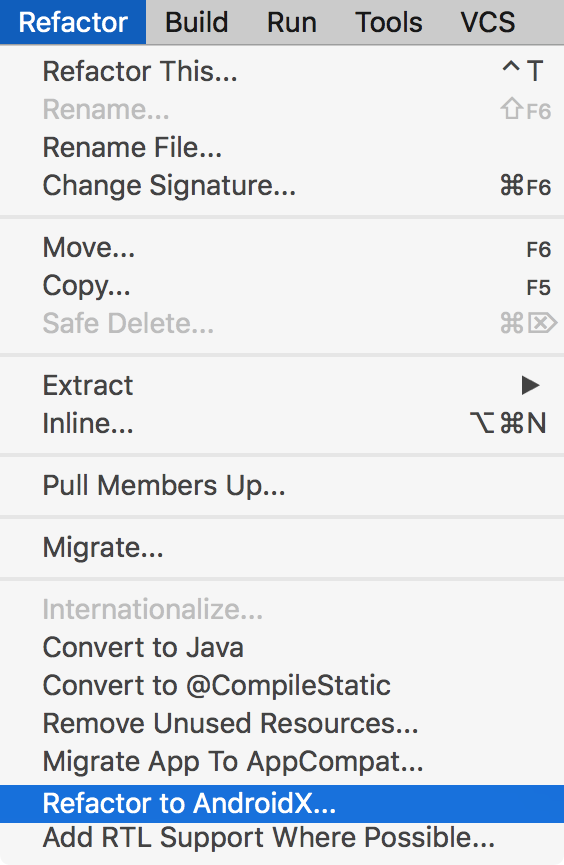
Source refactoring updates your Java code, XML resources, and Gradle configuration to reference the refactored classes and Maven artifacts. This feature is available in Android Studio Canary 14 for applications targeting Android P.

If you depend on a library that references the older Support Library, Android Studio will update that library to reference androidx instead via dependency translation. Dependency translation is automatically applied by the Android Gradle Plugin 3.2.0-alpha14, which rewrites bytecode and resources of JAR and AAR dependencies (and transitive dependencies) to reference the new androidx-packaged classes and artifacts. We will also provide a standalone translation tool as a JAR.

What's next?

We understand this is a big change for existing projects and codebases. Our intention is to provide a strong foundation that sets Android library projects up for more sustainable growth, better modularity, and smaller code size.

We hope that these changes also make it easier for developers to discover features and implement high-quality apps in less time; however, we understand that migration takes time and may not fit into everyone's production schedule. For this reason, we will continue to provide parallel updates to an android.support-packaged set of libraries for the duration of the P preview SDK timeframe. These updates will continue the 28.0.0 versioning scheme that began with 28.0.0-alpha1 in March 2018, and they will continue to be source-compatible with existing projects that depend on the android.support package.

The stable release of 28.0.0 will be the final feature release packaged as android.support. All subsequent feature releases will only be made available as androidx-packaged artifacts.

We'd love to hear from you as we iterate on this exciting future. Send us feedback by posting comments below, and please file any bugs you run into on AOSP.

We look forward to a new era of Android libraries!