Part of our series on how to save time this holiday season with Google Maps.
Forget the eggnog for a holiday party? On the road to grandma's and need to gas up along the way? Or maybe you need to pick up a last-minute gift on the way to your in-laws’ house?
One poorly planned pit stop can add a lot of time to your trip – especially during the holidays when crowds can be bigger and traffic heavier. The good news is that Google Maps can help you make quick pit stops without long detours.
On Google Maps for Android, you can now search for places like a gas station, grocery store or coffee shop, navigate there, and then pick back up on your original route—all without leaving navigation mode (coming soon to iOS).
Here’s how it works: When you’re in navigation mode, simply tap the magnifying glass at the top right corner in the app. Pick a category from the drop down menu and you'll see a few options, along with ratings of businesses, prices at gas stations, and how much time the detour will add to your trip. Once you choose a place, the stop is automatically incorporated into your route. Can’t type and tap while driving? You can use voice commands instead.
Every minute counts. Save more time with Google Maps hacks. Next up: turn-by-turn navigation even when you’re offline.
Posted by Dai Pham, Head of Geo and Google Maps Marketing
Editor’s note: Today’s post is guest authored by Joel Heath, Executive Director of the Arctic Eider Society
The Arctic Eider isn’t just any duck. The feather of this sea-ice dweller is the warmest in the world—a marvel of nature that allows the Eider duck to spend its winters in one of the most remote and frozen habitats on the planet. And now—thanks to Google Maps, the Inuit community of Sanikiluaq and our small environmental charity the Arctic Eider Society—people from around the world can explore this extraordinary and fragile part of Canadian geographythat the Arctic Eider calls home.
The Trekker collects Street View imagery of a Polynya
Last winter, in -50 degree celsius winds, the Google Maps team traveled to the Belcher Islands in Hudson’s Bay and helped the Arctic Eider Society mount the Trekker on a snowmobile to collect stunning Street View imagery from nearby “polynyas”—bodies of open water that form in the sea ice. The polynyas act as an oasis of sorts, providing a habitat for wildlife like eiders who dive under the ice to feed on shellfish and sea urchins.
You’ll see from the images that it’s not just ducks up here in the cold. The Inuit of the Belcher Islands have also lived here for centuries. This community, a hamlet of just 850 people, has an important relationship with the eider duck—aside from providing them a traditional source of warmth and food, the bird’s feathers are ingrained in their history, used to create traditional parkas unique to the Inuit of this region.
But this is an ecosystem under threat. The region has suffered from a lack of environmental stewardship, and the sensitive sea-ice—critical to the eiders and Inuit– is suffering as a result of hydroelectric development around Hudson Bay. Large die-off events of eiders and beluga whales have been occurring as changing ice conditions trap the animals until they starve or run out of air.
Our partnership with Google Maps is helping to support research programs designed to preserve these winter sea ice habitats. We’re combining imagery captured by the Trekker with data and knowledge from the local Inuit and Cree communities and mapping by the Arctic Eider Society to create a platform where we can all track and report on the local wildlife, together. This mix of new and old, combining indigenous knowledge with Google Street View and the Arctic Eider Society’s mapping, may be just what’s needed to address the impacts hydroelectricity heating is having on the bird that produces winter’s warmest feather.
Take a moment to visit Google Maps to better understand this amazing bird and the community who relies on it. Take an icy walk down the streets of Sanikiluaq, climb onto a snowmobile and explore the amazing sea-ice the Arctic Eider calls home. Eider down parka not required.
Posted by Joel Heath, Arctic Eider Society
To learn more about the unique relationship between the community of Sanikiluaq and the Arctic Eider, be sure to watch the critically acclaimed award winning film People of a Featherthat started it all.
This post is the first in a series about how you can use Google Maps to save time this holiday season.
Your time is finite. But what if you could save all the minutes you waste in traffic, standing in lines, or shopping and spend them on what you love?
In December when things sometimes get a tad bit crazier, make the most of the time you do have. In the next few weeks we’ll share simple Google Maps hacks you can use to save time during the holidays.
We’re starting with…traffic. Why? Because no one likes traffic. Whether you’re driving to your once-a-year family gathering or trying to get to the mall in time for last-minute shopping, beating bumper-to-bumper traffic just might be one of the best holiday gifts you receive this year.
Google Maps gives you the best route, based on real-time traffic and historic traffic information. All you need to do is hit the navigation button and Google Maps takes care of the rest. You’ll even get an explanation for why it's the fastest route and updates when your ETA changes.
If you find yourself in a jam caused by an accident or construction, Google Maps lets you know how long you'll be at a standstill and automatically re-routes you if there’s a faster path.
Every minute counts, so hit the road and enjoy the ride—Google Maps has your back this holiday season.
Stay tuned for more Maps Minutes hacks. Next up: flying through airports with indoor Google Maps.
Posted by Olga Suvorova, Product Marketing Manager, Google Maps
The first memory I have of watching a movie is with my dad. I was around four years old, and one afternoon he fired up our bulky, '80s-style front-projection TV and the Betamax, and popped in Star Wars. Of course, it was *amazing*, and I've watched the original trilogy a dozen times since.
It probably isn't a surprise that there are tons of Star Wars fans like me here at Google. You can regularly spot Darth Vaders, dogs dressed like Yoda, and even the occasionalstormtrooper, roaming the halls of our data centers (probably still looking for those droids). So when we first heard about Episode VII, we started thinking about what a Google tribute to these epic stories might look like: “Wouldn't it be cool if there was some sort of Star Wars thingy in Search? The Millennium Falcon in Cardboard would be sweet! What if Google Translate could decipher galactic languages?"... and on, and on, and on. As this list of ideas grew, so too did the band of passionate engineers and product folks who wanted to build them.
We reached out to our friends at Lucasfilm and Disney, and since then we’ve been working together on building google.com/starwars. It's a place for fans, by fans, and starting today you can choose the light or the dark side, and then watch your favorite Google apps like Gmail, Google Maps, YouTube, Chrome and many more transform to reflect your path. And that's just the beginning. We've got more coming between now and opening night—the Millennium Falcon in all its (virtual reality) glory included, so stay tuned. And we've hidden a few easter eggs, too. So awaken the Force within, and be on the lookout for things from a long time ago in a galaxy far, far away…
See you in line at the theater in December. I'll be there with my dad.
You just landed at Delhi airport and need to get to your next appointment fast, but you don’t know where you’re going, your connection is spotty, and the directions are taking way too long to load. Gah!
Travelling doesn’t need to be this stressful. From today, Google Maps can help you find directions and get where you’re going, even when you don’t have an Internet connection with the launch of new offline functions in Google Maps.
You can now download the map of an area to your phone, and the next time you find there’s no connectivity—whether you’re on a holiday in Goa or looking up for your next destination from an underground parking —Google Maps will continue to work. Once you have saved that area for offline access, you can get turn-by-turn driving directions, search for specific destinations, and find useful information about places, even when you don’t have an internet connection.
Before you head off, download maps of Delhi in Google Maps by searching for “Delhi”, and then tapping "Download". You can also go to "Offline Areas" in the Google Maps menu and tap the “+” button. Once you’ve downloaded your map, Google Maps will still work even when you’re somewhere with spotty service or no connectivity at all. When a connection is found, it will switch back online so you can easily access the full version of Maps, including live traffic conditions for your current route. Google Maps will only download areas to your device when you are on a Wi-Fi connection.
We firstpreviewed these new capabilities during Google I/O in May, and starting rolling out these features globallylast week. Today we’re gradually rolling out the first set of these improvements with the latest version of Google Maps on Android (coming soon to iOS) in India. Over time, we’ll be introducing even more offline features to help you find your way—even when you can’t find a connection.
Posted by Sanket Gupta, Program Manager, Google Maps
Some Android Wear apps are most useful when they are always available to the user, even at a glance. Now, with Google Play Services 8.1, the Google Maps Android API supports ambient mode, the API that provides always-on capabilities. In ambient mode, the map adjusts its style to provide a simplified, low-color rendering of the map. All markers, objects, and UI controls disappear, keeping the map on the screen while letting the user know that it is not currently ready to accept user input. An important advantage is the camera position and zoom level are retained, thus keeping the user’s context within the map.
The screenshot below show how maps appear in interactive mode and in ambient mode.
To implement ambient mode in your maps, follow these steps:
Set your your targetSDKVersion to 22 or higher
Add the following dependencies to build.gradle for your app to add the wearable support library.
In the onCreate() method of your activity, call the setAmbientEnabled() method. This tells the framework that the app should enter ambient mode rather than returning to the watch face.
Set your map to support ambient mode. You can do this by setting the attribute map:ambientEnabled="true" in the activity's XML layout file, or programmatically by setting GoogleMapOptions.ambientEnabled(true). This informs the API to pre-load necessary map tiles for ambient mode.
When in ambient mode, your app can update the display every minute by overriding onUpdateAmbient(). If you need more frequent updates, check out this guide.
With always-on maps on Android Wear, you can now show maps at a glance. For more information on these APIs check out the documentation and the sample code.
Posted by Ankur Kotwal, Developer Advocate at Google
Editor's Note: Gone are the days when users were impressed with a marker on a map. The Maps Zen blog post series covers integrations of Google Maps APIs to help your apps provide great maps user experiences. What’s a zen pattern? Simply put, a design pattern that results in harmonious user experiences.
Maps are awesome because they show us where to go. But how are your users getting to their chosen destination? The Directions API web service provides step-by-step directions from point A to B and can get your user where they’re going. Being a web service, it is protected by an API key and thus it should not consumed in the mobile app - proxy it via your server as shown here.
The Directions API can give you walking, cycling and driving directions as expected. But it also gives great public transport directions. When guiding users to a destination, it’s best to show them the path on a map.
Polylines are a great way to show a path but rather than have them simply appear on the map, it’s nicer to animate them in place. In the image below, the intended path grows providing a clear distinction about the direction of travel.
So now we’re showing users where to go and how to get there. But once they’re at their destination, our app’s work is not done. In Shibuya, a city in Tokyo, Japan, there are many tall buildings whose shops visible from the road. It can be really hard to tell which one of those is the destination. In effect, users can be left feeling lost after they get to their destination. Thankfully, there’s a Maps API for that!
Street View is a great way to visualize the user’s destination, or any address really. Adding Street View adds a real-world visual element to your app and provides meaningful context for users. Users will generally expect that they can interact with a Street View since they’re likely to pan and scan around the location so be sure to leave not to disable interactivity with the StreetViewPanorama.
You can add a StreetViewPanorama into your app by including it in your XML layouts, like so.
You can provide a location for the StreetViewPanorama using the following Java code.
streetViewPanorama.setPosition(targetLatLng);
StreetViewPanoramaCamera camera =
    new StreetViewPanoramaCamera(zoom, tilt, bearing);
mStreetViewPanorama.animateTo(camera, duration);
With guided directions and the addition of Street View in your apps, users are given a visual representation of their destination. They’re no longer lost on the way there and they’re not lost when they get there.
Posted by Ankur Kotwal, Developer Advocate at Google
Editor's Note: Gone are the days when users were impressed with a marker on a map. The Maps Zen blog post series covers integrations of Google Maps APIs to help your apps provide great maps user experiences. What’s a zen pattern? Simply put, a design pattern that results in harmonious user experiences.
Markers are much more useful than identifying points on a map. Markers can also be used as a way to visually convey information about a place. If a user is searching for a well rated restaurant, they’d fire up your app to find that there’s a bunch of restaurants in their vicinity. But it’s not easy to tell which ones are actually worth visiting. To see the ratings for each place, they’d end up having to tap each one first.
Here’s an how marker selection and marker animations can be a great way to show this information. In this example, markers that lack colour rate poorly and the vibrant colorful markers are the highly rated ones. There’s also animated steam on some markers also helping to highlight the best rated restaurants!
To achieve the steam animation, the marker icon is being changed by calling the setIcon() method periodically. A delay of 32ms roughly corresponds to 30 marker icon updates a second — animating the icon at 30 frames per second.
mAnimHandler.post(new Runnable() {
@Override
public void run() {
marker.setIcon(mSteamFrames.nextFrame());
// Next frame in 32 ms
mAnimHandler.postDelayed(this, 32);
}
});
To desaturate the marker icons, a ColorMatrixColorFilter from the Android framework being used. First, setup the color filter based on the restaurant rating scale via a ColorMatrix. In this case, any restaurant that has a 3 star rating will be presented as having an entirely grayscale icon. Restaurants with a 4.5 star or higher rating will be presented in full color. The restaurant scale is set it to a Paint object and the filter is applied to the marker image using a canvas.
ColorMatrix desatMatrix = new ColorMatrix();
desatMatrix.setSaturation(restaurantRating);

ColorFilter paintColorFilter = new
ColorMatrixColorFilter(desatMatrix);
Paint paint = new Paint();

paint.setColorFilter(paintColorFilter);

Canvas canvas = new Canvas(newImage);
canvas.drawBitmap(oldImage, 0, 0, paint);
Markers are great for showing points on a map but sometimes you can end up with too many. In this case, we have too well rated many restaurants around us - sure, it’s a nice problem to have but it’s not helping the user choose a restaurant. In such situations, you need to display many markers but still keep the view comprehensible. We’re going to look at two ways to overcome these issues.
The first is through the use of marker clustering. As the zoom levels of the map change, markers are aggregated making for a much more digestible view. Now as the map zooms out, markers will combine, showing how many restaurants are in the surrounding areas.
2. Implement ClusterItem interface in your main data class.
public interface ClusterItem {
LatLng getPosition();
}
3. Instantiate the cluster manager and register it for a couple of map listeners.
mClusterManager = new ClusterManager<>(this, mMap);
mMap.setOnCameraChangeListener(mClusterManager);
mMap.setOnMarkerClickListener(mClusterManager);
4. Replace your marker management code with calls to the cluster manager - the cluster manager will manage adding and removing the markers for you.
mClusterManager.addItem(clusterItem);
5. You can optionally customise the effect further by providing custom aggregate markers (showing images instead of a count for example).
Let’s look at the second method to show marker aggregation - it looks really cool! Here, the count of markers are replaced with a heat map showing the concentration of these markers.
2. Instantiate a HeatMapTileProvider and pass it your LatLngs.
mHeatmapTileProvider = new HeatmapTileProvider.Builder()
.data(mLatLngCollection)
.build();
3. Use it to create a map overlay.
mTileOverlay = mMap.addTileOverlay(
new TileOverlayOptions().tileProvider(mHeatmapTileProvider));
4. You can optionally customize this further by specifying the gradient and the radius of the heatmap.
It’s worth keeping in mind that information overload is a common problem with mobile apps. Location apps, in particular suffer from poor user experiences when dealing lots of places. The Android Maps Utils library offers beautiful visualizations enabling you to build amazing maps.
Posted by Ankur Kotwal, Developer Advocate at Google
Gone are the days when users were impressed with a marker on a map. The Maps Zen blog post series covers integrations of Google Maps APIs to help your apps provide great maps user experiences. What’s a zen pattern? Simply put, a design pattern that results in harmonious user experiences.
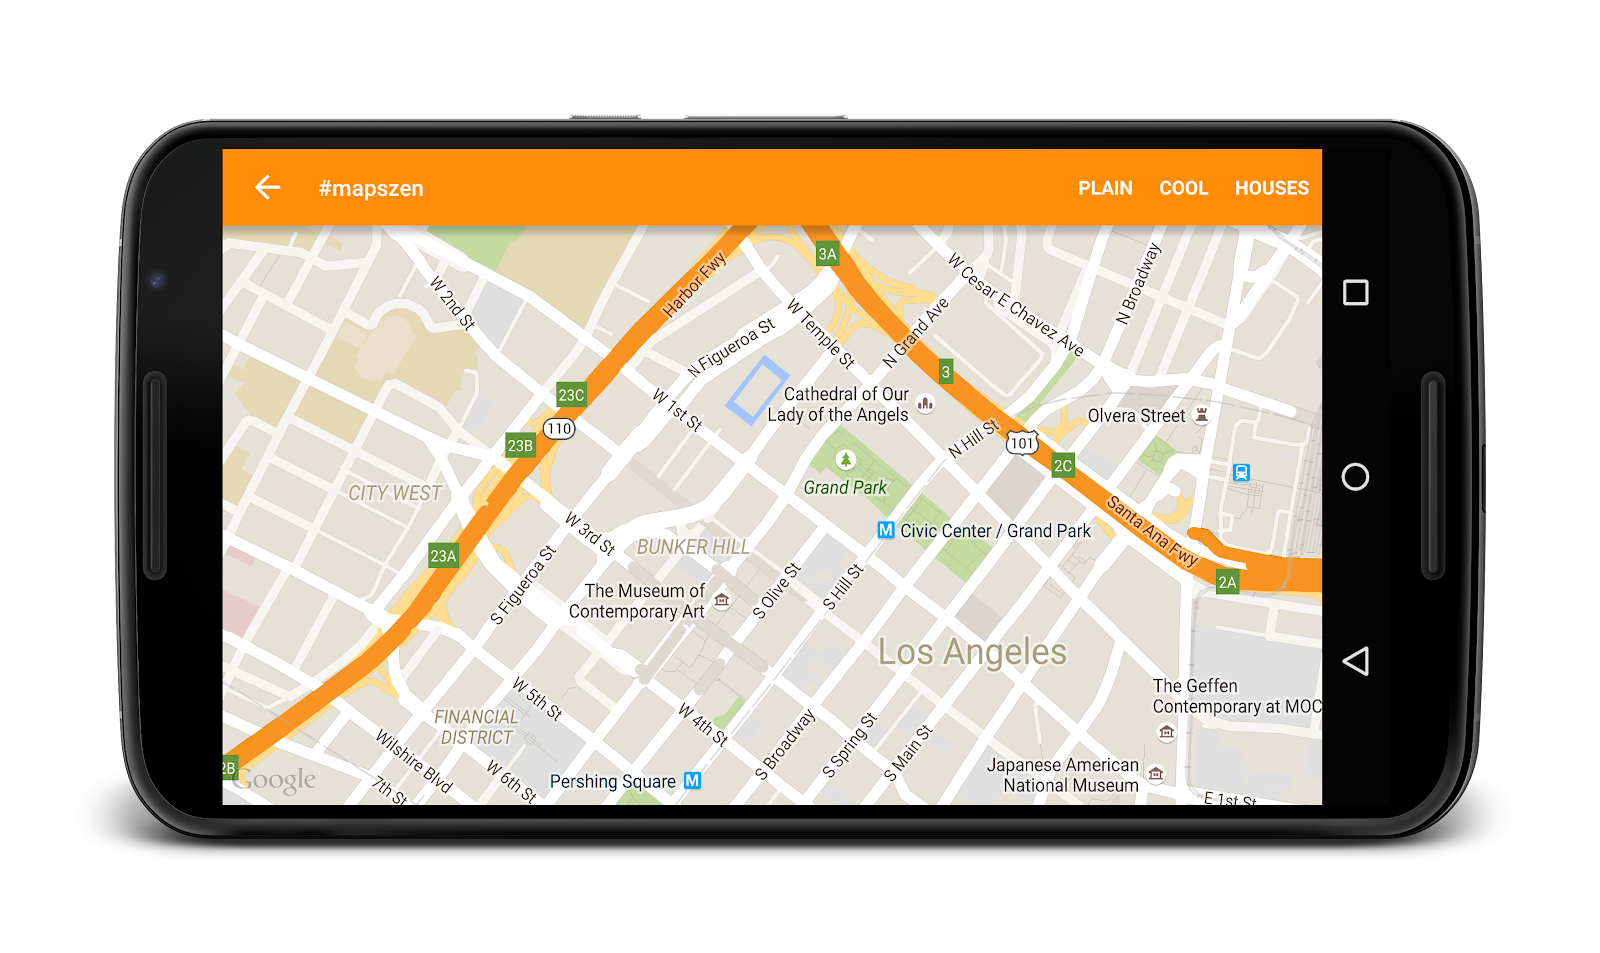
Movie & television directors have fascinating jobs — shooting movies seems like a lot of fun, right? The idea that you’re in control of the camera, framing each shot and creating an evocative scene can be really inspirational. Maps developers have the same creative direction over UI. We get to build maps scenes to create evocative user experiences.
The Maps API provides a sophisticated camera, which enables you to frame your maps in three dimensions. Its has expected capabilities such as projections, zooming and panning but additionally you can rotate, tilt and animate the camera. With that in mind, here’s a map — one that you’ve seen many times before. It’s top down, displaying a certain region, at a pre-determined zoom level.
Lets take that same location and adjust its bearing and tilt. This feels like much more like a real place. The user feels a greater sense of depth; a feeling that there’s a bigger world out there.
When directing the camera for something like a house hunting app, the map can be presented in a way that shows more of the surrounding area. First, the map type has been changed to satellite mode and as a result, the nearby beach is more impactful.
As we select the next house in the search results, the camera animates to its next location and during this journey, we’re effectively flying over the area retaining location context. There are also changes to the zoom, bearing and tilt. Once again, the user gets a strong sense of depth and a feeling of exploration. This is crucial in a house hunting scenario since it’s all about location!
To accomplish such camera angles, check out the bearing and tilt methods on the CameraPosition builder. When transitioning from one CameraPosition to another, you’ll achieve a greater impact if you animate it to place rather that instantly moving there — to do this, use the animateCamera method on the GoogleMap object.
Posted by Ankur Kotwal, Developer Advocate at Google
Gone are the days when users were impressed with a marker on a map. This is the first in a series of Maps Zen blog posts covering integrations of Google Maps APIs to help your apps provide great maps user experiences. What’s a zen pattern? Simply put, a design pattern that results in harmonious user experiences.
A common UI pattern is showing a collection of places. At first glance it seems pretty easy. You could just throw together a list of place names and you’re done, right? Its not quite that simple. Here are two ways to visualize locations using the Google Maps Android API.
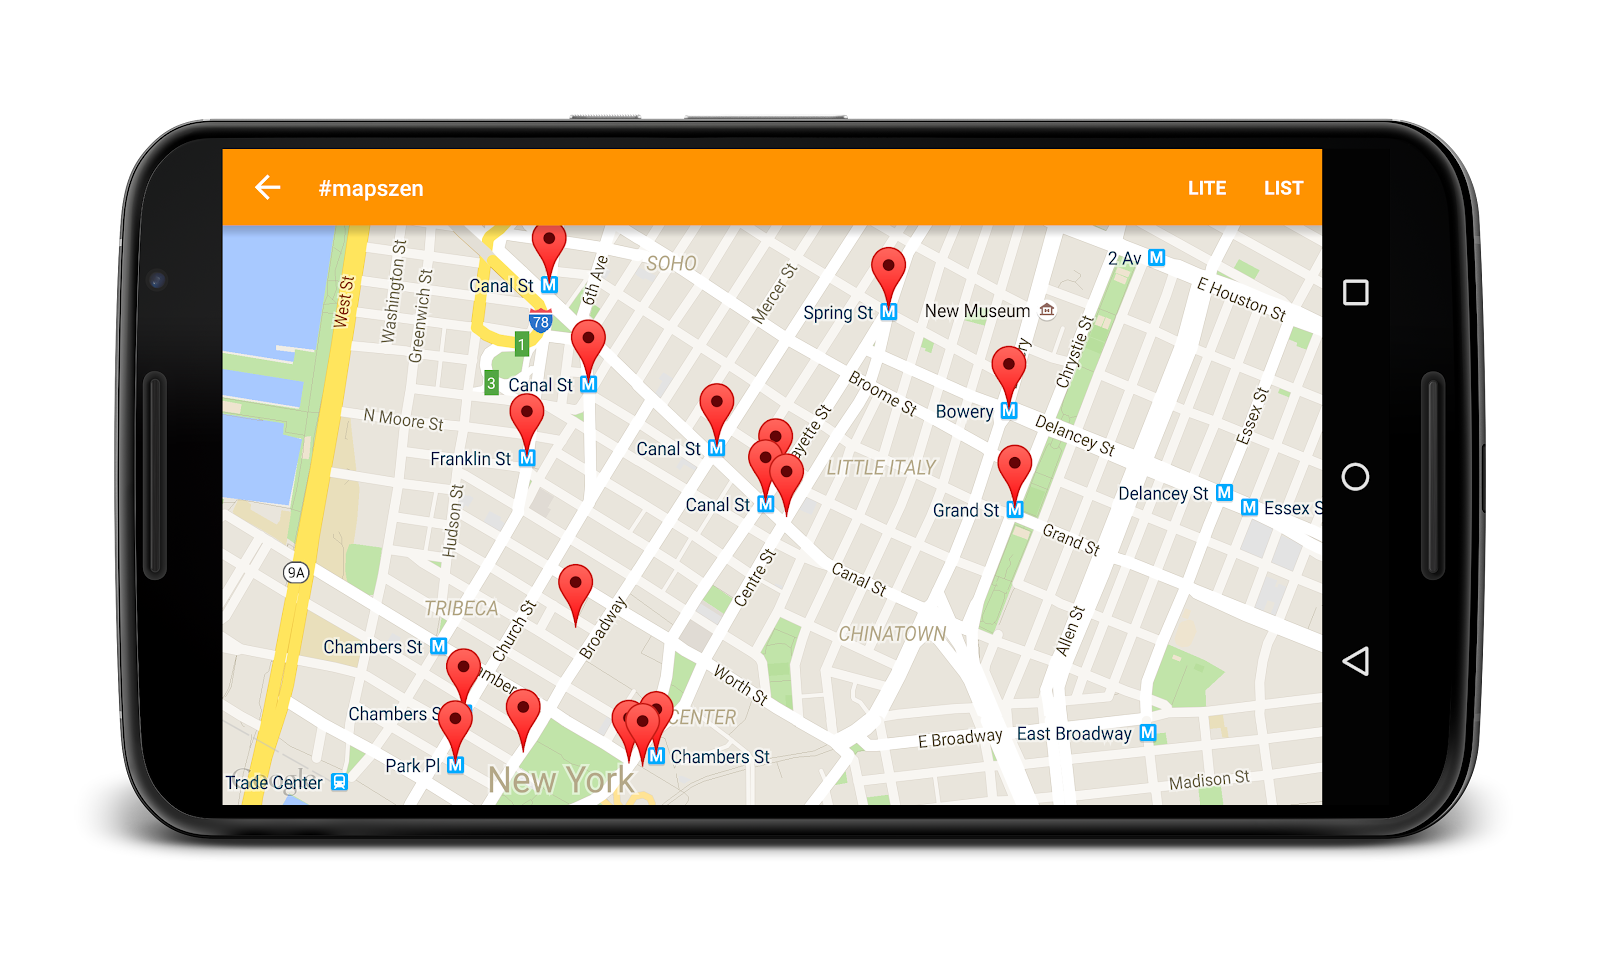
First is on the map itself. Here, we remove the UI and let the map markers be the primary point of interaction. This makes for a very immersive experience, however it's only effective if the markers fit comfortably on one screen. If the user has to zoom or scroll, the emphasis of your collection is lost. For example, “Train stations near me” works well since the results are co-located.
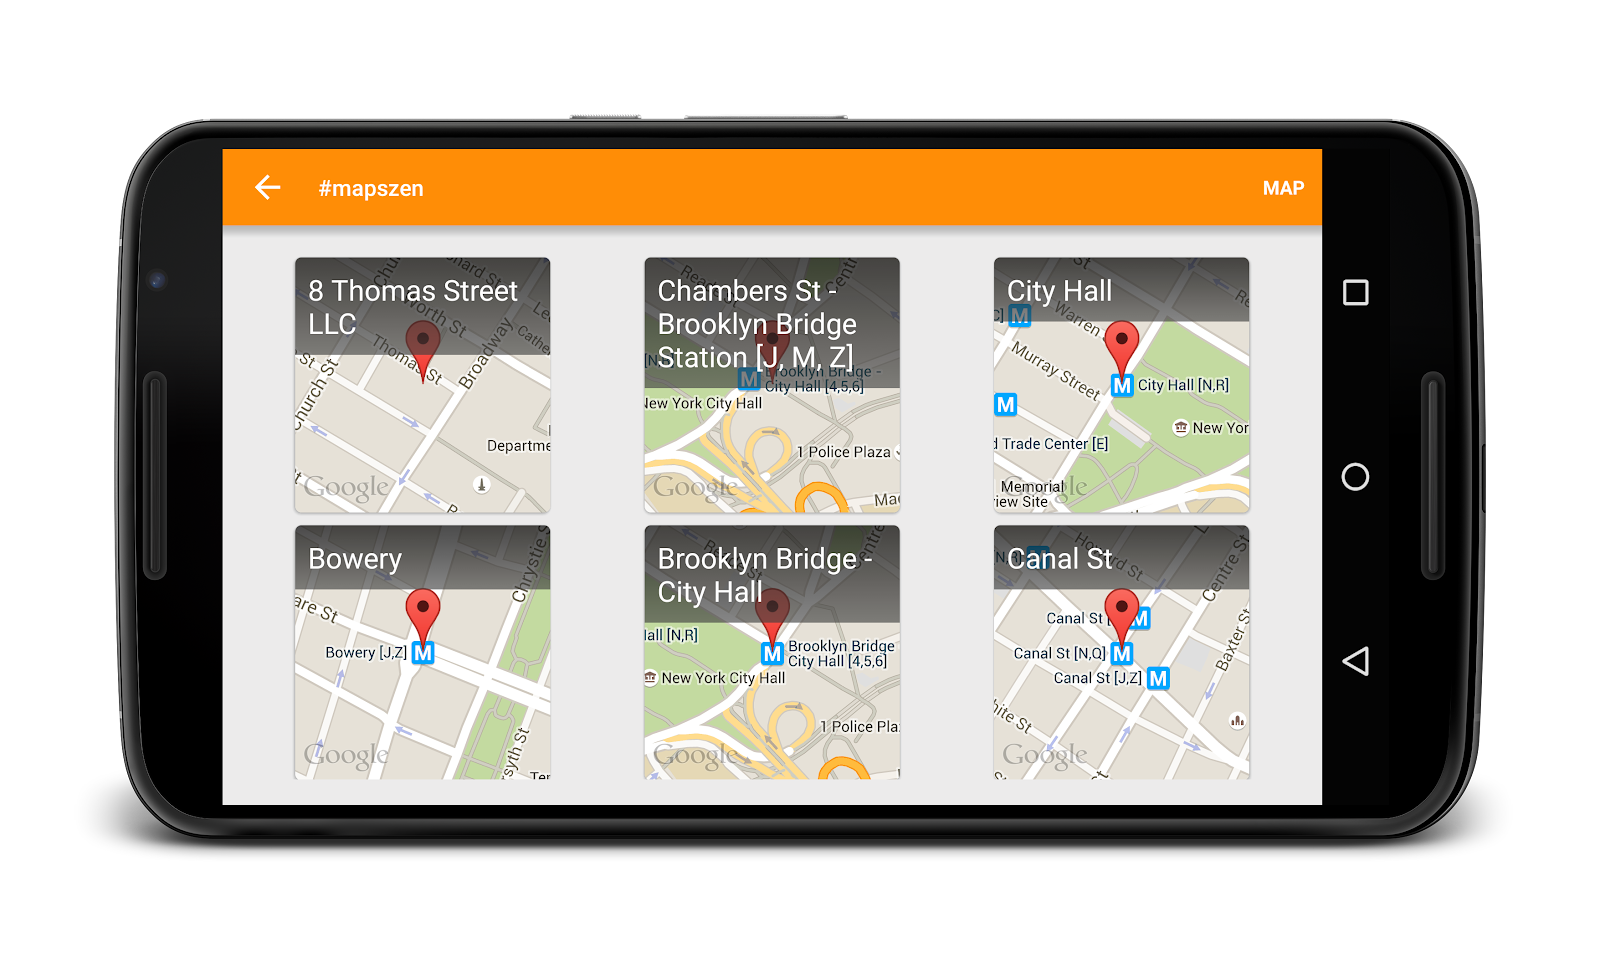
The second method of displaying a list of places that are spread out —it uses map thumbnails. The Maps Android API offers Lite mode — an ideal mode for such scenarios.
Lite mode provides a static map; effectively just the image of a map without the ability for the user to pan, or tilt the camera. This limited functionality, however, comes with some big benefits — it’s super fast and uses less memory. Additionally, you still get click listeners, markers and polylines. Lite mode makes it possible to show lists of maps — they are just images so you can instantiate many of these.
Enabling Lite mode is simple. If you’re creating your maps in Java, on creation, simply specify litemode in the GoogleMapOptions object as shown below.
GoogleMapOptions options = new GoogleMapOptions().liteMode(true);
If your map is declared via layouts, add the xml property in your layouts as shown below. Be sure to include the map namespace since it makes the litemode attribute available.
At some point, you may need to replace the lite mode map with the fully-interactive one. In that situation, you can gracefully transition into a regular map triggered by a touch event. In the image below, Android Lollipop transitions are being used across screens. You can see the big map dissolve and the grid implode in place. For users on older versions of Android, a reasonable fallback is to instantiate a MapFragment and animate it into place.
With this technique, we’re able to mix and match Lite mode and regular maps seamlessly. I hope you’ve now seen the lite — Lite mode that is. It enables you to show multiple maps simultaneously whilst keeping your app performant.


