Tag Archives: Google I/O

Search at I/O 16 Recap: Eight things you don’t want to miss

Posted by Posted by Fabian Schlup, Software Engineer

Two weeks ago, over 7,000 developers descended upon Mountain View for this year’s Google I/O, with a takeaway that it’s truly an exciting time for Search. People come to Google billions of times per day to fulfill their daily information needs. We’re focused on creating features and tools that we believe will help users and publishers make the most of Search in today’s world. As Google continues to evolve and expand to new interfaces, such as the Google assistant and Google Home, we want to make it easy for publishers to integrate and grow with Google.

In case you didn’t have a chance to attend all our sessions, we put together a recap of all the Search happenings at I/O.

1: Introducing rich cards

We announced rich cards, a new Search result format building on rich snippets, that uses schema.org markup to display content in an even more engaging and visual format. Rich cards are available in English for recipes and movies and we’re excited to roll out for more content categories soon. To learn more, browse the new gallery with screenshots and code samples of each markup type or watch our rich cards devByte.

2: New Search Console reports

We want to make it easy for webmasters and developers to track and measure their performance in search results. We launched a new report in Search Console to help developers confirm that their rich card markup is valid. In the report we highlight “enhanceable cards,” which are cards that can benefit from marking up more fields. The new Search Appearance filter also makes it easy for webmasters to filter their traffic by AMP and rich cards.

3: Real-time indexing

Users are searching for more than recipes and movies: they’re often coming to Search to find fresh information about what’s happening right now. This insight kickstarted our efforts to use real-time indexing to connect users searching for real-time events with fresh content. Instead of waiting for content to be crawled and indexed, publishers will be able to use the Google Indexing API to trigger the indexing of their content in real time. It’s still in its early days, but we’re excited to launch a pilot later this summer.

3: Getting up to speed with Accelerated Mobile Pages

We provided an update on our use of AMP, an open source effort to speed up the mobile web. Google Search uses AMP to enable instant-loading content. Speed is important---over 40% of users abandon a page that takes more than three seconds to load. We announced that we’re bringing AMPed news carousels to the iOS and Android Google apps, as well as experimenting with combining AMP and rich cards. Stay tuned for more via our blog and github page.

In addition to the sessions, attendees could talk directly with Googlers at the Search & AMP sandbox.

5: A new and improved Structured Data Testing Tool

We updated the popular Structured Data Testing tool. The tool is now tightly integrated with the DevSite Search Gallery and the new Search Preview service, which lets you preview how your rich cards will look on the search results page.

6: App Indexing got a new home (and new features)

We announced App Indexing’s migration to Firebase, Google’s unified developer platform. Watch the session to learn how to grow your app with Firebase App Indexing.

7: App streaming

App streaming is a new way for Android users to try out games without having to download and install the app -- and it’s already available in Google Search. Check out the session to learn more.

8. Revamped documentation

We also revamped our developer documentation, organizing our docs around topical guides to make it easier to follow.

Thanks to all who came to I/O -- it’s always great to talk directly with developers and hear about experiences first-hand. And whether you came in person or tuned in from afar, let’s continue the conversation on the webmaster forum or during our office hours, hosted weekly via hangouts-on-air.

A YouTube experience like nothing you’ve seen before

Ever wish you could swim with sharks, ride in an Indy Car, or go on a world tour? Well, later this year you’ll be able to experience these events and more as if you were really there with the YouTube VR app.

For more than a year, we’ve been adding support for new video and audio formats on YouTube like 360-degree video, VR video and Spatial Audio. These were the first steps on our way toward a truly immersive video experience, and now we're taking another one with the YouTube VR app for Daydream, Google's platform for high-quality mobile virtual reality, announced today at Google I/O.

We’re creating the YouTube VR app to provide an easier, more immersive way to find and experience virtual reality content on YouTube. It also comes with all the YouTube features you already love, like voice search, discovery, and playlists, all personalized for you, so you can experience the world's largest collection of VR videos in a whole new way.

And thanks to the big, early bet we made on 360-degree and 3-D video, you will be able to see all of YouTube’s content on the app—everything from classic 16x9 videos to 360-degree footage to cutting-edge VR experiences in full 3-D. Whether you want a front row seat to your favorite concert, access to the best museums in the world, or a midday break from work watching your favorite YouTube creator, YouTube VR will have it all.

To bring even more great VR content onto YouTube, we’ve been working with some amazing creators to experiment with new formats that offer a wide range of virtual experiences. We’re already collaborating with the NBA, BuzzFeed and Tastemade to explore new ways of storytelling in virtual environments that will provide valuable lessons about the way creators and viewers interact with VR video. Stay tuned!

We’ve also been working with camera partners to make Jump-ready cameras, such as the GoPro Odyssey, available to creators, to help make the production of VR video more accessible. And today, we’re officially launching our Jump program at the YouTube Spaces in L.A. and NYC and we will it bring to all YouTube Space locations around the globe soon.

We’re just beginning to understand what a truly immersive VR experience can bring to fans of YouTube, but we’re looking forward to making that future a (virtual) reality.

Kurt Wilms, Senior Product Manager, YouTube Virtual Reality, recently watched "Insane 360 video of close-range tornado near Wray, CO yesterday!"

Source: YouTube Blog


Get ready for Google I/O 2016

Posted by Mike Pegg, Head of Developer Marketing

Google I/O is almost here! We’ll kick-off live from the Shoreline Amphitheatre in Mountain View at 10AM PDT next Wednesday, May 18th. This year’s festival will focus on key themes that matter to you: Develop, to build high quality apps; Grow & Earn, to increase user engagement and create successful businesses; and What’s Next, a look at new platforms for future growth.

While we’re putting the finishing touches on the keynote, sessions, and code labs, we wanted to provide you with some tips to get ready to experience I/O, either in-person or offsite.

Navigate the conference with the Web & Mobile apps

To get the most out of Google I/O, make sure to install the Android or iOS app and add the web app to your mobile homescreen. The apps will help you plan your schedule (even while offline!), view the venue map, and keep up with the latest I/O details.


Attending in person?

Badge pick-up starts on Tuesday, May 17th, between 7AM - 7PM at the Shoreline Amphitheatre. Keynote seating will be pre-assigned on a first come, first served basis during badge pick-up so plan to come by early on! Remember to bring your ID, the QR code that will be emailed to you before the conference, proof of academic eligibility if you registered for an Academic badge, and your best look for the badge photo! Find the full badge pick-up schedule here.

After the keynote ends, in addition to attending technical sessions, you’ll have the opportunity to talk directly with Google engineers throughout the Sandbox space which will feature multiple product demos and activations; during Code Labs where you can complete self-paced tutorials; and at Office Hours where you can get specific questions answered by Google specialists.

Don’t forget to bring your (comfortable) party shoes! On Day 1, we’ll have an After Hours Concert from 7-10PM that will include dinner, drinks, and feature some exciting musical performances we think you’ll enjoy! On Day 2, we’ll have an After Hours Party from 8-10PM which also includes food, drinks and lots of fun activities. Enjoy the time to explore the venue at dusk - it will look quite different than during the day. We recommend bringing a jacket for the evening festivities as it can get chilly after dark.

Attending remotely?

Whether you’re looking to experience I/O with other devs in your neighborhood, or if you’ll be streaming it live from your couch, here are some ways you can connect with I/O in real-time:

  • I/O Extended: Find an I/O Extended event happening in your community. There’ll be over 450 events taking place around the world organized by Google Developer Groups, Student Ambassadors, and local developers who will be watching the I/O keynote together, participating in hackathons, code labs, and much more.
  • I/O Live: Tune into the live stream throughout the 3 day festival on google.com/io and via the Android and iOS app. If you want to bring the live stream and the #io16 conversation to your audience, you can customize and embed our I/O Live widget on your site or blog.
  • #io16request: Send us your I/O questions on May 18-20 via public english posts on Google+ or Twitter that include the #io16request hashtag. A team of onsite Googlers will do their best to track down an answer in real time for you.
  • I/O in photos: Be sure to check out real time photos from Mountain View on all three days of the event.

We’re looking forward to having you with us for 3 days of I/O fun, soon!

Don’t forget to join the social conversation at #io16!

Apply now to join us and celebrate our #love4dev at #io16

Published by Mike Pegg, Head of Developer Marketing

One day in June of 2006 a very special thing happened. For the first time ever, we invited a handful of developers to spend the day with us at Google celebrating what they had achieved with our Maps APIs. Our engineering team came all the way from the Sydney office to help answer questions from developers, and help them learn new ways to solve problems in the apps they were building.

What a difference a decade makes. We’re absolutely amazed with all that developers from around the world have created and changed since that day in 2006. We’ve enjoyed this journey with you, and as developers ourselves we continue to be excited by the challenges that lie ahead.


It was this thinking that drove us to bring I/O back to where it all started 10 years ago and to continue celebrating this developer journey we’re on together. We’re really excited for I/O 2016 and we hope this year’s festival, happening May 18-20 at Shoreline Amphitheatre, is just as special as that first gathering at Google back in 2006.

We know a lot has changed over the years and the opportunities (and challenges) are even greater today than they were back then. We’re gearing up for an I/O festival that will celebrate your accomplishments, answer your burning technical questions, and hopefully help make your life as a developer a little bit easier. We hope you can join us! Applications for attendance opened today and will remain open until 3/10, 5PM PST. And in the meantime, share your #love4dev back with us.

Conference Data Sync and GCM in the Google I/O App

By Bruno Oliveira, tech lead of the 2014 Google I/O mobile app

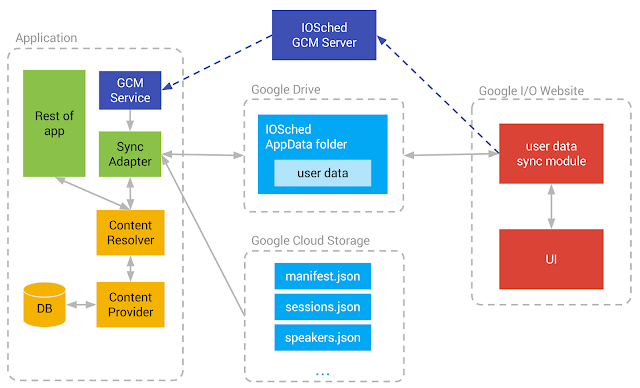
Keeping data in sync with the cloud is an important part of many applications, and the Google I/O App is no exception. To do this, we leverage the standard Android mechanism for this purpose: a Sync Adapter. Using a Sync Adapter has many benefits over using a more rudimentary mechanism such as setting up recurring alarms, because the system automatically handles the scheduling of Sync Adapters to optimize battery life.

We store the data in a local SQLite database. However, rather than having the whole application access that database directly, the application employs another standard Android mechanism to control and organize access to that data. This structure is, naturally, a Content Provider. Only the content provider's implementation has direct access to the SQLite database. All other parts of the app can only access data through the Content Resolver. This allows for a very flexible decoupling between the representation of the data in the database and the more abstract view of that data that is used throughout the app.

The I/O app maintains with two main kinds of data: conference data (sessions, speakers, rooms, etc) and user data (the user's personalized schedule). Conference data is kept up to date with a one-way sync from a set of JSON files stored in Google Cloud Storage, whereas user data goes through a two-way sync with a file stored in the user's Google Drive AppData folder.

Downloading Conference Data Efficiently

For a conference like Google I/O, conference data can be somewhat large. It consists of information about all the sessions, rooms, speakers, map locations, social hashtags, video library items and others. Downloading the whole data set repeatedly would be wasteful both in terms of battery and bandwidth, so we adopt a strategy to minimize the amount of data we download and process.

This strategy is separating the data into several different JSON files, and having them be referenced by a central master JSON file called the manifest file. The URL of the manifest file is the only URL that is hard-coded into the app (it is defined by the MANIFEST_URL constant in Config.java). Note that the I/O app uses Google Cloud Storage to store and serve these files, but any robust hosting service accessible via HTTP can be used for the same purpose.

The first part of the sync process is checking if the manifest file was changed since the app last downloaded it, and processing it only if it's newer. This logic is implemented by the fetchConfenceDataIfNewer method in RemoteConferenceDataFetcher.

public class RemoteConferenceDataFetcher {
    // (...)
    public String[] fetchConferenceDataIfNewer(String refTimestamp) throws IOException {
        BasicHttpClient httpClient = new BasicHttpClient();
        httpClient.setRequestLogger(mQuietLogger);
        // (...)

        // Only download if data is newer than refTimestamp
        if (!TextUtils.isEmpty(refTimestamp) && TimeUtils
            .isValidFormatForIfModifiedSinceHeader(refTimestamp)) {
                httpClient.addHeader("If-Modified-Since", refTimestamp);
            }
        }

        HttpResponse response = httpClient.get(mManifestUrl, null);
        int status = response.getStatus();
        if (status == HttpURLConnection.HTTP_OK) {
            // Data modified since we last checked -- process it!
        } else if (status == HttpURLConnection.HTTP_NOT_MODIFIED) {
            // data on the server is not newer than our data - no work to do!
            return null;
        } else {
            // (handle error)
        }
    }
    // (...)
}

Notice that we submit the HTTP If-Modified-Since header with our request, so that if the manifest hasn't changed since we last checked it, we will get an HTTP response code of HTTP_NOT_MODIFIED rather than HTTP_OK, we will react by skipping the download and parsing process. This means that unless the manifest has changed since we last saw it, the sync process is very economical: it consists only of a single HTTP request and a short response.

The manifest file's format is straightforward: it consists of references to other JSON files that contain the relevant pieces of the conference data:

{
  "format": "iosched-json-v1",
  "data_files": [
    "past_io_videolibrary_v5.json",
    "experts_v11.json",
    "hashtags_v8.json",
    "blocks_v10.json",
    "map_v11.json",
    "keynote_v10.json",
    "partners_v2.json",
    "session_data_v2.681.json"
  ]
}

The sync process then proceeds to process each of the listed data files in order. This part is also implemented to be as economical as possible: if we detect that we already have a cached version of a specific data file, we skip it entirely and use our local cache instead. This task is done by the processManifest method.

Then, each JSON file is parsed and the entities present in each one are accumulated in memory. At the end of this process, the data is written to the Content Provider.

Issuing Content Provider Operations Efficiently

The conference data sync needs to be efficient not only in the amount of data it downloads, but also in the amount of operations it performs on the database. This must be done as economically as possible, so this step is also optimized: instead of overwriting the whole database with the new data, the Sync Adapter attempts to preserve the existing entities and only update the ones that have changed. In our tests, this optimization step reduced the total sync time from 16 seconds to around 2 seconds on our test devices.

In order to accomplish this important third layer of optimization, the application needs to know, given an entity in memory and its version in the Content Provider, whether or not we need to issue content provider operations to update that entity. Comparing the entity in memory to the entity in the database field by field is one option, but is cumbersome and slow, since it would require us to read every field. Instead, we add a field to each entity called the import hashcode. The import hashcode is a weak hash value generated from its data. For example, here is how the import hashcode for a speaker is computed:

public class Speaker {
    public String id;
    public String publicPlusId;
    public String bio;
    public String name;
    public String company;
    public String plusoneUrl;
    public String thumbnailUrl;

    public String getImportHashcode() {
        StringBuilder sb = new StringBuilder();
        sb.append("id").append(id == null ? "" : id)
                .append("publicPlusId")
                .append(publicPlusId == null ? "" : publicPlusId)
                .append("bio")
                .append(bio == null ? "" : bio)
                .append("name")
                .append(name == null ? "" : name)
                .append("company")
                .append(company== null ? "" : company)
                .append("plusoneUrl")
                .append(plusoneUrl == null ? "" : plusoneUrl)
                .append("thumbnailUrl")
                .append(thumbnailUrl == null ? "" : thumbnailUrl);
        String result = sb.toString();
        return String.format(Locale.US, "%08x%08x", 
            result.hashCode(), result.length());
    }
}

Every time an entity is updated in the database, its import hashcode is saved with it as a database column. Later, when we have a candidate for an updated version of that entity, all we need to do is compute the import hashcode of the candidate and compare it to the import hashcode of the entity in the database. If they differ, then we issue Content Provider operations to update the entity in the database. If they are the same, we skip that entity. This incremental update logic can be seen, for example, in the makeContentProviderOperations method of the SpeakersHandler class:

public class SpeakersHandler extends JSONHandler {
    private HashMap mSpeakers = new HashMap();

    // (...)
    @Override
    public void makeContentProviderOperations(ArrayList list) {
        // (...)
        int updatedSpeakers = 0;
        for (Speaker speaker : mSpeakers.values()) {
            String hashCode = speaker.getImportHashcode();
            speakersToKeep.add(speaker.id);

            if (!isIncrementalUpdate || !speakerHashcodes.containsKey(speaker.id) ||
                    !speakerHashcodes.get(speaker.id).equals(hashCode)) {
                // speaker is new/updated, so issue content provider operations
                ++updatedSpeakers;
                boolean isNew = !isIncrementalUpdate || 
                    !speakerHashcodes.containsKey(speaker.id);
                buildSpeaker(isNew, speaker, list);
            }
        }

        // delete obsolete speakers
        int deletedSpeakers = 0;
        if (isIncrementalUpdate) {
            for (String speakerId : speakerHashcodes.keySet()) {
                if (!speakersToKeep.contains(speakerId)) {
                    buildDeleteOperation(speakerId, list);
                    ++deletedSpeakers;
                }
            }
        }
    }
}

The buildSpeaker and buildDeleteOperation methods (omitted here for brevity) simply build the Content Provider operations necessary to, respectively, insert/update a speaker or delete a speaker from the Content Provider. Notice that this approach means we only issue Content Provider operations to update a speaker if the import hashcode has changed. We also deal with obsolete speakers, that is, speakers that were in the database but were not referenced by the incoming data, and we issue delete operations for those speakers.

Making Sync Robust

The sync adapter in the I/O app is responsible for several tasks, amongst which are the remote conference data sync, the user schedule sync and also the user feedback sync. Failures can happen in any of them because of network conditions and other factors. However, a failure in one of the tasks should not impact the execution of the other tasks. This is why we structure the sync process as a series of independent tasks, each protected by a try/catch block, as can be seen in the performSync method of the SyncHelper class:

// remote sync consists of these operations, which we try one by one (and
// tolerate individual failures on each)
final int OP_REMOTE_SYNC = 0;
final int OP_USER_SCHEDULE_SYNC = 1;
final int OP_USER_FEEDBACK_SYNC = 2;

int[] opsToPerform = userDataOnly ?
        new int[] { OP_USER_SCHEDULE_SYNC } :
        new int[] { OP_REMOTE_SYNC, OP_USER_SCHEDULE_SYNC, OP_USER_FEEDBACK_SYNC};

for (int op : opsToPerform) {
    try {
        switch (op) {
            case OP_REMOTE_SYNC:
                dataChanged |= doRemoteSync();
                break;
            case OP_USER_SCHEDULE_SYNC:
                dataChanged |= doUserScheduleSync(account.name);
                break;
            case OP_USER_FEEDBACK_SYNC:
                doUserFeedbackSync();
                break;
        }
    } catch (AuthException ex) {
        // (... handle auth error...)
    } catch (Throwable throwable) {
        // (... handle other error...)

        // Let system know an exception happened:
        if (syncResult != null && syncResult.stats != null) {
            ++syncResult.stats.numIoExceptions;
        }
    }
}

When one particular part of the sync process fails, we let the system know about it by increasing syncResult.stats.numIoExceptions. This will cause the system to retry the sync at a later time, using exponential backoff.

When Should We Sync? Enter GCM.

It's very important for users to be able to get updates about conference data in a timely manner, especially during (and in the few days leading up to) Google I/O. A naïve way to solve this problem is simply making the app poll the server repeatedly for updates. Naturally, this causes problems with bandwidth and battery consumption.

To solve this problem in a more elegant way, we use GCM (Google Cloud Messaging). Whenever there is an update to the data on the server side, the server sends a GCM message to all registered devices. Upon receipt of this GCM message, the device performs a sync to download the new conference data. The GCMIntentService class handles the incoming GCM messages:

public class GCMIntentService extends GCMBaseIntentService {
    private static final String TAG = makeLogTag("GCM");

    private static final Map MESSAGE_RECEIVERS;
    static {
        // Known messages and their GCM message receivers
        Map  receivers = new HashMap();
        receivers.put("test", new TestCommand());
        receivers.put("announcement", new AnnouncementCommand());
        receivers.put("sync_schedule", new SyncCommand());
        receivers.put("sync_user", new SyncUserCommand());
        receivers.put("notification", new NotificationCommand());
        MESSAGE_RECEIVERS = Collections.unmodifiableMap(receivers);
    }

    // (...)

    @Override
    protected void onMessage(Context context, Intent intent) {
        String action = intent.getStringExtra("action");
        String extraData = intent.getStringExtra("extraData");
        LOGD(TAG, "Got GCM message, action=" + action + ", extraData=" + extraData);

        if (action == null) {
            LOGE(TAG, "Message received without command action");
            return;
        }

        action = action.toLowerCase();
        GCMCommand command = MESSAGE_RECEIVERS.get(action);
        if (command == null) {
            LOGE(TAG, "Unknown command received: " + action);
        } else {
            command.execute(this, action, extraData);
        }

    }
    // (...)
}

Notice that the onMessage method delivers the message to the appropriate handler depending on the GCM message's "action" field. If the action field is "sync_schedule", the application delivers the message to an instance of the SyncCommand class, which causes a sync to happen. Incidentally, notice that the implementation of the SyncCommand class allows the GCM message to specify a jitter parameter, which causes it to trigger a sync not immediately but at a random time in the future within the jitter interval. This spreads out the syncs evenly over a period of time rather than forcing all clients to sync simultaneously, and thus prevents a sudden peak in requests on the server side.

Syncing User Data

The I/O app allows the user to build their own personalized schedule by choosing which sessions they are interested in attending. This data must be shared across the user's Android devices, and also between the I/O website and Android. This means this data has to be stored in the cloud, in the user's Google account. We chose to use the Google Drive AppData folder for this task.

User data is synced to Google Drive by the doUserScheduleSync method of the SyncHelper class. If you dive into the source code, you will notice that this method essentially accesses the Google Drive AppData folder through the Google Drive HTTP API, then reconciles the set of sessions in the data with the set of sessions starred by the user on the device, and issues the necessary modifications to the cloud if there are locally updated sessions.

This means that if the user selects one session on their Android device and then selects another session on the I/O website, the result should be that both the Android device and the I/O website will show that both sessions are in the user's schedule.

Also, whenever the user adds or removes a session on the I/O website, the data on all their Android devices should be updated, and vice versa. To accomplish that, the I/O website sends our GCM server a notification every time the user makes a change to their schedule; the GCM server, in turn, sends a GCM message to all the devices owned by that user in order to cause them to sync their user data. The same mechanism works across the user's devices as well: when one device updates the data, it issues a GCM message to all other devices.

Conclusion

Serving fresh data is a key component of many Android apps. This article showed how the I/O app deals with the challenges of keeping the data up-to-date while minimizing network traffic and database changes, and also keeping this data in sync across different platforms and devices through the use of Google Cloud Storage, Google Drive and Google Cloud Messaging.

Material design in the 2014 Google I/O app

By Roman Nurik, lead designer for the Google I/O Android App

Every year for Google I/O, we publish an Android app for the conference that serves two purposes. First, it serves as a companion for conference attendees and those tuning in from home, with a personalized schedule, a browsing interface for talks, and more. Second, and arguably more importantly, it serves as a reference demo for Android design and development best practices.

Last week, we announced that the Google I/O 2014 app source code is now available, so you can go check out how we implemented some of the features and design details you got to play with during the conference. In this post, I’ll share a glimpse into some of our design thinking for this year’s app.

On the design front, this year’s I/O app uses the new material design approach and features of the Android L Developer Preview to present content in a rational, consistent, adaptive and beautiful way. Let’s take a look at some of the design decisions and outcomes that informed the design of the app.

Surfaces and shadows

In material design, surfaces and shadows play an important role in conveying the structure of your app. The material design spec outlines a set of layout principles that helps guide decisions like when and where shadows should appear. As an example, here are some of the iterations we went through for the schedule screen:

First iteration
Second iteration
Third iteration

The first iteration was problematic for a number of reasons. First, the single shadow below the app bar conveyed that there were two “sheets” of paper: one for the app bar and another for the tabs and screen contents. The bottom sheet was too complex: the “ink” that represents the contents of a sheet should be pretty simple; here ink was doing too much work, and the result was visual noise. An alternative could be to make the tabs a third sheet, sitting between the app bar and content, but too much layering can also be distracting.

The second and third iterations were stronger, creating a clear separation between chrome and content, and letting the ink focus on painting text, icons, and accent strips.

Another area where the concept of “surfaces” played a role was in our details page. In our first release, as you scroll the details screen, the top banner fades from the session image to the session color, and the photo scrolls at half the speed beneath the session title, producing a parallax effect. Our concern was that this design bent the physics of material design too far. It’s as if the text was sliding along a piece of paper whose transparency changed throughout the animation.

A better approach, which we introduced in the app update on June 25th, was to introduce a new, shorter surface on which the title text was printed. This surface has a consistent color and opacity. Before scrolling, it’s adjacent to the sheet containing the body text, forming a seam. As you scroll, this surface (and the floating action button attached to it) rises above the body text sheet, allowing the body text to scroll beneath it.

This aligns much better with the physics in the world of material design, and the end result is a more coherent visual, interaction and motion story for users. (See the code: Fragment, Layout XML)

Color

A key principle of material design is also that interfaces should be “bold, graphic, intentional” and that the foundational elements of print-based design should guide visual treatments. Let’s take a look at two such elements: color and margins.

In material design, UI element color palettes generally consist of one primary and one accent color. Large color fields (like the app bar background) take on the main 500 shade of the primary color, while smaller areas like the status bar use a darker shade, e.g. 700.

The accent color is used more subtly throughout the app, to call attention to key elements. The resulting juxtaposition of a tamer primary color and a brighter accent, gives apps a bold, colorful look without overwhelming the app’s actual content.

In the I/O app, we chose two accents, used in various situations. Most accents were Pink 500, while the more conservative Light Blue 500 was a better fit for the Add to Schedule button, which was often adjacent to session colors. (See the code: XML color definitions, Theme XML)

And speaking of session colors, we color each session’s detail screen based on the session’s primary topic. We used the base material design color palette with minor tweaks to ensure consistent brightness and optimal contrast with the floating action button and session images.

Below is an excerpt from our final session color palette exploration file.

Session colors, with floating action button juxtaposed to evaluate contrast
Desaturated session colors, to evaluate brightness consistency across the palette

Margins

Another important “traditional print design” element that we thought about was margins, and more specifically keylines. While we’d already been accustomed to using a 4dp grid for vertical sizing (buttons and simple list items were 48dp, the standard action bar was 56dp, etc.), guidance on keylines was new in material design. Particularly, aligning titles and other textual items to keyline 2 (72dp on phones and 80dp on tablets) immediately instilled a clean, print-like rhythm to our screens, and allowed for very fast scanning of information on a screen. Gestalt principles, for the win!

Grids

Another key principle in material design is “one adaptive design”:

A single underlying design system organizes interactions and space. Each device reflects a different view of the same underlying system. Each view is tailored to the size and interaction appropriate for that device. Colors, iconography, hierarchy, and spatial relationships remain constant.

Now, many of the screens in the I/O app represent collections of sessions. For presenting collections, material design offers a number of containers: cards, lists, and grids. We originally thought to use cards to represent session items, but since we’re mostly showing homogenous content, we deemed cards inappropriate for our use case. The shadows and rounded edges of the cards would add too much visual clutter, and wouldn’t aid in visually grouping content. An adaptive grid was a better choice here; we could vary the number of columns on screen size (see the code), and we were free to integrate text and images in places where we needed to conserve space.

Delightful details

Two of the little details we spent a lot of time perfecting in the app, especially with the L Developer Preview, were touch ripples and the Add to Schedule floating action button.

We used both the clipped and unclipped ripple styles throughout the app, and made sure to customize the ripple color to ensure the ripples were visible (but still subtle) regardless of the background. (See the code: Light ripples, Dark ripples)

But one of our favorite details in the app is the floating action button that toggles whether a session shows up in your personalized schedule or not:

We used a number of new API methods in the L preview (along with a fallback implementation) to ensure this felt right:

  1. View.setOutline and setClipToOutline for circle-clipping and dynamic shadow rendering.
  2. android:stateListAnimator to lift the button toward your finger on press (increase the drop shadow)
  3. RippleDrawable for ink touch feedback on press
  4. ViewAnimationUtils.createCircularReveal for the blue/white background state reveal
  5. AnimatedStateListDrawable to define the frame animations for changes to icon states (from checked to unchecked)

The end result is a delightful and whimsical UI element that we’re really proud of, and hope that you can draw inspiration from or simply drop into your own apps.

What’s next?

And speaking of dropping code into your own apps, remember that all the source behind the app, including L Developer Preview features and fallback code paths, is now available, so go check it out to see how we implemented these designs.

We hope this post has given you some ideas for how you can use material design to build beautiful Android apps that make the most of the platform. Stay tuned for more posts related to this year’s I/O app open source release over the coming weeks to get even more great ideas for ways to deliver the best experience to your users.

ActionBarCompat and I/O 2013 App Source

Posted by Chris Banes, Android Developer Relations

Following on the Android 4.3 and Nexus 7 announcements, we recently released two important tools to help you build beautiful apps that follow Android Design best practices:

  • We released a new backward-compatible Action Bar implementation called ActionBarCompat that's part of the Support Library r18. The ActionBarCompat APIs let you build the essential Action Bar design pattern into your app, with broad compatibility back to Android 2.1.
  • We released the full source code for the I/O 2013 app, which gives you working examples of ActionBarCompat, responsive design for phones and tablets, Google+ sign-in, synchronized data kept fresh through Google Cloud Messaging, livestreaming using the YouTube Android Player API, Google Maps API v2, and much more. All of the app code and resources are available for you to browse or download, and it's all licensed under Apache License 2.0/Creative Commons 3.0 BY so you can reuse it in your apps. You can get the source at code.google.com/p/iosched

This post helps you get started with ActionBarCompat, from setting up the Support Library to adding an Action Bar to your UI. If you want to see ActionBarCompat in action first, download the I/O 2013 app from Google Play and give it a try. The app's Action Bar is built using the ActionBarCompat and served as our main test environment for making sure the APIs work properly, with full compatibility across platform versions.

Getting Started with ActionBarCompat

ActionBarCompat is a new API in the Android Support Library that allows you to add an Action Bar to applications targeting minSdkVersion 7 or greater. The API and integration have been designed to closely mirror the existing framework APIs, giving you an easy migration path for your existing apps.

If you've already using another implementation of Action Bar in your app, you can choose whether to ActionBarCompat. If you’re using the old ActionBarCompat sample available through the SDK, then we highly recommend that you upgrade to the new ActionBarCompat API in the Support Library. If you’re using a third-party solution (such as ActionBarSherlock), there are a few reasons to consider upgrading:

ActionBarSherlock is a solid and well-tested library which has served developers very well for a long time. If you are already using it and do not currently require any of the above then there is no need to migrate.

If you are ready to get started with ActionBarCompat, the sections below take you through the process.

1. Add ActionBarCompat as a project dependency

ActionBarCompat is distributed as both a Gradle artifact and a library project. See Setting Up the Support Library for more information.

2. Update your style resources

The first thing to update are your Activity themes so they use a Theme.AppCompat theme. If you're currently using one of the Theme.Holo themes then just replace this with the related Theme.AppCompat theme. For instance if you have the following in your AndroidManifest.xml:

<activity
        ...
        android:theme="@android:style/Theme.Holo" />

You would change it to:

<activity
        ...
        android:theme="@style/Theme.AppCompat" />

Things get more tricky when you have a customized theme. The first thing to do is change your base theme to one of the Theme.AppCompat themes, like above.

If you have customized styles for the Action Bar (and related widgets) then you must also change these styles to extend from the Widget.AppCompat version. You also need to double-set each attribute: once in the Android namespace and again with no namespace (the default namespace).

For example, in the following example we have a custom theme which extends from Theme.Holo.Light, which references a custom Action Bar style.

<style name="Theme.Styled" parent="@android:style/Theme.Holo.Light">
    <item name="android:actionBarStyle">@style/Widget.Styled.ActionBar</item>
</style>

<style name="Widget.Styled.ActionBar" 
    parent="@android:style/Widget.Holo.Light.ActionBar">
    <item name="android:background">@drawable/ab_custom_solid_styled</item>
    <item name="android:backgroundStacked"
        >@drawable/ab_custom_stacked_solid_styled</item>
    <item name="android:backgroundSplit"
        >@drawable/ab_custom_bottom_solid_styled</item>
</style>

To make this work with AppCompat you would move the above styles into the values-v14 folder, modifying each style's parent to be an AppCompat version.

<style name="Theme.Styled" parent="@style/Theme.AppCompat.Light">
    <!-- Setting values in the android namespace affects API levels 14+ -->
    <item name="android:actionBarStyle">@style/Widget.Styled.ActionBar</item>
</style>

<style name="Widget.Styled.ActionBar" parent="@style/Widget.AppCompat.Light.ActionBar">
    <!-- Setting values in the android namespace affects API levels 14+ -->
    <item name="android:background">@drawable/ab_custom_solid_styled</item>
    <item name="android:backgroundStacked"
      >@drawable/ab_custom_stacked_solid_styled</item>
    <item name="android:backgroundSplit"
      >@drawable/ab_custom_bottom_solid_styled</item>
</style>

You would then need add the following into the values folder:

<style name="Theme.Styled" parent="@style/Theme.AppCompat.Light">
    <!-- Setting values in the default namespace affects API levels 7-13 -->
    <item name="actionBarStyle">@style/Widget.Styled.ActionBar</item>
</style>

<style name="Widget.Styled.ActionBar" parent="@style/Widget.AppCompat.Light.ActionBar">
    <!-- Setting values in the default namespace affects API levels 7-13 -->
    <item name="background">@drawable/ab_custom_solid_styled</item>
    <item name="backgroundStacked">@drawable/ab_custom_stacked_solid_styled</item>
    <item name="backgroundSplit">@drawable/ab_custom_bottom_solid_styled</item>
</style>

3. Modify Menu resources

As with the standard Action Bar in Android 3.0 and later versions, action items are added via the options menu. The difference with ActionBarCompat is that you need to modify your Menu resource files so that any action item attributes come from ActionBarCompat's XML namespace.

In the example below you can see that a new "yourapp" namespace has been added to the menu element, with the showAsAction and actionProviderClass attributes being provided from this namespace. You should also do this for the other action item attributes (actionLayout and actionViewClass) if you use them.

<menu xmlns:yourapp="http://schemas.android.com/apk/res-auto"
    xmlns:android="http://schemas.android.com/apk/res/android">

    <item
        android:id="@+id/menu_share"
        android:title="@string/menu_share"
        yourapp:actionProviderClass="android.support.v7.widget.ShareActionProvider"
        yourapp:showAsAction="always" />
    ...
</menu>

4. Extend Activity classes from ActionBarCompat

ActionBarCompat contains one Activity class which all of your Activity classes should extend: ActionBarActivity.

This class itself extends from FragmentActivity so you can continue to use Fragments in your application. There is not a ActionBarCompat Fragment class that you need to extend, so you should continue using android.support.v4.Fragment as the base class for your Fragments.

5. Add Menu callbacks

To display items on the Action Bar, you need to populate it by overriding onCreateOptionsMenu() and populating the Menu object. The best way to do this is by inflating a menu resource. If you need to call any MenuItem methods introduced in API level 11 or later, you need to call the shim for that method in MenuItemCompat instead. Here's an example:

@Override
public boolean onCreateOptionsMenu(Menu menu) {
    // Inflate the menu
    getMenuInflater().inflate(R.menu.main_menu, menu);

    // Find the share item
    MenuItem shareItem = menu.findItem(R.id.menu_share);

    // Need to use MenuItemCompat to retrieve the Action Provider
    mActionProvider = (ShareActionProvider)
        MenuItemCompat.getActionProvider(shareItem);

    return super.onCreateOptionsMenu(menu);
}

6. Retrieve the Action Bar

ActionBarCompat contains it’s own ActionBar class, and to retrieve the Action Bar attached to your activity you call getSupportActionBar(). The API exposed by the compatibility class mirrors that of the framework ActionBar class, allowing you to alter the navigation, show/hide it, and change how it display it’s contents.

7. Add ActionMode callbacks

To start an action mode from your ActionBarActivity simply call startSupportActionMode(), providing a callback similar to how you would with the native action mode. The following example shows how to start an action mode, inflate a menu resource and react to user’s selection:

startSupportActionMode(new ActionMode.Callback() {
    @Override
    public boolean onCreateActionMode(ActionMode actionMode, Menu menu) {
        // Inflate our menu from a resource file
        actionMode.getMenuInflater().inflate(R.menu.action_mode_main, menu);

        // Return true so that the action mode is shown
        return true;
    }

    @Override
    public boolean onPrepareActionMode(ActionMode actionMode, Menu menu) {
        // As we do not need to modify the menu before displayed, we return false.
        return false;
    }

    @Override
    public boolean onActionItemClicked(ActionMode actionMode, MenuItem menuItem) {
        // Similar to menu handling in Activity.onOptionsItemSelected()
        switch (menuItem.getItemId()) {
            case R.id.menu_remove:
                // Some remove functionality
                return true;
        }

        return false;
    }

    @Override
    public void onDestroyActionMode(ActionMode actionMode) {
        // Allows you to be notified when the action mode is dismissed
    }
});

Similar to the Activity class, ActionBarActivity provides two methods that you can override to be notified when an action mode is started/finished from within your Activity (including attached Fragments). The methods are onSupportActionModeStarted() and onSupportActionModeFinished().

8. Add support for Up navigation

Simple example

Up navigation support is built into ActionBarCompat and is similar to that provided in the Android framework in Android 4.1 and higher.

In the simplest form, you just need add a reference in each AndroidManifest <activity> element to its logical parent activity. This is done by adding a metadata element to the <activity> element. You should also set the android:parentActivityName attribute for explicit Android 4.1 support, although this is not strictly necessary for ActionBarCompat:

<activity android:name=".SampleActivity"
    android:parentActivityName=".SampleParentActivity">
    <meta-data android:name="android.support.PARENT_ACTIVITY"
        android:value=".SampleParentActivity" />
</activity>

In your Activity you should then configure the home button to display for up navigation:

getSupportActionBar().setDisplayHomeAsUpEnabled(true);

When the user now clicks on the home item, the user will navigate up to the parent Activity set in your AndroidManifest.

Advanced calls

There are a number of methods which can be overridden to customize what happens when a user clicks on the home item. Each of the methods below replicate/proxy similarly-named methods added in Android 4.1:

  • onSupportNavigateUp()
  • supportNavigateUpTo(Intent)
  • getSupportParentActivityIntent()
  • supportShouldUpRecreateTask(Intent)
  • onCreateSupportNavigateUpTaskStack(TaskStackBuilder) and onPrepareSupportNavigateUpTaskStack(TaskStackBuilder)

Requesting Window features

When using ActionBarActivity you should call supportRequestWindowFeature() to request window features. For instance the following piece of code requests an overlay action bar:

@Override
protected void onCreate(Bundle savedInstanceState) {
    super.onCreate(savedInstanceState);

    // Needs to be called before setting the content view
    supportRequestWindowFeature(Window.FEATURE_ACTION_BAR_OVERLAY);

    // Now set the content view
    setContentView(R.layout.activity_main);
    ...
}

Adding support for ProgressBar

Similar to the native Action Bar, ActionBarCompat supports displaying progress bars on the Action Bar. First you need to request the window feature, you then display or alter the progress bars with one of the following methods, each of which mirror functionality in the similar named method from Activity:

  • setSupportProgress()
  • setSupportProgressBarIndeterminate()
  • setSupportProgressBarVisibility()
  • setSupportProgressBarIndeterminateVisibility()

Below is an example which requests an indeterminate progress bar, and then later displays it:

@Override
protected void onCreate(Bundle savedInstanceState) {
    super.onCreate(savedInstanceState);

    // Needs to be called before setting the content view
    supportRequestWindowFeature(Window.FEATURE_INDETERMINATE_PROGRESS);

    // Now set the content view
    setContentView(R.layout.activity_main);
    ...
    // When ready, show the indeterminate progress bar
    setSupportProgressBarIndeterminateVisibility(true);
}

Further Reading

The Action Bar API Guide covers a lot of what is in this post and much more. Even if you have used the Action Bar API in the past, it’s definitely worth reading to see how ActionBarCompat differs from the framework.

There are also a number of sample applications using ActionBarCompat covering how to use the library in various ways. You can find them in the “Samples for SDK” package in the SDK Manager.

Check out the video below for a quick hands-on with ActionBarCompat.