Tag Archives: Google Brain

DeepVariant: Highly Accurate Genomes With Deep Neural Networks

Crossposted on the Google Research Blog

Across many scientific disciplines, but in particular in the field of genomics, major breakthroughs have often resulted from new technologies. From Sanger sequencing, which made it possible to sequence the human genome, to the microarray technologies that enabled the first large-scale genome-wide experiments, new instruments and tools have allowed us to look ever more deeply into the genome and apply the results broadly to health, agriculture and ecology.

One of the most transformative new technologies in genomics was high-throughput sequencing (HTS), which first became commercially available in the early 2000s. HTS allowed scientists and clinicians to produce sequencing data quickly, cheaply, and at scale. However, the output of HTS instruments is not the genome sequence for the individual being analyzed — for humans this is 3 billion paired bases (guanine, cytosine, adenine and thymine) organized into 23 pairs of chromosomes. Instead, these instruments generate ~1 billion short sequences, known as reads. Each read represents just 100 of the 3 billion bases, and per-base error rates range from 0.1-10%. Processing the HTS output into a single, accurate and complete genome sequence is a major outstanding challenge. The importance of this problem, for biomedical applications in particular, has motivated efforts such as the Genome in a Bottle Consortium (GIAB), which produces high confidence human reference genomes that can be used for validation and benchmarking, as well as the precisionFDA community challenges, which are designed to foster innovation that will improve the quality and accuracy of HTS-based genomic tests.

CAPTION: For any given location in the genome, there are multiple reads among the ~1 billion that include a base at that position. Each read is aligned to a reference, and then each of the bases in the read is compared to the base of the reference at that location. When a read includes a base that differs from the reference, it may indicate a variant (a difference in the true sequence), or it may be an error.

Today, we announce the open source release of DeepVariant, a deep learning technology to reconstruct the true genome sequence from HTS sequencer data with significantly greater accuracy than previous classical methods. This work is the product of more than two years of research by the Google Brain team, in collaboration with Verily Life Sciences. DeepVariant transforms the task of variant calling, as this reconstruction problem is known in genomics, into an image classification problem well-suited to Google's existing technology and expertise.

CAPTION: Each of the four images above is a visualization of actual sequencer reads aligned to a reference genome. A key question is how to use the reads to determine whether there is a variant on both chromosomes, on just one chromosome, or on neither chromosome. There is more than one type of variant, with SNPs and insertions/deletions being the most common. A: a true SNP on one chromosome pair, B: a deletion on one chromosome, C: a deletion on both chromosomes, D: a false variant caused by errors. It's easy to see that these look quite distinct when visualized in this manner.

We started with GIAB reference genomes, for which there is high-quality ground truth (or the closest approximation currently possible). Using multiple replicates of these genomes, we produced tens of millions of training examples in the form of multi-channel tensors encoding the HTS instrument data, and then trained a TensorFlow-based image classification model to identify the true genome sequence from the experimental data produced by the instruments. Although the resulting deep learning model, DeepVariant, had no specialized knowledge about genomics or HTS, within a year it had won the the highest SNP accuracy award at the precisionFDA Truth Challenge, outperforming state-of-the-art methods. Since then, we've further reduced the error rate by more than 50%.


DeepVariant is being released as open source software to encourage collaboration and to accelerate the use of this technology to solve real world problems. To further this goal, we partnered with Google Cloud Platform (GCP) to deploy DeepVariant workflows on GCP, available today, in configurations optimized for low-cost and fast turnarounds using scalable GCP technologies like the Pipelines API. This paired set of releases provides a smooth ramp for users to explore and evaluate the capabilities of DeepVariant in their current compute environment while providing a scalable, cloud-based solution to satisfy the needs of even the largest genomics datasets.

DeepVariant is the first of what we hope will be many contributions that leverage Google's computing infrastructure and ML expertise to both better understand the genome and to provide deep learning-based genomics tools to the community. This is all part of a broader goal to apply Google technologies to healthcare and other scientific applications, and to make the results of these efforts broadly accessible.

By Mark DePristo and Ryan Poplin, Google Brain Team

DeepVariant: Highly Accurate Genomes With Deep Neural Networks


(Crossposted on the Google Open Source Blog)

Across many scientific disciplines, but in particular in the field of genomics, major breakthroughs have often resulted from new technologies. From Sanger sequencing, which made it possible to sequence the human genome, to the microarray technologies that enabled the first large-scale genome-wide experiments, new instruments and tools have allowed us to look ever more deeply into the genome and apply the results broadly to health, agriculture and ecology.

One of the most transformative new technologies in genomics was high-throughput sequencing (HTS), which first became commercially available in the early 2000s. HTS allowed scientists and clinicians to produce sequencing data quickly, cheaply, and at scale. However, the output of HTS instruments is not the genome sequence for the individual being analyzed — for humans this is 3 billion paired bases (guanine, cytosine, adenine and thymine) organized into 23 pairs of chromosomes. Instead, these instruments generate ~1 billion short sequences, known as reads. Each read represents just 100 of the 3 billion bases, and per-base error rates range from 0.1-10%. Processing the HTS output into a single, accurate and complete genome sequence is a major outstanding challenge. The importance of this problem, for biomedical applications in particular, has motivated efforts such as the Genome in a Bottle Consortium (GIAB), which produces high confidence human reference genomes that can be used for validation and benchmarking, as well as the precisionFDA community challenges, which are designed to foster innovation that will improve the quality and accuracy of HTS-based genomic tests.
For any given location in the genome, there are multiple reads among the ~1 billion that include a base at that position. Each read is aligned to a reference, and then each of the bases in the read is compared to the base of the reference at that location. When a read includes a base that differs from the reference, it may indicate a variant (a difference in the true sequence), or it may be an error.
Today, we announce the open source release of DeepVariant, a deep learning technology to reconstruct the true genome sequence from HTS sequencer data with significantly greater accuracy than previous classical methods. This work is the product of more than two years of research by the Google Brain team, in collaboration with Verily Life Sciences. DeepVariant transforms the task of variant calling, as this reconstruction problem is known in genomics, into an image classification problem well-suited to Google's existing technology and expertise.
Each of the four images above is a visualization of actual sequencer reads aligned to a reference genome. A key question is how to use the reads to determine whether there is a variant on both chromosomes, on just one chromosome, or on neither chromosome. There is more than one type of variant, with SNPs and insertions/deletions being the most common. A: a true SNP on one chromosome pair, B: a deletion on one chromosome, C: a deletion on both chromosomes, D: a false variant caused by errors. It's easy to see that these look quite distinct when visualized in this manner.
We started with GIAB reference genomes, for which there is high-quality ground truth (or the closest approximation currently possible). Using multiple replicates of these genomes, we produced tens of millions of training examples in the form of multi-channel tensors encoding the HTS instrument data, and then trained a TensorFlow-based image classification model to identify the true genome sequence from the experimental data produced by the instruments. Although the resulting deep learning model, DeepVariant, had no specialized knowledge about genomics or HTS, within a year it had won the the highest SNP accuracy award at the precisionFDA Truth Challenge, outperforming state-of-the-art methods. Since then, we've further reduced the error rate by more than 50%.
DeepVariant is being released as open source software to encourage collaboration and to accelerate the use of this technology to solve real world problems. To further this goal, we partnered with Google Cloud Platform (GCP) to deploy DeepVariant workflows on GCP, available today, in configurations optimized for low-cost and fast turnarounds using scalable GCP technologies like the Pipelines API. This paired set of releases provides a smooth ramp for users to explore and evaluate the capabilities of DeepVariant in their current compute environment while providing a scalable, cloud-based solution to satisfy the needs of even the largest genomics datasets.

DeepVariant is the first of what we hope will be many contributions that leverage Google's computing infrastructure and ML expertise to both better understand the genome and to provide deep learning-based genomics tools to the community. This is all part of a broader goal to apply Google technologies to healthcare and other scientific applications, and to make the results of these efforts broadly accessible.

Interpreting Deep Neural Networks with SVCCA


Deep Neural Networks (DNNs) have driven unprecedented advances in areas such as vision, language understanding and speech recognition. But these successes also bring new challenges. In particular, contrary to many previous machine learning methods, DNNs can be susceptible to adversarial examples in classification, catastrophic forgetting of tasks in reinforcement learning, and mode collapse in generative modelling. In order to build better and more robust DNN-based systems, it is critically important to be able to interpret these models. In particular, we would like a notion of representational similarity for DNNs: can we effectively determine when the representations learned by two neural networks are same?

In our paper, “SVCCA: Singular Vector Canonical Correlation Analysis for Deep Learning Dynamics and Interpretability,” we introduce a simple and scalable method to address these points. Two specific applications of this that we look at are comparing the representations learned by different networks, and interpreting representations learned by hidden layers in DNNs. Furthermore, we are open sourcing the code so that the research community can experiment with this method.

Key to our setup is the interpretation of each neuron in a DNN as an activation vector. As shown in the figure below, the activation vector of a neuron is the scalar output it produces on the input data. For example, for 50 input images, a neuron in a DNN will output 50 scalar values, encoding how much it responds to each input. These 50 scalar values then make up an activation vector for the neuron. (Of course, in practice, we take many more than 50 inputs.)
Here a DNN is given three inputs, x1, x2, x3. Looking at a neuron inside the DNN (bolded in red, right pane), this neuron produces a scalar output zi corresponding to each input xi. These values form the activation vector of the neuron.
With this basic observation and a little more formulation, we introduce Singular Vector Canonical Correlation Analysis (SVCCA), a technique for taking in two sets of neurons and outputting aligned feature maps learned by both of them. Critically, this technique accounts for superficial differences such as permutations in neuron orderings (crucial for comparing different networks), and can detect similarities where other, more straightforward comparisons fail.

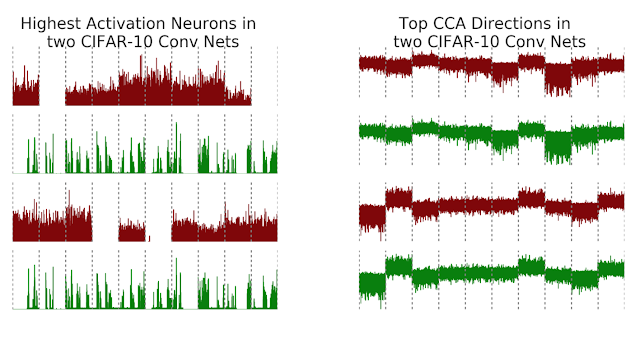
As an example, consider training two convolutional neural nets (net1 and net2, below) on CIFAR-10, a medium scale image classification task. To visualize the results of our method, we compare activation vectors of neurons with the aligned features output by SVCCA. Recall that the activation vector of a neuron is the raw scalar outputs on input images. The x-axis of the plot consists of images sorted by class (gray dotted lines showing class boundaries), and the y axis the output value of the neuron.
On the left pane, we show the two highest activation (largest euclidean norm) neurons in net1 and net2. Examining highest activations neurons has been a popular method to interpret DNNs in computer vision, but in this case, the highest activation neurons in net1 and net2 have no clear correspondence, despite both being trained on the same task. However, after applying SVCCA, (right pane), we see that the latent representations learned by both networks do indeed share some very similar features. Note that the top two rows representing aligned feature maps are close to identical, as are the second highest aligned feature maps (bottom two rows). Furthermore, these aligned mappings in the right pane also show a clear correspondence with the class boundaries, e.g. we see the top pair give negative outputs for Class 8, with the bottom pair giving a positive output for Class 2 and Class 7.

While you can apply SVCCA across networks, one can also do this for the same network, across time, enabling the study of how different layers in a network converge to their final representations. Below, we show panes that compare the representation of layers in net1 during training (y-axes) with the layers at the end of training (x-axes). For example, in the top left pane (titled “0% trained”), the x-axis shows layers of increasing depth of net1 at 100% trained, and the y axis shows layers of increasing depth at 0% trained. Each (i,j) square then tells us how similar the representation of layer i at 100% trained is to layer j at 0% trained. The input layer is at the bottom left, and is (as expected) identical at 0% to 100%. We make this comparison at several points through training, at 0%, 35%, 75% and 100%, for convolutional (top row) and residual (bottom row) nets on CIFAR-10.
Plots showing learning dynamics of convolutional and residual networks on CIFAR-10. Note the additional structure also visible: the 2x2 blocks in the top row are due to batch norm layers, and the checkered pattern in the bottom row due to residual connections.
We find evidence of bottom-up convergence, with layers closer to the input converging first, and layers higher up taking longer to converge. This suggests a faster training method, Freeze Training — see our paper for details. Furthermore, this visualization also helps highlight properties of the network. In the top row, there are a couple of 2x2 blocks. These correspond to batch normalization layers, which are representationally identical to their previous layers. On the bottom row, towards the end of training, we can see a checkerboard like pattern appear, which is due to the residual connections of the network having greater similarity to previous layers.

So far, we’ve concentrated on applying SVCCA to CIFAR-10. But applying preprocessing techniques with the Discrete Fourier transform, we can scale this method to Imagenet sized models. We applied this technique to the Imagenet Resnet, comparing the similarity of latent representations to representations corresponding to different classes:
SVCCA similarity of latent representations with different classes. We take different layers in Imagenet Resnet, with 0 indicating input and 74 indicating output, and compare representational similarity of the hidden layer and the output class. Interestingly, different classes are learned at different speeds: the firetruck class is learned faster than the different dog breeds. Furthermore, the two pairs of dog breeds (a husky-like pair and a terrier-like pair) are learned at the same rate, reflecting the visual similarity between them.
Our paper gives further details on the results we’ve explored so far, and also touches on different applications, e.g. compressing DNNs by projecting onto the SVCCA outputs, and Freeze Training, a computationally cheaper method for training deep networks. There are many followups we’re excited about exploring with SVCCA — moving on to different kinds of architectures, comparing across datasets, and better visualizing the aligned directions are just a few ideas we’re eager to try out. We look forward to presenting these results next week at NIPS 2017 in Long Beach, and we hope the code will also encourage many people to apply SVCCA to their network representations to interpret and understand what their network is learning.

Understanding Medical Conversations


Good documentation helps create good clinical care by communicating a doctor's thinking, their concerns, and their plans to the rest of the team. Unfortunately, physicians routinely spend more time doing documentation than doing what they love most — caring for patients. Part of the reason is that doctors spend ~6 hours in an 11-hour workday in the Electronic Health Records (EHR) on documentation.1 Consequently, one study found that more than half of surveyed doctors report at least one symptom of burnout.2

In order to help offload note-taking, many doctors have started using medical scribes as a part of their workflow. These scribes listen to the patient-doctor conversations and create notes for the EHR. According to a recent study, introducing scribes not only improved physician satisfaction, but also medical chart quality and accuracy.3 But the number of doctor-patient conversations that need a scribe is far beyond the capacity of people who are available for medical scribing.

We wondered: could the voice recognition technologies already available in Google Assistant, Google Home, and Google Translate be used to document patient-doctor conversations and help doctors and scribes summarize notes more quickly?
In “Speech Recognition for Medical Conversations”, we show that it is possible to build Automatic Speech Recognition (ASR) models for transcribing medical conversations. While most of the current ASR solutions in medical domain focus on transcribing doctor dictations (i.e., single speaker speech consisting of predictable medical terminology), our research shows that it is possible to build an ASR model which can handle multiple speaker conversations covering everything from weather to complex medical diagnosis.

Using this technology, we will start working with physicians and researchers at Stanford University, who have done extensive research on how scribes can improve physician satisfaction, to understand how deep learning techniques such as ASR can facilitate the scribing process of physician notes. In our pilot study, we investigate what types of clinically relevant information can be extracted from medical conversations to assist physicians in reducing their interactions with the EHR. The study is fully patient-consented and the content of the recording will be de-identified to protect patient privacy.

We hope these technologies will not only help return joy to practice by facilitating doctors and scribes with their everyday workload, but also help the patients get more dedicated and thorough medical attention, ideally, leading to better care.


1 http://www.annfammed.org/content/15/5/419.full
2 http://www.mayoclinicproceedings.org/article/S0025-6196%2815%2900716-8/abstract
3 http://www.annfammed.org/content/15/5/427.full

Tangent: Source-to-Source Debuggable Derivatives

Crossposted on the Google Research Blog

Tangent is a new, free, and open source Python library for automatic differentiation. In contrast to existing machine learning libraries, Tangent is a source-to-source system, consuming a Python function f and emitting a new Python function that computes the gradient of f. This allows much better user visibility into gradient computations, as well as easy user-level editing and debugging of gradients. Tangent comes with many more features for debugging and designing machine learning models.
This post gives an overview of the Tangent API. It covers how to use Tangent to generate gradient code in Python that is easy to interpret, debug and modify.

Neural networks (NNs) have led to great advances in machine learning models for images, video, audio, and text. The fundamental abstraction that lets us train NNs to perform well at these tasks is a 30-year-old idea called reverse-mode automatic differentiation (also known as backpropagation), which comprises two passes through the NN. First, we run a “forward pass” to calculate the output value of each node. Then we run a “backward pass” to calculate a series of derivatives to determine how to update the weights to increase the model’s accuracy.

Training NNs, and doing research on novel architectures, requires us to compute these derivatives correctly, efficiently, and easily. We also need to be able to debug these derivatives when our model isn’t training well, or when we’re trying to build something new that we do not yet understand. Automatic differentiation, or just “autodiff,” is a technique to calculate the derivatives of computer programs that denote some mathematical function, and nearly every machine learning library implements it.

Existing libraries implement automatic differentiation by tracing a program’s execution (at runtime, like TF Eager, PyTorch and Autograd) or by building a dynamic data-flow graph and then differentiating the graph (ahead-of-time, like TensorFlow). In contrast, Tangent performs ahead-of-time autodiff on the Python source code itself, and produces Python source code as its output.
As a result, you can finally read your automatic derivative code just like the rest of your program. Tangent is useful to researchers and students who not only want to write their models in Python, but also read and debug automatically-generated derivative code without sacrificing speed and flexibility.

You can easily inspect and debug your models written in Tangent, without special tools or indirection. Tangent works on a large and growing subset of Python, provides extra autodiff features other Python ML libraries don’t have, is high-performance, and is compatible with TensorFlow and NumPy.

Automatic differentiation of Python code

How do we automatically generate derivatives of plain Python code? Math functions like tf.exp or tf.log have derivatives, which we can compose to build the backward pass. Similarly, pieces of syntax, such as  subroutines, conditionals, and loops, also have backward-pass versions. Tangent contains recipes for generating derivative code for each piece of Python syntax, along with many NumPy and TensorFlow function calls.

Tangent has a one-function API:
import tangent
df = tangent.grad(f)
Here’s an animated graphic of what happens when we call tangent.grad on a Python function:
If you want to print out your derivatives, you can run
import tangent
df = tangent.grad(f, verbose=1)
Under the hood, tangent.grad first grabs the source code of the Python function you pass it. Tangent has a large library of recipes for the derivatives of Python syntax, as well as TensorFlow Eager functions. The function tangent.grad then walks your code in reverse order, looks up the matching backward-pass recipe, and adds it to the end of the derivative function. This reverse-order processing gives the technique its name: reverse-mode automatic differentiation.

The function df above only works for scalar (non-array) inputs. Tangent also supports
Although we started with TensorFlow Eager support, Tangent isn’t tied to one numeric library or another—we would gladly welcome pull requests adding PyTorch or MXNet derivative recipes.

Next Steps

Tangent is open source now at github.com/google/tangent. Go check it out for download and installation instructions. Tangent is still an experiment, so expect some bugs. If you report them to us on GitHub, we will do our best to fix them quickly.

We are working to add support in Tangent for more aspects of the Python language (e.g., closures, inline function definitions, classes, more NumPy and TensorFlow functions). We also hope to add more advanced automatic differentiation and compiler functionality in the future, such as automatic trade-off between memory and compute (Griewank and Walther 2000; Gruslys et al., 2016), more aggressive optimizations, and lambda lifting.

We intend to develop Tangent together as a community. We welcome pull requests with fixes and features. Happy deriving!

By Alex Wiltschko, Research Scientist, Google Brain Team

Acknowledgments

Bart van Merriënboer contributed immensely to all aspects of Tangent during his internship, and Dan Moldovan led TF Eager integration, infrastructure and benchmarking. Also, thanks to the Google Brain team for their support of this post and special thanks to Sanders Kleinfeld and Aleks Haecky for their valuable contribution for the technical aspects of the post.

Feature Visualization


Have you ever wondered what goes on inside neural networks? Feature visualization is a powerful tool for digging into neural networks and seeing how they work.

Our new article, published in Distill, does a deep exploration of feature visualization, introducing a few new tricks along the way!

Building on our work in DeepDream, and lots of work by others since, we are able to visualize what every neuron a strong vision model (GoogLeNet [1]) detects. Over the course of multiple layers, it gradually builds up abstractions: first it detects edges, then it uses those edges to detect textures, the textures to detect patterns, and the patterns to detect parts of objects….
But neurons don’t understand the world by themselves — they work together. So we also need to understand how they interact with each other. One approach is to explore interpolations between them. What images can make them both fire, to different extents?

Here we interpolate from a neuron that seems to detect artistic patterns to a neuron that seems to detect lizard eyes:
We can also let you try adding different pairs of neurons together, to explore the possibilities for yourself:
In addition to allowing you to play around with visualizations, we explore a variety of techniques for getting feature visualization to work, and let you experiment with using them.
Techniques for visualizing and understanding neural networks are becoming more powerful. We hope our article will help other researchers apply these techniques, and give people a sense of their potential. Check it out on Distill.

Acknowledgement
We're extremely grateful to our co-author, Ludwig Schurbert, who made incredible contributions to our paper and especially to the interactive visualizations.


Tangent: Source-to-Source Debuggable Derivatives


Tangent is a new, free, and open-source Python library for automatic differentiation. In contrast to existing machine learning libraries, Tangent is a source-to-source system, consuming a Python function f and emitting a new Python function that computes the gradient of f. This allows much better user visibility into gradient computations, as well as easy user-level editing and debugging of gradients. Tangent comes with many more features for debugging and designing machine learning models:
This post gives an overview of the Tangent API. It covers how to use Tangent to generate gradient code in Python that is easy to interpret, debug and modify.

Neural networks (NNs) have led to great advances in machine learning models for images, video, audio, and text. The fundamental abstraction that lets us train NNs to perform well at these tasks is a 30-year-old idea called reverse-mode automatic differentiation (also known as backpropagation), which comprises two passes through the NN. First, we run a “forward pass” to calculate the output value of each node. Then we run a “backward pass” to calculate a series of derivatives to determine how to update the weights to increase the model’s accuracy.

Training NNs, and doing research on novel architectures, requires us to compute these derivatives correctly, efficiently, and easily. We also need to be able to debug these derivatives when our model isn’t training well, or when we’re trying to build something new that we do not yet understand. Automatic differentiation, or just “autodiff,” is a technique to calculate the derivatives of computer programs that denote some mathematical function, and nearly every machine learning library implements it.

Existing libraries implement automatic differentiation by tracing a program’s execution (at runtime, like TF Eager, PyTorch and Autograd) or by building a dynamic data-flow graph and then differentiating the graph (ahead-of-time, like TensorFlow). In contrast, Tangent performs ahead-of-time autodiff on the Python source code itself, and produces Python source code as its output.

As a result, you can finally read your automatic derivative code just like the rest of your program. Tangent is useful to researchers and students who not only want to write their models in Python, but also read and debug automatically-generated derivative code without sacrificing speed and flexibility.

You can easily inspect and debug your models written in Tangent, without special tools or indirection. Tangent works on a large and growing subset of Python, provides extra autodiff features other Python ML libraries don’t have, is high-performance, and is compatible with TensorFlow and NumPy.

Automatic differentiation of Python code
How do we automatically generate derivatives of plain Python code? Math functions like tf.exp or  tf.log have derivatives, which we can compose to build the backward pass. Similarly, pieces of syntax, such as subroutines, conditionals, and loops, also have backward-pass versions. Tangent contains recipes for generating derivative code for each piece of Python syntax, along with many NumPy and TensorFlow function calls.

Tangent has a one-function API:
Here’s an animated graphic of what happens when we call tangent.grad on a Python function:
If you want to print out your derivatives, you can run:
Under the hood, tangent.grad first grabs the source code of the Python function you pass it. Tangent has a large library of recipes for the derivatives of Python syntax, as well as TensorFlow Eager functions. The function  tangent.grad then walks your code in reverse order, looks up the matching backward-pass recipe, and adds it to the end of the derivative function. This reverse-order processing gives the technique its name: reverse-mode automatic differentiation.

The function df above only works for scalar (non-array) inputs. Tangent also supports
Although we started with TensorFlow Eager support, Tangent isn’t tied to one numeric library or another—we would gladly welcome pull requests adding PyTorch or MXNet derivative recipes.

Next Steps
Tangent is open source now at github.com/google/tangent. Go check it out for download and installation instructions. Tangent is still an experiment, so expect some bugs. If you report them to us on GitHub, we will do our best to fix them quickly.

We are working to add support in Tangent for more aspects of the Python language (e.g., closures, inline function definitions, classes, more NumPy and TensorFlow functions). We also hope to add more advanced automatic differentiation and compiler functionality in the future, such as automatic trade-off between memory and compute (Griewank and Walther 2000; Gruslys et al., 2016), more aggressive optimizations, and lambda lifting.

We intend to develop Tangent together as a community. We welcome pull requests with fixes and features. Happy differentiating!

Acknowledgments
Bart van Merriënboer contributed immensely to all aspects of Tangent during his internship, and Dan Moldovan led TF Eager integration, infrastructure and benchmarking. Also, thanks to the Google Brain team for their support of this post and special thanks to Sanders Kleinfeld, Matt Johnson and Aleks Haecky for their valuable contribution for the technical aspects of the post.

Latest Innovations in TensorFlow Serving


Since initially open-sourcing TensorFlow Serving in February 2016, we’ve made some major enhancements. Let’s take a look back at where we started, review our progress, and share where we are headed next.

Before TensorFlow Serving, users of TensorFlow inside Google had to create their own serving system from scratch. Although serving might appear easy at first, one-off serving solutions quickly grow in complexity. Machine Learning (ML) serving systems need to support model versioning (for model updates with a rollback option) and multiple models (for experimentation via A/B testing), while ensuring that concurrent models achieve high throughput on hardware accelerators (GPUs and TPUs) with low latency. So we set out to create a single, general TensorFlow Serving software stack.

We decided to make it open-sourceable from the get-go, and development started in September 2015. Within a few months, we created the initial end-to-end working system and our open-source release in February 2016.

Over the past year and half, with the help of our users and partners inside and outside our company, TensorFlow Serving has advanced performance, best practices, and standards:
  • Out-of-the-box optimized serving and customizability: We now offer a pre-built canonical serving binary, optimized for modern CPUs with AVX, so developers don't need to assemble their own binary from our libraries unless they have exotic needs. At the same time, we added a registry-based framework, allowing our libraries to be used for custom (or even non-TensorFlow) serving scenarios.
  • Multi-model serving: Going from one model to multiple concurrently-served models presents several performance obstacles. We serve multiple models smoothly by (1) loading in isolated thread pools to avoid incurring latency spikes on other models taking traffic; (2) accelerating initial loading of all models in parallel upon server start-up; (3) multi-model batch interleaving to multiplex hardware accelerators (GPUs/TPUs).
  • Standardized model format: We added SavedModel to TensorFlow 1.0, giving the community a single standard model format that works across training and serving.
  • Easy-to-use inference APIs: We released easy-to-use APIs for common inference tasks (classification, regression) that we know work for a wide swathe of our applications. To support more advanced use-cases we support a lower-level tensor-based API (predict) and a new multi-inference API that enables multi-task modeling.
All of our work has been informed by close collaborations with: (a) Google’s ML SRE team, which helps ensure we are robust and meet internal SLAs; (b) other Google machine learning infrastructure teams including ads serving and TFX; (c) application teams such as Google Play; (d) our partners at the UC Berkeley RISE Lab, who explore complementary research problems with the Clipper serving system; (e) our open-source user base and contributors.

TensorFlow Serving is currently handling tens of millions of inferences per second for 1100+ of our own projects including Google’s Cloud ML Prediction. Our core serving code is available to all via our open-source releases.

Looking forward, our work is far from done and we are exploring several avenues of innovation. Today we are excited to share early progress in two experimental areas:
  • Granular batching: A key technique we employ to achieve high throughput on specialized hardware (GPUs and TPUs) is "batching": processing multiple examples jointly for efficiency. We are developing technology and best practices to improve batching to: (a) enable batching to target just the GPU/TPU portion of the computation, for maximum efficiency; (b) enable batching within recursive neural networks, used to process sequence data e.g. text and event sequences. We are experimenting with batching arbitrary sub-graphs using the Batch/Unbatch op pair.
  • Distributed model serving: We are looking at model sharding techniques as a means of handling models that are too large to fit on one server node or sharing sub-models in a memory-efficient way. We recently launched a 1TB+ model in production with good results, and hope to open-source this capability soon.
Thanks again to all of our users and partners who have contributed feedback, code and ideas. Join the project at: github.com/tensorflow/serving.

Eager Execution: An imperative, define-by-run interface to TensorFlow

Posted by Asim Shankar and Wolff Dobson, Google Brain Team

Today, we introduce eager execution for TensorFlow.

Eager execution is an imperative, define-by-run interface where operations are executed immediately as they are called from Python. This makes it easier to get started with TensorFlow, and can make research and development more intuitive.

The benefits of eager execution include:

  • Fast debugging with immediate run-time errors and integration with Python tools
  • Support for dynamic models using easy-to-use Python control flow
  • Strong support for custom and higher-order gradients
  • Almost all of the available TensorFlow operations

Eager execution is available now as an experimental feature, so we're looking for feedback from the community to guide our direction.

To understand this all better, let's look at some code. This gets pretty technical; familiarity with TensorFlow will help.

Using Eager Execution

When you enable eager execution, operations execute immediately and return their values to Python without requiring a Session.run(). For example, to multiply two matrices together, we write this:

import tensorflow as tf
import tensorflow.contrib.eager as tfe

tfe.enable_eager_execution()

x = [[2.]]
m = tf.matmul(x, x)

It's straightforward to inspect intermediate results with print or the Python debugger.


print(m)
# The 1x1 matrix [[4.]]

Dynamic models can be built with Python flow control. Here's an example of the Collatz conjecture using TensorFlow's arithmetic operations:

a = tf.constant(12)
counter = 0
while not tf.equal(a, 1):
if tf.equal(a % 2, 0):
a = a / 2
else:
a = 3 * a + 1
print(a)

Here, the use of the tf.constant(12) Tensor object will promote all math operations to tensor operations, and as such all return values with be tensors.

Gradients

Most TensorFlow users are interested in automatic differentiation. Because different operations can occur during each call, we record all forward operations to a tape, which is then played backwards when computing gradients. After we've computed the gradients, we discard the tape.

If you're familiar with the autograd package, the API is very similar. For example:

def square(x):
return tf.multiply(x, x)

grad = tfe.gradients_function(square)

print(square(3.)) # [9.]
print(grad(3.)) # [6.]

The gradients_function call takes a Python function square() as an argument and returns a Python callable that computes the partial derivatives of square() with respect to its inputs. So, to get the derivative of square() at 3.0, invoke grad(3.0), which is 6.

The same gradients_function call can be used to get the second derivative of square:

gradgrad = tfe.gradients_function(lambda x: grad(x)[0])

print(gradgrad(3.)) # [2.]

As we noted, control flow can cause different operations to run, such as in this example.

def abs(x):
return x if x > 0. else -x

grad = tfe.gradients_function(abs)

print(grad(2.0)) # [1.]
print(grad(-2.0)) # [-1.]

Custom Gradients

Users may want to define custom gradients for an operation, or for a function. This may be useful for multiple reasons, including providing a more efficient or more numerically stable gradient for a sequence of operations.

Here is an example that illustrates the use of custom gradients. Let's start by looking at the function log(1 + ex), which commonly occurs in the computation of cross entropy and log likelihoods.

def log1pexp(x):
return tf.log(1 + tf.exp(x))
grad_log1pexp = tfe.gradients_function(log1pexp)

# The gradient computation works fine at x = 0.
print(grad_log1pexp(0.))
# [0.5]
# However it returns a `nan` at x = 100 due to numerical instability.
print(grad_log1pexp(100.))
# [nan]

We can use a custom gradient for the above function that analytically simplifies the gradient expression. Notice how the gradient function implementation below reuses an expression (tf.exp(x)) that was computed during the forward pass, making the gradient computation more efficient by avoiding redundant computation.

@tfe.custom_gradient
def log1pexp(x):
e = tf.exp(x)
def grad(dy):
return dy * (1 - 1 / (1 + e))
return tf.log(1 + e), grad
grad_log1pexp = tfe.gradients_function(log1pexp)

# Gradient at x = 0 works as before.
print(grad_log1pexp(0.))
# [0.5]
# And now gradient computation at x=100 works as well.
print(grad_log1pexp(100.))
# [1.0]

Building models

Models can be organized in classes. Here's a model class that creates a (simple) two layer network that can classify the standard MNIST handwritten digits.

class MNISTModel(tfe.Network):
def __init__(self):
super(MNISTModel, self).__init__()
self.layer1 = self.track_layer(tf.layers.Dense(units=10))
self.layer2 = self.track_layer(tf.layers.Dense(units=10))
def call(self, input):
"""Actually runs the model."""
result = self.layer1(input)
result = self.layer2(result)
return result

We recommend using the classes (not the functions) in tf.layers since they create and contain model parameters (variables). Variable lifetimes are tied to the lifetime of the layer objects, so be sure to keep track of them.

Why are we using tfe.Network? A Network is a container for layers and is a tf.layer.Layer itself, allowing Networkobjects to be embedded in other Network objects. It also contains utilities to assist with inspection, saving, and restoring.

Even without training the model, we can imperatively call it and inspect the output:

# Let's make up a blank input image
model = MNISTModel()
batch = tf.zeros([1, 1, 784])
print(batch.shape)
# (1, 1, 784)
result = model(batch)
print(result)
# tf.Tensor([[[ 0. 0., ...., 0.]]], shape=(1, 1, 10), dtype=float32)

Note that we do not need any placeholders or sessions. The first time we pass in the input, the sizes of the layers' parameters are set.

To train any model, we define a loss function to optimize, calculate gradients, and use an optimizer to update the variables. First, here's a loss function:

def loss_function(model, x, y):
y_ = model(x)
return tf.nn.softmax_cross_entropy_with_logits(labels=y, logits=y_)

And then, our training loop:

optimizer = tf.train.GradientDescentOptimizer(learning_rate=0.001)
for (x, y) in tfe.Iterator(dataset):
grads = tfe.implicit_gradients(loss_function)(model, x, y)
optimizer.apply_gradients(grads)

implicit_gradients() calculates the derivatives of loss_function with respect to all the TensorFlow variables used during its computation.

We can move computation to a GPU the same way we've always done with TensorFlow:

with tf.device("/gpu:0"):
for (x, y) in tfe.Iterator(dataset):
optimizer.minimize(lambda: loss_function(model, x, y))

(Note: We're shortcutting storing our loss and directly calling the optimizer.minimize, but you could also use the apply_gradients() method above; they are equivalent.)

Using Eager with Graphs

Eager execution makes development and debugging far more interactive, but TensorFlow graphs have a lot of advantages with respect to distributed training, performance optimizations, and production deployment.

The same code that executes operations when eager execution is enabled will construct a graph describing the computation when it is not. To convert your models to graphs, simply run the same code in a new Python session where eager execution hasn't been enabled, as seen, for example, in the MNIST example. The value of model variables can be saved and restored from checkpoints, allowing us to move between eager (imperative) and graph (declarative) programming easily. With this, models developed with eager execution enabled can be easily exported for production deployment.

In the near future, we will provide utilities to selectively convert portions of your model to graphs. In this way, you can fuse parts of your computation (such as internals of a custom RNN cell) for high-performance, but also keep the flexibility and readability of eager execution.

How does my code change?

Using eager execution should be intuitive to current TensorFlow users. There are only a handful of eager-specific APIs; most of the existing APIs and operations work with eager enabled. Some notes to keep in mind:

  • As with TensorFlow generally, we recommend that if you have not yet switched from queues to using tf.data for input processing, you should. It's easier to use and usually faster. For help, see this blog post and the documentation page.
  • Use object-oriented layers, like tf.layer.Conv2D() or Keras layers; these have explicit storage for variables.
  • For most models, you can write code so that it will work the same for both eager execution and graph construction. There are some exceptions, such as dynamic models that use Python control flow to alter the computation based on inputs.
  • Once you invoke tfe.enable_eager_execution(), it cannot be turned off. To get graph behavior, start a new Python session.

Getting started and the future

This is still a preview release, so you may hit some rough edges. To get started today:

There's a lot more to talk about with eager execution and we're excited… or, rather, we're eager for you to try it today! Feedback is absolutely welcome.