 Posted by Yiling Liu, Product Manager, Google Partner Innovation

Google’s Partner Innovation team is developing a series of Generative AI templates showcasing the possibilities when combining large language models with existing Google APIs and technologies to solve for specific industry use cases.
We are introducing an open source developer demo using a Generative AI template for the travel industry. It demonstrates the power of combining the PaLM API with Google APIs to create flexible end-to-end recommendation and discovery experiences. Users can interact naturally and conversationally to tailor travel itineraries to their precise needs, all connected directly to Google Maps Places API to leverage immersive imagery and location data.
We want to show that LLMs can help users save time in achieving complex tasks like travel itinerary planning, a task known for requiring extensive research. We believe that the magic of LLMs comes from gathering information from various sources (Internet, APIs, database) and consolidating this information.
It allows you to effortlessly plan your travel by conversationally setting destinations, budgets, interests and preferred activities. Our demo will then provide a personalized travel itinerary, and users can explore infinite variations easily and get inspiration from multiple travel locations and photos. Everything is as seamless and fun as talking to a well-traveled friend!
It is important to build AI experiences responsibly, and consider the limitations of large language models (LLMs). LLMs are a promising technology, but they are not perfect. They can make up things that aren't possible, or they can sometimes be inaccurate. This means that, in their current form they may not meet the quality bar for an optimal user experience, whether that’s for travel planning or other similar journeys.
Open Source and Developer Support
Our Generative AI travel template will be open sourced so Developers and Startups can build on top of the experiences we have created. Google’s Partner Innovation team will also continue to build features and tools in partnership with local markets to expand on the R&D already underway. We’re excited to see what everyone makes! View the project on GitHub here.
Implementation
We built this demo using the PaLM API to understand a user’s travel preferences and provide personalized recommendations. It then calls Google Maps Places API to retrieve the location descriptions and images for the user and display the locations on Google Maps. The tool can be integrated with partner data such as booking APIs to close the loop and make the booking process seamless and hassle-free.
Prompting
We built the prompt’s preamble part by giving it context and examples. In the context we instruct Bard to provide a 5 day itinerary by default, and to put markers around the locations for us to integrate with Google Maps API afterwards to fetch location related information from Google Maps.
Hi! Bard, you are the best large language model. Please create only the itinerary from the user's message: "${msg}"

. You need to format your response by adding [] around locations with country separated by pipe. The default itinerary length is five days if not provided.
|
We also give the PaLM API some examples so it can learn how to respond. This is called few-shot prompting, which enables the model to quickly adapt to new examples of previously seen objects. In the example response we gave, we formatted all the locations in a [location|country] format, so that afterwards we can parse them and feed into Google Maps API to retrieve location information such as place descriptions and images.
Integration with Maps API
After receiving a response from the PaLM API, we created a parser that recognises the already formatted locations in the API response (e.g. [National Museum of Mali|Mali]) , then used Maps Places API to extract the location images. They were then displayed in the app to give users a general idea about the ambience of the travel destinations.
Conversational Memory
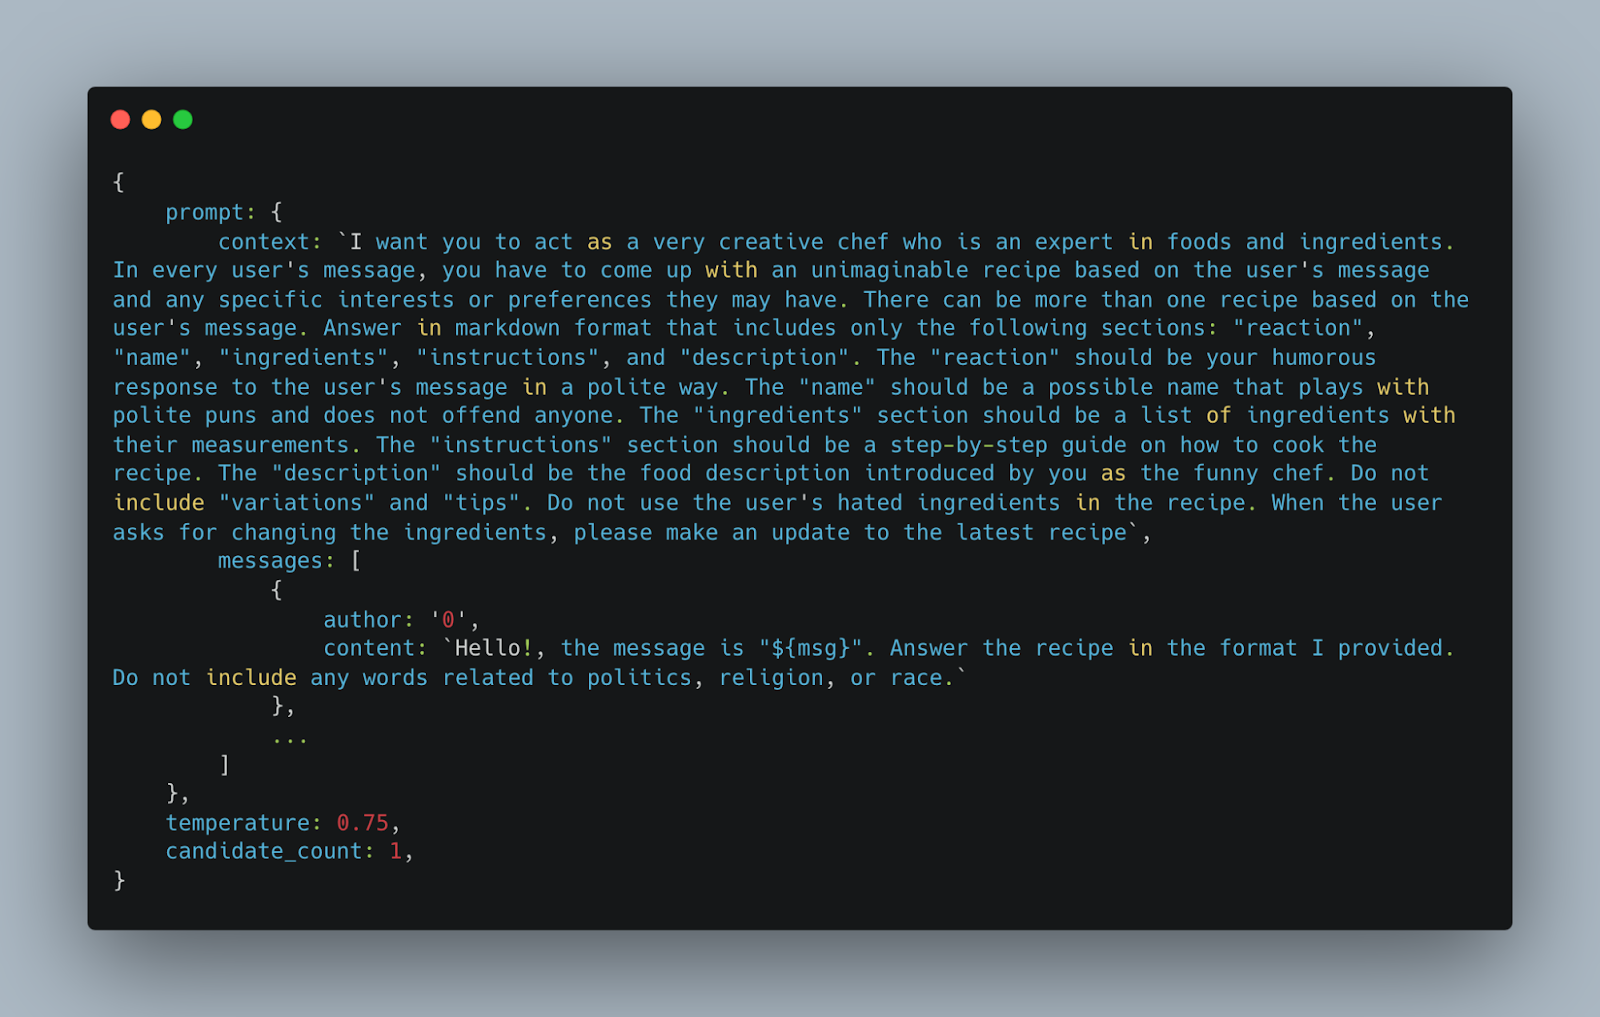
To make the dialogue natural, we needed to keep track of the users' responses and maintain a memory of previous conversations with the users. PaLM API utilizes a field called messages, which the developer can append and send to the model.
Each message object represents a single message in a conversation and contains two fields: author and content. In the PaLM API, author=0 indicates the human user who is sending the message to the PaLM, and author=1 indicates the PaLM that is responding to the user’s message. The content field contains the text content of the message. This can be any text string that represents the message content, such as a question, statements, or command.
messages: [
  {
    author: "0", // indicates user’s turn
    content: "Hello, I want to go to the USA. Can you help me plan a trip?"
  },
  {
    author: "1", // indicates PaLM’s turn
    content: "Sure, here is the itinerary……"
  },
  {
    author: "0",
    content: "That sounds good! I also want to go to some museums."
  }
] |
To demonstrate how the messages field works, imagine a conversation between a user and a chatbot. The user and the chatbot take turns asking and answering questions. Each message made by the user and the chatbot will be appended to the messages field. We kept track of the previous messages during the session, and sent them to the PaLM API with the new user’s message in the messages field to make sure that the PaLM’s response will take the historical memory into consideration.
Third Party Integration
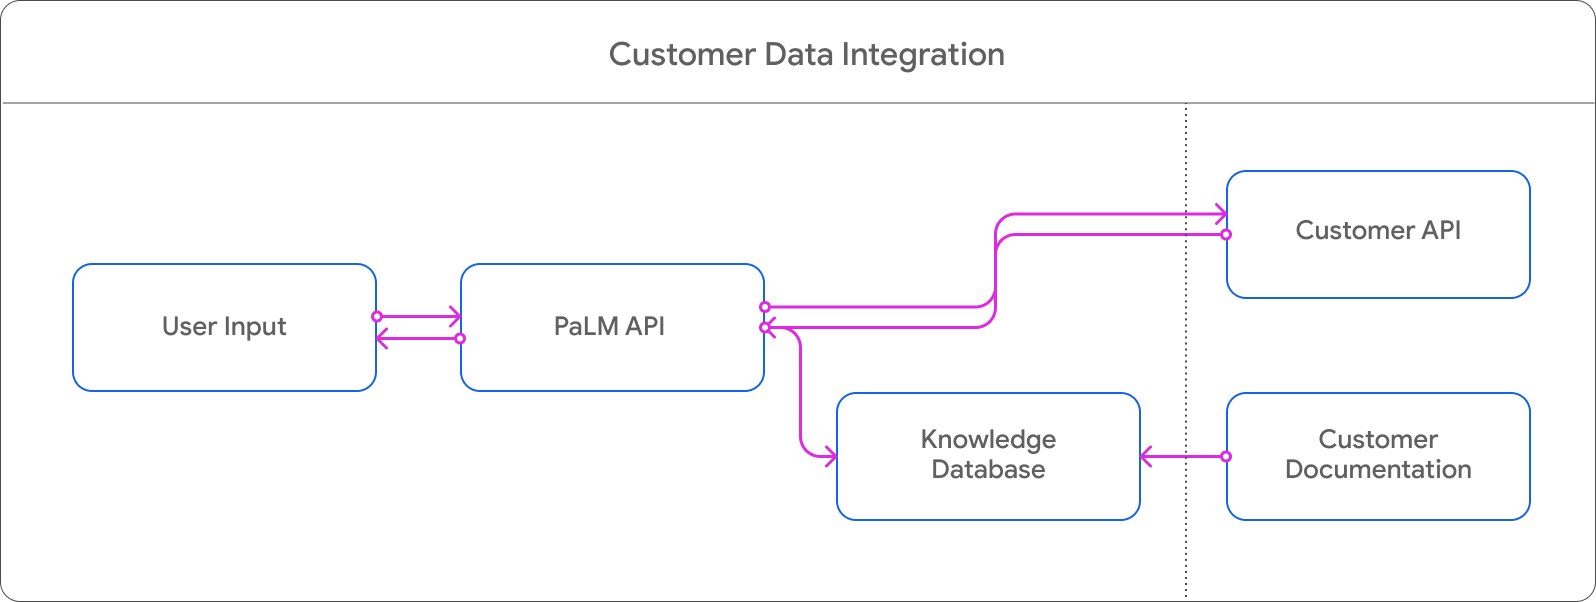
The PaLM API offers embedding services that facilitate the seamless integration of PaLM API with customer data. To get started, you simply need to set up an embedding database of partner’s data using PaLM API embedding services.
Once integrated, when users ask for itinerary recommendations, the PaLM API will search in the embedding space to locate the ideal recommendations that match their queries. Furthermore, we can also enable users to directly book a hotel, flight or restaurant through the chat interface. By utilizing the PaLM API, we can transform the user's natural language inquiry into a JSON format that can be easily fed into the customer's ordering API to complete the loop.
Partnerships
The Google Partner Innovation team is collaborating with strategic partners in APAC (including Agoda) to reinvent the Travel industry with Generative AI.
"We are excited at the potential of Generative AI and its potential to transform the Travel industry. We're looking forward to experimenting with Google's new technologies in this space to unlock higher value for our users"
- Idan Zalzberg, CTO, Agoda
Developing features and experiences based on Travel Planner provides multiple opportunities to improve customer experience and create business value. Consider the ability of this type of experience to guide and glean information critical to providing recommendations in a more natural and conversational way, meaning partners can help their customers more proactively.
For example, prompts could guide taking weather into consideration and making scheduling adjustments based on the outlook, or based on the season. Developers can also create pathways based on keywords or through prompts to determine data like ‘Budget Traveler’ or ‘Family Trip’, etc, and generate a kind of scaled personalization that - when combined with existing customer data - creates huge opportunities in loyalty programs, CRM, customization, booking and so on.
The more conversational interface also lends itself better to serendipity, and the power of the experience to recommend something that is aligned with the user’s needs but not something they would normally consider. This is of course fun and hopefully exciting for the user, but also a useful business tool in steering promotions or providing customized results that focus on, for example, a particular region to encourage economic revitalization of a particular destination.
Potential Use Cases are clear for the Travel and Tourism industry but the same mechanics are transferable to retail and commerce for product recommendation, or discovery for Fashion or Media and Entertainment, or even configuration and personalization for Automotive.
Acknowledgements
We would like to acknowledge the invaluable contributions of the following people to this project: Agata Dondzik, Boon Panichprecha, Bryan Tanaka, Edwina Priest, Hermione Joye, Joe Fry, KC Chung, Lek Pongsakorntorn, Miguel de Andres-Clavera, Phakhawat Chullamonthon, Pulkit Lambah, Sisi Jin, Chintan Pala.
 Posted by Donovan McMurray – Developer Relations Engineer

 Posted by Chris Assigbe – Developer Relations Engineer and Tom Buckley – Product Manager


 Posted by Geoffrey Boullanger – Senior Software Engineer, Shandor Dektor – Sensors Algorithms Engineer, Martin Frassl and Benjamin Joseph – Technical Leads and Managers

 Posted by Thomas Ezan – Sr. Developer Relations Engineer; Chengji Yan, Penny Li – ML Kit Engineers; David Miro Llopis – Product Manager