Tag Archives: Develop

Build flexible layouts with FlexboxLayout

Posted by Takeshi Hagikura, Developer Programs Engineer

At Google I/O last year we announced ConstraintLayout, which enables you to build complex layouts while maintaining a flat view hierarchy. It is also fully supported in Android Studio's Visual Layout Editor.

At the same time, we open sourced FlexboxLayout to bring the same functionalities of the CSS Flexible Layout module to Android. Here are some cases where FlexboxLayout is particularly effective.

FlexboxLayout can be interpreted as an advanced LinearLayout because both layouts align their child views sequentially. The significant difference between LinearLayout and FlexboxLayout is that FlexboxLayout has a feature for wrapping.

That means if you add the flexWrap="wrap" attribute, FlexboxLayout puts a view to a new line if there is not enough space left in the current line as shown in the picture below.


One layout for various screen sizes

With that characteristic in mind, let's take a case where you want to put views sequentially but have them move to new lines if the available space changes (due to a device factor, orientation changes or the window resizing in the multi-window mode).


Nexus5X portrait


Nexus5X landscape

Pixel C with multi window mode enabled, divider line on the left.


Pixel C with multi window mode enabled, divider line on the middle.


Pixel C with multi window mode enabled, divider line on the right.

You would need to define multiple DP-bucket layouts (such as layout-600dp, layout-720dp, layout-1020dp) to handle various screen sizes with traditional layouts such as LinearLayout or RelativeLayout. But the dialog above is built with a single FlexboxLayout.

The technique used in the example is setting the flexWrap="wrap" as explained above,

<com .google.android.flexbox.flexboxlayout 
     android:layout_width="match_parent" 
     android:layout_height="wrap_content" 
     app:flexwrap="wrap">
then you can get the following layout where child views are aligned to a new line instead of overflowing its parent.


Another technique I'd like to highlight is setting the layout_flexGrow attribute to an individual child. This helps improve the look of the final layout when free space is left over. The layout_flexGrow attribute works similar to the layout_weight attribute in LinearLayout. That means FlexboxLayout will distribute the remaining space according to the layout_flexGrow value set to each child in the same line.

In the example below, it assumes each child has the layout_flexGrow attribute set to 1, so free space will be evenly distributed to each of them.
 <android .support.design.widget.TextInputLayout
     android:layout_width="100dp"
     android:layout_height="wrap_content" 
     app:layout_flexgrow="1">


You can check out the complete layout xml file in the GitHub repository.

RecyclerView integration 

Another advantage of FlexboxLayout is that it can be integrated with RecyclerView. With the latest release of the alpha version the new FlexboxLayoutManager extends RecyclerView.LayoutManager, now you can make use of the Flexbox functionalities in a scrollable container in much more memory-efficient way.

Note that you can still achieve a scrollable Flexbox container with FlexboxLayout wrapped with ScrollView. But, you will be likely to experience jankiness or even an OutOfMemoryError if the number of items contained in the layout is large, as FlexboxLayout doesn't take view recycling into account for the views that go off the screen as the user scrolls.

(If you would like to learn more about the RecyclerView in details, you can check out the videos from the Android UI toolkit team such as 1, 2)

A real world example where the RecyclerView integration is useful is for apps like the Google Photos app or News apps, both expect large number of items while needing to handle various width of items.

One example is found in the demo application in the FlexboxLayout repository. As you can see in the repository, each image shown in RecyclerView has a different width. But by setting the flexWrap setting to wrap,

FlexboxLayoutManager layoutManager = new FlexboxLayoutManager();
layoutManager.setFlexWrap(FlexWrap.WRAP);
and setting the flexGrow (as you can see, you can configure the attributes through FlexboxLayoutManager and FlexboxLayoutManager.LayoutParams for child attributes instead of configuring it from xml) attribute to a positive value for each child,
void bindTo(Drawable drawable) {
  mImageView.setImageDrawable(drawable);
  ViewGroup.LayoutParams lp = mImageView.getLayoutParams();
  if (lp instanceof FlexboxLayoutManager.LayoutParams) {
    FlexboxLayoutManager.LayoutParams flexboxLp = 
        (FlexboxLayoutManager.LayoutParams) mImageView.getLayoutParams();
    flexboxLp.setFlexGrow(1.0f);
  }
}
you can see every image fits within the layout nicely regardless of the screen orientation.


If you would like to see complete FlexboxLayout example, you can check:


What's next?

Check out the full documentation for other attributes to build flexible layouts tailored for your needs. We're very open to hear your feedback, if you find any issues or feature requests, please file an issue on the GitHub repository.


Get a sneak peek at Android Nougat 7.1.2

Posted by Dave Burke, VP of Engineering

The next maintenance release for Android Nougat -- 7.1.2 -- is just around the corner! To get the recipe just right, starting today, we're rolling out a public beta to eligible devices that are enrolled in the Android Beta Program, including Pixel and Pixel XL, Nexus 5X, Nexus Player, and Pixel C devices. We're also preparing an update for Nexus 6P that we expect to release soon.

Android 7.1.2 is an incremental maintenance release focused on refinements, so it includes a number of bugfixes and optimizations, along with a small number of enhancements for carriers and users.

If you'd like to try the public beta for Android 7.1.2, the easiest way is through the Android Beta Program. If you have an eligible device that's already enrolled, you're all set -- your device will get the public beta update in the next few days and no action is needed on your part. If your device isn't enrolled, it only takes a moment to visit android.com/beta and opt-in your eligible Android phone or tablet -- you'll soon receive the public beta update over-the-air. As always, you can also download and flash this update manually.

We're expecting to launch the final release of the Android 7.1.2 in just a couple of months, Like the beta, it will be available for for Pixel, Pixel XL, Nexus 5X, Nexus 6P, Nexus Player, and Pixel C devices. Meanwhile we welcome your feedback or requests in the Android Beta community as we work towards the final over-the-air update. Thanks for being part of the public beta!

App Security Improvements: Looking back at 2016

Posted by Rahul Mishra, Android Security Program Manager
In April 2016, the Android Security team described how the Google Play App Security Improvement (ASI) program has helped developers fix security issues in 100,000 applications. Since then, we have detected and notified developers of 11 new security issues and provided developers with resources and guidance to update their apps. Because of this, over 90,000 developers have updated over 275,000 apps!
ASI now notifies developers of 26 potential security issues. To make this process more transparent, we introduced a new page where developers can find information about all these security issues in one place. This page includes links to help center articles containing instructions and additional support contacts. Developers can use this page as a resource to learn about new issues and keep track of all past issues.

Make sure to check out our new Security for Android Developers page, which highlights the latest security posts, security best practices documents and security checklist. These resources are all aimed at improving your understanding of general security concepts and giving you examples that can help you address app-specific issues.

How you can help:
For feedback or questions, please reach out to us through the Google PlayDeveloper Help Center.
To report potential security issues in apps, email us at [email protected].

Introducing the ExifInterface Support Library

With the release of the 25.1.0 Support Library, there's a new entry in the family: the ExifInterface Support Library. With significant improvements introduced in Android 7.1 to the framework's ExifInterface, it only made sense to make those available to all API 9+ devices via the Support Library's ExifInterface.

The basics are still the same: the ability to read and write Exif tags embedded within image files: now with 140 different attributes (almost 100 of them new to Android 7.1/this Support Library!) including information about the camera itself, the camera settings, orientation, and GPS coordinates.

Camera Apps: Writing Exif Attributes

For Camera apps, the writing is probably the most important - writing attributes is still limited to JPEG image files. Now, normally you wouldn't need to use this during the actual camera capturing itself - you'd instead be calling the Camera2 API CaptureRequest.Builder.set() with JPEG_ORIENTATION, JPEG_GPS_LOCATION or the equivalents in the Camera1 Camera.Parameters. However, using ExifInterface allows you to make changes to the file after the fact (say, removing the location information on the user's request).

Reading Exif Attributes

For the rest of us though, reading those attributes is going to be our bread-and-butter; this is where we see the biggest improvements.

Firstly, you can read Exif data from JPEG and raw images (specifically, DNG, CR2, NEF, NRW, ARW, RW2, ORF, PEF, SRW and RAF files). Under the hood, this was a major restructuring, removing all native dependencies and building an extensive test suite to ensure that everything actually works.

For apps that receive images from other apps with a content:// URI (such as those sent by apps that target API 24 or higher), ExifInterface now works directly off of an InputStream; this allows you to easily extract Exif information directly out of content:// URIs you receive without having to create a temporary file.

Uri uri; // the URI you've received from the other app
InputStream in;
try {
  in = getContentResolver().openInputStream(uri);
  ExifInterface exifInterface = new ExifInterface(in);
  // Now you can extract any Exif tag you want
  // Assuming the image is a JPEG or supported raw format
} catch (IOException e) {
  // Handle any errors
} finally {
  if (in != null) {
    try {
      in.close();
    } catch (IOException ignored) {}
  }
}

Note: ExifInterface will not work with remote InputStreams, such as those returned from a HttpURLConnection. It is strongly recommended to only use them with content:// or file:// URIs.

For most attributes, you'd simply use the getAttributeInt(), getAttributeDouble(), or getAttribute() (for Strings) methods as appropriate.

One of the most important attributes when it comes to displaying images is the image orientation, stored in the aptly-named TAG_ORIENTATION, which returns one of the ORIENTATION_ constants. To convert this to a rotation angle, you can post-process the value.

int rotation = 0;
int orientation = exifInterface.getAttributeInt(
    ExifInterface.TAG_ORIENTATION,
    ExifInterface.ORIENTATION_NORMAL);
switch (orientation) {
  case ExifInterface.ORIENTATION_ROTATE_90:
    rotation = 90;
    break;
  case ExifInterface.ORIENTATION_ROTATE_180:
    rotation = 180;
    break;
  case ExifInterface.ORIENTATION_ROTATE_270:
    rotation = 270;
    break;
}

There are some helper methods to extract values from specific Exif tags. For location data, the getLatLong() method gives you the latitude and longitude as floats and getAltitude() will give you the altitude in meters. Some images also embed a small thumbnail. You can check for its existence with hasThumbnail() and then extract the byte[] representation of the thumbnail with getThumbnail() - perfect to pass to BitmapFactory.decodeByteArray().

Working with Exif: Everything is optional

One thing that is important to understand with Exif data is that there are no required tags: each and every tag is optional - some services even specifically strip Exif data. Therefore throughout your code, you should always handle cases where there is no Exif data, either due to no data for a specific attribute or an image format that doesn't support Exif data at all (say, the ubiquitous PNGs or WebP images).

Add the ExifInterface Support Library to your project with the following dependency:

compile "com.android.support:exifinterface:25.1.0"

But when an Exif attribute is exactly what you need to prevent a mis-rotated image in your app, the ExifInterface Support Library is just what you need to #BuildBetterApps

Games authentication adopting Google Sign-In API

Posted by Clayton Wilkinson, Developer Platform Engineer

Some changes are coming to Play Game Services in early 2017:

Changes to Google API Client building

In November, we announced an update to Google Sign-In API. Play Game Services is being updated to use Google Sign-In API for authentication. The advantages are:

  • Games and Sign-In in same client connection.
  • Single API for getting Auth code to send to backend servers.

This change unifies the Google Sign-in and the Games API Sign-in, so there are updates to how to build the Google API Client:

// Defaults to Games Lite scope, no server component
  GoogleSignInOptions gso = new
     GoogleSignInOptions.Builder(GoogleSignInOptions.DEFAULT_GAMES_SIGN_IN).build();

// OR for apps with a server component
   GoogleSignInOptions gso = new
     GoogleSignInOptions.Builder(GoogleSignInOptions.DEFAULT_GAMES_SIGN_IN)
         .requestServerAuthCode(SERVER_CLIENT_ID)
         .build();

// OR for developers who need real user Identity
  GoogleSignInOptions gso = new
     GoogleSignInOptions.Builder(GoogleSignInOptions.DEFAULT_GAMES_SIGN_IN)
         .requestEmail()
         .build();

// Build the api client.
     mApiClient = new GoogleApiClient.Builder(this)
                .addApi(Games.API)
                .addApi(Auth.GOOGLE_SIGN_IN_API, gso)
                .addConnectionCallbacks(this)
                .build();
    }

 @Override
    public void onConnected(Bundle connectionHint) {
        if (mApiClient.hasConnectedApi(Games.API)) {
            Auth.GoogleSignInApi.silentSignIn(mApiClient).setResultCallback(
                   new ResultCallback() {
                       @Override
                       public void onResult(GoogleSignInResult googleSignInResult) {
                           // In this case, we are sure the result is a success.
                           GoogleSignInAccount acct = 
                              googleSignInResult.getGoogleSignInAccount());
 
                          // For Games with a server, send the auth code to your server.
                          String serverAuthCode = signInAccount.getServerAuthCode();
 
                         // Use the API client as normal.
                        Player player = Games.API.getCurrentPlayer(mApiClient);
                       }
                   }
            );
        } else {
            onSignedOut();
        }
    }

Account creation within iOS is no longer supported

  • Currently, there is no support for new players to create a Play Games account on iOS. Additionally, the Google+ integration has been removed from iOS. As a result "social" APIs will return result codes indicating success, but return empty lists. This includes the "standard" UIs for leaderboards and multiplayer invitations.

Google+ is no longer integrated

  • Announced last year, Games is decoupled from Google+ during this transition. As a result the public APIs for getting connected players via circles stopped working, but the standard UIs for multiplayer invitations and social leaderboards continued to work. Starting from February 2017, the standard UIs will also not display the Social graph results as Google+ data becomes inaccessible. This will affect multiplayer games, social leaderboards, and gifts API on Android. The effect will be that these APIs will return successfully, but with an empty list of players.

List of APIs that are deprecated by removing Google+ integration (and their C++ equivalents):

  1. Games.Players.getPlayerSearchIntent()
  2. Games.Players.loadConnectedPlayers()
  3. Games.Players.loadInvitablePlayers()
  4. The value LeaderboardVariant.COLLECTION_SOCIAL
  5. Invitations.loadInvitations()
  6. RealtimeMultiplayer.getSelectOpponentsIntent()
  7. TurnBasedMultiplayer.getSelectOpponentsIntent()
  8. All methods in the Requests package.

We realize this is a large change, but moving forward Play Game Services are much better aligned with the rest of the Mobile platform from Google and will lead to better developer experience for Android game developers.

Formatting text with the Google Slides API

Originally posted on G Suite Developers blog

Posted by Wesley Chun (@wescpy), Developer Advocate, G Suite

It's common knowledge that presentations utilize a set of images to impart ideas to the audience. As a result, one of the best practices for creating great slide decks is to minimize the overall amount of text. It means that if you do have text in a presentation, the (few) words you use must have higher impact and be visually appealing. This is even more true when the slides are generated by a software application, say using the Google Slides API, rather than being crafted by hand.

The G Suite team recently launched the first Slides API, opening up a whole new category of applications. Since then, we've published several videos to help you realize some of those possibilities, showing you how to replace text and images in slides as well as how to generate slides from spreadsheet data. To round out this trifecta of key API use cases, we're adding text formatting to the conversation.

Developers manipulate text in Google Slides by sending API requests. Similar to the Google Sheets API, these requests come in the form of JSON payloads sent to the API's batchUpdate() method. Here's the JavaScript for inserting text in some shape (shapeID) on a slide:

{
"insertText": {
"objectId": shapeID,
"text": "Hello World!\n"
}

In the video, developers learn that writing text, such as the request above, is less complex than reading or formatting because both the latter require developers to know how text on a slide is structured. Notice for writing that just the copy, and optionally an index, are all that's required. (That index defaults to zero if not provided.)

Assuming "Hello World!" has been successfully inserted in a shape on a slide, a request to bold just the "Hello" looks like this:

{
"updateTextStyle": {
"objectId": shapeID,
"style": {
"bold": true
},
"textRange": {
"type": "FIXED_RANGE",
"startIndex": 0,
"endIndex": 5
},
"fields": "bold"
}
If you've got at least one request, like the ones above, in an array named requests, you'd ask the API to execute them with just one call to the API, which in Python looks like this (assuming SLIDES is your service endpoint and the slide deck ID is deckID):
SLIDES.presentations().batchUpdate(presentationId=deckID,
body=requests).execute()

To better understand text structure & styling in Google Slides, check out the text concepts guidein the documentation. For a detailed look at the complete code sample featured in the DevByte, check out the deep dive post. To see more samples for common API operations, take a look at this page. We hope the videos and all these developer resources help you create that next great app that automates producing highly impactful presentations for your users!

Android Wear 2.0 for China – Developer Preview

Posted by Hoi Lam, Developer Advocate

Today at Google Developer Day China, we are happy to announce a developer preview of Android Wear 2.0 for developers creating apps for China. Android Wear 2.0 is the biggest update since our partners launched their first devices in China last year.

We're making a Developer Preview available today and plan to release additional updates in the coming months. Please send us your feedback by filing bugs or posting in our Android Wear Developers community.

Developing for the Chinese Market

With Android Wear 2.0, apps can access the internet directly on Android Wear devices. As a result, for the majority of apps, having a companion phone application is no longer necessary. This means that most developers creating apps for Android Wear 2.0 may no longer need to import the Google Play services library.

There are two situations where developers will need to import Google Play services for China:

  • Apps that require direct interaction with the paired mobile device - some experiences require Android Wear to connect directly to a paired phone. In this case, the Data Layer API introduced in Android Wear 1.0 will continue to function.
  • New FusedLocationProvider for China - we have added location detection to the SDK for Chinese developers. With the user's permission, your app can receive location updates via the FusedLocationProvider.

You can find more details about how to import the China compatible version of Google Play services library here.

Product testing for Android Wear 2.0 for China

The Android Wear 2.0 Developer Preview includes an updated SDK with tools, and system images for testing using the Huawei Watch.

To get started, follow these steps:

Give us feedback

We will update this developer preview over the next few months based on your feedback. The sooner we hear from you, the more we can include in the final release, so don't be shy!


Android Wear 2.0 中国版 - 开发者预览版

编辑: 林海泉, Android Wear 开发平台负责人

今天在上海举办的Google 开发者大会上,我们正式宣布了一款专门针对中国市场的Android Wear 2.0 开发者预览版。Android Wear 2.0系统,将是自我们的合作伙伴首次发布手表产品以来最重大的更新。

开发者预览版已于今日正式上线。与此同时,我们也计划在未来的几个月内持续进行更新。请您将您遇到的问题在此提交反馈,或者在我们的Android Wear开发者论坛发表意见。

为中国市场开发应用

在Android Wear 2.0系统中,应用可以由Android Wear手表直接连接至互联网。因此,对于大多数应用来说,手机端的伴侣应用也就变得不再必要。这也意味着,多数为Android Wear 2.0开发应用的开发者将不再需要引用Google Play services客户端库。

目前,在两个情况下开发者仍然需要引入Google Play Services客户端库来为中国市场开发应用:

  • 需要与手机直接进行通信的应用 - 有一些用例需要Android Wear手表与已配对手机直接连接。在这种情况下,Android Wear 1.0中引入的Data Layer API仍然可以继续使用。
  • 使用 FusedLocationProvider - 我们在最新的中国版SDK中加入了定位的支持。在用户的许可下,您的应用可以通过FusedLocationProvider来接收定位更新。

您可以在这里找到关于如何引入与中国版兼容的Google Play service的更多信息。

Android Wear 2.0 中国版产品测试

Android Wear 2.0 开发者预览版包括最新的SDK套件,手表测试系统镜像(基于华为手表)。

情按照以下步骤进行测试:

开发反馈

我们会根据您的反馈在未来的几个月中更新开发者预览版。您给我们的反馈越早,我们将会在最终的发布版本中包含更多针对您的反馈的解决方案。敬请期待!

Android Wear 2.0 Developer Preview 4: Authentication, In-App Billing, and more

Posted by Hoi Lam, Developer Advocate

A key part of Android Wear 2.0 is letting watch apps work as standalone apps, so users can respond to messages, track their fitness, and use their favorite apps, even when their phone isn't around. Developer Preview 4 includes a number of new APIs that will help you build more powerful standalone apps.

Seamless authentication

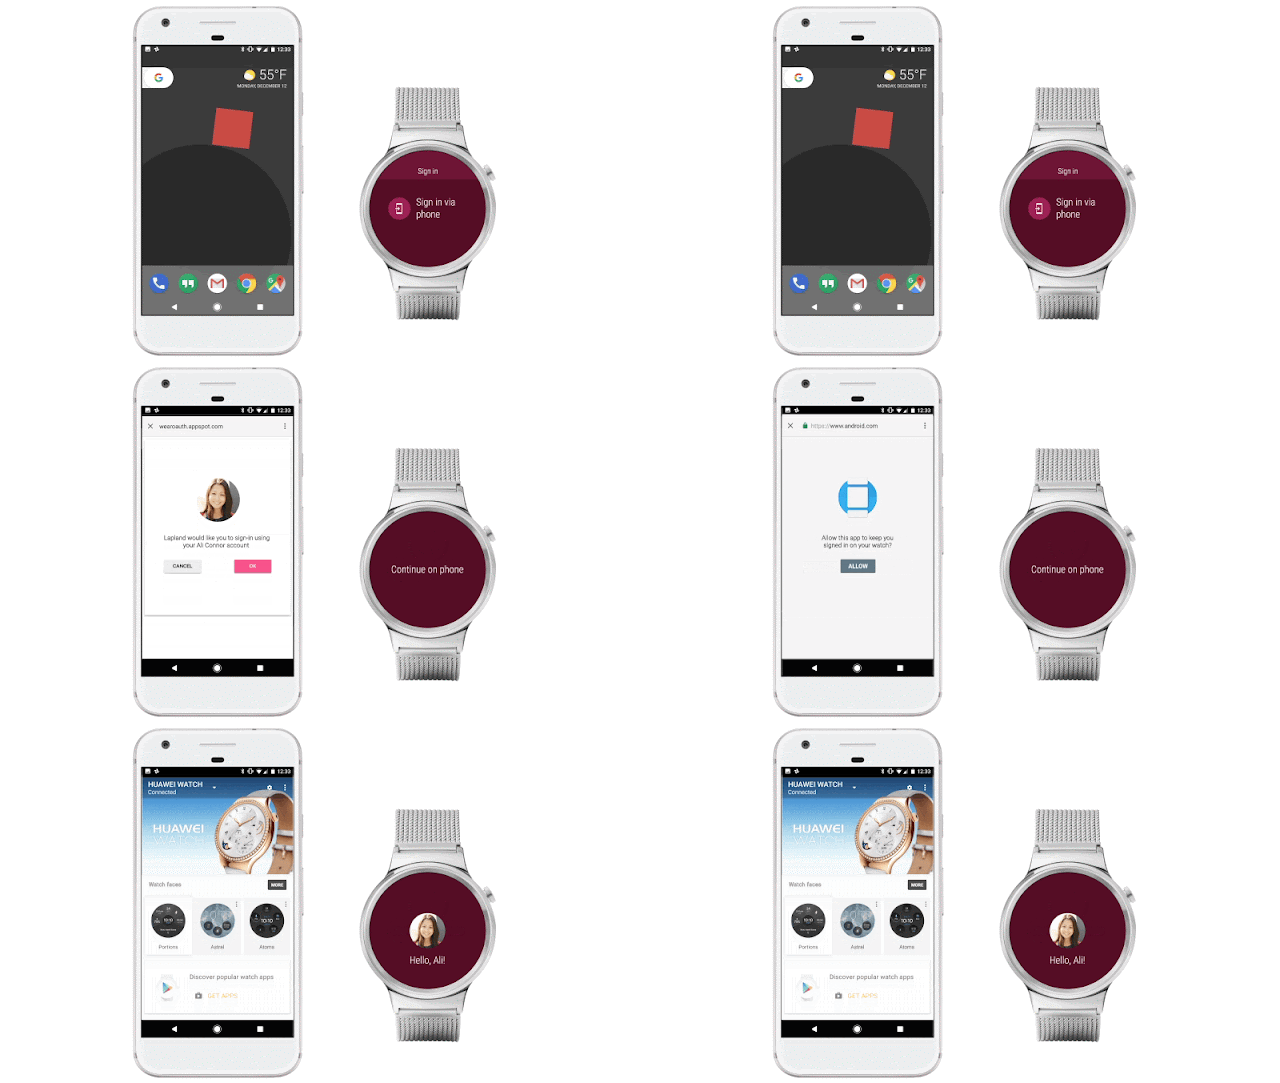
To make authentication a seamless experience for both Android phone and iPhone users, we have created new APIs for OAuth and added support for one-click Google Sign-in. With the OAuth API for Android Wear, users can tap a button on the watch that opens an authentication screen on the phone. Your watch app can then authenticate with your server side APIs directly. With Google Sign-In, it's even easier. All the user needs to do is select which account they want to authenticate with and they are done.

In-app billing

In addition to paid apps, we have added in-app billing support, to give you another way to monetize your Android Wear app or watch face. Users can authorize purchases quickly and easily on the watch through a 4-digit Google Account PIN. Whether it's new levels in a game or new styles on a watch face, if you can build it, users can buy it.

Cross-device promotion

What if your watch app doesn't work standalone? Or what if it offers a better user experience when both the watch and phone apps are installed? We've been listening carefully to your feedback, and we've added two new APIs (PlayStoreAvailability and RemoteIntent) to help you navigate users to the Play Store on a paired device so they can more easily install your app. Developers can also open custom URLs on the phone from the watch via the new RemoteIntent API; no phone app or data layer is required.

// Check Play Store is available
int playStoreAvailabilityOnPhone =
    PlayStoreAvailability.getPlayStoreAvailabilityOnPhone(getApplicationContext());

if (playStoreAvailabilityOnPhone == PlayStoreAvailability.PLAY_STORE_ON_PHONE_AVAILABLE) {
    // To launch a web URL, setData to Uri.parse("https://g.co/wearpreview")
    Intent intent =
        new Intent(Intent.ACTION_VIEW)
            .addCategory(Intent.CATEGORY_BROWSABLE)
            .setData(Uri.parse("market://details?id=com.google.android.wearable.app"));
    // mResultReceiver is optional; it can be null.
    RemoteIntent.startRemoteActivity(this, intent, mResultReceiver);
}

Swipe-to-dismiss is back

Many of you have given us the feedback that the swipe-to-dismiss gesture from Android Wear 1.0 is an intuitive time-saver. We agree, and have reverted back to the previous behavior with this developer preview release. To support swipe-to-dismiss in this release, we've made the following platform and API changes:

  • Activities now automatically support swipe-to-dismiss. Swiping an activity from left to right will result in it being dismissed and the app will navigate down the back stack.
  • New Fragment and View support. Developers can wrap the containing views of a Fragment or Views in general in the new SwipeDismissFrameLayout to implement custom actions such as going down the back stack when the user swipes rather than exiting the activity.
  • Hardware button now maps to "power" instead of "back" which means it can no longer be intercepted by apps.

Additional details are available under the behavior changes section of the Android Wear Preview site.

Compatibility with Android Wear 1.0 apps

Android Wear apps packaged using the legacy embedded app mechanism can now be delivered to Android Wear 2.0 watches. When a user installs a phone app that also contains an embedded Android Wear app, the user will be prompted to install the embedded app via a notification. If they choose not to install the embedded app at that moment, they can find it in the Play Store on Android Wear under a special section called "Apps you've used".

Despite support for the existing mechanism, there are significant benefits for apps that transition to the multi-APK delivery mechanism. Multi-APK allows the app to be searchable in the Play Store on Android Wear, to be eligible for merchandising on the homepage, and to be remotely installed from the web to the watch. As a result, we strongly recommend that developers move to multi-APK.

More additions in Developer Preview 4

  • Action and Navigation Drawers: An enhancement to peeking behavior allows the user to take action without scrolling all the way to the top or bottom of a list. Developers can further fine-tune drawer peeking behavior through new APIs, such as setShouldPeekOnScrollDown for the action drawer.
  • WearableRecyclerView: The curved layout is now opt-in, and with this, the WearableRecyclerView is now a drop-in replacement for RecyclerView.
  • Burn-in protection icon for complications: Complication data providers can now provide icons for use on screens susceptible to burn-in. These burn-in-safe icons are normally the outline of the icon in interactive mode. Previously, watch faces may have chosen not to display the icon at all in ambient mode to prevent screen burn-in.

Feedback welcome!

Thanks for all your terrific feedback on Android Wear 2.0. Check out g.co/wearpreview for the latest builds and documentation, keep the feedback coming by filing bugs or posting in our Android Wear Developers community, and stay tuned for Android Wear Developer Preview 5!

Announcing updates to Google’s Internet of Things platform: Android Things and Weave

Posted by Wayne Piekarski, Developer Advocate for IoT

The Internet of Things (IoT) will bring computing to a whole new range of devices. Today we're announcing two important updates to our IoT developer platform to make it faster and easier for you to create these smart, connected products.

We're releasing a Developer Preview of Android Things, a comprehensive way to build IoT products with the power of Android, one of the world's most supported operating systems. Now any Android developer can quickly build a smart device using Android APIs and Google services, while staying highly secure with updates direct from Google. We incorporated the feedback from Project Brillo to include familiar tools such as Android Studio, the Android Software Development Kit (SDK), Google Play Services, and Google Cloud Platform. And in the coming months, we will provide Developer Preview updates to bring you the infrastructure for securely pushing regular OS patches, security fixes, and your own updates, as well as built-in Weave connectivity and more.

There are several turnkey hardware solutions available for you to get started building real products with Android Things today, including Intel Edison, NXP Pico, and Raspberry Pi 3. You can easily scale to large production runs with custom designs of these solutions, while continuing to use the same Board Support Package (BSP) from Google.

We are also updating the Weave platform to make it easier for all types of devices to connect to the cloud and interact with services like the Google Assistant. Device makers like Philips Hue and Samsung SmartThings already use Weave, and several others like Belkin WeMo, LiFX, Honeywell, Wink, TP-Link, and First Alert are implementing it. Weave provides all the cloud infrastructure, so that developers can focus on building their products without investing in cloud services. Weave also includes a Device SDK for supported microcontrollers and a management console. The Weave Device SDK currently supports schemas for light bulbs, smart plugs and switches, and thermostats. In the coming months we will be adding support for additional device types, custom schemas/traits, and a mobile application API for Android and iOS. Finally, we're also working towards merging Weave and Nest Weave to enable all classes of devices to connect with each other in a secure and reliable way. So whether you started with Google Weave or Nest Weave, there is a path forward in the ecosystem.

This is just the beginning of the IoT ecosystem we want to build with you. To get started, check out Google's IoT developer site, or go directly to the Android Things, Weave, and Google Cloud Platform sites for documentation and code samples. You can also join Google's IoT Developers Community on Google+ to get the latest updates and share and discuss ideas with other developers.

Announcing updates to Google’s Internet of Things platform: Android Things and Weave

Originally posted on Android Developer Blog

Posted by Wayne Piekarski, Developer Advocate for IoT

The Internet of Things (IoT) will bring computing to a whole new range of devices. Today we're announcing two important updates to our IoT developer platform to make it faster and easier for you to create these smart, connected products.

We're releasing a Developer Preview of Android Things, a comprehensive way to build IoT products with the power of Android, one of the world's most supported operating systems. Now any Android developer can quickly build a smart device using Android APIs and Google services, while staying highly secure with updates direct from Google. We incorporated the feedback from Project Brillo to include familiar tools such as Android Studio, the Android Software Development Kit (SDK), Google Play Services, and Google Cloud Platform. And in the coming months, we will provide Developer Preview updates to bring you the infrastructure for securely pushing regular OS patches, security fixes, and your own updates, as well as built-in Weave connectivity and more.

There are several turnkey hardware solutions available for you to get started building real products with Android Things today, including Intel Edison, NXP Pico, and Raspberry Pi 3. You can easily scale to large production runs with custom designs of these solutions, while continuing to use the same Board Support Package (BSP) from Google.

We are also updating the Weave platform to make it easier for all types of devices to connect to the cloud and interact with services like the Google Assistant. Device makers like Philips Hue and Samsung SmartThings already use Weave, and several others like Belkin WeMo, LiFX, Honeywell, Wink, TP-Link, and First Alert are implementing it. Weave provides all the cloud infrastructure, so that developers can focus on building their products without investing in cloud services. Weave also includes a Device SDK for supported microcontrollers and a management console. The Weave Device SDK currently supports schemas for light bulbs, smart plugs and switches, and thermostats. In the coming months we will be adding support for additional device types, custom schemas/traits, and a mobile application API for Android and iOS. Finally, we're also working towards merging Weave and Nest Weave to enable all classes of devices to connect with each other in a secure and reliable way. So whether you started with Google Weave or Nest Weave, there is a path forward in the ecosystem.

This is just the beginning of the IoT ecosystem we want to build with you. To get started, check out Google's IoT developer site, or go directly to the Android Things, Weave, and Google Cloud Platform sites for documentation and code samples. You can also join Google's IoT Developers Community on Google+ to get the latest updates and share and discuss ideas with other developers.