Posted by Suresh Ganapathy, Product Manager
Developers have built amazing Android apps. They use your mobile device to the fullest, including the camera, GPS, and sensors to connect to the real world. They’re beautiful and immersive, with Material Design and smooth animations running at 60 frames per second. They use access to identity and payments to create seamless experiences.
But developers tell us they wish they could bring users into their apps more quickly and easily. With the web, you can click on a link and land on a web page — it takes one click and just a few seconds. It should be easier for users to access a wider range of apps, and for developers to reach more people.
So, we asked ourselves: How do we make it possible for people to access a wider range of apps, seamlessly? How do we help developers reach more people? And how do we do that while giving developers access to the range of capabilities and experiences that Android apps provide?
Today we’re sharing a preview of a new project that we think will change how people experience Android apps. We call it Android Instant Apps, and it evolves Android apps to be able to run instantly, without requiring installation. With Instant Apps, a tap on a URL can open right in an Android app, even if the user doesn’t have that app installed.
As a developer, you won’t need to build a new, separate app. It’s the same Android APIs, the same project, the same source code. You’ll simply update your existing Android app to take advantage of Instant Apps functionality. In fact, it can take less than a day to get up and running for some developers, though the effort involved will vary depending on how your app is structured. You modularize your app, and Google Play downloads only the parts that are needed, on the fly. And when you do upgrade, your app will be available to more than a billion users on Android devices going back to Jelly Bean.
This is a big change, so it's going to take some time. We’ve been working with a small set of partners to help refine the experience, including developers like BuzzFeed, B&H Photo, Medium, Hotel Tonight, Zumper and Disney. We’ll be gradually expanding access for developers and bringing Instant Apps to users later this year.
B&H Photo
(via Google Search)
BuzzFeedVideo
(via a shared link)
Park and Pay (example)
(via NFC)
If you’re interested in learning more about Android Instant Apps, please check out the Android developers website, where you can sign up for updates as they become available. We can’t wait to see what you build when your app is just a tap away.
We launched a fully revamped Sign-In API with Google Play services 8.3 providing a much more streamlined user
experience and enabling easy server authentication and authorization. We’ve heard from many developers that they’ve found these APIs simple and
less error prone to use. But when we look at applications in the Play Store, we
see many that are still using legacy Plus.API / GoogleAuthUtil.getToken and do
not follow best practices for authentication and authorization. Not following best practices can make your apps easily vulnerable to attack.
Ensuring your apps are secure
Developers should ensure that their apps are not open to the following
vulnerabilities:
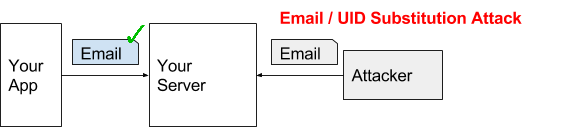
Email or user ID substitution attack
After signing in with Google on Android, some apps directly send email or
user ID in plain text to their backend server as the identity credential. These
server endpoints enable a malicious attacker to easily forge a request and gain
access to any user’s account by guessing their email / user ID.
Figure 1. Email / User ID Substitution Attack
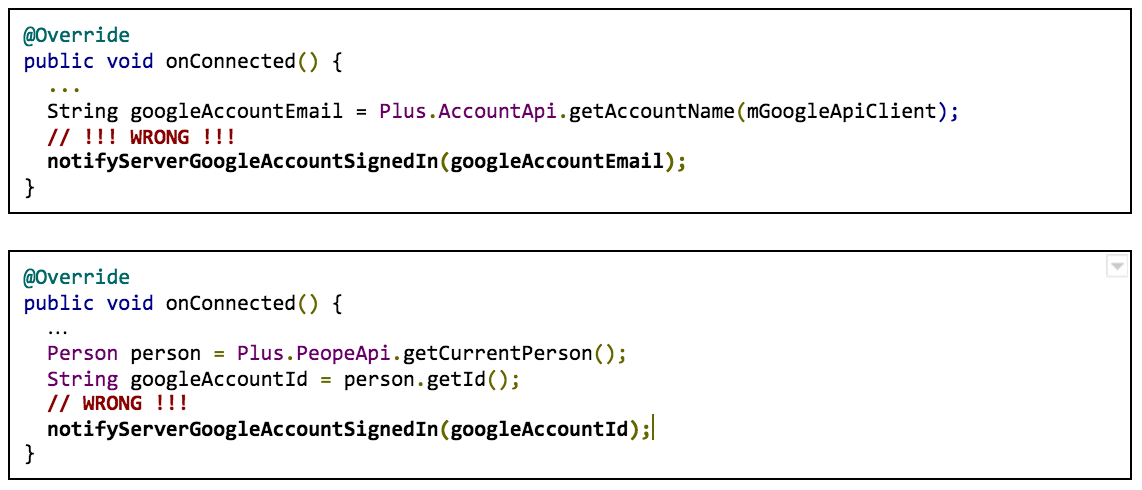
We see a number of developers implement this anti-pattern by using getAccountName or getId from the Plus.API and sending it to their backend.
Problematic implementations, DO NOT COPY
Access token substitution attack
After signing in with Google on Android, many apps send an access token
obtained via GoogleAuthUtil.getToken to their backend server as the identity
assertion. Access tokens are bearer tokens and backend servers cannot easily
check if the token is issued to them. A malicious attacker can phish the user
to sign-in on another application and use that different access token to forge
a request to your backend.
Figure 2. Access Token Substitution Attack
Many developers implement this anti-pattern by using GoogleAuthUtil to retrieve
an access token and sending it to their server to authenticate like in the
following example:
If your server needs access to other Google services, e.g. Drive, you should
use server auth code flow. You can also check out this blogpost. Worth mentioning, you can also get an ID token using server auth code flow,
from which you can retrieve user id / email / name / profile url without
additional network call. Check out the migration guide.
Improving the user experience and performance of your apps
There are still many apps using GoogleAuthUtil for server auth and their users
are losing out the improved user experience while the developers of those apps
need to maintain a significantly more complicated implementation.
Here are some of the common problems that we see:
Requesting unnecessary permissions and displaying redundant user experience
Many apps request GET_ACCOUNTS permission and draw their own customized picker
with all email addresses. After getting the email address, the app calls either
GoogleAuthUtil or Plus.API to do OAuth consent for basic sign in. For those
apps, users will see redundant user experience like:
Figure 3. GET_ACCOUNTS runtime permission and redundant user experience
The worst thing is the GET_ACCOUNTS permission. On Marshmallow and above, this
permission is displayed to the user as ‘Contacts’. Many users are unwilling to
grant access to this runtime permission.
Solution
Switch to our new Auth.GOOGLE_SIGN_IN_API for a streamlined user consent experience by providing an intuitive one-tap
interface to provide your app with the user’s name, email address and profile
picture. Your app receives an OAuth grant when the user selects an account,
making it easier to sign the user in on other devices. Learn more
Figure 4. New streamlined, one-tap sign-in experience
Getting ID Token from GoogleAuthUtil for your backend
Before we released revamped Sign-In API, GoogleAuthUtil.getToken was the previously recommended way to retrieve an ID
token via a “magic string.”
Wrong pattern, DO NOT COPY
GoogleAuthUtil.getToken needs to take an email address, which usually leads to
the undesirable user experience in Figure 3. Also, user’s profile information
like name, profile picture url is valuable information to store in your server.
The ID token obtained via Auth.GOOGLE_SIGN_IN_API will contain profile information and your server won’t need additional network
calls to retrieve them.
Getting auth code from GoogleAuthUtil for your backend
We once recommended using GoogleAuthUtil.getToken to retrieve a server auth
code via another “magic string.”
Wrong pattern, DO NOT COPY
In addition to the possible redundant user experience in Figure 3, another
problem with this implementation was that if a user had signed in to your
application in the past and then switched to a new device, they would likely
see this confusing dialog:
Figure 5. Confusing consent dialog for returned user if using
GoogleAuthUtil.getToken for auth code
In general, you should NOT use GoogleAuthUtil.getToken, unless you are making
REST API call on Android client. Use Auth.GOOGLE_SIGN_IN_API instead. Whenever possible, use native Android API in Google Play services
SDK. You can check out those APIs at Google APIs for Android.
The primary mode that users will be interacting with multi-window is through split-screen mode, which is available on both handheld devices and larger tablets. In this mode,
two apps split the available screen space and the user can drag the divider
between the two split screens to resize the apps. As you might imagine, this
mode offers some unique design challenges beyond what was needed previously.
An even more responsive UI
The lessons learned from previous versions of Android, the mobile web, and
desktop environments still apply to Android N. Designing a responsive UI is still an important first step towards an amazing multi-window experience.
A responsive UI is one that adapts to the size provided, picking the best
representation of the content and the appropriate navigation patterns to make a great user experience on any device. Check out the Building a Responsive UI blog post for details on how to design and build an effective responsive UI.
Adapting your layout
As you’re designing layouts for the largest and smallest screens and everything
in between, it is important to make resizing a smooth and seamless transition
as mentioned in the split screen layout guidelines. If you already have a similar layout between mobile and tablet, you’ll find
much of your work taken care of for you.
However, if your mobile and tablet layouts are vastly different and there’s no
way to smoothly transition between the two, you should not transition between them when resizing. Instead, focus on making your tablet UI scale down using the
same responsive UI patterns. This ensures that users do not have to relearn
their UI when resizing your app.
Note that the minimalHeight and minimalWidthlayout attributes allow you to set a minimum size you want reported to your Activity, but they
do not mean the user cannot resize your activity smaller - it actually means that
your activity will be cropped to the size the user requests, potentially
forcing elements of your UI off the screen. Strive to support down to the
minimum size of 220x220dp.
Design configurations to consider
While many of the sizes and aspect ratios possible in multi-window are similar
to existing devices (1/3rd of a landscape tablet is similar to existing mobile
devices in screen size), there are a few configurations that are much more
common when considering multi-window.
The first is a 16x9 layout on mobile devices in portrait. In this case, the
vertical space is extremely limited. If you have a number of fixed elements
stacked on top of one another (a toolbar, scrolling content, and a bottom
navigation bar), you might find there’s not actually any room for the scrolling
content - the most important part!
The second case to consider is the 34.15% layout on tablets. The very wide
aspect ratio in device portrait or very tall aspect ratio in device landscape
orientation are more extreme than what is found on existing devices. Consider
using your mobile layouts as a starting point for this configuration.
Patterns to avoid
When it comes to multi-window, there are a few patterns you want to avoid
entirely.
The first is UI interactions that rely on swiping from the edge of the screen.
This has already been somewhat of an issue when it comes to the on screen
navigation bar prominent on many devices (such as Nexus devices), but is even
more so in split-screen mode. Since there is (purposefully) no way to determine
if your activity is on the top or bottom or the left or the right, don’t make edge swipes the only way to access functionality in your app. That doesn’t mean you have to avoid them entirely - just make sure there is
an alternative. A good example of this is the temporary navigation drawer - an edge swipe opens the drawer, but it is also accessible by pressing the
hamburger icon in the toolbar.
The second is disabling multi-window entirely. While there are certainly cases
where this makes sense (i.e., it is fundamentally an immersive experience such
as a game), there are also cases where your activity and any Activities
launched from that Activity are forced to support multi-window. As mentioned in the Preparing for Multi-Window blog post, when you support external apps launching your activity, your activity inherits the multi-window properties of the calling Activity.
Designing for Multi-Window is designing for every device
Building a responsive UI that reacts to the space available is critical to a
great multi-window experience, but it is an exercise that can benefit all of
your users across the wide variety of Android devices.
Posted by Dan Austin and Jeff Vander Stoep, Android Security team
To help make Android more secure, we encourage and reward researchers who discover vulnerabilities. In 2015, a series of bugs in
mediaserver’s libstagefright were disclosed to Google. We released updates for
these issues with our August and September 2015 security bulletins.
In addition to addressing issues on a monthly basis, we’ve also been working on
new security features designed to enhance the existing security model and
provide additional defense in-depth. These defense measures attempt to achieve
two goals:
Prevention: Stop bugs from becoming vulnerabilities
Containment: Protect the system by de-privileging and isolating components that handle
untrusted content
Prevention
Most of the vulnerabilities found in libstagefright were heap overflows
resulting from unsigned integer overflows. A number of integer overflows in libstagefright allowed an attacker to
allocate a buffer with less space than necessary for the incoming data,
resulting in a buffer overflow in the heap.
The result of an unsigned integer overflow is well defined, but the ensuing
behavior could be unexpected or unsafe. In contrast, signed integer overflows
are considered undefined behavior in C/C++, which means the result of an
overflow is not guaranteed, and the compiler author may choose the resulting
behavior—typically what is fastest or simplest. We have added compiler changes
that are designed to provide safer defaults for both signed and unsigned
integer overflows.
The UndefinedBehaviorSanitizer (UBSan) is part of the LLVM/Clang compiler toolchain that detects undefined or
unintended behavior. UBSan can check for multiple types of undefined and unsafe
behavior, including signed and unsigned integer overflow. These checks add code
to the resulting executable, testing for integer overflow conditions during
runtime. For example, figure 1 shows source code for the parseChunk function in the MPEG4Extractor component of libstagefright after the original researcher-supplied patch was
applied. The modification, which is contained in the black box below, appears
to prevent integer overflows from occurring. Unfortunately, while SIZE_MAX and size are 32-bit values, chunk_size is a 64-bit value, resulting in an incomplete check and the potential for
integer overflow. In the line within the red box, the addition of size and chunk_size may result in an integer overflow and creation of buffer smaller than size elements. The subsequent memcpy could then lead to exploitable memory corruption, as size + chunk_size could be less than size, which is highlighted in the blue box. The mechanics of a potential exploit
vector for this vulnerability are explained in more detail by Project Zero.
Figure 1. Source code demonstrating a subtle unsigned integer overflow.
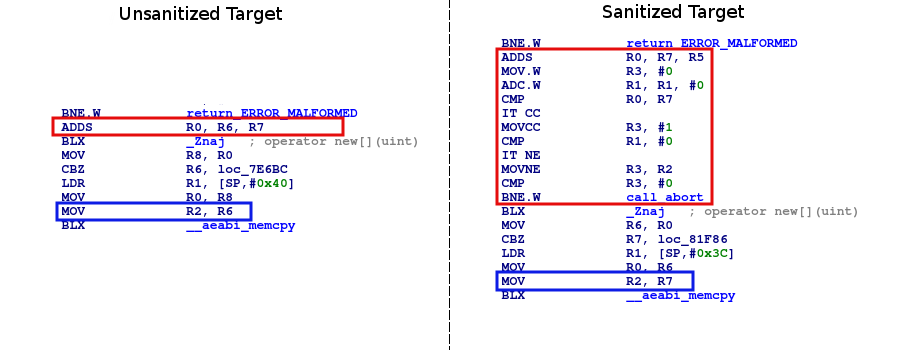
Figure 2 compares assembly generated from the code segment above with a second
version compiled with integer sanitization enabled. The add operation that
results in the integer overflow is contained in the red box.
In the unsanitized version, size (r6) and chunk_size (r7) are added together, potentially resulting in r0 overflowing and being less than size. Then, buffer is allocated with the size specified in r0, and size bytes are copied to it. If r0 is less than r6, this results in memory corruption.
In the sanitized version, size (r7) and chunk_size (r5) are added together with the result stored in r0. Later, r0 is checked against r7, if r0 is less than r7, as indicated by the CC condition code, r3 is set to 1. If r3 is 1, and the carry bit was set, then an integer overflow occurred, and an
abort is triggered, preventing memory corruption.
Note that the incomplete check provided in the patch was not included in figure
2. The overflow occurs in the buffer allocation’s add operation. This addition triggers an integer sanitization check, which turns
this exploitable flaw into a harmless abort.
Figure 2. Comparing unsanitized and sanitized compiler output.
While the integer sanitizers were originally intended as code hygiene tools,
they effectively prevent the majority of reported libstagefright
vulnerabilities. Turning on the integer overflow checks was just the first
step. Preventing the runtime abort by finding and fixing integer overflows,
most of which are not exploitable, represented a large effort by Android's
media team. Most of the discovered overflows were fixed and those that remain
(mostly for performance reasons) were verified and marked as safe to prevent
the runtime abort.
In Android N, signed and unsigned integer overflow detection is enabled on the
entire media stack, including libstagefright. This makes it harder to exploit
integer overflows, and also helps to prevent future additions to Android from
introducing new integer overflow bugs.
Containment
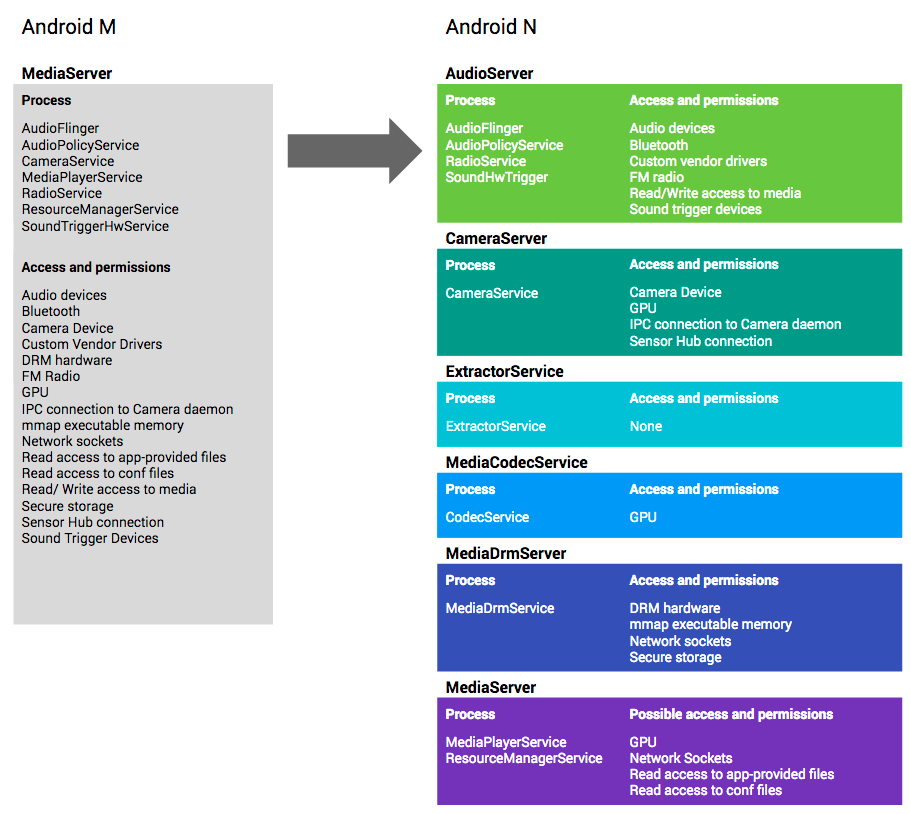
For Android M and earlier, the mediaserver process in Android was responsible
for most media-related tasks. This meant that it required access to all
permissions needed by those responsibilities and, although mediaserver ran in
its own sandbox, it still had access to a lot of resources and capabilities.
This is why the libstagefright bugs from 2015 were significant—mediaserver
could access several important resources on an Android device including camera,
microphone, graphics, phone, Bluetooth, and internet.
A root cause analysis showed that the libstagefright bugs primarily occurred in
code responsible for parsing file formats and media codecs. This is not
surprising—parsing complex file formats and codecs while trying to optimize for
speed is hard, and the large number of edge cases makes such code susceptible
to both accidental and malicious malformed inputs.
However, media parsers do not require access to most of the privileged
permissions held by mediaserver. Because of this, the media team re-architected
mediaserver in Android N to better adhere to the principle of least privilege.
Figure 3 illustrates how the monolithic mediaserver and its permissions have
been divided, using the following heuristics:
parsing code moved into unprivileged sandboxes that have few or no permissions
components that require sensitive permissions moved into separate sandboxes
that only grant access to the specific resources the component needs. For
example, only the cameraserver may access the camera, only the audioserver may
access Bluetooth, and only the drmserver may access DRM resources.
Figure 3. How mediaserver and its permissions have been divided in Android N.
Comparing the potential impact of the libstagefright bugs on Android N and
older versions demonstrates the value of this strategy. Gaining code execution
in libstagefright previously granted access to all the permissions and
resources available to the monolithic mediaserver process including graphics
driver, camera driver, or sockets, which present a rich kernel attack surface.
In Android N, libstagefright runs within the mediacodec sandbox with access to
very few permissions. Access to camera, microphone, photos, phone, Bluetooth,
and internet as well as dynamic code loading are disallowed by SELinux. Interaction with the kernel is further restricted by seccomp. This means that compromising libstagefright would grant the attacker access
to significantly fewer permissions and also mitigates privilege escalation by
reducing the attack surface exposed by the kernel.
Conclusion
The media hardening project is an ongoing effort focused on moving
functionality into less privileged sandboxes and further reducing the
permissions granted to those sandboxes. While the techniques discussed here
were applied to the Android media framework, they are suitable across the
Android codebase. These hardening techniques—and others—are being actively
applied to additional components within Android. As always, we appreciate
feedback on our work and welcome suggestions for how we can improve Android.
Contact us at [email protected].
With the launch Android N Developer Preview, we wanted to give you an easy and comprehensive way to build, test and validate your apps on the latest release with Android Studio. Built on the speed and feature enhancements of Android Studio 2.0, the stable release of Android Studio 2.1 includes updates to the IDE wizards, build system and Android Emulator so that you can try out new features and APIs of the developer preview including the new Jack compiler and Java 8 language support. In addition to support for the N Developer Preview, Android Studio 2.1 also includes performance improvements to Instant Run which leads to faster edit and deploy build speeds. If you are developing and validating your app with the N Developer Preview or want faster Instant Run speeds, you should download or update on the stable release channel to Android Studio 2.1.
Android Studio 2.1 includes the following new features:
N Developer Preview Support: Android Studio 2.1 is the best IDE to test and validate your app with the N Developer Preview. Get the latest versions of the preview SDK, experiment with the new Java 8 support, and gain access to the only official Android Emulator able to run N Developer Preview Emulator System Images to help in your testing.
Instant Run: For those of you who enjoyed the fast edit, build and deploy cycle with Android Studio 2.0, Instant Run now can now update incremental changes to your app code significantly faster.
Deeper Dive into the New Features
N Developer Preview
On top of new features and APIs of the N Developer Preview, Android Studio 2.1 release includes support for the new Jack compiler and support for Java 8. With the Jack compiler, lambdas, method references, compile-time type annotations, intersection types and type inference are available on all versions of the Android platform. Default and static methods and repeatable annotations are available on Android N and higher. To use Java 8 language features when developing with the N Developer Preview, you need to use the Jack compiler. The New Project Wizard [File→ New→ Project] generates the correct configurations for projects targeting the N.
Getting started with development is as easy generating a new project or updating a few settings in your existing project. Once you are ready to test, you can create a fresh Android Virtual Device (AVD) and run your app on the N Developer Preview using the new Android Emulator.
N Developer Preview on the new Android Emulator
Instant Run & General Build Performance Improvements
Instant Run and general build speed are now faster with two new features: incremental Java compilation and in-process dex.
In previous versions of Android Studio, a single line of Java code change will cause all the Java sources in the module to be recompiled. Now in Android Studio 2.1, incremental Java compilation is enabled by default to reduce compilation time by compiling only what is needed.
We are also speeding up build times by using in-process dex, which converts class files to dex files within the Gradle daemon process. This avoids the costly processing operation of creating separate dex processes. To use this feature, you will need to increase the amount of memory available to the Gradle daemon to at least 2GB (1 GB is the default). This feature will help speed up both incremental and full builds.
We’d appreciate your feedback as we continue to improve Instant Run and general build performance. We are going to keep working on making build times even faster in coming releases. Click here to learn even more about the build changes.
What's Next
Update
If you are using a previous version of Android Studio, you can check for updates on the Stable channel from the navigation menu (Help → Check for Update [Windows/Linux] , Android Studio → Check for Updates [OS X]). If you need a new copy of Android Studio, you can download it here.
Test and Validate Apps with N Developer Preview
After you update to or download Android Studio 2.1 and you want to test and develop your apps with the N Developer Preview, create a fresh Android Virtual Device (AVD) for the new Android emulator, and check out these additional setup instructions.
We appreciate any feedback on things you like, issues or features you would like to see. Connect with us -- the Android Studio development team -- on our Google+ page or on Twitter.
Posted by Purnima Kochikar, Director, Apps and Games Business Development, Google Play
Google Play has seen tremendous growth over the past year, reaching more than 1 billion Android users across 190 countries. As a way to recognize our incredible developer community and highlight some of the best apps and games, we’re kicking off our first-ever Google Play Awards.
The program will showcase five nominees across 10 award categories and feature them in a dedicated collection on Google Play. Nominees were selected by a panel of experts on the Google Play team based on criteria emphasizing app quality, innovation, and having a launch or major update in the last 12 months. The winners of each category will be announced at Google I/O in May.
The full list of categories and nominees are below:
Standout Startup
Apps from new developers that offer a unique experience while achieving strong install growth. And the nominees are...
Join us live at the ceremony on May 19th at 7:00 pm PDT on stage 7 at Google I/O or via the live stream. You can also track the conversation on Twitter and G+ using the hashtags #io16.
Starting with Google Play services 8.3, we did a major revamp of the Google Sign-In APIs, supporting both client and server auth. Behind the scenes, these APIs use OAuth 2.0 tokens to ensure secure authentication and authorization. To maintain security, we provide tools in the Google Developers Console to register the clients using these tokens.
In this post, we’ll discuss the important task of registering OAuth clients for Google Sign-In, and the tools that we offer to make this as easy as possible.
Here are some scenarios that might apply to you:
Start by creating a project in the Google Developers Console, which registers the client app on your behalf.
If you have a backend server in your project, you’ll need an OAuth client ID for it, too.
And don't forget to register OAuth clients for other test and release versions of your app, too!
In this post, we’ll cover some details on this process and address common pitfalls.
Getting Started - Create a Project in the Google Developers Console.
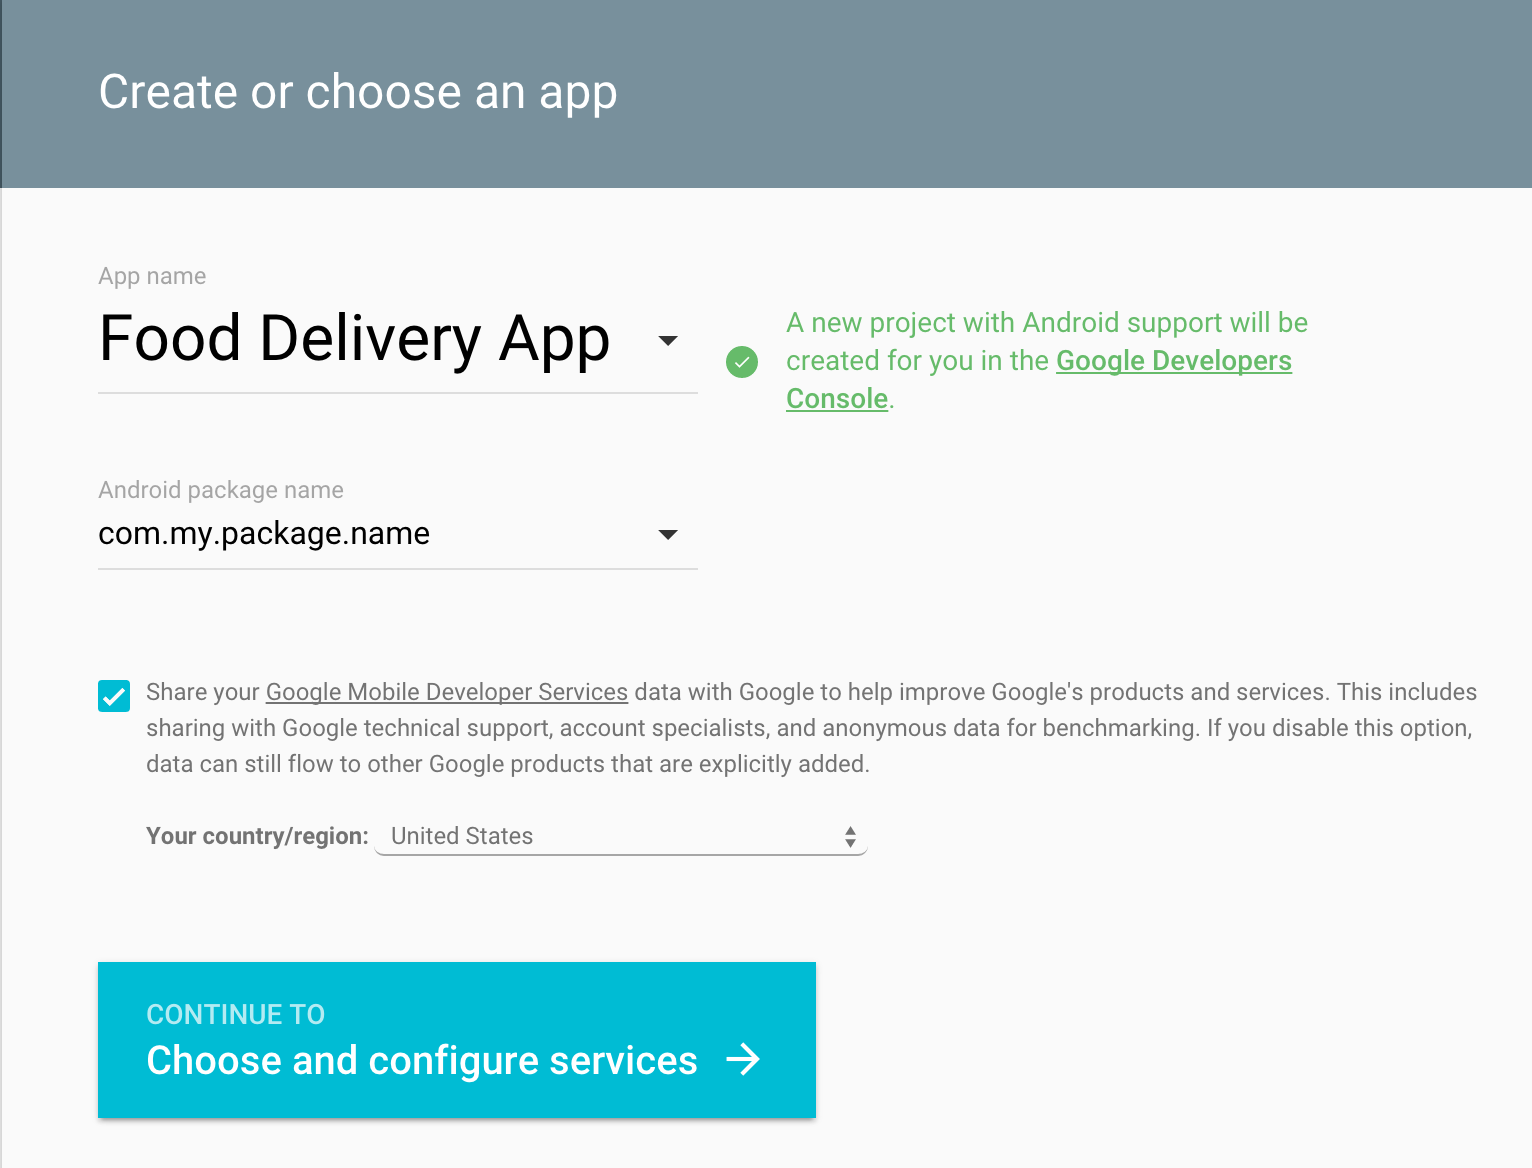
If you have not used Google Sign-In before, you can start integrating the API into your app by following the ‘Get a configuration file’ steps on this site. You’ll be taken to a setup wizard that will create an OAuth 2.0 client ID as shown in Figure 1.
Figure 1. Configuring your app
Once you’ve specified your app, you’ll be taken to a screen to choose and configure services such as Google Sign-In, Cloud Messaging or Google Analytics that you want your app to be able to use.
Choose Google Sign-In. In order to use it, you’ll need to get the SHA-1 of the signing certificate for your Android app. This can either be a debug or a release certificate, and for the purposes of this blog you’ll look at a debug one, but keep in mind that you’ll need to repeat this process for each package / certificate pair you end up using (described in the last section below).
You can get the debug SHA-1 using the keytool command like this:
Once you have your SHA-1, enter it as seen in Figure 2.
Figure 2. Enabling Google Sign-in
Now that your project is set up, you can get started with integrating the Sign-In API. But if you need to configure your project to work with a backend server or additional package name / keystores, keep reading the sections below.
Server Config - Ensure your server is registered within the same project.
If you have your own web or cloud server with data for your application, you’ll need OAuth credentials for your backend. Details on doing this can be found in the ID token and server auth code documentation.
Before using these flows, you’ll need to make sure you register your web server correctly in the Google Developers Console. Once there, you’ll be asked to select your project. See Figure 3.
Figure 3. Going directly to a project in the Google Developers Console.
Once you’ve selected your project, press the ‘Continue’ button, and you’ll go directly to the Credentials tab where all credential types are managed. Check the “OAuth 2.0 client IDs” section, and you will see the “Web client” and “Android client for com.my.package.name” that were created for you by the setup wizard. See Figure 4.
Figure 4. The Credentials Tab on the Developers Console - Web server OAuth client info
Take note of the Client ID for for your Web client, you’ll need it for both your app and server as illustrated below. (If you’ve created your project in the past and there’s no OAuth 2.0 client ID with Type “Web application”, then you will need to create one by selecting ‘New Credentials’ -> ‘OAuth client ID’.)
If you use an ID token flow for backend authentication, when you start developing your Android app, request an ID token in your GoogleSignInOptions, supplying the web client ID for your server:
GoogleSignInOptions gso =
    new GoogleSignInOptions.Builder(GoogleSignInOptions.DEFAULT_SIGN_IN)
        .requestIdToken(serverClientId)
  .requestEmail()
  .build();
And then on your server, set the same OAuth client ID for your web application to be the audience:
GoogleIdTokenVerifier verifier =
    new GoogleIdTokenVerifier.Builder(transport, jsonFactory)
        .setAudience(Arrays.asList(serverClientId))
        .setIssuer("https://accounts.google.com")
        .build();
Successful verification will allow you to authenticate and issue a session for this newly signed-in user.
GoogleSignInOptions gso =
    new GoogleSignInOptions.Builder(GoogleSignInOptions.DEFAULT_SIGN_IN)
        .requestScopes(new Scope(Scopes.DRIVE_APPFOLDER))
  .requestServerAuthCode(serverClientId)
  .requestEmail()
  .build();
And then on the server, both the OAuth client ID and the “Client secret” will be useful. The server SDK from Google can directly consume a downloaded JSON configuration file. You can click the download icon to download the JSON file (as shown in Figure 4) and use below code to construct GoogleClientSecrets:
GoogleClientSecrets clientSecrets =
    GoogleClientSecrets.load(
        JacksonFactory.getDefaultInstance(),
        new FileReader(PATH_TO_CLIENT_SECRET_FILE));
At which point you can access authenticated Google APIs on behalf of the signed-in user. Note that the “client secret” is really a secret that you should never reveal in your Android client.
Handling multiple environments - Registering other client IDs for your project.
Note that it can be common for apps to have different package names as well as different certificates (and thus SHA-1 keys) for various types of environment (such for different developers or test and release environments). Google uses your package name together with SHA-1 signing-certificate fingerprint to uniquely identify your Android application. It’s important to register every package name + SHA1 fingerprint pair in Google Developers Console.
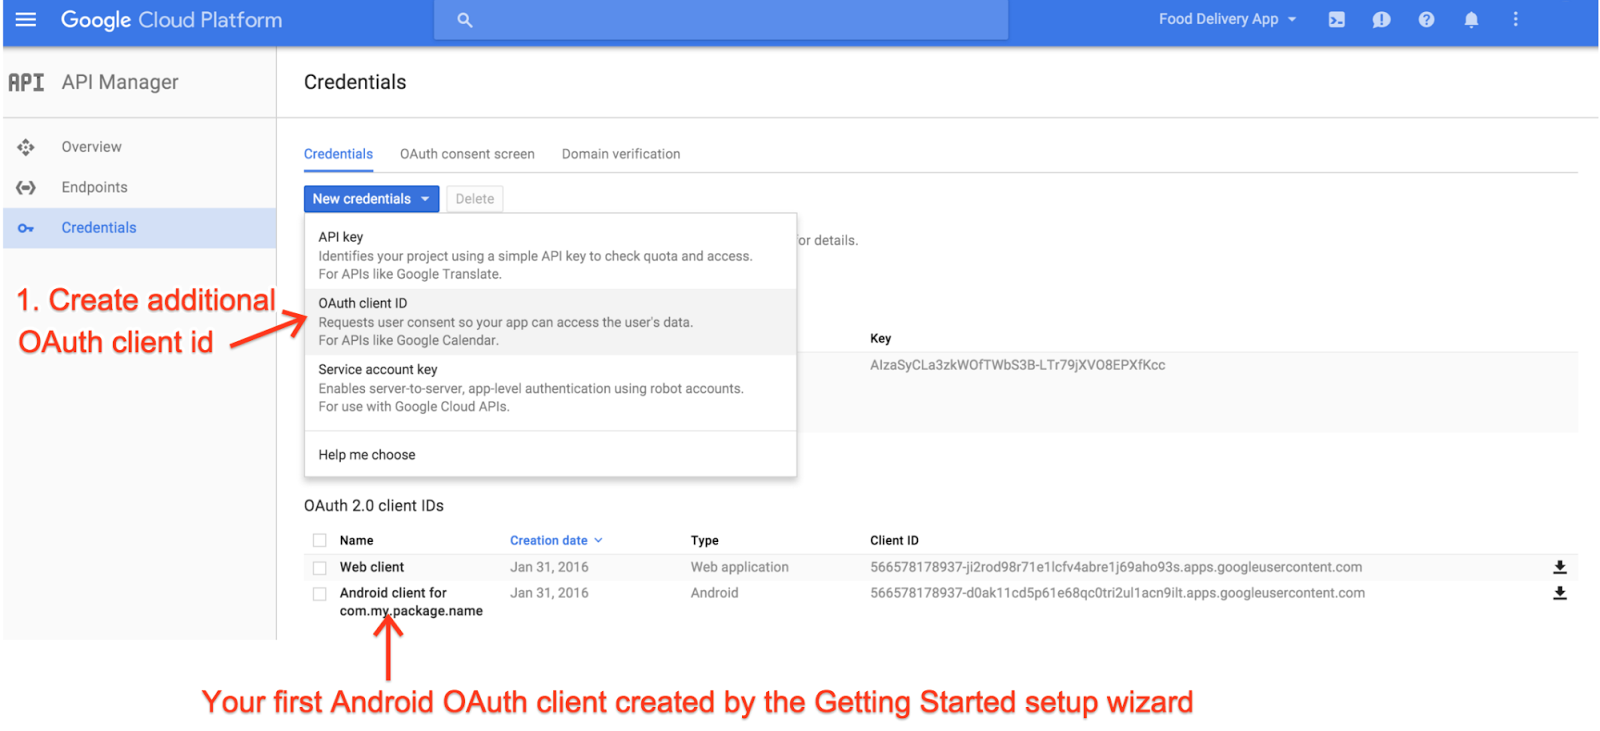
For example, to register the release version of this package, you can do so by selecting ‘New Credentials’ -> ‘OAuth client ID’, shown in Figure 5 below, and then following the steps to add the package name and production keystore SHA-1.
Figure 5. The Credentials Tab on the Developers Console - create additional OAuth client ID
Now you are ready to handle the different environments where your app might be running and release to your users!
Hopefully, this has been helpful to you in understanding how to register for OAuth keys to keep your apps and servers secure. For more information, check out the Google Developers homepage for Identity.
When talking about the Android Support Library, it is important to realize this isn’t one monolithic library, but a whole collection of libraries that seek to provide backward-compatible versions of APIs, as well as offer unique features without requiring the latest platform version. Version 23.2 adds a few new support libraries as well as new features to many of the existing libraries.
Support Vector Drawables and Animated Vector Drawables
Vector drawables allow you to replace multiple png assets with a single vector graphic, defined in XML. While previously limited to Lollipop and higher devices, both VectorDrawable and AnimatedVectorDrawable are now available through two new Support Libraries support-vector-drawable and support-animated-vector-drawable, respectively.
Android Studio 1.4 introduced limited support for vector drawables by generating pngs at build time. To disable this functionality (and gain the true advantage and space savings of this Support Library), you need to add vectorDrawables.useSupportLibrary = true to your build.gradle file:
You’ll note this new attribute only exists in the version 2.0 of the Gradle Plugin. If you are using Gradle 1.5 you’ll instead use
 // Gradle Plugin 1.5
 android {
   defaultConfig {
     generatedDensities = []
  }

  // This is handled for you by the 2.0+ Gradle Plugin
  aaptOptions {
    additionalParameters "--no-version-vectors"
  }
 }
You’ll be able to use VectorDrawableCompat back to API 7 and AnimatedVectorDrawableCompat on all API 11 and higher devices. Due to how drawables are loaded by Android, not every place that accepts a drawable id (such as in an XML file) will support loading vector drawables. Thankfully, AppCompat has added a number of features to make it easy to use your new vector drawables.
Firstly, when using AppCompat with ImageView (or subclasses such as ImageButton and FloatingActionButton), you’ll be able to use the new app:srcCompat attribute to reference vector drawables (as well as any other drawable available to android:src):
And if you’re changing drawables at runtime, you’ll be able to use the same setImageResource() method as before - no changes there. Using AppCompat and app:srcCompat is the most foolproof method of integrating vector drawables into your app.
You’ll find directly referencing vector drawables outside of app:srcCompat will fail prior to Lollipop. However, AppCompat does support loading vector drawables when they are referenced in another drawable container such as a StateListDrawable, InsetDrawable, LayerDrawable, LevelListDrawable, and RotateDrawable. By using this indirection, you can use vector drawables in cases such as TextView’sandroid:drawableLeft attribute, which wouldn’t normally be able to support vector drawables.
AppCompat DayNight theme
While enabling the use of vector graphics throughout your app is already a large change to AppCompat, there’s a new theme added to AppCompat in this release: Theme.AppCompat.DayNight.
Prior to API 14, The DayNight theme and its descendents DayNight.NoActionBar, DayNight.DarkActionBar, DayNight.Dialog, etc. become their Light equivalents. But on API 14 and higher devices, this theme allows apps to easily support both a Light and Dark theme, effectively switching from a Light theme to a Dark theme based on whether it is ‘night’.
By default, whether it is ‘night’ will match the system value (from UiModeManager.getNightMode()), but you can override that value with methods in AppCompatDelegate. You’ll be able to set the default across your entire app (until process restart) with the static AppCompatDelegate.setDefaultNightMode() method or retrieve an AppCompatDelegate via getDelegate() and use setLocalNightMode() to change only the current Activity or Dialog.
When using AppCompatDelegate.MODE_NIGHT_AUTO, the time of day and your last known location (if your app has the location permissions) are used to automatically switch between day and night, while MODE_NIGHT_NO and MODE_NIGHT_YES forces the theme to never or always use a dark theme, respectively.
It is critical that you test your app thoroughly when using the DayNight themes as hardcoded colors can easily make for unreadable text or icons. If you are using the standard TextAppearance.AppCompat styles for your text or colors pulled from your theme such as android:textColorPrimary, you’ll find these automatically update for you.
However, if you’d like to customize any resources specifically for night mode, AppCompat reuses the night resource qualifier folder, making it possible customize every resource you may need. Please consider using the standard colors or taking advantage of the tinting support in AppCompat to make supporting this mode much easier.
By attaching a BottomSheetBehavior to a child View of a CoordinatorLayout (i.e., adding app:layout_behavior=”android.support.design.widget.BottomSheetBehavior”), you’ll automatically get the appropriate touch detection to transition between five state:
STATE_COLLAPSED: this collapsed state is the default and shows just a portion of the layout along the bottom. The height can be controlled with the app:behavior_peekHeight attribute (defaults to 0)
STATE_DRAGGING: the intermediate state while the user is directly dragging the bottom sheet up or down
STATE_SETTLING: that brief time between when the View is released and settling into its final position
STATE_EXPANDED: the fully expanded state of the bottom sheet, where either the whole bottom sheet is visible (if its height is less than the containing CoordinatorLayout) or the entire CoordinatorLayout is filled
STATE_HIDDEN: disabled by default (and enabled with the app:behavior_hideable attribute), enabling this allows users to swipe down on the bottom sheet to completely hide the bottom sheet
Keep in mind that scrolling containers in your bottom sheet must support nested scrolling (for example, NestedScrollView, RecyclerView, or ListView/ScrollView on API 21+).
If you’d like to receive callbacks of state changes, you can add a BottomSheetCallback:
 // The View with the BottomSheetBehavior
 View bottomSheet = coordinatorLayout.findViewById(R.id.bottom_sheet);
 BottomSheetBehavior behavior = BottomSheetBehavior.from(bottomSheet);
 behavior.setBottomSheetCallback(new BottomSheetCallback() {
    @Override
    public void onStateChanged(@NonNull View bottomSheet, int newState) {
      // React to state change
    }
      @Override
      public void onSlide(@NonNull View bottomSheet, float slideOffset) {
       // React to dragging events
   }
 });
While BottomSheetBehavior captures the persistent bottom sheet case, this release also provides a BottomSheetDialog and BottomSheetDialogFragment to fill the modal bottom sheets use case. Simply replace AppCompatDialog or AppCompatDialogFragment with their bottom sheet equivalents to have your dialog styled as a bottom sheet.
Support v4: MediaBrowserServiceCompat
The Support v4 library serves as the foundation for much of the support libraries and includes backports of many framework features introduced in newer versions of the platform (as well a number of unique features).
Adding onto the previously released MediaSessionCompat class to provide a solid foundation for media playback, this release adds MediaBrowserServiceCompat and MediaBrowserCompat providing a compatible solution that brings the latest APIs (even those added in Marshmallow) back to all API 4 and higher devices. This makes it much easier to support audio playback on Android Auto and browsing through media on Android Wear along with providing a standard interface you can use to connect your media playback service and your UI.
RecyclerView
The RecyclerView widget provides an advanced and flexible base for creating lists and grids as well as supporting animations. This release brings an exciting new feature to the LayoutManager API: auto-measurement! This allows a RecyclerView to size itself based on the size of its contents. This means that previously unavailable scenarios, such as using WRAP_CONTENT for a dimension of the RecyclerView, are now possible. You’ll find all built in LayoutManagers now support auto-measurement.
Due to this change, make sure to double check the layout parameters of your item views: previously ignored layout parameters (such as MATCH_PARENT in the scroll direction) will now be fully respected.
If you have a custom LayoutManager that does not extend one of the built in LayoutManagers, this is an opt-in API - you’ll be required to call setAutoMeasureEnabled(true) as well as make some minor changes as detailed in the Javadoc of the method.
Note that although RecyclerView animates its children, it does not animate its own bounds changes. If you would like to animate the RecyclerView bounds as they change, you can use the Transition APIs.
Custom Tabs
Custom Tabs makes it possible to seamlessly transition to web content while keeping the look and feel of your app. With this release, you’ll now be able to add actions to a bottom bar for display alongside the web content.
With the new addToolbarItem() method, you’ll be able to add up to currently 5 (MAX_TOOLBAR_ITEMS) actions to the bottom bar and update them with setToolbarItem() once the session has begun. Similar to the previous setToolbarColor() method, you’ll also find a setSecondaryToolbarColor() method for customizing the background color of the bottom bar.
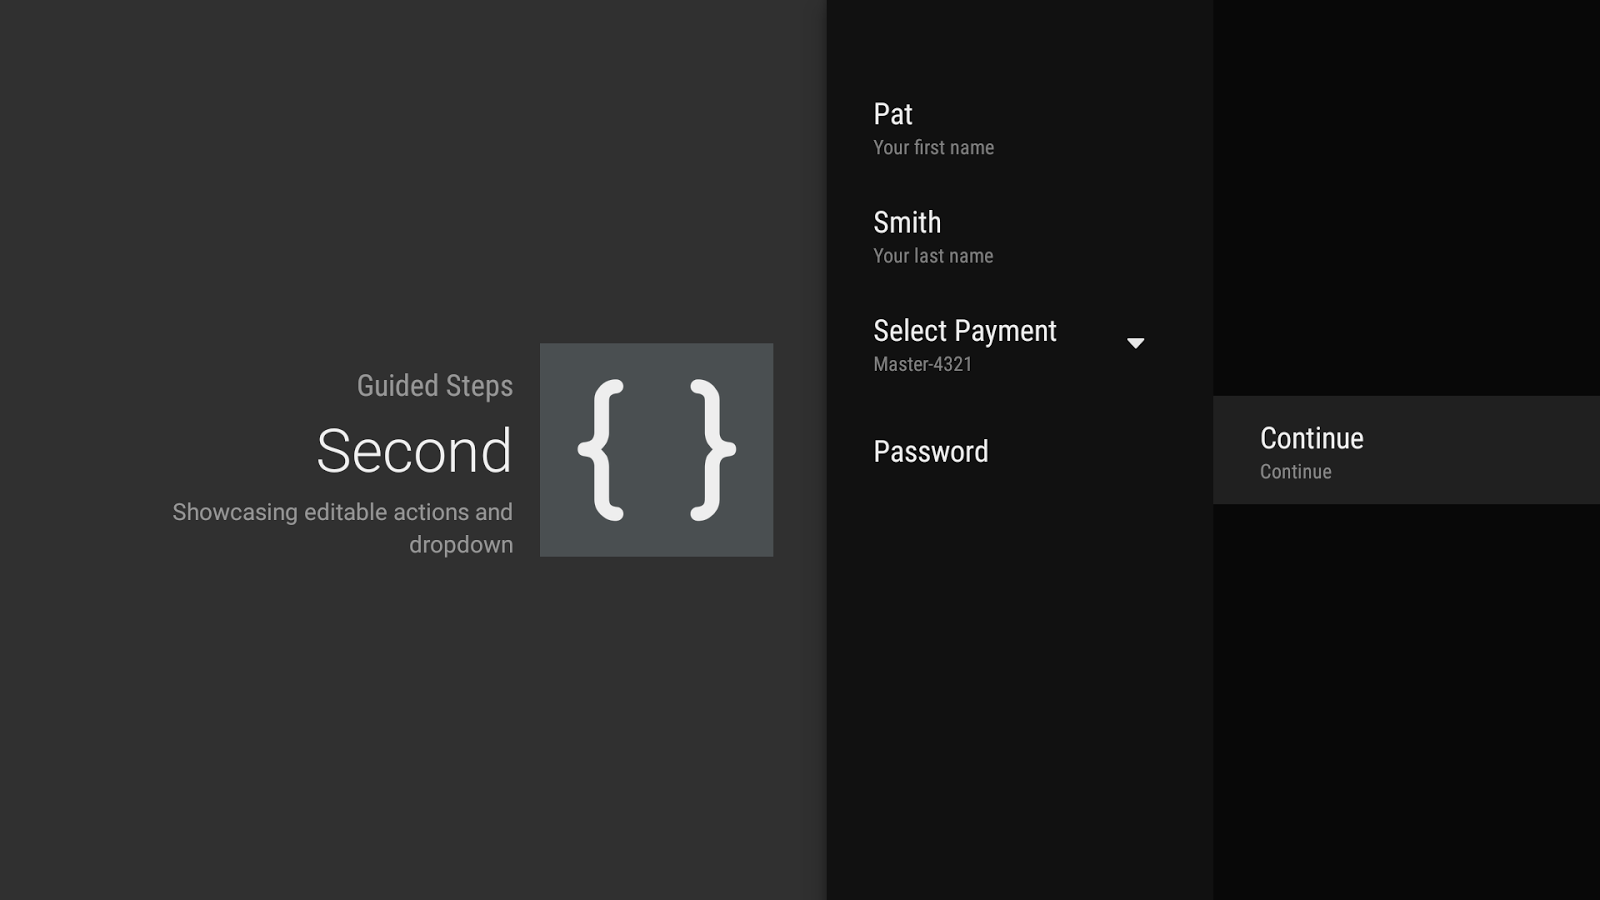
The most visible change may be the introduce of a second column used for action buttons (added by overriding onCreateButtonActions() or calling setButtonActions()). This makes it much easier to reach completion actions without having to scroll through the list of available GuidedActions.
Speaking of GuidedActions, there’s a number of new features to allow richer input including editable descriptions (via descriptionEditable()), sub actions in the form of a dropdown (with subActions()), and a GuidedDatePickerAction.
These components should make it much easier for you to get information from the user when absolutely required.
Available Now
Version 23.2 of the Android Support Library is available via your SDK Manager and Android Studio. Take advantage of all of the new features as well as additional bug fixes starting now! As always, file bug reports at b.android.com and connect with other developers on the Android Development Google+ community.
Sarah Clark, Program Manager, Google Developer Training
Front-end web developers face challenges when using common “asynchronous” requests. These requests, such as fetching a URL or reading a file, often lead to complicated code, especially when performing multiple actions in a row. How can we make this easier for developers?
Javascript Promises are a new tool that simplifies asynchronous code, converting a tangle of callbacks and event handlers into simple, straightforward code such as: fetch(url).then(decodeJSON).then(addToPage)...
We’ve just opened up a online course on Promises, built in collaboration with Udacity. This brief course, which you can finish in about a day, walks you through building an “Exoplanet Explorer” app that reads and displays live data using Promises. You’ll also learn to use the Fetch API and finally kiss XMLHttpRequest goodbye!
This short course is a prerequisite for most of the Senior Web Developer Nanodegree. Whether you are in the paid Nanodegree program or taking the course for free, won’t you come learn to make your code simpler and more reliable today?
At Fun Propulsion Labs we spend some of our time building sample games to help demonstrate how to make easy-to-build, performant, cross-platform games. With the growth of Google Cardboard, we got to work and over many long evenings, feeding our animal hunger on sushi, we came up with Zooshi. Zooshi is an open source, cross-platform game written in C++ which supports:
Android, Android TV, Windows, OSX, and Linux
Google Cardboard
Google Play Games Services sign-in and leaderboards on Android
Level customization
Zooshi serves as a demonstration of how to build Android games using a suite of newly released and updated open source game technologies from Google:
Motive drives our Animation system, giving life and movement to the characters and environment.
CORGI, the Component Oriented Reusable Game Interface, is an Entity-Component system designed to allow users to define complicated game objects as collections of modular, custom-defined behaviors.
FlatUI is a straightforward immediate mode GUI system with a light footprint that makes building up user interfaces a breeze.
Scene Lab allows designers to design levels and edit entities from right in the game without needing to use an external editor.
Breadboard provides an easy to use node based scripting system for editing entity behaviors that's accessible to designers without deep knowledge of programming.
FPLBase is a cross-platform API layer, for abstracting low-level tasks like reading input and creation of graphical contexts.
You can download the game in the Play Store and the latest open source release from our GitHub page. We invite you to learn from the code to see how you can apply these libraries and utilities in your own Android games. Take advantage of our discussion list if you have any questions, and don’t forget to toss some sushi around while you’re at it!
* Fun Propulsion Labs is a team within Google that's dedicated to advancing gaming on Android and other platforms.