We've added the Oboe C++ audio library to the
Android Game SDK. Oboe's support of high-performance, low-latency audio across the widest range of Android devices is the right choice for most game developers.
Single API
On Android devices running Android 8.1 (API level 27) and higher, Oboe takes advantage of the improved performance and features of AAudio while maintaining backward compatibility (using OpenSL ES) with Android 4.1 (API level 16) and higher. Oboe also adds key features on top of the platform APIs to improve the audio developer experience, such as resampling, format conversion, and dynamic latency tuning. It performs audio data transformations, such as channel count conversion, when necessary to improve performance on selected devices, and has workarounds for other device-specific behaviors that improve the robustness of your audio code. In short, Oboe is now the recommended way to write audio code in C/C++ on Android.
Integrating Oboe
There are two primary ways to incorporate Oboe library prebuilts into your project. If you're using the Android Gradle plugin version 4.1.0 or higher along with CMake, and are using or can enable shared STL, enabling Oboe is as easy as adding Oboe to your Gradle dependencies, enabling prefabs, and adding a few lines to your CMakeLists file.
You can also integrate Oboe by statically linking using the Android Game SDK. Begin by downloading the library and checking it into your source control system. You need to be using minSdkVersion of 16 or higher with NDK release 18 or higher. Then, to specify the version of the game SDK to link in that's been compiled for the given ABI, API level, NDK, and STL combination, add a compiler include path in this form:
Then add -loboe_static to your linker command. Since you don't need to bundle the liboboe.so shared library, static linking gives you a smaller code footprint. If the ABI, API level, NDK, and STL combination doesn't have a precompiled version available for your settings, you can alternately link against the shared library. We have more guidance, including how to configure CMake for static libraries, in our developer documentation.
Oboe Basics
To output audio, you begin by creating a stream with the required properties, including a callback that is used when the stream requires new data.
You'll then populate the audio data inside of the callback. If the stream creates successfully, that means you got the requested stream type. If you didn't specify these types, you'll have to query to see what format was returned.
class MyCallback : public oboe::AudioStreamDataCallback {
public:
    oboe::DataCallbackResult
    onAudioReady(oboe::AudioStream *audioStream, void *audioData, int32_t numFrames) {
        // We requested AudioFormat::Float
        auto *outputData = static_cast<float *>(audioData);
        // TODO: populate audioData here
        return oboe::DataCallbackResult::Continue;
    }
};
Posted by Jon Harmer, Product Manager, Google Cloud
We recently introduced Google Workspace, which seamlessly brings together messaging, meetings, docs, and tasks and is a great way for teams to create, communicate, and collaborate. Google Workspace has what you need to get anything done, all in one place. This includes giving developers the ability to extend Google Workspace’s standard functionality like with Google Workspace Add-ons, launched earlier this year.
Google Workspace Add-ons, at launch, allowed a developer to build a single integration for Google Workspace that surfaces across Gmail, Google Drive, and Google Calendar. We recently announced that we added to the functionality of Google Workspace Add-ons by enabling more of the Google Workspace applications with the newer add-on framework, Google Docs, Google Sheets, and Google Slides. With Google Workspace Add-ons, developers can scale their presence across multiple touchpoints in which users can engage, and simplifies processes for building and managing add-ons.
One of our early developers for Google Workspace Add-ons has been Adobe. Adobe has been working to integrate Creative Cloud Libraries into Google Workspace. Using Google Workspace Add-ons, Adobe was able to quickly design a Creative Cloud Libraries experience that felt native to Google Workspace. “With the new add-ons framework, we were able to improve the overall performance and unify our Google Workspace and Gmail Add-ons.” said Ryan Stewart, Director of Product Management at Adobe. “This means a much better experience for our customers and much higher productivity for our developers. We were able to quickly iterate with the updated framework controls and easily connect it to the Creative Cloud services.”
One of the big differences between the Gmail integration and the Google Workspace integration is how it lets users work with Libraries. With Gmail, they’re sharing links to Libraries, but with Docs and Slides, they can add Library elements to their document or presentation. So by offering all of this in a single integration, we are able to provide a more complete Libraries experience. Being able to offer that breadth of experiences in a consistent way for users is exciting for our team.
Adobe’s Creative Cloud Libraries API announced at Adobe MAX, was also integral to integrating Creative Cloud with Google Workspace, letting developers retrieve, browse, create, and get renditions of the creative elements in libraries.
Adobe’s new Add-on for Google Workspace lets you add brand colors, character styles and graphics from Creative Cloud Libraries to Google Workspace apps like Docs and Slides. You can also save styles and assets back to Creative Cloud.
With Google Workspace Add-ons, we understand that teams require many applications to get work done, and we believe that process should be simple, and those productivity applications should connect all of a company’s workstreams. With Google Workspace Add-ons, teams can bring their favorite workplace apps like Adobe Creative Cloud into Google Workspace, enabling a more productive day-to-day experience for design and marketing teams. With quick access to Creative Cloud Libraries, the Adobe Creative Cloud Add-on for Google Workspace lets eveyone easily access and share assets in Gmail and apply brand colors, character styles, and graphics to Google Docs and Slides to keep deliverables consistent and on-brand. There’s a phased rollout to users, first with Google Docs, then Slides, so if you don’t see it in the Add-on yet, stay tuned as it is coming soon.
For developers, Google Workspace Add-ons lets you build experiences that not only let your customers manage their work, but also simplify how they work.
In the previous episode of our new Google Cloud for Student Developers video series, we introduced G Suite REST APIs, showing how to enhance your applications by integrating with Gmail, Drive, Calendar, Docs, Sheets, and Slides. However, not all developers prefer the lower-level style of programming requiring the use of HTTP, OAuth2, and processing the request-response cycle of API usage. Building apps that access Google technologies is open to everyone at any level, not just advanced software engineers.
Enhancing career readiness of non-engineering majors helps make our services more inclusive and helps democratize API functionality to a broader audience. For the budding data scientist, business analyst, DevOps staff, or other technical professionals who don't code every day as part of their profession, Google Apps Script was made just for you. Rather than thinking about development stacks, HTTP, or authorization, you access Google APIs with objects.
This video blends a standard "Hello World" example with various use cases where Apps Script shines, including cases of automation, add-ons that extend the functionality of G Suite editors like Docs, Sheets, and Slides, accessing other Google or online services, and custom functions for Google Sheets—the ability to add new spreadsheet functions.
One featured example demonstrates the power to reach multiple Google technologies in an expressive way: lots of work, not much code. What may surprise readers is that this entire app, written by a colleague years ago, is comprised of just 4 lines of code:
function sendMap() {
  var sheet = SpreadsheetApp.getActiveSheet();
  var address = sheet.getRange('A1').getValue();
  var map = Maps.newStaticMap().addMarker(address);
  GmailApp.sendEmail('[email protected]',
     'Map', 'See below.', {attachments:[map]});
}
Apps Script shields its users from the complexities of authorization and "API service endpoints." Developers only need an object to interface with a service; in this case, SpreadsheetApp to access Google Sheets, and similarly, Maps for Google Maps plus GmailApp for Gmail. Viewers can build this sample line-by-line with its corresponding codelab (a self-paced, hands-on tutorial). This example helps student (and professional) developers...
Build something useful that can be extended into much more
Learn how to accomplish several tasks without a lot of code
Imagine what else is possible with G Suite developer tools
For further exploration, check out this video as well as this one which introduces Apps Script and presents the same code sample with more details. (Note the second video emails the map's link, but the app has been updated to attach it instead; the code has been updated everywhere else.) You may also access the code at its open source repository. If that's not enough, learn about other ways you can use Apps Script from its video library. Finally, stay tuned for the next pair of episodes which will cover full sample apps, one with G Suite REST APIs, and another with Apps Script.
We look forward to seeing what you build with Google Cloud.
Editor’s Note: Guest authors Diego Moreno and Sophia Deng (@sophdeng) are from Gigster, a firm that builds dynamic teams made of top global talent who create industry-changing custom software.
Prelude: Data input & management … three general choices
Google Cloud provides multiple services for gathering and managing data. Google Forms paired with Google Sheets are quite popular as they require no engineering resources while being incredibly powerful, providing storage of up to 5 million rows of data and built-in analytics for small team projects.
At the other end of the spectrum, to support a high volume of users or data, Google Cloud provides advanced serverless platforms like Google App Engine (web app-hosting) and Google Cloud Functions (function/service-hosting) that can use Google Cloud Firestore for fast and scalable data storage. These are perfect for professional engineering teams that need autoscaling to respond to any level of user traffic and data input. Such apps can also be packaged into a container and deployed serverlessly on Google Cloud Run.
However, it's quite possible your needs are right in-between. Today, we're happy to present the Gigster story and their innovative use of Google Apps Script—a highly-accessible service conventionally relegated to simple macro and add-on development, but which Gigster used to its advantage, building robust systems to transform their internal operations. Apps Script is also serverless, meaning Gigster didn't have to manage any servers for their application nor did they need to find a place to host its source code.
The Gigster story
Gigster enables distributed teams of software engineers, product managers and designers to build software applications for enterprise clients. Over the past five years, Gigster has delivered thousands of projects, all with distributed software teams. Our group, the Gigster Staffing Operations Team, is responsible for assembling these teams from Gigster’s network of over 1,000 freelancers.
Two years ago, our team began building custom software to automate the multi-stage and highly manual team staffing process. Building internal software has allowed the same-size Staffing Operations Team (3 members!) to enjoy a 60x reduction in time spent staffing each role.
The Apps Script ecosystem has emerged as the most critical component in our toolkit for building this internal software, due to its versatility and ease of deployment. We want to share how one piece of the staffing process has evolved to become more powerful over time thanks to Apps Script. Ultimately, we hope that sharing this journey enables all types of teams to build their own tools and unlock new possibilities.
End-to-end automation in Google Sheets
Staffing is an operationally intensive procedure. Just finding willing and able candidates requires numerous steps:
Gathering and formatting customer requirements.
Communicating with candidates through multiple channels.
Logging candidate responses.
Processing paperwork for placement
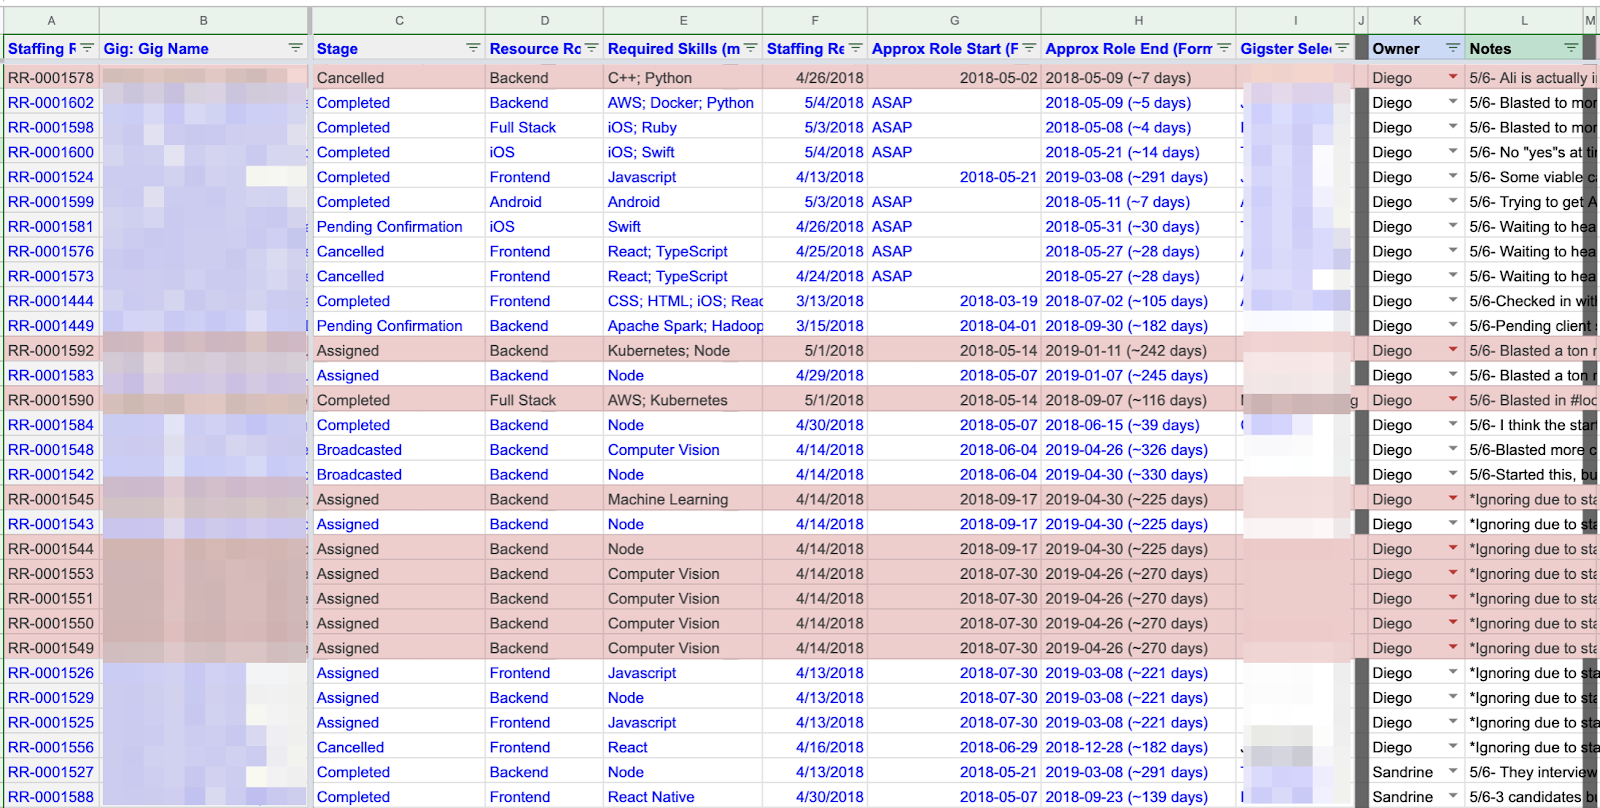
To add complexity, many of these steps require working with different third-party applications. For awhile, we performed every step manually, tracking every piece of data generated in one central Sheet (the “Staffing Broadcast Google Sheet”). At a certain point, this back-and-forth work to log data from numerous applications became unsustainable. Although we leveraged Google Sheets features like Data Validation rules and filters, the Staffing Broadcast Sheet could not alleviate the high degree of manual processes that were required of the team.
The centralized Staffing Broadcast Google Sheet provided organization, but required a high degree of manual entry for tracking candidate decisions.
The key transformation was integrating Sheets data with third-party APIs via Apps Script. This enabled us to cut out the most time-consuming operations. We no longer had to flip between applications to message candidates, wait for their replies, and then manually track responses.
To interact with these APIs, we built a user interface directly into the Staffing Broadcast Google Sheet. By introducing an information module, as well as drop-down lists and buttons, we were able to define a small set of manual actions versus the much wider list of tasks the tool would perform automatically across multiple applications.
By integrating Google Apps Script with third-party APIs and creating a user interface, we evolved the Staffing Broadcast Tool to centralize and automate almost every step of the staffing process.
doPost() is the key function in our staffing tool that facilitates third-party services triggering our Apps Script automations. Below is a snippet of how we listened to candidates' responses from a third-party messaging application. In this case, queueing the third-party message in a Google Sheet so it can be processed with improved error-handling.
/**
 * Receive POST requests and record to queue.
 */
doPost(e) {
  var payload = e.postData.contents;
  SpreadsheetApp.openById(SPREADSHEET_ID)
    .getSheetByName("Unprocessed")
    .appendRow([payload]);
  return ContentService.createTextOutput(""); // Return 200
}
Almost all manual work associated with finding candidates was automated through the combination of integrations with third-party APIs and having a user interface to perform a small, defined set of actions. Our team’s day-to-day became shockingly simple: select candidates to receive messages within the Staffing Broadcast Tool, then click the “Send Broadcast” button. That’s it. The tool handled everything else.
Leveraging Sheets as our foundation, we fundamentally transformed our spreadsheet into a custom software application. The spreadsheet went from a partially automated datastore to a tool that provided an end-to-end automated solution, requiring only the click of a few buttons to execute.
Evolution into a standalone application
While satisfied, we understood that having our application live in Google Sheets had its limitations, namely, it was difficult for multiple team members to simultaneously use the tool. Using doGet(), the sibling to doPost(), we began building an HTML frontend to the Staffing Broadcast Tool. In addition to resolving difficulties related to multiple users being in a spreadsheet, it also allowed us to build an easier-to-use and more responsive tool by leveraging Bootstrap & jQuery.
Having multiple users in a single Google Sheet can create conflicts, but Apps Script allowed us to build a responsive web app leveraging common libraries like Bootstrap & jQuery that eliminated those problems while providing an improved user experience.
When other teams at Gigster got wind of what we built, it was easy to grant access to others beyond the Staffing Operations Team. Since Apps Script is part of the G Suite developer ecosystem, we relied on Google’s security policies to help deploy our tools to larger audiences.
While this can be done through Google’s conventional sharing tools, it can also be done with built-in Apps Script functions like Session.getActiveUser() that allow us to restrict access to specific Google users. In our case, those within our organization plus a few select users.
To this day, we continue to use this third version of the Staffing Broadcast Tool in our daily operations as it supports 100% of all client projects at Gigster.
Conclusion
By fundamentally transforming the Staffing Broadcast Tool with Apps Script, Gigster’s Staffing Operations Team increased its efficiency while supporting the growth of our company. Inspired by these business benefits, we applied this application-building approach using Apps Script for multiple tools, including candidate searching, new user onboarding, and countless automations.
Our team’s psychological shift about how we view what we are capable of, especially as a non-engineering team, has been the most valuable part of this journey. By leveraging an already familiar ecosystem to build our own software, we have freed team members to become more self-sufficient and valuable to our customers.
To get started on your Apps Script journey, we recommend you check out the Apps Script Fundamentals playlist and the official documentation. And if you're a freelancer looking to build software applications for clients, we’re always looking for talented software engineers, product managers or designers to join Gigster’s Talent Network.
Thank you to Sandrine Bitton, the third member of the Staffing Operations Team, for all her help in the development of the Staffing Broadcast Tool.
Google Cloud Platform (GCP) provides infrastructure, serverless products, and APIs that help you build, innovate, and scale. G Suite provides a collection of productivity tools, developer APIs, extensibility frameworks and low-code platforms that let you integrate with G Suite applications, data, and users. While each solution is compelling on its own, users can get more power and flexibility by leveraging both together.
In the latest episode of the G Suite Dev Show, I'll show you one example of how you can take advantage of powerful GCP tools right from G Suite applications. BigQuery, for example, can help you surface valuable insight from massive amounts of data. However, regardless of "the tech" you use, you still have to justify and present your findings to management, right? You've already completed the big data analysis part, so why not go that final mile and tap into G Suite for its strengths? In the sample app covered in the video, we show you how to go from big data analysis all the way to an "exec-ready" presentation.
The sample application is meant to give you an idea of what's possible. While the video walks through the code a bit more, let's give all of you a high-level overview here. Google Apps Script is a G Suite serverless development platform that provides straightforward access to G Suite APIs as well as some GCP tools such as BigQuery. The first part of our app, the runQuery() function, issues a query to BigQuery from Apps Script then connects to Google Sheets to store the results into a new Sheet (note we left out CONSTANT variable definitions for brevity):
function runQuery() {
  // make BigQuery request
  var request = {query: BQ_QUERY};
  var queryResults = BigQuery.Jobs.query(request, PROJECT_ID);
  var jobId = queryResults.jobReference.jobId;
  queryResults = BigQuery.Jobs.getQueryResults(PROJECT_ID, jobId);
  var rows = queryResults.rows;

  // put results into a 2D array
  var data = new Array(rows.length);
  for (var i = 0; i < rows.length; i++) {
    var cols = rows[i].f;
    data[i] = new Array(cols.length);
    for (var j = 0; j < cols.length; j++) {
      data[i][j] = cols[j].v;
    }
  }

  // put array data into new Sheet
  var spreadsheet = SpreadsheetApp.create(QUERY_NAME);
  var sheet = spreadsheet.getActiveSheet();
  var headers = queryResults.schema.fields;
  sheet.appendRow(headers); // header row
  sheet.getRange(START_ROW, START_COL,
      rows.length, headers.length).setValues(data);

  // return Sheet object for later use
  return spreadsheet;
}
It returns a handle to the new Google Sheet which we can then pass on to the next component: using Google Sheets to generate a Chart from the BigQuery data. Again leaving out the CONSTANTs, we have the 2nd part of our app, the createColumnChart() function:
function createColumnChart(spreadsheet) {
  // create & put chart on 1st Sheet
  var sheet = spreadsheet.getSheets()[0];
  var chart = sheet.newChart()
     .setChartType(Charts.ChartType.COLUMN)
     .addRange(sheet.getRange(START_CELL + ':' + END_CELL))
     .setPosition(START_ROW, START_COL, OFFSET, OFFSET)
     .build();
  sheet.insertChart(chart);

  // return Chart object for later use
  return chart;
}
The chart is returned by createColumnChart() so we can use that plus the Sheets object to build the desired slide presentation from Apps Script with Google Slides in the 3rd part of our app, the createSlidePresentation() function:
function createSlidePresentation(spreadsheet, chart) {
  // create new deck & add title+subtitle
  var deck = SlidesApp.create(QUERY_NAME);
  var [title, subtitle] = deck.getSlides()[0].getPageElements();
  title.asShape().getText().setText(QUERY_NAME);
  subtitle.asShape().getText().setText('via GCP and G Suite APIs:\n' +
    'Google Apps Script, BigQuery, Sheets, Slides');

  // add new slide and insert empty table
  var tableSlide = deck.appendSlide(SlidesApp.PredefinedLayout.BLANK);
  var sheetValues = spreadsheet.getSheets()[0].getRange(
      START_CELL + ':' + END_CELL).getValues();
  var table = tableSlide.insertTable(sheetValues.length, sheetValues[0].length);

  // populate table with data in Sheets
  for (var i = 0; i < sheetValues.length; i++) {
    for (var j = 0; j < sheetValues[0].length; j++) {
      table.getCell(i, j).getText().setText(String(sheetValues[i][j]));
    }
  }

  // add new slide and add Sheets chart to it
  var chartSlide = deck.appendSlide(SlidesApp.PredefinedLayout.BLANK);
  chartSlide.insertSheetsChart(chart);

  // return Presentation object for later use
  return deck;
}
Finally, we need a driver application that calls all three one after another, the createColumnChart() function:
function createBigQueryPresentation() {
  var spreadsheet = runQuery();
  var chart = createColumnChart(spreadsheet);
  var deck = createSlidePresentation(spreadsheet, chart);
}
We left out some detail in the code above but hope this pseudocode helps kickstart your own project. Seeking a guided tutorial to building this app one step-at-a-time? Do our codelab at g.co/codelabs/bigquery-sheets-slides. Alternatively, go see all the code by hitting our GitHub repo at github.com/googlecodelabs/bigquery-sheets-slides. After executing the app successfully, you'll see the fruits of your big data analysis captured in a presentable way in a Google Slides deck:
This isn't the end of the story as this is just one example of how you can leverage both platforms from Google Cloud. In fact, this was one of two sample apps featured in our Cloud NEXT '18 session this summer exploring interoperability between GCP & G Suite which you can watch here:
Stay tuned as more examples are coming. We hope these videos plus the codelab inspire you to build on your own ideas.
While most chatbots respond to user requests in a synchronous way, there are scenarios when bots don't perform actions based on an explicit user request, such as for alerts or notifications. In today's DevByte video, I'm going to show you how to send messages asynchronously to rooms or direct messages (DMs) in Hangouts Chat, the team collaboration and communication tool in G Suite.
What comes to mind when you think of a bot in a chat room? Perhaps a user wants the last quarter's European sales numbers, or maybe, they want to look up local weather or the next movie showtime. Assuming there's a bot for whatever the request is, a user will either send a direct message (DM) to that bot or @mention the bot from within a chat room. The bot then fields the request (sent to it by the Hangouts Chat service), performs any necessary magic, and responds back to the user in that "space," the generic nomenclature for a room or DM.
Our previous DevByte video for the Hangouts Chat bot framework shows developers what bots and the framework are all about as well as how to build one of these types of bots, in both Python and JavaScript. However, recognize that these bots are responding synchronously to a user request. This doesn't suffice when users want to be notified when a long-running background job has completed, when a late bus or train will be arriving soon, or when one of their servers has just gone down. Recognize that such alerts can come from a bot but also perhaps a monitoring application. In the latest episode of the G Suite Dev Show, learn how to integrate this functionality in either type of application.
From the video, you can see that alerts and notifications are "out-of-band" messages, meaning they can come in at any time. The Hangouts Chat bot framework provides several ways to send asynchronous messages to a room or DM, generically referred to as a "space." The first is the HTTP-based REST API. The other way is using what are known as "incoming webhooks."
The REST API is used by bots to send messages into a space. Since a bot will never be a human user, a Google service account is required. Once you create a service account for your Hangouts Chat bot in the developers console, you can download its credentials needed to communicate with the API. Below is a short Python sample snippet that uses the API to send a message asynchronously to a space.
from apiclient import discovery from httplib2 import Http from oauth2client.service_account import ServiceAccountCredentials
The alternative to using the API with services accounts is the concept of incoming webhooks. Webhooks are a quick and easy way to send messages into any room or DM without configuring a full bot, i.e., monitoring apps. Webhooks also allow you to integrate your custom workflows, such as when a new customer is added to the corporate CRM (customer relationship management system), as well as others mentioned above. Below is a Python snippet that uses an incoming webhook to communicate into a space asynchronously.
To get started, take a look at the Hangouts Chat developer documentation, especially the specific pages linked to above. We hope this video helps you take your bot development skills to the next level by showing you how to send messages to the Hangouts Chat service asynchronously.
Posted by Isai Damier, Software Engineer, Android DA
Working with Multiple JobServices
In its continuous effort to improve user experience, the Android platform has
introduced strict limitations on background services starting in API level 26.
Basically, unless your app is running in the foreground,
the system will stop all of your app's background services within minutes.
As a result of these restrictions on background services,
JobScheduler jobs have become the de facto solution for performing
background tasks. For people familiar with services, JobScheduler
is generally straightforward to use: except in a few cases, one of which we
shall explore presently.
Imagine you are building an Android TV app. Since channels are very important to
TV Apps, your app should be able to perform at least five different background
operations on channels: publish a channel, add programs to a channel, send logs
about a channel to your remote server, update a channel's metadata, and delete a
channel. Prior to Android 8.0 (Oreo) each of these five operations could be
implemented within background services. Starting in API 26, however, you must be
judicious in deciding which should be plain old background Services
and which should be JobServices.
In the case of a TV app, of the five operations mentioned above, only channel
publication can be a plain old background service. For some context, channel
publication involves three steps: first the user clicks on a button to start the
process; second the app starts a background operation to create and submit the
publication; and third, the user gets a UI to confirm subscription. So as you
can see, publishing channels requires user interactions and therefore a visible
Activity. Hence, ChannelPublisherService could be an IntentService
that handles the background portion. The reason you should not use a
JobService here is because JobService will introduce a
delay in execution, whereas user interaction usually requires immediate response
from your app.
For the other four operations, however, you should use JobServices;
that's because all of them may execute while your app is in the background. So
respectively, you should have ChannelProgramsJobService,
ChannelLoggerJobService, ChannelMetadataJobService,
and ChannelDeletionJobService.
Avoiding JobId Collisions
Since all the four JobServices above deal with Channel
objects, it should be convenient to use the channelId as the
jobId for each one of them. But because of the way
JobServices are designed in the Android Framework, you can't. The
following is the official description of jobId
Application-provided id for this job. Subsequent calls to cancel,
or jobs created with the same jobId, will update the pre-existing
job with the same id. This ID must be unique across all clients
of the same uid (not just the same package). You will want to
make sure this is a stable id across app updates, so probably not
based on a resource ID.
What the description is telling you is that even though you are using 4
different Java objects (i.e. -JobServices), you still cannot use the same
channelId as their jobIds. You don't get credit for
class-level namespace.
This indeed is a real problem. You need a stable and scalable way to relate a
channelId to its set of jobIds. The last thing you
want is to have different channels overwriting each other's operations because
of jobId collisions. Were jobId of type String instead
of Integer, the solution would be easy: jobId= "ChannelPrograms" +
channelId for ChannelProgramsJobService, jobId= "ChannelLogs" +
channelId for ChannelLoggerJobService, etc. But since
jobId is an Integer and not a String, you have to devise a clever
system for generating reusable jobIds for your jobs. And for that,
you can use something like the following JobIdManager.
JobIdManager is a class that you tweak according to your app's
needs. For this present TV app, the basic idea is to use a single
channelId over all jobs dealing with Channels. To
expedite clarification: let's first look at the code for this sample
JobIdManager class, and then we'll discuss.
public class JobIdManager {

   public static final int JOB_TYPE_CHANNEL_PROGRAMS = 1;
   public static final int JOB_TYPE_CHANNEL_METADATA = 2;
   public static final int JOB_TYPE_CHANNEL_DELETION = 3;
   public static final int JOB_TYPE_CHANNEL_LOGGER = 4;

   public static final int JOB_TYPE_USER_PREFS = 11;
   public static final int JOB_TYPE_USER_BEHAVIOR = 21;

   @IntDef(value = {
           JOB_TYPE_CHANNEL_PROGRAMS,
           JOB_TYPE_CHANNEL_METADATA,
           JOB_TYPE_CHANNEL_DELETION,
           JOB_TYPE_CHANNEL_LOGGER,
           JOB_TYPE_USER_PREFS,
           JOB_TYPE_USER_BEHAVIOR
   })
   @Retention(RetentionPolicy.SOURCE)
   public @interface JobType {
   }

   //16-1 for short. Adjust per your needs
   private static final int JOB_TYPE_SHIFTS = 15;

   public static int getJobId(@JobType int jobType, int objectId) {
       if ( 0 < objectId && objectId < (1<< JOB_TYPE_SHIFTS) ) {
           return (jobType << JOB_TYPE_SHIFTS) + objectId;
       } else {
           String err = String.format("objectId %s must be between %s and %s",
                   objectId,0,(1<<JOB_TYPE_SHIFTS));
           throw new IllegalArgumentException(err);
       }
   }
}
As you can see, JobIdManager simply combines a prefix with a
channelId to get a jobId. This elegant simplicity,
however, is just the tip of the iceberg. Let's consider the assumptions and
caveats beneath.
First insight: you must be able to coerce channelId into a Short,
so that when you combine channelId with a prefix you still end up
with a valid Java Integer. Now of course, strictly speaking, it does not have to
be a Short. As long as your prefix and channelId combine into a
non-overflowing Integer, it will work. But margin is essential to sound
engineering. So unless you truly have no choice, go with a Short coercion. One
way you can do this in practice, for objects with large IDs on your remote
server, is to define a key in your local database or content provider and use
that key to generate your jobIds.
Second insight: your entire app ought to have only one JobIdManager
class. That class should generate jobIds for all your app's jobs:
whether those jobs have to do with Channels, Users, or
Cats and Dogs. The sample JobIdManager
class points this out: not all JOB_TYPEs have to do with
Channel operations. One job type has to do with user prefs and one
with user behavior. The JobIdManager accounts for them all by
assigning a different prefix to each job type.
Third insight: for each -JobService in your app, you must have a
unique and final JOB_TYPE_ prefix. Again, this must be an
exhaustive one-to-one relationship.
Using JobIdManager
The following code snippet from ChannelProgramsJobService
demonstrates how to use a JobIdManager in your project. Whenever
you need to schedule a new job, you generate the jobId using
JobIdManager.getJobId(...).
import android.app.job.JobInfo;
import android.app.job.JobParameters;
import android.app.job.JobService;
import android.content.ComponentName;
import android.content.Context;
import android.os.PersistableBundle;

public class ChannelProgramsJobService extends JobService {

   private static final String CHANNEL_ID = "channelId";
   . . .

   public static void schedulePeriodicJob(Context context,
                                      final int channelId,
                                      String channelName,
                                      long intervalMillis,
                                      long flexMillis)
{
   JobInfo.Builder builder = scheduleJob(context, channelId);
   builder.setPeriodic(intervalMillis, flexMillis);

   JobScheduler scheduler =
            (JobScheduler) context.getSystemService(Context.JOB_SCHEDULER_SERVICE);
   if (JobScheduler.RESULT_SUCCESS != scheduler.schedule(builder.build())) {
       //todo what? log to server as analytics maybe?
       Log.d(TAG, "could not schedule program updates for channel " + channelName);
   }
}

private static JobInfo.Builder scheduleJob(Context context,final int channelId){
   ComponentName componentName =
           new ComponentName(context, ChannelProgramsJobService.class);
   final int jobId = JobIdManager
             .getJobId(JobIdManager.JOB_TYPE_CHANNEL_PROGRAMS, channelId);
   PersistableBundle bundle = new PersistableBundle();
   bundle.putInt(CHANNEL_ID, channelId);
   JobInfo.Builder builder = new JobInfo.Builder(jobId, componentName);
   builder.setPersisted(true);
   builder.setExtras(bundle);
   builder.setRequiredNetworkType(JobInfo.NETWORK_TYPE_ANY);
   return builder;
}

   ...
}
Footnote: Thanks to Christopher Tate and Trevor Johns for their invaluable
feedback
Posted by Michael Amygdalidis, Stephan Linzner and Nick Korostelev from the Mobile-Ninjas team at Google
We're pleased to announce the version 1.0 release of the Android Testing Support
Library (ATSL).
ATSL version 1.0 is a major update to our existing testing APIs and comes with
lots of new features, improved performance, stability, and bug fixes. It
provides full API parity with the now deprecated Android platform testing APIs.
This release also adds a number of features that we discussed in our Google I/O 2017 talk,
such as native support for Multiprocess
Espresso and the Android
Test Orchestrator.
We are also happy to announce that, starting with version 1.0, we're
distributing releases on Google's Maven repository, which makes it a lot easier
to use ATSL in your builds. To learn more about using this repository, see the
getting started with the Google Maven repository guide. Note that we're no
longer tying future updates to the testing infrastructure with platform updates.
If you have not yet upgraded your tests to ATSL, this is an excellent time.
Finally, we want to announce a big update to our Android testing documentation.
We've migrated our old testing documentation from our GitHub
website to developers.android.com/testing.
All the testing documentation now appears in a single place, making it even
easier to learn how to write and execute tests on Android.
Let's move on to the fun part of this post, an overview of new APIs and tools
that we're providing in this release.
Espresso
Improvements
Espresso 3.0.0 comes with amazing new features and improved
overall performance. Some of the highlights include: Multiprocess Espresso,
Idling Registry and new Idling Resources. Let's dive in and have a more detailed
look at these new features:
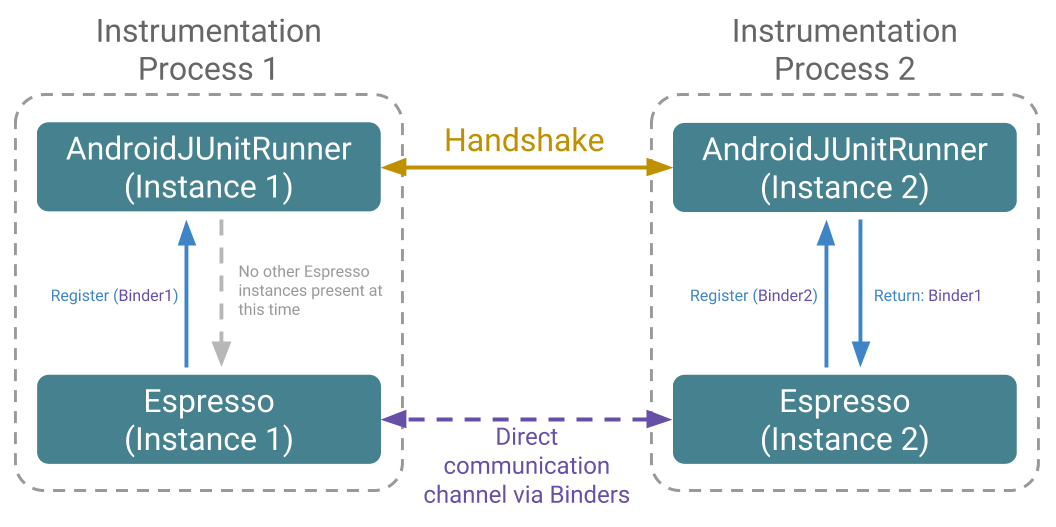
Multiprocess Espresso
Starting with Android
O, the platform includes support for instrumenting tests outside of your
app's default process. (Prior to Android O, you could only test against app
components in your app's default process.) Multiprocess Espresso makes this
support possible. It allows you to seamlessly test your app's UI interactions
that cross process boundaries while still maintaining Espresso's synchronization
guarantees.
The good news is that Espresso does all the work; you don't have to change
anything for setups with UI in multiple processes. You can keep writing your
Espresso tests like you would for single process apps, and Espresso
automatically handles the process IPC and synchronization between processes.
The following diagram shows how multiple instances of Espresso communicate with
each other:
If you want to learn more about Multiprocess Espresso and how to use it, please
take a look at our documentation
and our Multiprocess
sample.
Idling Registry
Some apps use build flavors in Gradle or a dependency injection framework, like
Dagger, to generate test build configurations that register idling resources.
Others simply expose the idling resource through their activities. The problem
with all these approaches is that they add complexity to your development
workflow, and some of them even break encapsulation. With the latest release of
Espresso, we've made it easier to register idling resources from within your app
code by introducing the new IdlingRegistry API.
IdlingRegistry is a lightweight registry that doesn't bring in the
entire Espresso library, so you can more easily register resources from your
application code. When combining this API with Multiprocess Espresso, you can
register idling resources from any process within your application code.
Registration from the Espresso class is now deprecated.
Idling Resources
Writing custom idling resources can be time consuming, so Espresso 3.0.0 now
comes with more idling resources out of the box to synchronize your threads. The
new resources include: IdlingThreadPoolExecutor and
IdlingScheduledThreadPoolExecutor. There will be more to come!
To take advantage of the new idling resource, add these new dependencies to your
build.gradle file:
Additionally, CountingIdlingResource,
which was previously deprecated in Espresso contrib, has been removed with this
release. Therefore, you need to update your tests to use the new CountingIdlingResource
package that's located in Espresso idling resource. For the full migration
details, refer to our release
notes.
ProviderTestRule
When you test ContentProvider
objects, you can now use ProviderTestRule
instead of ProviderTestCase2.
ProviderTestRule offers an easier way to work with other test rules
currently available for AndroidJUnit4.
ProviderTestRule
includes APIs for initialization, as well as commands to run against a ContentProvider
under test. If your ContentProvider is based off of a SQLite
database, you can use the ProviderTestRule commands for setting the
database file and initialization commands.
Android M (API level 23) allows apps to request permissions at runtime. However,
the dialogs that request runtime permissions place tests in a state where they
cannot continue, causing them to fail. By using GrantPermissionRule,
you can skip the dialog popups altogether and simulate a user granting a runtime
permission for your app.
Android Test
Orchestrator
Typically, AndroidJUnitRunner runs all tests in the same instrumentation
process, which can cause a number of problems. For example, tests share their
state in memory, and if one test crashes, it prevents the remainder of the test
suite from running.
Although it's possible to isolate tests by issuing sequential adb
commands, this process adds host-side processing load. By using the new Android
Test Orchestrator instead, you can achieve test isolation entirely on the
device, as shown in this diagram:
Be aware that if your tests require shared state to pass, the
orchestrator causes them to fail. This behavior is by design. As of this post,
Android Test Orchestrator is in beta and is available for use via the command
line. We have integrations planned for Firebase Test Lab and Android Studio,
coming soon.
You can configure class loaders and custom JUnit test filters using the
runner arguments
Sometimes you want to test an activity that you create and configure on the fly
as part of your test workflow. Now, you can configure MonitoringInstrumentation
(and by extension, AndroidJUnitRunner)
using an InterceptingActivityFactory.
You can create your activity under test with a test-specific configuration
without having to rely on compile-time injection.
This overview highlights only some of the most significant changes that we've
made to ATSL. They are many more changes that are worth exploring. For the full
release details, refer to our release
notes.
Last but not least, we want to thank all the developers who contributed features
to this release. We also want to thank the Android testing experts on the mobile
engineering teams at American Express, Slack and GDE Chiu-Ki Chan for
collaborating with us and providing valuable feedback on the pre-release version
of Android Testing Support Library.
Posted by Paul Saxman, Android Devices and Media Developer Relations Lead
Android TV brings rich app experiences and entertainment to the biggest screen in your house, and with Android O, we’re making it even easier for users to access content from their favorite apps. We’ve built a new, content-centric home screen experience for Android TV, and we're bringing the Google Assistant to the platform as well. These features put content that users want to access a few clicks, or spoken words, away.
The New Android TV Home Screen
The new Android TV home screen organizes video content into channels and programs in a way that’s familiar to TV viewers. Each Android TV app can publish multiple channels, which are represented as rows of programs on the home screen. Apps add relevant programs on each channel, and update these programs and channels as users access content or when new content is available. To help engage users, programs can include a video preview, which is automatically played when a user focuses on a program. Users can configure which channels they wish to see on the home screen, and the ordering of channels, so the themes and shows they’re interested in are quick and easy to access.
In addition to channels for you app, the top of the new Android TV home screen includes a quick launch bar for users' favorite apps, and a special Watch Next channel. This channel contains programs based on the viewing habits of the user.
The APIs for creating and maintaining channels and programs are part of the TvProvider
APIs, which are distributed as an Android Support Library module with
Android O. To get started using these APIs, visit the Android O
Developer Preview site for an overview, and try out the Android
TV Channels and Programs codelab for a first-hand experience building an
Android TV app for Android O.
Later this year, Nexus Players will receive the new Android TV home experience
as an OTA update. If you wish build and test apps for the new interface today,
however, you can use the Android TV emulator or Nexus Player device images that
are part of the latest Android O Developer
Preview.
The Google Assistant on Android TV
The Google Assistant on Android TV, coming later this year, will allow users to
quickly find and access content using their voice. Because the Assistant is
context-aware, it can help users narrow down what content to play. Users will
also be able access the Assistant to control playback, even while a video or
music is playing. And since the Assistant can control compatible smart home
devices, a simple voice request can dim the lights to create an ideal movie
viewing environment. When the Google Assistant comes to Android TV, it will
launch in the US on Android devices running M, N, and O.
We're looking forward to seeing how developers take advantage of the new Android
TV home screen. We welcome feedback, so please visit the Android TV
Developer Community on G+ to share you thoughts and ideas!
Originally posted on G Suite Developers Blog Posted by Wesley Chun (@wescpy), Developer Advocate, G Suite At Google I/O earlier this year, we launched a new Google Sheets API (click here to watch the entire announcement). The updated API includes many new features that weren't available in previous versions, including access to more functionality found in the Sheets desktop and mobile user interfaces. Formatting cells in Sheets is one example of something that wasn't possible with previous versions of the API and is the subject of today's DevByte video.
In our previous Sheets API video, we demonstrated how to get data into and out of a Google Sheet programmatically, walking through a simple script that reads rows out of a relational database and transferring the data to a new Google Sheet. The Sheet created using the code from that video is where we pick up today.
Formatting spreadsheets is accomplished by creating a set of request commands in the form of JSON payloads, and sending them to the API. Here is a sample JavaScript Object made up of an array of requests (only one this time) to bold the first row of the default Sheet automatically created for you (whose ID is 0):
With at least one request, say in a variable named requests and the ID of the sheet as SHEET_ID, you send them to the API via an HTTP POST to https://sheets.googleapis.com/v4/spreadsheets/{SHEET_ID}:batchUpdate, which in Python, would be a single call that looks like this:
For more details on the code in the video, check out the deepdive blog post. As you can probably guess, the key challenge is in constructing the JSON payload to send to API calls—the common operations samples can really help you with this. You can also check out our JavaScript codelab where we guide you through writing a Node.js app that manages customer orders for a toy company, featuring the toy orders data we looked at today but in a relational database. While the resulting equivalent Sheet is featured prominently in today's video, we will revisit it again in an upcoming episode showing you how to generate slides with spreadsheet data using the new Google Slides API, so stay tuned for that!
We hope all these resources help developers enhance their next app using G Suite APIs! Please subscribe to our channel and tell us what topics you would like to see in other episodes of the G Suite Dev Show!