Category Archives: Google Cloud Platform Blog

Product updates, customer stories, and tips and tricks on Google Cloud Platform

Toward better node management with Kubernetes and Google Container Engine


Using our Google Container Engine managed service is a great way to run a Kubernetes cluster with a minimum of management overhead. Now, we’re making it even easier to manage Kubernetes clusters running in Container Engine, with significant improvements to upgrading and maintaining your nodes.

Automated Node Management

In the past, while we made it easy to spin up a cluster, keeping nodes up-to-date and healthy were still the user’s responsibility. To ensure your cluster was in a healthy, current state, you needed to track Kubernetes releases, set up your own tooling and alerting to watch nodes that drifted into an unhealthy node, and then develop a process for repairing that node. While we take care of keeping the master healthy, with the nodes that make up a cluster (particularly large ones), this could be a significant amount of work. Our goal is to provide an end-to-end automated management experience that minimizes how much you need to worry about common management tasks. To that end, we're proud to introduce two new features that help ease these management burdens.

Node Auto-Upgrades


Rather than having to manually execute node upgrades, you can choose to have the nodes automatically upgrade when the latest release has been tested and confirmed to be stable by Google engineers.

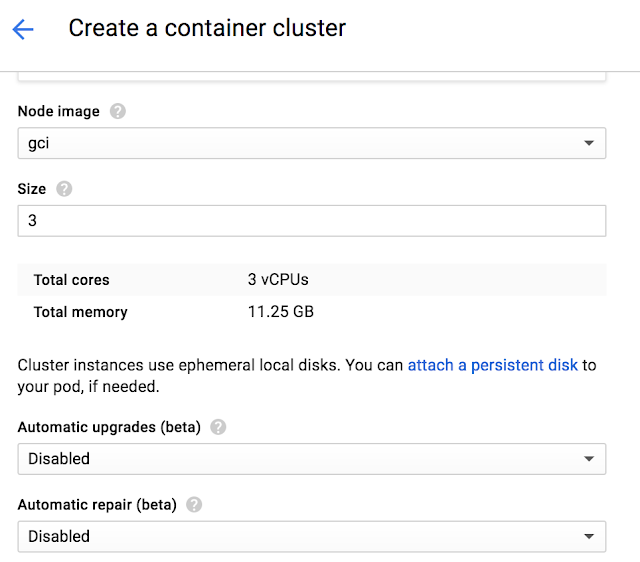
You can enable it in the UI during new Cluster and Node Pool creation by enabling the “Auto upgrades”.
To enable it in the CLI add the “--enable-autoupgrade” flag.

gcloud beta container clusters create CLUSTER --zone ZONE --enable-autoupgrade

gcloud beta container node-pools create NODEPOOL --cluster CLUSTER --zone ZONE --enable-autoupgrade

Once enabled, each node in the selected node pool will have its workloads gradually drained, shut down and a new node will be created and joined to the cluster. The node will be confirmed to be healthy before moving onto the next node.

To learn more see Node Auto-Upgrades on Container Engine.

Node Auto-Repairs

Like any production system, cluster resources must be monitored to detect issues (crashing Kubernetes binaries, workloads triggering kernel bugs and out-of-disk issues, etc.) and repair them if they're out of specification. A node that goes unhealthy will decrease the scheduling capacity of your cluster and as the capacity reduces your workloads will stop getting scheduled.

Google already monitors and repairs your Kubernetes master in case of these issues. With our new Node-Auto Repair feature, we'll also monitor to each node in the node pool.

You can enable Auto Repairs during new Cluster and Node Pool Creation.

To enable it in the UI:


To enable it in the CLI:

gcloud beta container clusters create CLUSTER --zone ZONE --enable-autorepair

gcloud beta container node-pools create NODEPOOL --cluster CLUSTER --zone ZONE --enable-autorepair

Once enabled, Container Engine will monitor several signals, including the node health status as seen by the cluster master and the VM state from the managed instance group backing the node. Too many consecutive health check failures (around 10 minutes) will trigger a re-creation of the node VM.

To learn more see Node Auto-Repair on Container Engine.

Improving Node Upgrades


In order to achieve both these features, we had to do some significant work under the hood. Previously, Container Engine node upgrades did not consider a node’s health status and did not ensure that it was ready to be upgraded. Ideally a node should be drained prior to taking it offline, and health-checked once the VM has successfully booted up. Without observing these signals, Container Engine could begin upgrading the next node in the cluster before the previous node was ready, potentially impacting workloads in smaller clusters.

In the process of building Auto Node Upgrades and Auto Node Repair, we’ve made several architectural improvements. We redesigned our entire upgrade logic with an emphasis on making upgrades as non-disruptive as possible. We also added proper support for cordoning and draining of nodes prior to taking them offline, controlled via podTerminationGracePeriod. If these pods are backed by a controller (e.g. ReplicaSet or Deployment) they're automatically rescheduled onto other nodes (capacity permitting). Finally, we added additional steps after each node upgrade to verify that the node is healthy and can be scheduled, and we retry upgrades if a node is unhealthy. These improvements have significantly reduced the disruptive nature of upgrades.


Cancelling, Continuing and Rolling Back Upgrades

Additionally, we wanted to make upgrades more than a binary operation. Frequently, particularly with large clusters, upgrades need to be halted, paused or cancelled altogether (and rolled back). We're pleased to announce that Container Engine now supports cancelling, rolling back and continuing upgrades.

If you cancel an upgrade, it impacts the process in the following way:

  • Nodes that have not been upgraded remain at their current version
  • Nodes that are in-flight proceed to completion
  • Nodes that have already been upgraded remain at the new version


An identical upgrade (roll-forward) issued after a cancellation or a failure will pick up the upgrade from where it left off. For example, if the initial upgrade completes three out of five nodes, the roll-forward will only upgrade the remaining two nodes; nodes that have been upgraded are not upgraded again.

Cancelled and failed node upgrades can also be rolled back to the previous state. Just like in a roll-forward, nodes that hadn’t been upgraded are not rolled-back. For example, if the initial upgrade completed three out of five nodes, a rollback is performed on the three nodes, and the remaining two nodes are not affected. This makes the upgrade significantly cleaner.

Note: A node upgrade still requires the VM to be recreated which destroys any locally stored data. Rolling back and rolling forward does not restore that local data.


Node Condition\Action
Cancellation
Rolling forward
Rolling back
In Progress
Proceed to completion
N/A
N/A
Upgraded
Untouched
Untouched
Rolled back
Not Upgraded
Untouched
Upgraded
Untouched


Try it

These improvements extend our commitment in making Container Engine the easiest way to use Kubernetes. With Container Engine you get pure open source Kubernetes experience along with the powerful benefits of Google Cloud Platform (GCP): friendly per-minute billing, a global load balancer, IAM integration, and all fully managed by Google reliability engineers ensuring your cluster is available and up-to-date.

With our new generous 12-month free trial that offers a $300 credit, it’s never been simpler to get started. Try Container Engine today.

Container-Optimized OS from Google is generally available


It's not news to anyone in IT that container technology has become one of the fastest growing areas of innovation. We're excited about this trend and are continuously enhancing Google Cloud Platform (GCP) to make it a great place to run containers.

There are many great OSes available today for hosting containers, and we’re happy that customers have so many choices. Many people have told us that they're also interested in using the same image that Google uses, even when they’re launching their own VMs, so they can benefit from all the optimizations that Google services receive.

Last spring, we released the beta version of Container-Optimized OS (formerly Container-VM Image), optimized for running containers on GCP. We use Container-Optimized OS to run some of our own production services (such as Google Cloud SQL, Google Container Engine, etc.) on GCP.

Today, we’re announcing the general availability of Container-Optimized OS. This means that if you're a Compute Engine user, you can now run your Docker containers “out of the box” when you create a VM instance with Container-Optimized OS (see the end of this post for examples).

Container-Optimized OS represents the best practices we've learned over the past decade running containers at scale:
  • Controlled build/test/release cycles: The key benefit of Container-Optimized OS is that we control the build, test and release cycles, providing GCP customers (including Google’s own services) enhanced kernel features and managed updates. Releases are available over three different release channels (dev, beta, stable), each with different levels of early access and stability, enabling rapid iterations and fast release cycles.
  • Container-ready: Container-Optimized OS comes pre-installed with the Docker container runtime and supports Kubernetes for large-scale deployment and management (also known as orchestration) of containers.
  • Secure by design: Container-Optimized OS was designed with security in mind. Its minimal read-only root file system reduces the attack surface, and includes file system integrity checks. We also include a locked-down firewall and audit logging.
  • Transactional updates: Container-Optimized OS uses an active/passive root partition scheme. This makes it possible to update the operating system image in its entirety as an atomic transaction, including the kernel, thereby significantly reducing update failure rate. Users can opt-in for automatic updates.
It’s easy to create a VM instance running Container-Optimized OS on Compute Engine. Either use the Google Cloud Console GUI or the gcloud command line tool as shown below:

gcloud compute instances create my-cos-instance \
    --image-family cos-stable \
    --image-project cos-cloud

Once the instance is created, you can run your container right away. For example, the following command runs an Nginx container in the instance just created:

gcloud compute ssh my-cos-instance -- "sudo docker run -p 80:80 nginx"

You can also log into your instance with the command:

gcloud compute ssh my_cos_instance --project my_project --zone us-east1-d

Here's another simple example that uses Container Engine (which uses Container-Optimized OS as its OS) to run your containers. This example comes from the Google Container Engine Quickstart page.

gcloud container clusters create example-cluster
kubectl run hello-node --image=gcr.io/google-samples/node-hello:1.0 \
   --port=8080
kubectl expose deployment hello-node --type="LoadBalancer"
kubectl get service hello-node
curl 104.196.176.115:8080

We invite you to setup your own Container-Optimized OS instance and run your containers on it. Documentation for Container-Optimized OS is available here, and you can find the source code on the Chromium OS repository. We'd love to hear about your experience with Container-Optimized OS; you can reach us at StackOverflow with questions tagged google-container-os.

Google Cloud IAM for AWS users


Many businesses want to use multiple cloud providers as part of their IT strategy. This allows them to leverage unique services from different cloud vendors and protect app availability in disaster and recovery scenarios. However, running across multiple providers requires more sophisticated planning and management, for example, managing the different Identity and Access Management (IAM) policies from their providers. Setting the right IAM policies is key to securing your resources and data on the different platforms.

If you have experience with Amazon Web Services (AWS) IAM, we recently published a guide on how to think about IAM policies on Google Cloud Platform (GCP). The two platforms offer different frameworks for resources and policies. It’s important to understand these concepts during planning, as it may not be possible to translate directly from a feature in one service to a feature in the other.

One key concept in Google Cloud IAM is policy inheritance. GCP resources can be organized into hierarchies with projects, folders and organizations. Policies are inherited down the hierarchy. For example, if you're granted the “log viewer” role in an organization, you'll automatically be able to read logs in projects and resources created under that organization. When using GCP IAM, you'll want to leverage this capability by planning the hierarchies you create to map to your company and team structures. This will allow for simpler policy management.

AWS policies used to be managed at the granularity of individual resources. Recently with the addition of AWS Organization, you can start to apply the same hierarchical model to AWS resources as well. A remaining difference is the concept of a GCP Project, which is a resource encapsulation that creates a trust boundary for a team, an app or a development environment.

Another difference with AWS is how GCP uses IAM roles to provide groups of permissions that map to meaningful aspects of people’s job functions. These roles allow you to grant the same access to different resources without having to list all the permissions every time, which makes your policies simpler to read and understand. GCP provides many pre-defined roles and will soon support custom roles.

The guide discusses these concepts in detail, and also compares GCP and AWS IAM capabilities in other areas, such as identity management and automation. We hope it helps you manage policies and permissions across multiple providers.

Google Cloud Platform expands to Mars


Google Cloud Platform (GCP) is committed to meeting our customers needs—no matter where they are. Amidst our growing list of new regions, today we're pleased to announce our expansion to Mars. In addition to supporting some of the most demanding disaster recovery and data sovereignty needs of our Earth-based customers, we’re looking to the future cloud infrastructure needed for the exploration and ultimate colonization of the Red Planet.
Visit Mars with Google Street View
Mars has long captured the imagination as the most hospitable planet for future colonization, and expanding to Mars has been a top priority for Google. By opening a dedicated extraterrestrial cloud region, we're bringing the power of Google’s compute, network, and storage to the rest of the solar system, unlocking a plethora of possibilities for astronomy research, exploration of Martian natural resources and interplanetary life sciences. This region will also serve as an important node in an extensive network throughout the solar system.

Our first interplanetary data center—affectionately nicknamed “Ziggy Stardust”—will open in 2018. Our Mars exploration started as a 20% project with the Google Planets team, which mapped Mars and other bodies in space and found a suitable location in Gale Crater, near the landing site of NASA’s Curiosity rover.
Explore more of Mars in Google Maps
In order to ease the transition for our Earthling customers, Google Cloud Storage (GCS) is launching a new Earth-Mars Multi-Regional location. Users can store planet-redundant data across Earth and Mars, which means even if Earth experiences another asteroid strike like the one that wiped out the dinosaurs, your cat videos, selfies and other data will still be safe. Of course, we'll also store all public domain scientific data, history and arts free of charge so that the next global catastrophe doesn't send humanity back into the dark ages.

Customers can choose to store data exclusively in the new Mars region, outside of any controlled jurisdictions on Earth, ensuring that they're both compliant with and benefit from the terms of the Outer Space Treaty. The ability to store and process data on Mars enables low-latency data analysis pipelines and consumer apps to serve the expected influx of Mars explorers and colonists. How exciting would it be to stream movies of potatoes growing right from the craters and dunes of our new frontier?

One of our early access customers says “This will be a game changer for us. With GCS, we can store all the data collected from our rovers right on Mars and run big data analytics to query exabyte-scale datasets all in a matter of seconds. Our dream of colonizing Mars by 2020 can now become a reality.”
Walk inside our new data center in Google Street View
The Martian data center will become Google’s greenest facility yet by taking full advantage of its new location. The cold weather enables natural, unpowered cooling throughout the year, while the thin atmosphere and high winds allow the entire facility to be redundantly powered by entirely renewable sources.

But why stop at Mars? We're taking a moonshot at N+42 redundancy with galaxy-scale computing. While GCP is optimized for faster-than-light data coordination for databases, the Google Planets team is already hard at work mapping the rest of our solar system for future data center locations. Stay tuned and join our journey! We can’t wait to see the problems you solve and the breakthroughs you achieve.

P.S. Check out Curiosity’s journey across the Red Planet on Mars Street View.


How release canaries can save your bacon – CRE life lessons


The first part of any reliable software release is being able to roll back if something goes wrong; we discussed how we do this at Google in last week’s post, Reliable releases and rollbacks. Once you have that under your belt, you’ll want to understand how to detect that things are starting to go wrong in the first place, with canarying.
Photo taken by David Carroll
The concept of canarying first emerged in 1913 when physiologist John Scott Haldane took the caged bird down into a coal mine, to detect for carbon monoxide. This fragile bird is more susceptible to the odorless gas than humans, and quickly falls off its perch in its presence  signaling to the miners that it’s time to get out!

In software, a canary process is usually the first instance that receives live production traffic about a new configuration update, either a binary or configuration rollout. The new release only goes to the canary at first. The fact that the canary handles real user traffic is key: if it breaks, real users get affected, so canarying should be the first step in your deployment process, as opposed to the last step in testing.

The first step in implementing canarying is a manual process where release engineers trigger the new binary release to the canary instance(s). They then monitor the canary for any signs of increased errors, latency and load. If everything looks good, they then trigger a release to the rest of the production instances.

We here on Google’s SRE teams have found over time that manual inspection of monitoring graphs isn’t sufficiently reliable to detect performance problems or rises in error rates of a new release. When most releases work well, the release engineer gets used to seeing no problems and so, when a low-level problem appears, tends to implicitly rationalize the monitoring anomalies as “noise.” We have several internal postmortems on bad releases whose root cause boils down to “the canary graph wasn’t wiggly enough to make the release engineer concerned.”

We've moved towards automated analysis, where our canary rollout service measures the canary tasks to detect elevated errors, latency and load automatically  and roll back automatically. (Of course, this only works if rollbacks are safe!)

Likewise, if you implement canaries as part of your releases, take care to make it easy to see problems with a release. Consider very carefully how you implement fault tolerance in your canary tasks; it’s fine for the canary to do the best it can with a query, but if it starts to see errors either internally or from its dependency services then it should “squawk loudly” by manifesting those problems in your monitoring. (There’s a good reason why the Welsh miners didn’t breed canaries to be resistant to toxic gases, or put little gas masks on them.)

Client canarying

If you’re doing releases of client software, you should have a mechanism for canarying new versions of the client, and you'll need to answer the following questions:
  1. How will you deploy the new version to only a small percentage of users?
  2. How will you detect if the new version is crash-looping, dropping traffic or showing users errors? (“What's the monitoring sound of no queries happening?”)
A solution for question 2 is for clients to identify themselves to your backend service ideally, by including information in each request about the client’s operating system and application version ID  and for the server to log this information. If you can make the clients identify themselves specifically as canaries, so much the better; this lets you export their stats to a different set of monitoring metrics. To detect that clients are failing to send queries, you'll generally need to know what the lowest plausible amount of incoming traffic is at any given time of the day or week, and trigger an alert if inbound traffic drops below that amount.

Typically, alerting rules for canaries for high-availability systems use a longer evaluation duration (how long you listen to the monitoring signals before deciding you have a problem) than for the main system because the much smaller traffic amount makes the standard signal much noisier; a relatively innocuous problem such as a few service instances being restarted can briefly push the canary error rate above the regular alarm threshold.

Your release should normally aim to cover a wide range of user types but a small fraction of active users. For Android clients, the Google Play Store allows you to deploy a new version of your application package file (APK) to an (essentially random) fraction of users; you can do this on a country-by-country basis. However, see the discussion on Android APK releases below for the limitations and risks in this approach.

Web clients

If your end users access your service via desktop or mobile web rather than an application, you tend to have better control of what’s being executed.

Regular web clients whose UI is managed by JavaScript are fairly easy to control in that you have the potential to deliver updated JavaScript resources to them every time a page loads. However, if you cache JavaScript and similar resources client-side  which is useful in reducing service load and user latency+bandwidth consumption  it’s hard to roll back a bad change. As we discussed in our last post, anything that gets in the way of easy and quick rollbacks is going to be a problem.

One solution is to version your JavaScript files (first release in a /v1/ directory, second in a /v2/ etc.). Then the rollout simply consists of changing the resource links in your root pages to reference the new (or old) versions.

Android APK releases

New versions of an Android app can be rolled out to a % of current users using staged rollouts in the Play Store. This lets you try out a new release of an app on a small subset of your current users; once you have confidence in that release, you can roll it out to more users, and so on.

The % release mechanism marks a percent of users that are eligible to pick up the new release. When their mobile device next checks into the Play Store for updates, it will see an available update for the app and start the update process.

There can be problems with this approach though:
  • You have no control over when eligible-for-update users will actually check in; normally it’ll be within 24 hours, assuming they have adequate connectivity, but this may not be true for users in countries where cellular and Wi-Fi data services are slow and expensive per-byte.
  • You have no control over whether users will accept your update on their mobile device, which can be a particular issue if the new release requires additional permissions.
Following the canarying process described above, you can determine whether your new client release has a problem once your active user base of the canary grows enough for the characteristics of the new traffic become clear: Is there a higher error rate? Is the latency rising? Has traffic to your server mysteriously increased sharply?

If you have a known bad release of your app at version v, the most expedient fix (given the inability to roll back) might be to build your version v-1 code branch into release v+1 and release that, stepping up quickly to 100%. That removes the time pressure to fix the problems detected in code.

Release percentage steps

When you perform a gradual release of a new binary or app, you need to decide in what percentage increments to release your application, and when to trigger the next step in a release. Consider:
  1. The first (canary) step should generate enough traffic for any problems to be clear in your monitoring or logging; normally somewhere between 1% and 10% depending on the size of your user base.
  2. Each step involves significant manual work and delays the overall release. If you step by 3% per day, it will take you a month to do a complete release.
  3. Going up by a single large increment (say, 10% to 100%) can reveal dramatic traffic problems that weren’t apparent at much smaller traffic levels: try not to increase your upgraded user base by more than 2x per step if this is a risk.
  4. If a new version is good, you generally want most of your users to pick it up quickly. If you're doing a rollback, you want to ramp up to 100% much faster than for a new release.
  5. Traffic patterns are often diurnal  typically, highest during the daytime  so you may need at least 24 hours to see the peak traffic load after a release.
  6. In the case of mobile apps, you'll also need to allow time for the users to pick up and start using the new release after they’ve been enabled for it.
If you're looking to roll out an Android app update to most of your users within a few days, you might choose to use a Play Store staged update starting with a 10% rollout that then increases to 50% and finally 100%. Plan for at least 24 hours between release stages and check your monitoring and logging before the next step. This way, a large fraction of your user base picks up the new release within 72 hours of the initial release, and it’s possible to detect most problems before they become too big to handle. For launches where you know there's a risk of significant traffic increase to a service, choose to use steps of 10%, 25%, 50% and 100%  or even more fine-grained increases.

For internal binary releases where you update your service instances directly, you might instead choose to use steps of 1%, 10% then 100%. The 1% release lets you see if there's any gross error in the new release, e.g., if 90% of responses are errors. The 10% release lets you pick up errors or latency increases that are one order of magnitude smaller, and detect any gross performance differences. The third step is normally a complete release. For performance-sensitive systems  generally, those operating at 75%+ of capacity  consider adding a 50% step to catch more subtle performance regressions. The higher the target reliability of a system, the longer you should let each step “bake” to detect problems.

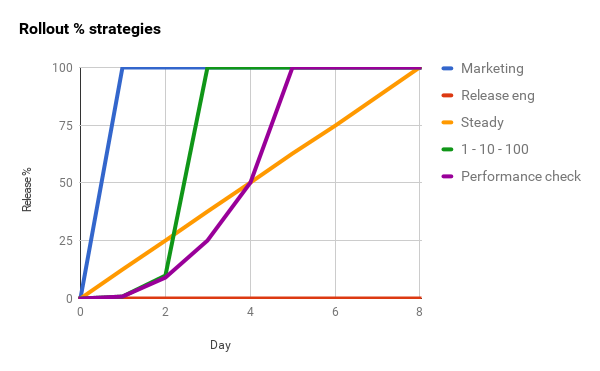
If an ideal marketing launch sequence is 0-100 (everyone gets the new features at once), and the ideal reliability engineer launch sequence is 0-0 (no change means no problems), the “right” launch sequence for an app is inevitably a matter of negotiation. Hopefully the considerations described here give you a principled way to determine a mutually acceptable rollout. The graph below shows you how these various strategies might play out over an 8-day release window.

Summary

In short, we here at Google have developed a software release philosophy that works well for us, for a variety of scenarios:
  • “Rollback early, rollback often.” Try to move your service towards this philosophy, and you’ll reduce the Mean Time To Recover of your service.
  • “Canary your rollouts.” No matter how good your testing and QA, you'll find that your binary releases occasionally have problems with live traffic. An effective canarying strategy and good monitoring can reduce the Mean Time To Detect these problems, and dramatically reduce the number of affected users.
At the end of the day, though, perhaps the best kind of launch is one where the features launched can be enabled independent of the binary rollout. That’s a blog post for another day.

Google App Engine flexible environment now available from europe-west region


A few weeks ago we shared some big news on the Google App Engine flexible environment. Today, we’re excited to announce our first new region since going GA: App Engine flexible environment is now available in the europe-west region. This release makes it easier than ever for App Engine developers to reach customers all around the world.

To get started, simply open up the Developers Console and create a new project, and select App Engine. After choosing a language, you can now specify the location as europe-west. Note that once a project is created, its region cannot be changed.

You can also create your application from the command line using the latest version of the Cloud SDK:

gcloud app create --region europe-west

To learn more about the services offered in each location, as well as best practices for deploying your applications and saving your data across different regions and zones, check out our Cloud Locations and Geography and Regions pages.

Solution guide: Archive your cold data to Google Cloud Storage with Komprise


More than 56% of enterprises have more than half a petabyte of inactive data but this “cold” data often lives on expensive primary storage platforms. Google Cloud Storage provides an opportunity to store this data cost-effectively and achieve significant savings, but storage and IT admins often face the challenge of how to identify cold data and move it non-disruptively.

Komprise, a Google Cloud technology partner, provides software that analyzes data across NFS and SMB/CIFS storage to identify inactive/cold data, and moves the data transparently to Cloud Storage, which can help to cut costs significantly. Working with Komprise, we’ve prepared a full tutorial guide that describes how customers can understand data usage and growth in their storage environment, get a customized ROI analysis and move this data to Cloud Storage based on specific policies.
Cloud Storage provides excellent options to customers looking to store infrequently accessed data at low cost using Nearline or Coldline storage tiers. If and when access to this data is needed, there are no access time penalties; the data is available almost immediately. In addition, built-in object-level lifecycle management in Cloud Storage reduces the burden for admins by enabling policy-based movement of data across storage classes. With Komprise, customers can bring lifecycle management to their on-premise primary storage platforms and seamlessly move this data to the Cloud. Komprise deploys in under 15 minutes, works across NFS, SMB/CIFS and object storage without any storage agents, adapts to file-system and network loads to run non-intrusively in the background and scales out on-demand.

Teams can get started through this self-service tutorial or watch this on-demand webinar featuring Komprise’ COO Krishna Subramanian and Google Cloud Storage Product Manager Ben Chong. As always, don’t hesitate to reach out to us to explore which enterprise workloads make the most sense for your cloud initiatives.

Enterprise Slack apps on Google Cloud–now easier than ever


Slack recently announced a new, streamlined path to building apps, opening the door to corporate engineers to build fully featured internal integrations for companies of all sizes.

You can now make an app that supports any Slack API feature such as message buttons, threads and the Events API without having to enable app distribution. This means you can keep the app private to your team as an internal integration.
With support for the Events API in internal integrations, you can now use platforms like Google App Engine or Cloud Functions to host a Slack bot or app just for your team. Even if you're building an app for multiple teams, internal integrations let you focus on developing your app logic first and wait to implement the OAuth2 flow for distribution until you're ready.

We've updated the Google Cloud Platform samples for Slack to use this new flow. With samples for multiple programming languages, including Node.js, Java, and Go, it's easier than ever to get started building Slack apps on Google Cloud Platform (GCP).

Slack bots also made an appearance at Google Cloud Next '17. Check out the video for best practices for building bots for the enterprise from Amir Shevat, head of developer relations at Slack, and Alan Ho from Google Cloud.


Questions? Comments? Come chat with us on the #bots channel in the Google Cloud Platform Slack community.

Reliable releases and rollbacks – CRE life lessons


Editor’s note: One of the most common causes of service outages is releasing a new version of the service binaries; no matter how good your testing and QA might be, some bugs only surface when the affected code is running in production. Over the years, Google Site Reliability Engineering has seen many outages caused by releases, and now assumes that every new release may contain one or more bugs.

As software engineers, we all like to add new features to our services; but every release comes with the risk of something breaking. Even assuming that we are appropriately diligent in adding unit and functional tests to cover our changes, and undertaking load testing to determine if there are any material effects on system performance, live traffic has a way of surprising us. These are rarely pleasant surprises.

The release of a new binary is a common source of outages. From the point of view of the engineers responsible for the system’s reliability, that translates to three basic tasks:
  1. Detecting when a new release is actually broken;
  2. Moving users safely from a bad release to a “hopefully” fixed release; and
  3. Preventing too many clients from suffering through a bad release in the first place (“canarying”).
For the purpose of this analysis, we’ll assume that you are running many instances of your service on machines or VMs behind a load balancer such as nginx, and that upgrading your service to use a new binary will involve stopping and starting each service instance.

We’ll also assume that you monitor your system with something like Stackdriver, measuring internal traffic and error rates. If you don’t have this kind of monitoring in place, then it’s difficult to meaningfully discuss reliability; per the Hierarchy of Reliability described in the SRE Book, monitoring is the most fundamental requirement for a reliable system).

Detection

The best case for a bad release is that when a service instance is restarted with the bad release, a major fraction of improperly handled requests generate errors such as HTTP 502, or much higher response latencies than normal. In this case, your overall service error rate rises quickly as the rollout progresses through your service instances, and you realize that your release has a problem.

A more subtle case is when the new binary returns errors on a relatively small fraction of queries - say, a user setting change request, or only for users whose name contains an apostrophe for good or bad reasons. With this failure mode, the problem may only become manifest in your overall monitoring once the majority of your service instances are upgraded. For this reason, it can be useful to have error and latency summaries for your service instance broken down by binary release version.

Rollbacks

Before you plan to roll out a new binary or image to your service, you should ask yourself, “What will I do if I discover a catastrophic / debilitating / annoying bug in this release?” Not because it might happen, but because sooner or later it is going to happen and it is better to have a well-thought out plan in place instead of trying to make one up when your service is on fire.

The temptation for many bugs, particularly if they are not show-stoppers, is to build a quick patch and then “roll forward,” i.e., make a new release that consists of the original release plus the minimal code change necessary to fix the bug (a “cherry-pick” of the fix). We don’t generally recommend this though, especially if the bug in question is user-visible or causing significant problems internally (e.g., doubling the resource cost of queries).

What’s wrong with rolling forward? Put yourself in the shoes of the software developer: your manager is bouncing up and down next to your desk, blood pressure visibly climbing, demanding to know when your fix is going to be released because she has your company’s product director bending her ear about all the negative user feedback he’s getting. You’re coding the fix as fast as humanly possible, because for every minute it’s down another thousand users will see errors in the service. Under this kind of pressure, coding, testing or deployment mistakes are almost inevitable.

We have seen this at Google any number of times, where a hastily deployed roll-forward fix either fails to fix the original problem, or indeed makes things worse. Even if it fixes the problem it may then uncover other latent bugs in the system; you’re taking yourself further from a known-good state, into the wilds of a release that hasn’t been subject to the regular strenuous QA testing.

At Google, our philosophy is that “rollbacks are normal.” When an error is found or reasonably suspected in a new release, the releasing team rolls back first and investigates the problem second. A request for a rollback is not interpreted as an attack on the releasing team, or even the person who wrote the code containing the bug; rather, it is understood as The Right Thing To Do to make the system as reliable as possible for the user. No-one will ask “why did you roll back this change?” as long as the rollback changelist describes the problem that was seen.

Thus, for rollbacks to work, the implicit assumption is that they are:

  1. easy to perform; and
  2. trusted to be low-risk.

How do we make the latter true?

Testing rollbacks

If you haven’t rolled back in a few weeks, you should do a rollback “just because”; aim to find any traps with incompatible versions, broken automation/testing etc. If the rollback works, just roll forward again once you’ve checked out all your logs and monitoring. If it breaks, roll forward to remove the breakage and then focus all your efforts on diagnosing the cause of the rollback breakage. It is better by far to detect this when your new release is working well, rather than being forced off a release that is on fire and having to fight to get back to your known-good original release.

Incompatible changes

Inevitably, there are going to be times when a rollback is not straightforward. One example is when the new release requires a schema change to an in-app database (such as a new column). The danger is that you release the new binary, upgrade the database schema, and then find a problem with the binary that necessitates rollback. This leaves you with a binary that doesn’t expect the new schema, and hasn’t been tested with it.

The approach we recommend here is a feature-free release; starting from version v of your binary, build a new version v+1 which is identical to v except that it can safely handle the new database schema. The new features that make use of the new schema are in version v+2. Your rollout plan is now:
  1. Release binary v+1
  2. Upgrade database schema
  3. Release binary v+2
Now, if there are any problems with either of the new binaries then you can roll back to a previous version without having to also roll back the schema.

This is a special case of a more general problem. When you build the dependency graph of your service and identify all its direct dependencies, you need to plan for the situation where any one of your dependencies is suddenly rolled back by its owners. If your launch is waiting for a dependency service S to move from release r to r+1, you have to be sure that S is going to “stick” at r+1. One approach here is to make an ecosystem assumption that any service could be rolled back by one version, in which case your service would wait for S to reach version r+2 before your service moved to a version depending on a feature in r+1.

Summary

We’ve learned that there’s no good rollout unless you have a corresponding rollback ready to do, but how can we know when to rollback without having our entire service burned to the ground by a bad release?

In part 2 we’ll look at the strategy of “canarying” to detect real production problems without risking the bulk of your production traffic on a new release.

Solution guide: backing up Windows files using CloudBerry Backup with Google Cloud Storage


Modern businesses increasingly depend on their data as a foundation for their operation. The more critical the reliance is on that data, the more important it is to ensure that data is protected with backups. Unfortunately, even by taking regular backups, you're still susceptible to data loss from a local disaster or human error. Thus, many companies entrust their data to geographically distributed cloud storage providers like Google Cloud Platform (GCP). And when they do, they want convenient cloud backup automation tools that offer flexible backup options and quick on-demand restores.

One such tool is CloudBerry Backup (CBB), and has the following capabilities:

  • Creating incremental data copies with low impact on production workloads
  • Data encryption on all transferring paths
  • Flexible retention policy, allowing you to balance the volume of data stored and storage space used
  • Ability to carry out hybrid restores with the use of local and cloud storage resources

CBB includes a broad range of features out of the box, allowing you to address most of your cloud backup needs, and is designed to have low impact on production servers and applications.

CBB has a low-footprint backup client that you install on the desired server. After you provision a Google Cloud Storage bucket, attach it to CBB and create a backup plan to immediately start protecting your files in the cloud.

To simplify your cloud backup onboarding, check out the step-by-step tutorial on how to use CloudBerry Backup with Google Cloud Storage and easily restore any files.