Category Archives: Google Cloud Platform Blog

Product updates, customer stories, and tips and tricks on Google Cloud Platform

A developer’s toolkit for building great applications on GCP


Whether you're looking to build your next big application, learn some really cool technology concepts or gain some hands-on development experience, Google Cloud Platform (GCP) is a great development platform. But where do you start?

Lots of customers talk to us about their varying application development needs  for example, what are the best tools to use for web and mobile app development, how do I scale my application back-end and how do I add data processing and intelligence to my application? In this blog, we’ll share some resources to help you identify which products are best suited to your development goals.

To help you get started, here are a few resources such as quick start guides, videos and codelabs for services across web and mobile app development, developer tools, data processing and analytics and monitoring:

Web and mobile app development:


Google App Engine offers a fully managed serverless platform that allows you to build highly scalable web and mobile applications. If you're looking for a zero-config application hosting service that will let you auto-scale from zero to infinite-size without having to manage any infrastructure, look no further than App Engine
Cloud Functions is another great event-driven serverless compute platform you can use to build microservices at the functions level, scale to infinite size and pay only for what you use. If you're looking for a lightweight compute platform to run your code in response to user actions, analytics, authentication events or for telemetry data collection, real-time processing and analysis, Cloud Functions has everything you need to be agile and productive.

Build, deploy and debug:

Developer tools provide plugins to build, deploy and debug code using your favorite IDEs, such as IntelliJ, Eclipse, Gradle and Maven. You can use either cloud SDK or a browser-based command line to build your apps. Cloud Source Repositories that come as a part of developer tools let you host private Git repos and organize the associated code. Below are a sampling of resources, check out the developer tools section for more.

Data Processing and Analytics:

BigQuery offers a fast, highly scalable, low cost and fully managed data warehouse on which you can perform analytics. Cloud Pub/Sub allows you to ingest event streams from anywhere, at any scale, for simple, reliable, real-time stream analytics. BigQuery and Pub/Sub work seamlessly with services like Cloud Machine Learning Engine to help you add an intelligence layer to your application.

Monitoring, logging and diagnostics:

Google Stackdriver provides powerful monitoring, logging and diagnostics. It equips you with insight into the health, performance and availability of cloud-powered applications, enabling you to find and fix issues faster. It's natively integrated with GCP, other cloud providers and popular open source packages.
I hope this gives you enough content to keep you engaged and provide great learning experiences of the different application development services on GCP. Looking for tips and tricks as you're building your applications? Check out this link for details. Sign up for your free trial today and get a $300 GCP credit!

Out of one, many: Using Jenkins, GCP projects and service accounts at Catalant


[Editor’s Note: Today we hear from Catalant, an on-demand staffing provider that connects consultants and enterprises with a Software as a Service (SaaS) application that’s built on Google Cloud Platform (GCP). Using Jenkins, Google projects and service accounts, Catalant was able to build a single shared environment across production, development and sales that was easy to manage and that satisfied its compliance and regulatory requirements].

If your organization provides a SaaS application, you probably have multiple environments: production of course, but also demo, test, staging and integration environments to support various use cases. From a management perspective, you want to share resources across all those environments so you have the least number of moving parts. But ease of management and robust security are often at odds. For security purposes, the best practice is a separate project for each environment where nothing is shared and there's complete isolation.

Here at Catalant, we approached this problem by taking a step back and understanding the requirements from different parts of the organization:
  1. Compliance: Each environment and its data needs to be secure and not be shared. 
  2. Sales: We need an environment that lets us control the data, so that we can give a consistent, predictable demo. 
  3. Development: We need an environment where we can test things before putting them into production. 
  4. Engineering Management: We need continuous integration and continuous deployment (CI/CD). Also, developers should not be required to use GCP-specific tools.
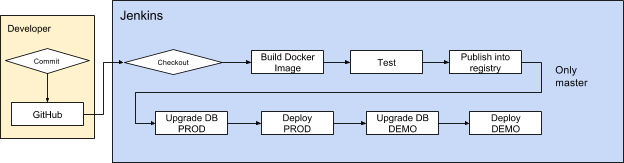
Based on these requirements, we elected to go with a single shared Jenkins project to manage CI/CD activities for all the environments (test, demo, prod) that we may bring up, which satisfied developers and engineering management. Google Cloud’s concept of projects, meanwhile, addressed the compliance team’s concerns with fortified boundaries that by default do not allow unauthorized traffic into the environment. Finally, we used service accounts to allow projects to communicate with one another.
Figure 1. Jenkins Pipeline
Figure 2. Projects Layout

We built this environment on Google Compute Engine. And while it’s out of the scope of this article to show how to build this out on Google Kubernetes Engine (formerly Container Engine), these resources can show you how to do it yourself:

Creating a service account


By default, when a developer creates a project, GCP also creates a default Compute Engine service account that you can use to access any of its own project resources as well as that of another project’s resources. We took advantage of this service account to access the Jenkins project resources.

We store all the images that we build with the Jenkins project in Container Registry. We provided “Storage Object Viewer” access for each project’s default service account so that the images can be deployed (via pull access) into an environment-specific project. In addition, to deploy the containers, we created a Jenkins service account that can authenticate into projects’ Kubernetes clusters for a specific namespace.

Here’s how to create a service account based on a namespace:

Step1 - Create a service account:

kubectl create serviceaccount <sa-name> --namespace <ns-name></ns-name></sa-name>

This command creates a service account on the destination project. This service account will be used by Jenkins in order to authenticate into the destination cluster.

Step 2 - Verify the new service account:

kubectl get serviceaccount <sa-name> --namespace <ns-name> -o yaml</ns-name></sa-name>

This checks that the service account was successfully created, and outputs the service account details in a yaml format.

Step 3 - Get the secret name:

kubectl get sa <sa-name> -o json --namespace  <ns-name> | jq -r .secrets[].name</ns-name></sa-name>

This retrieves the secret name associated with the service account created in Step 1.

Step 4 - Get the certificate:

kubectl get secret   -o json --namespace  <ns-name> | jq -r '.data["ca.crt"]' | base64 -d > ca.crt</ns-name></secret-name>

This gets the certificate details from the secret, decodes the certificate data and stores it into a file ca.crt. The certificate ca.crt will be used in order to authenticate into a cluster.

Step 5 - Get the token:

kubectl get secret <secret-name> -o json --namespace <ns-name> | jq -r '.data["token"]' | base64 -d</ns-name></secret-name>

This command gets the token from the secret and decodes the token to plain text. The token will be used in order to authenticate into the cluster.

Step 6 - Get the IP address of the cluster:

kubectl config view -o yaml | grep server

Allowing cross-project access


When Jenkins does a deploy, it needs to authenticate into each project's Kubernetes cluster. In the Jenkins application, we created the service account’s token and certificate as credentials. The steps below show how to authenticate into a different project, known as cross-project access.

Again, let’s explain what each step does:

Step 1 - Set a cluster entry in kubeconfig:

kubectl config set-cluster <cluster-name> --embed-certs=true --server=<cluster-ip> --certificate-authority=<path/to/certificate>

where
  • <cluster-name>can be any name 
  • --embed-certs=true embeds certs for the cluster entry in kubeconfig 
  • --server=<cluster-ip> is the cluster ip where we’re trying to authenticate, namely, the IP generated in Step 6 of the service account creation process 
  • --certificate-authority=<path certificate> is the certificate path and the certificate is the certificate file we generated in Step 4 of service account creation section above 
Step 2 - Set the user entry in kubeconfig:

kubectl config set-credentials  --token=

where
  • <credentials-name> can be any name 
  • --token=<token-value> is the token value that was decoded during Step 5 of the previous section 
Step 3- Set the context entry in kubeconfig:

kubectl config set-context <context-name> --cluster=<cluster-name> --user=<credentials-name> --namespace=<ns-name></ns-name></credentials-name></cluster-name></context-name>

where
  • <context-name>can be any name 
  • --cluster=<cluster-name> is the cluster name set up in Step 1 above
  • --user=<credentials-name> is the credentials name set up in Step 2 above 
  • --namespace=<ns-name> - the namespace name we like to interact with. 
Step 4 - Set the current-context in a kubeconfig file:
kubectl config use-context <context-name>

Where <context-name> is the context name that we created in Step 3 above. 

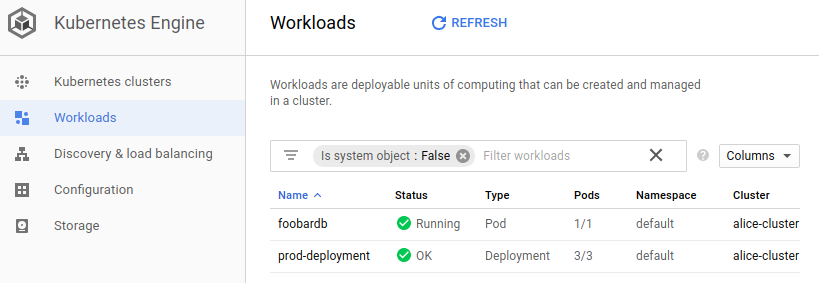
After setting up the context, we’re ready to access the destination project cluster. All the kubectl commands will be executed against the destination project cluster. A simple test to verify that we're accessing the destination project cluster successfully is to check for pods.

kubectl get pods -n <ns-name>

If the output pods’ list shown is the list of the destination project pods, then you set up the configuration correctly. All the Kubernetes commands are associated to the destination project.

In this setup, bringing up new environments is quick and easy since the Jenkins environment doesn’t have to be re-created or copied for each Google project. Of course, it does create a single point of failure and a shared resource. It’s important to configure Jenkins correctly, so that work from a single environment can’t starve out the rest. Make sure you have enough resources for the workers and limit the number of builds per branch to one  that way multiple commits in quick succession to a branch can’t overload the infrastructure.

All told, the combination of Jenkins for CI/CD plus Google Cloud projects and service accounts give us the best of both worlds: a single shared environment that uses resources efficiently and is easy to manage, plus the security and isolation that our compliance and sales teams demanded. If you have questions or comments about this environment, reach out to us. And for more information, visit GoCatalant.com.

Getting started with Google Compute Engine: a guide to all the guides


Happy holidays from all of us on the Google Cloud team. As we move into the final days of 2017, many people (myself included) reflect on the year, enjoy some downtime, and think about their goals and ambitions for the new year. Does this sound like you?

When the pace of family gatherings and social obligations begins to slow, I intend to use my downtime to learn about a few technologies. What will you do with your downtime? Have you ever wondered about Infrastructure-as-a-Service (IaaS) and what you could do with cloud computing? Ever wondered about Google Compute Engine?

Compute Engine is a type of IaaS. It takes most of the work out of procuring and setting up a VM. Compute Engine provides practically unlimited computing power using VMs in the cloud.

Below you'll find a collection of resources designed to help fast-track your learning journey with Compute Engine. Use them to quickly get up to speed on concepts, launch a virtual machine (VM) instance and use how-to guides to configure and manage your VM. You can also run through tutorials aimed at more interesting and sophisticated use cases, such as running PostgreSQL, a LAMP stack or even a Minecraft server.

These Compute Engine learning resources are neatly organized to help you quickly find what’s most interesting and relevant to you. If you’re a cloud novice, you’ll benefit from reading through the concepts section, and using the Quick Start Guides to launch a VM. If you’re already comfortable with Compute Engine, you may wish to skip to tutorials, or even the APIs and References section.

The Concepts page introduces topics such as VMs, storage, networking, access control, regions and more. This is a great place to start if you want to develop a foundational understanding of the basics. Learn the fundamentals here: https://cloud.google.com/compute/docs/concepts

Quick Start Guides provide you with step-by-step instructions for creating and accessing either a Linux or Windows virtual machine instances. Launch one now: https://cloud.google.com/compute/docs/quickstarts

How-to Guides dive into VM instance-configuration, access and management topics. These guides do a great job of answering the question of what to do after you launch a VM. Try adding storage to your VM, or fine-tuning your firewall rules here: https://cloud.google.com/compute/docs/how-to

Tutorials explore more sophisticated use cases, such as installing and running application and web services on your VMs. If you are interested in machine learning, check out the tutorial on running distributed TensorFlow. https://cloud.google.com/compute/docs/tutorials

The APIs and References section provides you with developer resources for programmatically interacting with GCP and Compute Engine. This page is organized by resource type. Each resource type has one or more data representations and one or more methods. Try adding a persistent disk to an existing project. https://cloud.google.com/compute/docs/apis

The Additional Resources section provides information about the service, and acts as a kind of catch-all. If you aren’t finding the information you're looking for in the other sections, be sure to check out this section. It contains information on pricing, quotas, release notes, third-party software and much more. https://cloud.google.com/compute/docs/resources

Hopefully you found enough content to satisfy your curiosity about Compute Engine, and maybe you even learned something new. We’ll be publishing additional resources in the new year, so you can learn and do even more. If you’re ready to get started, sign up for your free trial today and get a $300 GCP credit!

What a year! Google Cloud Platform in 2017


The end of the year is a time for reflection . . . and making lists. As 2017 comes to a close, we thought we’d review some of the most memorable Google Cloud Platform (GCP) product announcements, white papers and how-tos, as judged by popularity with our readership.

As we pulled the data for this post, some definite themes emerged about your interests when it comes to GCP:
  1. You love to hear about advanced infrastructure: CPUs, GPUs, TPUs, better network plumbing and more regions. 
  2.  How we harden our infrastructure is endlessly interesting to you, as are tips about how to use our security services. 
  3.  Open source is always a crowd-pleaser, particularly if it presents a cloud-native solution to an age-old problem. 
  4.  You’re inspired by Google innovation — unique technologies that we developed to address internal, Google-scale problems. So, without further ado, we present to you the most-read stories of 2017.

Cutting-edge infrastructure

If you subscribe to the “bigger is always better” theory of cloud infrastructure, then you were a happy camper this year. Early in 2017, we announced that GCP would be the first cloud provider to offer Intel Skylake architecture, GPUs for Compute Engine and Cloud Machine Learning became generally available and Shazam talked about why cloud GPUs made sense for them. In the spring, you devoured a piece on the performance of TPUs, and another about the then-largest cloud-based compute cluster. We announced yet more new GPU models and topping it all off, Compute Engine began offering machine types with a whopping 96 vCPUs and 624GB of memory.

It wasn’t just our chip offerings that grabbed your attention — you were pretty jazzed about Google Cloud network infrastructure too. You read deep dives about Espresso, our peering-edge architecture, TCP BBR congestion control and improved Compute Engine latency with Andromeda 2.1. You also dug stories about new networking features: Dedicated Interconnect, Network Service Tiers and GCP’s unique take on sneakernet: Transfer Appliance.

What’s the use of great infrastructure without somewhere to put it? 2017 was also a year of major geographic expansion. We started out the year with six regions, and ended it with 13, adding Northern Virginia, Singapore, Sydney, London, Germany, Sao Paolo and Mumbai. This was also the year that we shed our Earthly shackles, and expanded to Mars ;)

Security above all


Google has historically gone to great lengths to secure our infrastructure, and this was the year we discussed some of those advanced techniques in our popular Security in plaintext series. Among them: 7 ways we harden our KVM hypervisor, Fuzzing PCI Express and Titan in depth.

You also grooved on new GCP security services: Cloud Key Management and managed SSL certificates for App Engine applications. Finally, you took heart in a white paper on how to implement BeyondCorp as a more secure alternative to VPN, and support for the European GDPR data protection laws across GCP.

Open, hybrid development


When you think about GCP and open source, Kubernetes springs to mind. We open-sourced the container management platform back in 2014, but this year we showed that GCP is an optimal place to run it. It’s consistently among the first cloud services to run the latest version (most recently, Kubernetes 1.8) and comes with advanced management features out of the box. And as of this fall, it’s certified as a conformant Kubernetes distribution, complete with a new name: Google Kubernetes Engine.

Part of Kubernetes’ draw is as a platform-agnostic stepping stone to the cloud. Accordingly, many of you flocked to stories about Kubernetes and containers in hybrid scenarios. Think Pivotal Container Service and Kubernetes’ role in our new partnership with Cisco. The developers among you were smitten with Cloud Container Builder, a stand-alone tool for building container images, regardless of where you deploy them.

But our open source efforts aren’t limited to Kubernetes — we also made significant contributions to Spinnaker 1.0, and helped launch the Istio and Grafeas projects. You ate up our "Partnering on open source" series, featuring the likes of HashiCorp, Chef, Ansible and Puppet. Availability-minded developers loved our Customer Reliability Engineering (CRE) team’s missive on release canaries, and with API design: Choosing between names and identifiers in URLs, our Apigee team showed them a nifty way to have their proverbial cake and eat it too.

Google innovation


In distributed database circles, Google’s Spanner is legendary, so many of you were delighted when we announced Cloud Spanner and a discussion of how it defies the CAP Theorem. Having a scalable database that offers strong consistency and great performance seemed to really change your conception of what’s possible — as did Cloud IoT Core, our platform for connecting and managing “things” at scale. CREs, meanwhile, showed you the Google way to handle an incident.

2017 was also the year machine learning became accessible. For those of you with large datasets, we showed you how to use Cloud Dataprep, Dataflow, and BigQuery to clean up and organize unstructured data. It turns out you don’t need a PhD to learn to use TensorFlow, and for visual learners, we explained how to visualize a variety of neural net architectures with TensorFlow Playground. One Google Developer Advocate even taught his middle-school son TensorFlow and basic linear algebra, as applied to a game of rock-paper-scissors.

Natural language processing also became a mainstay of machine learning-based applications; here, we highlighted with a lighthearted and relatable example. We launched the Video Intelligence API and showed how Cloud Machine Learning Engine simplifies the process of training a custom object detector. And the makers among you really went for a post that shows you how to add machine learning to your IoT projects with Google AIY Voice Kit. Talk about accessible!

Lastly, we want to thank all our customers, partners and readers for your continued loyalty and support this year, and wish you a peaceful, joyful, holiday season. And be sure to rest up and visit us again Next year. Because if you thought we had a lot to say in 2017, well, hold onto your hats.

Cloud Audit Logging for Kubernetes Engine: Answer the who, what, when of admin accesses


Sometimes, in Google Kubernetes Engine, you want to investigate what’s happened in your cluster. Thankfully, Stackdriver Cloud Audit Logging now supports Kubernetes Engine in beta, and can help you answer “Who did what, where and when?” to your cluster.

To showcase Cloud Audit Logging, we’d like to introduce you to Alice, a DevOps engineer running her environment on Kubernetes Engine. Alice logs into her Kubernetes cluster to inspect the workloads and notices something odd – an instance of FoobarDB. This is peculiar, as to the best of her knowledge, her team is not using FoobarDB.
She examines the pod and realizes it’s actually a pod running a reverse shell that's only masquerading as FoobarDB. Alice decides to mitigate this vulnerability by deleting the offending pod, but wants to understand how it got there in the first place, to prevent future breaches. She turns to Cloud Audit Logging, which is a feature of Stackdriver Logging (our real-time log management and analysis tool) that writes and stores admin activity logs about your project.
While searching the audit logs, Alice finds a “create pod” request for the rogue pod coming from one of the service accounts.
She sees that this service account is associated with the deployment running the company’s PHP frontend (by investigating the “principalEmail” field highlighted by the top red box in the screenshot above) – however, there are hundreds of replicas of that deployment. Fortunately, audit logs contain the IP address of the node where pod is located. Alice can use that information to find the instance that created the rogue pod. Cloud Audit Logging contains logs about Admin Activity and Data Access but not the application-level logs so Alice uses her regular logging tool (also Stackdriver in this case) to look at the PHP frontend logs and to understand exactly what happened. She manages to track the breach to a vulnerability in the PHP version that the frontend is using so she applies a patch that upgrades the application.

Alice decides to try to prevent similar attacks in the future by using Stackdriver Monitoring features to create an alert based on a log-based metric that will fire if any identity other than the controller manager creates pods.

These are just some of the scenarios that Cloud Audit Logging can help you with. For more information on using Cloud Audit Logging, check out the documentation. And watch this space for future posts about how to use BigQuery and Cloud Audit Logging together to further identify and minimize unauthorized access.


Take it for a spin


Try Kubernetes Engine today with our generous 12-month free trial of $300 credits. Spin up a cluster (or a dozen) and experience the difference of running Kubernetes on the cloud build for containers.

Three tips for peak Cloud Load Balancing performance


The backbone of any modern, cloud-native application is a flexible, powerful load balancing system, which allows requests to come to a single location, and scatters them appropriately to waiting worker VMs. Coupled with an auto-scaler, a load balancer can also help your applications adapt to sudden spikes in traffic.

If you’re building applications on Google Cloud Platform (GCP), Cloud Load Balancing lets you scale your applications with no pre-warming, distribute your resources across single or multiple regions, and integrates with Cloud CDN. Here are a few tips to help you reduce your maintenance overhead, improve performance and minimize cost, all at the same time.

1. Leverage the HTTP(S) load balancer where you can


A load balancer’s principle features are its ability to handle auto-scaling and distribute packets to your running VMs. Cloud Load Balancing provides a number of options to handle those exact needs, but the HTTP load balancer offers something more: It gets requests off the public internet as quickly as possible, improving performance by redirecting traffic onto Google’s global high-speed network. Visualized, the result is dramatic:

Not only does the HTTP load balancer increase performance because packets spend less time on the internet, but it also uses connections between clients and the Google front end servers, which helps further reduce the networking overhead of TCP requests from your users.

2. Enable Cloud CDN on cachable requests


Caching outbound responses from your applications is critical to reduce repeated costs to fetch and serve assets. Turns out that GCP’s load balancer makes this process a breeze thanks to integration with Cloud CDN. If you enable Cloud CDN for your load balancer, you can automatically cache common requests to reduce latency, as well as the number of requests that the instance needs to serve. As long as the request is cached, it will be served directly at Google's network edge.

Setting up this feature with Cloud Load Balancing is really straightforward. All you need to do is check the “Enable Cloud CDN” button while creating the backend definition for your HTTPs LB and GCP takes care of the rest.

This graph shows the difference in performance of fetching an asset with and without Cloud CDN enabled for the load balancer.

You can see that once the asset gets cached, the response time drops significantly. No extra caching instances needed, all you have to do is check a box!

3. Combine Cloud CDN and Cloud Storage for static assets


Web applications tend to have a variety of static and dynamic assets. Assets that change very rarely, for example, a banner image or a company logo, can be separated, from an asset standpoint, and served more efficiently through caching. Cloud Load Balancing makes this process a little easier.

With Cloud Load Balancing, you can create a host routing path that your designated static-asset URL routes over to fetch assets from a public Cloud Storage bucket that's also cached on Cloud CDN. This helps reduce complexity and overhead in hosting and managing your static assets. Caching these requests via Cloud CDN also produces a very similar looking graph to the previous one:

Every millisecond counts


When building your cloud-native application, it’s always worth considering technologies that can help streamline your designs. With these three tips, Cloud Load Balancing services can help minimize long-term maintenance, improve performance and reduce costs. Not too bad for a few extra mouse clicks ;)

If you’d like to know more about ways to optimize your Google Cloud applications, check out the rest of the Google Cloud Performance Atlas blog posts and videos. Because, when it comes to performance, every millisecond counts.

Solution: Integrating on-premises storage with Google Cloud using an Avere vFXT


Running compute workloads on the cloud can be a powerful way to leverage the massive resources available on Google Cloud Platform (GCP).

Some workloads, such as 3D rendering or HPC simulations, rely on large datasets to complete individual tasks. This isn't a problem when running jobs on-premises, but how do you synchronize tens, or even hundreds of gigabytes of data with cloud storage in order to run the same workload on the cloud?

Even if your Network Attached Storage (NAS) is situated close enough to a Google Cloud datacenter to mount directly, you can quickly saturate your internet connection when hundreds (or even thousands) of virtual machines attempt to read the same data at the same time from your on-premises NAS.

You could implement a synchronization strategy to ensure files exist both on-premises and in the cloud, but managing data concurrency, storage and resources on your own can be challenging, as would be modifying your existing pipeline to perform these actions.

The Avere vFXT is a virtual appliance that provides a solution for such workloads. The vFXT is a cluster of virtual machines that serves as both read-through cache and POSIX-compliant storage. When you mount the vFXT on your cloud instances, your entire on-premises file structure is represented in the cloud. When files are read on the cloud, they're read from your on-premises NAS, across your secure connection, and onto the vFXT. If a file already exists in the vFXT's cache, it's compared with the on-premises version. If the files on both the cache and on-premises are identical, the file is not re-read, which can save you bandwidth and time to first byte.

As cloud instances are deployed, they mount the vFXT as they would any other filesystem (either NFS or SMB). The data is available when they need it, and your connection is spared oversaturation.
We recently helped Avere put together a partner tutorial that shows how to incorporate an Avere vFXT into your GCP project. It also provides guidance on different ways to connect to Google Cloud, and how to access your vFXT more securely and efficiently.

Check out the tutorial, and let us know what other Google Cloud tools you’d like to learn how to use in your visual effects or HPC pipeline. You can reach me on Twitter at @vfx_agraham.

Puppet and Google Cloud Platform: a year in review


Here at Google Cloud, our goal is to build a great environment in which to use your favorite management tools, including popular automation and change management software like Puppet. Over the past year, we’ve worked hard to dramatically improve support for Google Cloud in Puppet, and with PuppetConf 2017 behind us, we thought it’d be fun to take a walk down memory lane and recap how far we’ve come.

Our journey to support Puppet-based managed systems started well over a year ago, long before PuppetConf 2016. But that’s where we announced the effort and demoed the proposed model, which described a complete Google Cloud Platform (GCP) infrastructure using Puppet. We collected customer feedback and got busy.

The first wave of integration

Fast forward to this August, when we jointly announced support for the first GCP products on Puppet Forge (Google announcement and Puppet announcement), including:
  • Compute Engine 
  • Kubernetes Engine 
  • Cloud SQL 
  • Cloud DNS
  • Cloud Storage 
  • Unified authentication mechanism
You can find Installation / usage instructions at https://forge.puppet.com/google/cloud and detailed product specific references, usage and examples for the respective module at https://forge.puppet.com/google.

The reception from the community has been great, and these modules have garnered over 1,300 downloads at the time of this writing.

Migrating workloads to Google Cloud Platform


In September, we held a webinar with Puppet to demonstrate how to migrate a Puppet managed application from on-premise (or other cloud provider) to GCP without service interruption.

PuppetConf 2017


The biggest news for GCP and Puppet to come out of PuppetConf 2017 was a formal partnership between the two companies focused on increasing the strength of current and future contributions.

We also announced a second wave of integrations and updates:
  • Cloud Spanner 
  • Cloud Pub/Sub 
  • Stackdriver Logging Agent 
  • Improvements on Compute Engine to support load-balanced / clustered configurations 

You can find Installation / usage instructions at https://forge.puppet.com/google/cloud and detailed product specific references, usage and examples for the respective module at Google @ Puppet Forge.

We also gave a number of talks:
  • From nothing to production in 10 minutes (scalable in 30)
  • Kubernetes in the Cloud with Puppet and Google Kubernetes Engine
And we announced specific new features and integrations:

Bolt / Tasks Support 
We worked with Puppet to add Bolt support to GCP modules, allowing you to run non-idempotent actions that historically did not fit well in Puppet’s model, e.g., restarting a VM. We added a number of tasks to these modules. You can find them in the tasks/ folder of the respective module. We’ve been supporting Bolt since day 1 and will continue doing so in the future.

Puppet Discovery

Puppet unveiled Puppet Discovery during the conference and we're working together to quickly add GCP resource discovery to the Puppet Discovery platform.

What’s next?


We're far from done, and are working on a variety of integration efforts for Puppet, notably:
  • GCP support for Puppet Discovery 
  • Support for Cloud IAM 
  • Support for Cloud Resource Manager 
  • Improvements on Cloud Storage module 
  • Support for Regional Managed Instance Groups (MIG) 
  • Autoscaling of MIGs

If you’re a Puppet user, we hope you give it a try on GCP, and let us know how we’re doing. Reach out to us at [email protected].

How Google protects your data in transit


Protecting your data is of the utmost importance for Google Cloud, and one of the ways we protect customer data is through encryption. We encrypt your data at rest, by default, as well as while it’s in transit over the internet from the user to Google Cloud, and then internally when it’s moving within Google, for example between data centers.

We aim to create trust through transparency, and today, we’re releasing a whitepaper, “Encryption in Transit in Google Cloud,” that describes our approach to protecting data in transit.

Google Cloud employs several security measures to help ensure the authenticity, integrity and privacy of data in transit. Authentication means we know and verify the data source. Integrity means we make sure data you send arrives at its destination unaltered. Encryption means we make your data confidential while in transit to keep it private.


Your data is encrypted in transit by default


By default, when a user connects to Google Cloud, the connection between the user and Google is encrypted. That means that when you connect to Google Cloud, the data you send is encrypted using HTTPS, so that an adversary cannot snoop on your traffic. (You can find out more about HTTPS at Google in our HTTPS transparency report.) Google implements TLS and other encryption in transit protocols by using BoringSSL, an open-source cryptographic library derived from OpenSSL.

By default, Google Cloud encrypts and authenticates all data in transit at one or more network layers when data moves outside physical boundaries not controlled by or on behalf of Google. For comparison, data in transit inside a physical boundary is authenticated but not necessarily encrypted because rigorous security controls are already in place. To ensure we are protecting data against any potential threats, our inherent assumption is that the wide area network is only semi-trusted — that is, that network links between physical boundaries can be compromised by an active adversary who can snoop, inject or alter traffic on the wire. Encrypting data in transit helps protect against this type of activity.

At the network layer, Google Cloud’s virtual network infrastructure automatically encrypts VM to VM traffic if it crosses a physical boundary not controlled by or on behalf of Google. On top of this, at the application layer, Application Layer Transport Security automatically provides authentication, integrity and encryption of remote procedure calls from service to service, when those calls leave a physical boundary controlled by or on behalf of Google. Each service that runs in Google’s infrastructure has a service account identity with associated cryptographic credentials that are used to authenticate these communications.

You have additional options to encrypt your data in transit


In addition to default protections, Google Cloud customers have many options to further encrypt data in transit, including IPsec tunnels, free and automated TLS certificates and Istio.

With Google Cloud VPN, you can send requests from your on-premise machine to a service hosted on Google Cloud through a secure, IPsec VPN tunnel at the network layer. You can also set up multiple, load-balanced tunnels through multiple VPN gateways.

For applications built on Google Cloud, Google provisions free and automated certificates to implement TLS in Firebase Hosting and Google App Engine custom domains.

Istio is an open-source service mesh developed by Google, IBM, Lyft and others, to simplify service discovery and connectivity. Istio authentication aims to automatically encrypt data in transit between services, and manage the associated keys and certificates.

Google helps the internet encrypt data in transit


In addition to how we specifically protect Google Cloud users, we have several open-source projects and other efforts to improve the internet’s security at large and support the use of encryption in transit. These include Certificate Transparency (CT), which is designed to audit and monitor certificates issued by publicly trusted CAs. Certificate Transparency helps detect certificates that may not have been issued according to industry standards, or may not have been requested by the domain owner.

Your data is yours


While we’re on the topic of data protection and privacy, it's useful to reinforce how we think about customer data. In Google Cloud, you choose what data your business stores and what applications your business creates and runs on the service. We process your data only according to our agreement with your business. You can read more about how we keep your business data private on our Privacy website.

To learn more about how we encrypt your data at rest and our overall security design, read our whitepapers “Encryption at Rest in Google Cloud Platform” and “Google Infrastructure Security Design Overview.”

Safe computing!