Category Archives: Google Cloud Platform Blog

Product updates, customer stories, and tips and tricks on Google Cloud Platform

Getting to know Cloud IAM


If your cloud environment consists of multiple projects and services accessed by multiple users, you want to be able to specify who can do what, to which resource. On Google Cloud Platform (GCP), that means using Cloud Identity and Access Management (IAM), which gives you the control and visibility you need to centrally manage your cloud resources.

Implementing Cloud IAM is an ongoing, multi-step process. First, you need to configure your users and groups. Then, you need to determine whether to define functional roles—and map them to your users. You also need to determine whether pre-defined roles offered by Cloud IAM meet your organization’s needs, and if not, create custom ones. Of course, you’ll have to test your IAM policies, and revisit them over time to make sure that they continue to meet your needs.

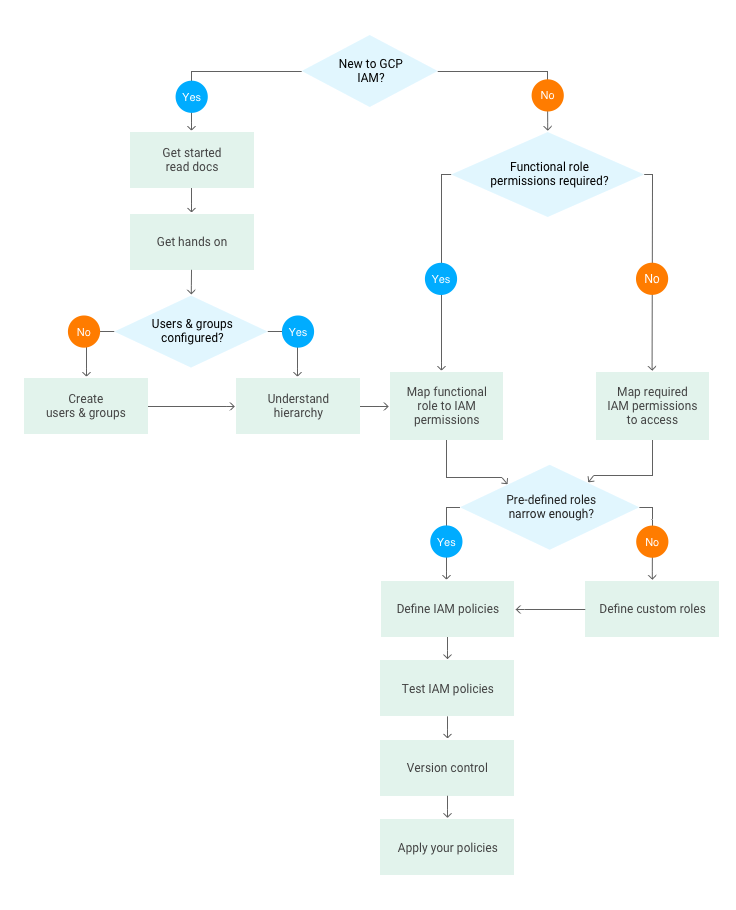
To help you implement these controls, we’ve created a flowchart to help you navigate Cloud IAM. Whether you're new to IAM or familiar with it and just need a gentle reminder, this flowchart can serve as a handy checklist of steps you need to follow.
Let’s drill down into the the various steps in the flowchart.

Get started by reading the documentation


If you’re new to Cloud IAM, we highly recommend you take time out to familiarize yourself with the IAM documentation, a comprehensive guide that includes resources to help you follow best practice guidance. In particular, the Understanding Roles document is a great way for you to become more familiar with IAM. This page lists all the available IAM roles per product, and from here you can easily locate the product-specific IAM pages for more detail on their respective IAM roles.


Get hands-on


Once you have familiarized yourself with the overview, it’s time to get hands-on to understand how to actually implement IAM policies. The tutorial on implementing GCP policies has a section on how to map your requirements to IAM and walks through the tutorial implementation using the GCP Console.

Create users and groups


GCP uses Google Accounts for authentication and access management. Best practice is to use groups to set up the IAM policies that meet your requirements. Google groups are a convenient way to apply an access policy to a collection of users. You can grant and change access controls for a whole group at once rather than one-at-a-time, as you do for individual users or service accounts. You can also easily add members to and remove members from a Google group rather than updating a Cloud IAM policy.


Understand hierarchy


A key concept in Cloud IAM is that it uses a hierarchical approach to implementing IAM, flowing from the Organization node downwards. GCP allows you to group and hierarchically organize all GCP resources into resource containers such as Organizations, Folders and Projects.

The following diagram shows an example of various resources and their hierarchical organization in GCP.
You can set an IAM policy at the organization level, the folder level, the project level, or (in some cases) the resource level. The tables in the Understanding Roles document indicate at what level in the hierarchy you can incorporate an IAM role for a product as part of a policy.

A resource inherits the policies of its parent node. If you set a policy at the Organization level, all its child folders and projects inherit that policy. Likewise, if you set a policy at the Project level, its child resources inherit that policy as well. In other words, the policy for a resource is effectively the union of the policies set on the resource as well as all of the policies it inherits from its ancestors.

Define functional or product-specific roles


When planning your IAM implementation there are two approaches: use a functional role or set access according to data or product type.

Typically the first few IAM policies that you need to map are functional and role-based, for example, the existing Networking and Billing roles.

Restricting access by product, meanwhile, looks at a particular resource and focuses on defining the policy focused on that resource. For example, you may wish to restrict access to specific Cloud Storage buckets, BigQuery datasets or Pub/Sub topics and subscriptions.


Define custom roles


If the predefined IAM roles do not meet your security needs, you can create a custom role with one or more permissions.When creating a custom role, we recommend starting from an existing predefined role and add or remove permissions to it, rather than starting from an empty list of permissions.

Creating custom roles is an advanced configuration action since managing them represents additional operational overhead. You're responsible for maintaining your custom roles, and will need to add any new IAM permissions to them. Any changes that Google Cloud makes to predefined roles will not be reflected in your custom roles. You can use the IAM permissions change log to track the history of permission changes.

Define IAM policy


You can grant roles to users by creating a Cloud IAM policy, which is a collection of statements that define who has what type of access. These policies consist of a set of bindings of members (who has access) to one or more IAM roles. Here's an example of a policy in JSON:

{
  "bindings": [
   {
     "role": "roles/owner",
     "members": [
       "user:[email protected]",
       "group:[email protected]",
       "domain:google.com",
       "serviceAccount:[email protected]"]
   },
   {
     "role": "roles/viewer",
     "members": ["user:[email protected]"]
   }
   ]
}

Using groups to define members is another best practice. It keeps the policies readable and allows you to easily adjust who has access to a resource without having to update the policies themselves.

Test IAM policies


Testing any policies you create is critical. This way, you can safely check whether you’ve inadvertently granted broader access than required or, conversely, locked things down too much before applying the new or updated policies to your production environment.

An important decision is where you'll undertake testing. We recommend using a dedicated Folder, assuming the functional roles assigned at the Organization level are well-defined and unlikely to change.

A quick way to validate policies set at the Project level is to use the Method: projects.setIamPolicy API page, which has a useful Try this API form so you can see the request and response.

Alternately, another way to troubleshoot IAM policies and simulate changes is to use IAM Explain, a part of the Foresti security suite.


Use version control


Infrastructure as code gives you the confidence that you're deploying reproducible consistent configurations, provides an audit trail for changes and allows you to treat your infrastructure as you do code. An integral component of this approach is version control. Cloud IAM policies form part of your infrastructure definition, and can be used as part of a version control system.

There are lots of ways to write IAM policies:


The policies, in whichever format you settle upon, can then be kept in a version control system, such as Cloud Source Repositories, which provides private Git repositories. You can then integrate the repositories as part of your chosen deployment workflow.

Apply your policies


Finally, it’s time to apply the policies that you've created. You can apply policies using the gcloud CLI, the IAM API, GCP Console, Cloud Deployment Manager or via open-source software tooling such as Terraform, which includes example IAM policies that can be applied using the gcloud command and the API.


Next steps


Navigating the flowchart provides you with a logical approach to implementing your IAM policies—but it doesn't stop there. Setting up Cloud Audit Logging to monitor your policies is a great next step. This done, you’ll be well on your way to a building an environment with control and visibility you need to centrally manage your GCP resources.

Optimizing your Cloud Storage performance: Google Cloud Performance Atlas


Google Cloud Storage is Google Cloud Platform’s powerful unified object storage that can meet most if not all of your developer needs. Out of the box, you get close-to-user-edge serving, CDN capabilities, automatic redundancy and the knowledge that you’re using a service that can even help reduce your storage carbon emissions to zero!

That being said, every developer has a unique use case and specific requirements for how they use Cloud Storage. While its out-of-the-box performance is quite impressive, here are a few pro tips, tweaks and suggestions to help you optimize for your particular use case.

Establishing baseline performance


First off, you can’t fix what you can’t measure. As such, it’s important to establish a baseline expectation of the performance of a Cloud Storage bucket. To this end, we suggest running the perfdiag utility which runs a set of tests to report the actual performance of a Cloud Storage bucket. It has lots of options, so that you can tune it as closely as possible to match your own usage pattern, which can help set expectations, and, if there’s a performance difference, help track down where the problem might be.

Improving upload performance


How to upload small files faster

Each Cloud Storage upload transaction has some small overhead associated with it, which in bulk scenarios, can quickly dominate the performance of the operation. For example, when uploading 20,000 files that are 1kb each, the overhead of individual upload takes more time than all the entire upload time altogether. This concept of overhead-per-operation is not new, nor is the solution: batch your operations together. If you’ve ever done SIMD programming on the CPU, for example, you’ve seen firsthand how batch operations mitigates the overhead of each operation across the set, improving performance.

To this end, gsutil provides the "-m" option that performs a batched, parallel (multi-threaded/multi-processing) upload from your local machine to your cloud bucket, which can significantly increase the performance of an upload. Here’s a test that compares uploading 100 200k files individually and batch uploading them using "gsutil -m cp". In the example below, upload speeds increase by more than 5X by using this flag. 
In this graph, smaller is better


More efficient large file uploads


The gsutil utility can also automatically use object composition to perform uploads in parallel for large, local files that you want to upload to Cloud Storage. It splits a large file into component pieces, uploads them in parallel and then recomposes them once they're in the cloud (and deletes the temporary components it created locally).

You can enable this by setting the `parallel_composite_upload_threshold` option on gsutil (or, updating your .boto file, like the console output suggests).

gsutil -o GSUtil:parallel_composite_upload_threshold=150M cp ./localbigfile gs://your-bucket

Where "localbigfile" is a file larger than 150MB. This divides up your data into chunks ~150MB and uploads them in parallel, increasing upload performance. (Note, there are some restrictions on the number of chunks that can be used. Refer to the documentation for more information.)

Here’s a graph that compares the speed of uploading 100 500MB files using regular vs. composite uploads.
In this graph, smaller is better

Avoid the sequential naming bottleneck


When uploading a number of files to Cloud Storage, the Google Cloud frontends auto-balance your upload connections to a number of backend shards to handle the transfer. This auto-balancing is, by default, done through the name/path of the file, which is very helpful if the files are in different directories (since each one can be properly distributed to different shards).

This means that how you name your files can impact your upload speed.


For example, imagine you’re using a directory structure that includes a timestamp:

YYYY/MM/DD/CUSTOMER/timestamp 


This can cause an upload speed issue, since the majority of your connections will all be directed to the same shard, since the filenames are so similar. Once the number of connections gets high enough, performance can quickly degrade. This scenario is very common with datasets which have a deep connection to a timestamp (like photographs, or sensor data logs).

A simple solution to this issue is to simply re-name your folder or file structure such that they are no longer linear. For example, prepending a uniformly distributed hash (over a fixed range) to the filenames breaks the linearity and allows the load balancers to do a better job at partitioning the connections.

Below, you can see the difference between how long it took to upload a set of files named linearly, vs. ones that were prepended with a hash:

It’s worth noting that if this renaming process breaks some data-dependencies in your pipeline, you can always run a script to remove the hashes on the files once the upload is finished.

Improving download performance


Set your optimal fetch size 

As mentioned before, Cloud Storage has fixed transactional overhead per request. For downloads (much like uploads), this means you can achieve improved performance by finding the sweet spot between the size of the request, and the number of requests that have to be made to download your data.

To demonstrate this, let’s take an 8MB file, and fetch it through different sized chunks. In the graph below, we can see that as the block size gets larger, performance improves. As the chunk size decreases, the overhead per-transaction increases, and performance slows down.

In this graph, smaller is better

What this graph highlights is that Cloud Storage is extremely strong in terms of single-stream throughput. That means that for both uploads and downloads, Cloud Storage performance is at its best for larger requests of around 1MB in size. If you have to use smaller requests, try to parallelize them, so that your fixed latency costs overlap.

Optimizing GSUTIL reads for large files


If you need to download multi-gigabyte files to an instance for processing, it’s important to note that gsutil’s default settings aren’t optimized for large-file transfer. As a result, you might want to adjust your use of slicing, and threadcount to improve performance.

The default settings for GSUTIL spread file downloads to four threads, but only use a single process. To copy a single file onto a powerful Compute Engine VM, we can improve the performance by limiting the number of threads, forcing the system to use multiple processes instead.

For large files, GSUTIL has a nifty feature that can help even further. Gsutil uses HTTP Range GET requests to perform "sliced" downloads in parallel when downloading large objects from Cloud Storage.


time gsutil -o 'GSUtil:parallel_thread_count=1' -o 
'GSUtil:sliced_object_download_max_components=8' cp gs://bukket/fileSRC.dat 
./localDST.bin

You can see in the graph below that using sliced and threaded downloads with HTTP Range GET requests is a big time-saver.
In this graph, smaller is better
So there you have it folks—some quick and dirty tricks to help you get the most performance out of your Cloud Storage environment. If you have any other tips that you’ve found helpful, reach out to me on social media, and let me know if there are other topics you’d like me to cover. And don’t forget to subscribe to the Google Cloud Platform Youtube channel for more great tips and tricks for optimizing your cloud application.

From open source to sustainable success: the Kubernetes graduation story


Today is a special day: Kubernetes graduates from CNCF incubation, an important milestone in its maturity, and an even bigger milestone for all the organizations that have come to rely on it as a cornerstone of their IT operations.

Graduation is also an opportunity for us at Google to look back at the work accomplished over the years and say thank you and congratulations to a class that has accomplished so much. In this case, we would like to congratulate the Kubernetes project community that has worked with us sometimes as students, frequently as peers, and often as teachers. Kubernetes would not be where it is today without the attention and devotion so many have given it across the industry.

Congratulations are also due to the Cloud Native Computing Foundation (CNCF), which incubated our project and gave the community an independent home in which to grow and learn.

Forgive us as we walk down memory lane for a moment—Google released Kubernetes as open source code in June 2014 and it was an immediate success.

Actually, that’s not how it worked—not at all. We started with a Google technical team that had deep experience running globally-scalable applications on distributed systems. And a year and a half in, we were running into challenges of every sort. We were at risk of becoming a very successful disaster, wrestling with growing interest and contributions to an increasingly complex system. There were so many changes in every release that changes in one area would break another area, making it harder to get a release out the door on time.

Today, there are few open source projects the size of Kubernetes and almost none with Kubernetes’ level of sustained activity. There was only so much prior experience to rely on. To reach this day, it took a cross-industry group of technologists, program managers, product managers, documentation writers and advocates that were open to experimenting and maturing as a community. We’d like to share some of the best practices that helped us get through and overcome those growing pains, and get where we are today.

#1 Focus on the user


A successful project is a combination of great technology, product market fit and innovation that solves real problems. But ensuring adoption in the early stages of an unknown open source project is hard. To support adoption we set up a user rotation early on, and assigned Google engineers to answer user project questions on IRC, StackOverflow and Slack channels. The rotation grew user adoption directly and provided valuable feedback to engineers.

#2 Build a community


Collaborating with engineers from companies like RedHat and CoreOS was critical for shaping Kubernetes to meet the needs of a wide variety of users. Additionally, it was important for the community to welcome independent, individual contributors as much as experienced contributors from big companies. Diverse voices sharing different use cases, unusual perspectives and offering a counterpoint in discussions was the only path to a project that would scale up to the needs of large enterprises and scale down to be digestible by students and hobbyists.

#3 Invest in sustainability


To scale the project in a healthy, sustainable way, Google Cloud funded large investments in test infrastructure, change-review automation, issue-management automation, documentation, project management, contributor experience, mentorship programs and project governance. We also worked closely with the CNCF to develop devstats, a tool for visualizing GitHub organization and repository statistics so that we can regularly review the project’s health.

#4 Enable an ecosystem


It was clear we had the ingredients for a technological revolution on our hands, but turning that into a ubiquitous platform required additional elements. It needed a clear vision of the future that understood user needs and recognized that not every use case was the same. It needed hooks for an ecosystem of contributors to build from, broader capabilities to handle new types of applications and standards to ensure consistent user experience and streamline adoption. It needed advocates and champions from across the industry.

Kubernetes is a successful platform in part due to early decisions by maintainers to ensure a modular architecture with well-defined interfaces. As a result, Kubernetes runs everywhere, from all major cloud platforms to card-sized ARM-based devices, and supports meaningful choices from the ecosystem, including container runtimes, network plugins, ingress controllers and monitoring systems, to name a few. In order to give users an efficient platform for more diverse workloads, we invested in support for stateful workloads, storage plugins, and hardware accelerators. Additionally, Kubernetes extension mechanisms such as API aggregation and Custom Resource Definitions unlock innovation in the ecosystem by enabling developers to take Kubernetes in new directions.

Last but not least, to ensure Kubernetes avoids the risk of fragmentation, Google worked with the CNCF and the Kubernetes community to initiate the Certified Kubernetes Conformance Program that aims to cement the portability and ubiquity of this platform.

Even with years of experience developing Borg and the collective effort of hundreds of Googlers, we couldn’t have done this alone. For all the help making Kubernetes what it is today, we must thank our many contributors, collaborators, leaders, users, advocates, dissenters and challengers—those who helped us turn open-source code into an open source project and an industry ecosystem.

Like a school graduation, this isn’t an end unto itself, but just the beginning. We look forward to the future where Kubernetes is even more critical thanks to all of you who have helped get it this far, and all of you who will help continue to mature it in the future.

For more information on the Kubernetes graduation, take a look at the CNCF announcement.

Learn to run Apache Spark natively on Google Kubernetes Engine with this tutorial


Apache Spark, the open-source cluster computing framework, is a popular choice for large-scale data processing and machine learning, particularly in industries like finance, media, healthcare and retail. Over the past year, Google Cloud has led efforts to natively integrate Apache Spark and Kubernetes. Starting as a small open-source initiative in December 2016, the project has grown and fostered an active community that maintains and supports this integration.

As of version 2.3, Apache Spark includes native Kubernetes support, allowing you to make direct use of multi-tenancy and sharing through Kubernetes Namespaces and Quotas, as well as administrative features such as Pluggable Authorization and Logging for your Spark workloads. This also opens up a range of hybrid cloud possibilities: you can now easily port and run your on-premises Spark jobs on Kubernetes to Kubernetes Engine. In addition, we recently released Hadoop/Spark GCP connectors for Apache Spark 2.3, allowing you to run Spark natively on Kubernetes Engine while leveraging Google data products such as Cloud Storage and BigQuery.

To help you get started, we put together a tutorial to learn how to run Spark on Kubernetes Engine. Here, Spark runs as a custom controller that creates Kubernetes resources in response to requests made by the Spark scheduler. This allows fine-grained management of Spark applications, improved elasticity and seamless integration with logging and monitoring tutorials on Kubernetes Engine.

This tutorial brings together some of the best data storage and processing services of Google. In addition to Cloud Storage and BigQuery, it shows you how to use Google Cloud Pub/Sub with Spark for streaming workloads. The tutorial details the Spark setup, including credentials and IAM to connect to Google’s services and provides runnable code to perform data transformations and aggregations on a public dataset derived from Github. This is a good approach to take if you're looking to write your own Spark applications and use Cloud Storage and BigQuery as data sources and sinks. For instance, you can store logs on Cloud Storage, and then use Spark on Kubernetes Engine to pre-process data, and use BigQuery to perform data analytics.

Designed for flexibility, use this tutorial as a jumping-off point, and customize Apache Spark for your use-case. Alternately, if you want a fully managed and supported Apache Spark service, we offer Cloud Dataproc running on GCP.
We have lots of other plans for Apache Spark and Kubernetes: For one, we’re building support for interactive Spark on Kubernetes Engine. In addition, we’re also working on Spark Dynamic Resource Allocation for future releases of Apache Spark that you’ll be able to use in conjunction with Kubernetes Engine cluster autoscaling, helping you achieve greater efficiencies and elasticity for bursty periodic batch jobs in multi-workload Kubernetes Engine clusters. Until then, be sure to try out the new Spark tutorial on your Kubernetes Engine clusters!

Expanding the reach of Google Cloud Platform’s HIPAA-compliant offerings for healthcare


At Google Cloud, we strive to create innovative and elegant solutions to help you address the unique challenges of your industries. In particular, we have a strong and growing focus on making Google Cloud the best platform for the healthcare industry as has been evidenced at numerous events over the past year, including HIMSS, RSNA and Google Cloud Next. We’ve showcased a number of solutions, including a clinical data warehouse, integration with multiple radiology workflows, an API-enabling an entire country’s healthcare system, as well as a petabyte-scale genomics processing capabilities.

Of course, no solution, whether it be for handling patient data or billing records, can be considered complete without proper consideration of the relevant data security and compliance requirements. Google Cloud Platform (GCP) offers market-leading security technologies, such as encryption by default, both at rest and in transit, trusted server boot and data loss prevention tools, which can help our customers jumpstart their compliance journeys. We've been steadily increasing the number of services covered by the Google Cloud Platform HIPAA Business Associate Agreement (BAA) in line with the overall growth of the product suite. Currently, we have around 75% of applicable GCP services covered under our BAA.

Today we're excited to announce a new addition to our HIPAA BAA, Google App Engine. App Engine offers customers the ability to build highly scalable web and mobile applications without having to worry about managing the underlying infrastructure and other overhead that comes from managing large-scale web applications. With this release, customers will now be able to leverage App Engine to build applications serving the healthcare sector. Many of our customers, for example CSG Actuarial, LLC, are already taking advantage of these additions:
"CSG Actuarial, LLC utilizes Google Cloud Platform to quickly design and implement innovative solutions for producers in the insurance industry. We are excited to be introducing a multi-carrier Medicare Supplement online enrollment tool in February, where we will be able to securely store personal health information with Google App Engine under the Google Cloud Platform HIPAA BAA" 
Bryan Neary, Principal, CSG Actuarial, LLC 
In addition, GCP’s AI and machine learning capabilities, including the Speech, Translation, Vision, and Natural Language APIs, as well as Cloud Machine Learning Engine, are covered by the HIPAA BAA. These products allow customers to leverage pre-trained models in the form of APIs and custom trained models with Cloud Machine Learning Engine. Cloud Machine Learning Engine provides a managed solution for the popular TensorFlow open source machine learning framework, allowing customers to develop, train, and run custom models on HIPAA-covered data on Google Cloud.
"The ability to train robust machine learning models in a secure, privacy-respecting and HIPAA compliant manner is central to our business. We found Google Cloud Platform to go beyond our expectations in terms of supporting infrastructure enabling us to focus on developing our core application and building on top of the stack that GCP provides."   
John Axerio-Cilies, CTO, Arterys

While there's no formal certification process recognized by the US Department of Health and Human Services for HIPAA compliance, and complying with HIPAA is a shared responsibility between the customer and Google, GCP has undergone several independent audits to assess the controls present in our systems, facilities and operations. This includes the ISO 27018 international standard of practice for protection of personally identifiable information in public cloud services. More information on GCP’s security and compliance efforts, as well as the complete list of services covered by our HIPAA BAA, can be found on our comprehensive compliance site here.

In addition to supporting healthcare, we have also developed industry guidance for life sciences customers working to deploy and validate “good practices” (commonly referred to as GxP) on GCP. Please contact a Google Cloud representative for details. Our recently announced partner, Flex, just launched its BrightInsight platform, built on GCP, that enables pharmaceutical and medical technology companies to optimize therapies through better data management and analysis from Class I, II and III medical devices and combination products. BrightInsight will accelerate the R&D and go-to-market timelines for these companies by delivering a secure, managed infrastructure service for regulated medical devices and therapies, and provides a platform for the development of advanced machine learning and analytics capabilities to deliver real-time actionable insights to its customers.
"Flex saw the need for a secure cloud platform designed to support highly-regulated connected drug delivery and medical devices, going beyond simple connectivity to deliver real-time intelligence and actionable insights. Through our strategic partnership with Google, we will be able to deliver a new level of intelligence to healthcare all built within a regulated, managed services framework that is designed to comply with the varying privacy and security laws around the world."  
Kal Patel, MD, Senior Vice President of Digital Health, Flex
To learn more about what we’re doing in the healthcare and life sciences space, visit us at HIMSS this week. In particular, come learn the basics of how to set up a project in the Developer Innovation Lab that can support HIPAA compliance so that you can take advantage of our comprehensive infrastructure, analytics and machine learning capabilities.

Queue-based scaling made easy with new Stackdriver per-group metrics


Even if you use managed instance groups in your Compute Engine environment, you know that scaling worker VM instances efficiently on a queue of jobs is not a trivial exercise. Sometimes the queue is empty and you want zero workers so that you’re not wasting money and resources. Other times the queue fills up quickly, is bursting at the seams, and you need all the workers you can get. Still other times, there’s a steady flow of work that you want to process at a consistent pace.

To help with these challenges, we're announcing per-group metrics scaling for managed instance groups, which lets you create a simple queue-based scaling system to address all of these scenarios. The feature relies on allowing managed instance groups to scale on previously unsupported Stackdriver monitoring metrics, such as the amount of work in a Pub/Sub queue.

This is a big improvement over the prior state of affairs. Before per-group metrics scaling, your best options were either to have a statically sized worker pool waiting around for work, or to write custom code to monitor the jobs in a queue, then manually scale worker pools up and down based on the current amount of work.

Using per-group metrics scaling 


Let’s work through an example of how you can use per-group scaling in managed instance groups. Consider this simple setup. You receive data jobs that you want to process as they come in. Once started, a job can be processed in a couple of minutes, but the jobs arrive in unpredictable bursts. When a new data job appears, a Cloud Pub/Sub message is created and sent, and as these messages build up, the number of unprocessed messages in the Pub/Sub queue is exported as a Stackdriver monitoring metric. We’ll use this metric to drive the number of workers, which in turn pulls the Pub/Sub messages, processes the data and reduces the length of the Pub/Sub queue.

To do this, start by creating a managed instance group with autoscaling enabled. For this example, we assume that you’ve already configured the Pub/Sub queue and that you have an instance template with your worker image ready to go.

Set “Autoscale on” to “Stackdriver monitoring metric” and “Metric export scope” to “Single time series per group.” This is the setting that configures the managed instance group to scale on a metric that's independent of individual instances. Unlike typical autoscaling metrics such as average CPU utilization, the length of a queue is independent from the instances in the managed instance group.

Set the metric identifier to be the number of undelivered Pub/Sub messages, filtered by your specific subscription name. This allows the autoscaler to find the correct Pub/Sub queue to scale on.
Now the managed instance group is connected to the correct metrics, and it’s time to set up how quickly the group scales up and down. Set the scaling policy to “Single instance assignment” of ‘2’ to indicate that for every two unprocessed messages in the queue, the managed instance group should have one worker instance. Finally, set the maximum and minimum size of the group. We want the group to scale to zero when there's no work, so set the minimum to "0" and the maximum to whatever makes sense for your workload. For this example, we’ll go with 20.
You can also configure per-group metric scaling programmatically. Here’s the same command written using the Google Cloud SDK CLI tool

gcloud beta compute instance-groups managed set-autoscaling \
    my-queue-based-scaling-group --zone us-central1-b --project my-project \
    --min-num-replicas 0 \
    --max-num-replicas 20 \
    --update-stackdriver-metric \
    pubsub.googleapis.com/subscription/num_undelivered_messages \
    --stackdriver-metric-single-instance-assignment 2 \
    --stackdriver-metric-filter \
    'resource.type = pubsub_subscription AND resource.label.subscription_id = "MY_SUBSCRIPTION"'

That’s it! Now, when messages arrive in the Pub/Sub queue, the managed instance group scales up, and as messages get processed, scales back down. When all the messages have been processed and the queue is empty, the managed instance group shuts down all machines in the group so that you don’t pay for resources that you aren’t using.

The diagram below shows how the number of instances in the managed instance group changes over 10 time-steps in response to the length of the Pub/Sub queue.
As work starts accumulating in the queue, the managed instance group scales up at an average rate of one instance per two messages sitting in the queue. Once the amount of queued-up work starts to decrease at time-step 6, the managed instance group scales down to match. Finally, as the queue empties around time-step 9, the managed instance group scales down to zero in time-step 10. It will stay at size zero until more work shows up.

Queue unto others


It’s never been easier to set up automatic scaling for queued jobs using managed instance groups. With a single metric to measure the amount of work and a simple assignment of work per worker, you can set up a responsive scaling system in a couple of clicks.

Of course, this also works for queueing systems other than Pub/Sub queues. Anytime you can express the amount of work as a Stackdriver metric, and assign work per node, you can use per group metrics scaling for managed instance groups to optimize costs.

To get started, check out the documentation for more details.

Fully managed export and import with Cloud Datastore now generally available


If you store information in a database, you know how important it is to have an easy and reliable way to get data in and out — whether you’re making a copy for backup or archival purposes, or you want to restore data after a user “ooops” moment. So today, we're announcing the general availability of managed export and import for Cloud Datastore, our highly scalable NoSQL managed database service.

This feature, in beta since September, replaces the previous Cloud Datastore Admin backup module, and provides a more fully managed database experience. Some of the benefits of managed export and import include:
  • Fully managed by Google Cloud Platform (GCP) and exposed as a simple service 
  • Improved export speed achieved through sharding improvements 
  • A new API in the same form as the Cloud Datastore v1 API 
  • Integration with Cloud IAM 
  • Billing exclusively based on Cloud Datastore entity reads and writes; no longer billing for App Engine instance hours
"Batterii, a consumer insights and collaboration platform, has been using Cloud Datastore for seven years. Previously, our backups took 8-10 hours. With managed export and import, we can now complete those backups in an hour." 
Greg Fairbanks, Senior Software Engineer
Since its beta release in September 2017, early users now perform more than 10,000 exports and imports per week. Now that the new feature is generally available, we'll phase out Datastore Admin backup in 12 months, and starting on February 28th, 2019, it will no longer be available from the Google Cloud Console. To learn more and to get started with managed exports and imports, check out the documentation on exporting and importing entities and scheduling an export.

Announcing SSL policies for HTTPS and SSL proxy load balancers


Applications in cloud deployments have diverse security needs. When you use a load balancer as an HTTPS or TLS front end, you need to be able to control how it secures connections to clients. In some cases, your security or compliance requirements may restrict the TLS protocols and ciphers that the load balancer can use. For other applications, you may need the load balancer to support older TLS features in order to accommodate legacy clients. Today we’re introducing SSL policies for HTTPS and SSL Proxy load balancers on GCP, giving you the controls you need for this.

Introducing SSL policies


The TLS protocol is at the heart of how we secure the internet, but in the 20+ years since its inception it has by no means remained static. What began as SSL has evolved through several TLS versions, each one adding new cryptographic techniques and enhancing performance. When using TLS, servers and clients negotiate exactly how to speak TLS to one another, including the version of the protocol and the underlying ciphers. With our new SSL policies feature, you can consider both what TLS capabilities your load balancer is willing to negotiate and how you manage those settings over time.

When you create an SSL policy, you specify two things:
  • A minimum TLS version: Setting this to 1.1, for example, means that the load balancer will only negotiate TLS with clients that support TLS version 1.1 or newer.
  • A profile of features: This selects the set of cipher suites that the load balancer can use.
The profile can be either a pre-defined or a custom profile:

To see which TLS features are enabled by each of these profiles, check our SSL policies documentation.

You need only a single gcloud command to create an SSL policy:

gcloud beta compute ssl-policies create web-front-end-app-policy \
       --profile MODERN --min-tls-version 1.1

You can then attach this SSL policy to your load balancer with a second command:

gcloud beta compute target-https-proxies update my_https_lb \
  --ssl-policy my_ssl_policy

Here's a preview of the configuration via the console (available soon):


Keeping up with TLS advances


We’ve designed the pre-defined profiles to satisfy a wide set of security needs. We manage these profiles for you, automatically enabling new features that are broadly implemented by clients and disabling features when they're no longer appropriate. With pre-defined profiles, there’s no need to manually revisit your policy in order to keep your load balancer up-to-date with modern TLS capabilities.

If pre-defined profiles aren’t right for you, use a CUSTOM profile instead. Here's a preview of custom profile configuration via the console (available soon):

With a CUSTOM profile, you can select exactly the TLS features that you want and manage the introduction of new features to keep your SSL policy current.

Try SSL policies today 

Learn more about SSL policies online, and give them a spin. We look forward to your feedback!

Google Cloud’s Response to Australian Privacy Principles (APP) and Australian Prudential Regulation Authority (APRA) Requirements


Google Cloud continuously works to help our enterprise customers understand how we view regulatory compliance requirements within regions. We recently produced three whitepapers highlighting Google Cloud’s commitment to meeting Australia’s rigorous privacy and compliance standards that test for data safety, privacy and security.

The first document is a whitepaper on the Australian Privacy Principles (APP) that helps Google Cloud customers understand how we store, process, maintain, access and secure information, particularly when using Google Cloud Platform (GCP) and G Suite products. The other two documents are both focused on providing assistance to Financial Services customers under the purview of the Australian Prudential Regulation Authority (APRA).

The first APRA-related document highlights Google Cloud’s general response to APRA Standard CPS 231 Outsourcing. In the document, we review the core concepts related to the outsourcing guidelines, examine the list of supported GCP and G Suite services along with our efforts to address compliance concerns, and outline the responsibilities of Financial Services customers under the standard. The second APRA-related document is Google Cloud’s response to APRA CPG 234 and CPG 235. In this document, we map the GCP and G Suite controls and processes outlined in our Service Organization Controls (SOC) 2 Type II report to the set of security guidelines and controls that these standards spell out. The mapping is designed to provide a more digestible format of Google Cloud’s compliance controls corresponding to the specific APRA requirements. To access this control mapping, you can contact our Cloud Sales team.

We plan to continue to produce these types of documents to support you in the coming months. Please stay tuned for further releases!

Introducing Cloud Billing Catalog API: GCP pricing in real time


As your organization uses more cloud resources, effective pricing and cost management are critical. We are delighted to announce the general availability of the Cloud Billing Catalog API, which helps you gain programmatic, real-time access to authoritative Google Cloud Platform (GCP) list pricing.

The Cloud Billing Catalog API joins the Google Cloud Billing API to help you manage your billing experience. The Cloud Billing API allows programmatic management of billing accounts, and allows you to get, list and manage permissions on billing accounts. The Cloud Billing Catalog API builds on that functionality with programmatic access to the rich information you see for GCP SKUs on our website.
Now, with the Cloud Billing Catalog API, you can predict bills, estimate costs and reconcile rates when you're using list GCP pricing. It provides you with a list of all GCP services. In addition, it contains a list of all SKUs within a service including:
  • A human-readable description of the SKU 
  • List pricing for the SKU 
  • Regions where the SKU is available for purchase
  • Categorization data about the SKU 
You can use the Cloud Billing Catalog API with your existing cost management tools, as well as to reconcile list pricing rates when you export billing data to Google BigQuery.

Both the Cloud Billing and Cloud Billing Catalog APIs are available via REST and RPC. To find out more and get started, visits the Cloud Billing Catalog API documentation.