If you’re building a link between your data center and Google Cloud, we have three ways to get you there: Cloud VPN over the public internet, Dedicated Interconnect, and now, Partner Interconnect—high-bandwidth connectivity to the nearest Google Cloud Platform (GCP) region through our many partners.
Like Dedicated Interconnect, Partner Interconnect offers private connectivity to GCP to organizations that don't require the full 10Gbps of a dedicated circuit. Partner Interconnect also allows organizations whose data centers are geographically distant from a Google Cloud region or Point of Presence (POP) to connect to GCP, using our partners’ connections.
Connect with who you want, how you want
Partner Interconnect lets you connect to GCP from a convenient location, at a data rate that meets your needs. Partner Interconnect lets you purchase a partial circuit, from 50Mbps to 10Gbps. In contrast, Dedicated Interconnect offers full circuits that are 10Gbps links.
Partner Interconnect also lets you pick from a list of providers to connect from your facility to the nearest Google Cloud POP. At launch, Partner Interconnect is available from partners across the globe, who together provide expansive coverage to GCP.
List of Google partners at launch
Getting up and running with Partner Interconnect is easy, as our partners have already set up and certified the infrastructure with Google Cloud. This provides a turnkey solution that minimizes the effort needed to bring up network connectivity from your data center to GCP.
Built on the Google network
With Partner Interconnect you get access to the GCP network and the global infrastructure that it connects to. We’ve built the GCP network over the last decade, it supports many POPs around the globe and we continue to invest in it to meet the growing needs of our customers.
Once connected to the GCP network, you have access to advanced networking technologies like GCP VPC, which seamlessly gives you a global reach to our distributed data centers across our backbone. No need to have distinct connections to each GCP region—just connect to one of our many partners and we take care of the rest behind the scenes!
GCP’s Global VPC enables access to your entire deployment by connecting to a single region.
Partner Interconnect will be generally available in the coming weeks. You can learn more at the Cloud Interconnect page. And if you’re a service provider who would like to help your customers connect to our cloud, please contact your local Google Cloud representative.
Editor’s note: Today marks the first installment in a seven-part video and blog series from Google Developer Advocate Sandeep Dinesh on how to get the most out of your Kubernetes environment. Today he tackles the theory and practicalities of keeping your container images as small as possible.
Docker makes building containers a breeze. Just put a standard Dockerfile into your folder, run the docker ‘build’ command, and shazam! Your container image is built!
The downside of this simplicity is that it’s easy to build huge containers full of things you don’t need—including potential security holes.
In this episode of “Kubernetes Best Practices,” let’s explore how to create production-ready container images using Alpine Linux and the Docker builder pattern, and then run some benchmarks that can determine how these containers perform inside your Kubernetes cluster.
The process for creating containers images is different depending on whether you are using an interpreted language or a compiled language. Let’s dive in!
Containerizing interpreted languages
Interpreted languages, such as Ruby, Python, Node.js, PHP and others send source code through an interpreter that runs the code. This gives you the benefit of skipping the compilation step, but has the downside of requiring you to ship the interpreter along with the code.
Luckily, most of these languages offer pre-built Docker containers that include a lightweight environment that allows you to run much smaller containers.
Let’s take a Node.js application and containerize it. First, let’s use the “node:onbuild” Docker image as the base. The “onbuild” version of a Docker container pre-packages everything you need to run so you don’t need to perform a lot of configuration to get things working. This means the Dockerfile is very simple (only two lines!). But you pay the price in terms of disk size— almost 700MB!
FROM node:onbuild
EXPOSE 8080
By using a smaller base image such as Alpine, you can significantly cut down on the size of your container. Alpine Linux is a small and lightweight Linux distribution that is very popular with Docker users because it’s compatible with a lot of apps, while still keeping containers small.
Luckily, there is an official Alpine image for Node.js (as well as other popular languages) that has everything you need. Unlike the default “node” Docker image, “node:alpine” removes many files and programs, leaving only enough to run your app.
The Alpine Linux-based Dockerfile is a bit more complicated to create as you have to run a few commands that the onbuild image otherwise does for you.
FROM node:alpine
WORKDIR /app
COPY package.json /app/package.json
RUN npm install --production
COPY server.js /app/server.js
EXPOSE 8080
CMD npm start
But, it’s worth it, because the resulting image is much smaller at only 65 MB!
Containerizing compiled languages
Compiled languages such as Go, C, C++, Rust, Haskell and others create binaries that can run without many external dependencies. This means you can build the binary ahead of time and ship it into production without having to ship the tools to create the binary such as the compiler.
With Docker’s support for multi-step builds, you can easily ship just the binary and a minimal amount of scaffolding. Let’s learn how.
Let’s take a Go application and containerize it using this pattern. First, let’s use the “golang:onbuild” Docker image as the base. As before, the Dockerfile is only two lines, but again you pay the price in terms of disk size—over 700MB!
FROM golang:onbuild
EXPOSE 8080
The next step is to use a slimmer base image, in this case the “golang:alpine” image. So far, this is the same process we followed for an interpreted language.
Again, creating the Dockerfile with an Alpine base image is a bit more complicated as you have to run a few commands that the onbuild image did for you.
FROM golang:alpine
WORKDIR /app
ADD . /app
RUN cd /app && go build -o goapp
EXPOSE 8080
ENTRYPOINT ./goapp
But again, the resulting image is much smaller, weighing in at only 256MB!
However, we can make the image even smaller: You don’t need any of the compilers or other build and debug tools that Go comes with, so you can remove them from the final container.
Let’s use a multi-step build to take the binary created by the golang:alpine container and package it by itself.
FROM golang:alpine AS build-env
WORKDIR /app
ADD . /app
RUN cd /app && go build -o goapp

FROM alpine
RUN apk update && \
   apk add ca-certificates && \
   update-ca-certificates && \
   rm -rf /var/cache/apk/*
WORKDIR /app
COPY --from=build-env /app/goapp /app
EXPOSE 8080
ENTRYPOINT ./goapp
Would you look at that! This container is only 12MB in size!
While building this container, you may notice that the Dockerfile does strange things such as manually installing HTTPS certificates into the container. This is because the base Alpine Linux ships with almost nothing pre-installed. So even though you need to manually install any and all dependencies, the end result is super small containers!
Note: If you want to save even more space, you could statically compile your app and use the “scratch” container. Using “scratch” as a base container means you are literally starting from scratch with no base layer at all. However, I recommend using Alpine as your base image rather than “scratch” because the few extra MBs in the Alpine image make it much easier to use standard tools and install dependencies.
Where to build and store your containers
In order to build and store the images, I highly recommend the combination of Google Container Builder and Google Container Registry. Container Builder is very fast and automatically pushes images to Container Registry. Most developers should easily get everything done in the free tier, and Container Registry is the same price as raw Google Cloud Storage (cheap!).
Platforms like Google Kubernetes Engine can securely pull images from Google Container Registry without any additional configuration, making things easy for you!
In addition, Container Registry gives you vulnerability scanning tools and IAM support out of the box. These tools can make it easier for you to secure and lock down your containers.
Evaluating performance of smaller containers
People claim that small containers’ big advantage is reduced time—both time-to-build and time-to-pull. Let’s test this, using containers created with onbuild, and ones created with Alpine in a multistage process!
TL;DR: No significant difference for powerful computers or Container Builder, but significant difference for smaller computers and shared systems (like many CI/CD systems). Small Images are always better in terms of absolute performance.
Building images on a large machine
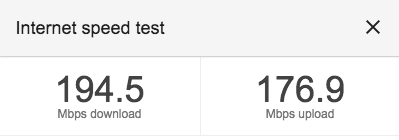
For the first test, I am going to build using a pretty beefy laptop. I’m using our office WiFi, so the download speeds are pretty fast!
For each build, I remove all Docker images in my cache.
Build:
Go Onbuild: 35 Seconds
Go Multistage: 23 Seconds
The build takes about 10 seconds longer for the larger container. While this penalty is only paid on the initial build, your Continuous Integration system could pay this price with every build.
The next test is to push the containers to a remote registry. For this test, I used Container Registry to store the images.
Push:
Go Onbuild: 15 Seconds
Go Multistage: 14 Seconds
Well this was interesting! Why does it take the same amount of time to push a 12MB object and a 700MB object? Turns out that Container Registry uses a lot of tricks under the covers, including a global cache for many popular base images.
Finally, I want to test how long it takes to pull the image from the registry to my local machine.
Pull:
Go Onbuild: 26 Seconds
Go Multistage: 6 Seconds
At 20 seconds, this is the biggest difference between using the two different container images. You can start to see the advantage of using a smaller image, especially if you pull images often.
You can also build the containers in the cloud using Container Builder, which has the added benefit of automatically storing them in Container Registry.
Build + Push:
Go Onbuild: 25 Seconds
Go Multistage: 20 Seconds
So again, there is a small advantage to using the smaller image, but not as dramatic as I would have expected.
Building images on small machines
So is there an advantage for using smaller containers? If you have a powerful laptop with a fast internet connection and/or Container Builder, not really. However, the story changes if you’re using less powerful machines. To simulate this, I used a modest Google Compute Engine f1-micro VM to build, push and pull these images, and the results are staggering!
Pull:
Go Onbuild: 52 seconds
Go Multistage: 6 seconds
Build:
Go Onbuild: 54 seconds
Go Multistage: 28 seconds
Push:
Go Onbuild: 48 Seconds
Go Multistage: 16 seconds
In this case, using smaller containers really helps!
Pulling on Kubernetes
While you might not care about the time it takes to build and push the container, you should really care about the time it takes to pull the container. When it comes to Kubernetes, this is probably the most important metric for your production cluster.
For example, let’s say you have a three-node cluster, and one of the node crashes. If you are using a managed system like Kubernetes Engine, the system automatically spins up a new node to take its place.
However, this new node will be completely fresh, and will have to pull all your containers before it can start working. The longer it takes to pull the containers, the longer your cluster isn’t performing as well as it should!
This can occur when you increase your cluster size (for example, using Kubernetes Engine Autoscaling), or upgrade your nodes to a new version of Kubernetes (stay tuned for a future episode on this).
We can see that the pull performance of multiple containers from multiple deployments can really add up here, and using small containers can potentially shave minutes from your deployment times!
Security and vulnerabilities
Aside from performance, there are significant security benefits from using smaller containers. Small containers usually have a smaller attack surface as compared to containers that use large base images.
I built the Go “onbuild” and “multistage” containers a few months ago, so they probably contain some vulnerabilities that have since been discovered. Using Container Registry’s built-in Vulnerability Scanning, it’s easy to scan your containers for known vulnerabilities. Let’s see what we find.
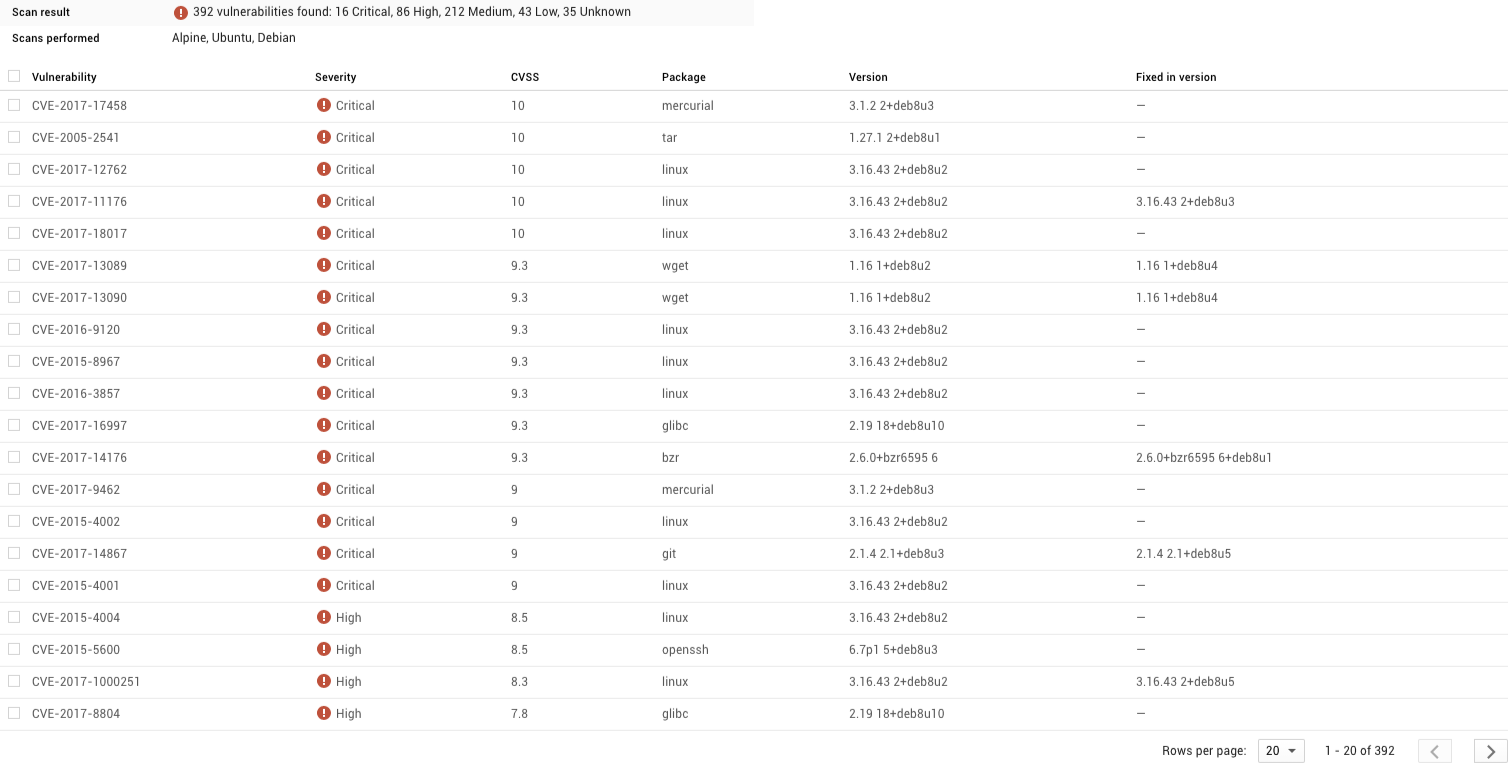
Wow, that’s a big difference between the two! Only three “medium” vulnerabilities in the smaller container, compared with 16 critical and over 300 other vulnerabilities in the larger container.
Let’s drill down and see which issues the larger container has.
You can see that most of the issues have nothing to do with our app, but rather programs that we are not even using! Because the multistage image is using a much smaller base image, there are just fewer things that can be compromised.
Conclusion
The performance and security advantages of using small containers speak for themselves. Using a small base image and the “builder pattern” can make it easier to build small images, and there are many other techniques for individual stacks and programming languages to minimize container size as well. Whatever you do, you can be sure that your efforts to keep your containers small are well worth it!
Check in next week when we’ll talk about using Kubernetes namespaces to isolate clusters from one another. And don’t forget to subscribe to our YouTube channel and Twitter for the latest updates. If you haven’t tried GCP and our various container services before, you can quickly get started with our $300 free credits.
Among open-source relational databases, PostgreSQL is one of the most popular—and the most sought-after by Google Cloud Platform (GCP) users. Today, we’re thrilled to announce that PostgreSQL is now generally available and fully supported for all customers on our Cloud SQL fully-managed database service.
Backed by Google’s 24x7 SRE team, high availability with automatic failover, and our SLA, Cloud SQL for PostgreSQL is ready for the demands of your production workloads. It’s built on the strength and reliability of Google Cloud’s infrastructure, scales to support critical workloads and automates all of your backups, replication, patches and updates while ensuring greater than 99.95% availability anywhere in the world. Cloud SQL lets you focus on your application, not your IT operations.
Cloud SQL for PostgreSQL runs standard PostgreSQL to maintain compatibility. And when we make improvements to PostgreSQL, we make them available for everyone by contributing to the open source community.
Throughout beta, thousands of customers from a variety of industries such as commercial real estate, satellite imagery, and online retail, deployed workloads on Cloud SQL for PostgreSQL. Here’s how one customer is using Cloud SQL for PostgreSQL to decentralize their data management and scale their business.
How OneMarket decentralizes data management with Cloud SQL
OneMarket is reshaping the way the world shops. Through the power of data, technology, and cross-industry collaboration, OneMarket’s goal is to create better end-to-end retail experiences for consumers.
Built out of Westfield Labs and Westfield Retail Solutions, OneMarket unites retailers, brands, venues and partners to facilitate collaboration on data insights and implement new technologies, such as natural language processing, artificial intelligence and augmented reality at scale.
To build the platform for a network of retailers, venues and technology partners, OneMarket selected GCP, citing its global locations and managed services such as Kubernetes Engine and Cloud SQL.
"I want to focus on business problems. My team uses managed services, like Cloud SQL for PostgreSQL, so we can focus on shipping better quality code and improve our time to market. If we had to worry about servers and systems, we would be spending a lot more time on important, but somewhat insignificant management tasks. As our CTO says, we don’t want to build the plumbing, we want to build the house."
— Peter McInerney, Senior Director of Technical Operations at OneMarket
OneMarket's platform is comprised of 15 microservices, each backed by one or more independent storage services. Cloud SQL for PostgreSQL backs each microservice with relational data requirements.
The OneMarket team employs a microservices architecture to develop, deploy and update parts of their platform quickly and safely. Each microservice is backed by an independent storage service. Cloud SQL for PostgreSQL instances back many of the platform’s 15 microservices, decentralizing data management and ensuring that each service is independently scalable.
"I sometimes reflect on where we were with Westfield Digital in 2008 and 2009. The team was constantly in the datacenter to maintain servers and manage failed disks. Now, it is so easy to scale."
— Peter McInerney
Because the team was able to focus on data models rather than database management, developing the OneMarket platform proceeded smoothly and is now in production, reliably processing transactions for its global customers. Using BigQuery and Cloud SQL for PostgreSQL, OneMarket analyzes data and provides insights into consumer behavior and intent to retailers around the world.
Peter’s advice for companies evaluating cloud solutions like Cloud SQL for PostgreSQL: “You just have to give it a go. Pick a non-critical service and get it running in the cloud to begin building confidence.”
Getting started with Cloud SQL for PostgreSQL
Connecting to a Google Cloud SQL database is the same as connecting to a PostgreSQL database—you use standard connectors and standard tools such as pg_dump to migrate data. If you need assistance, our partner ecosystem can help you get acquainted with Cloud SQL for PostgreSQL. To streamline data transfer, reach out to Google Cloud partners Alooma, Informatica, Segment, Stitch, Talend and Xplenty. For help with visualizing analytics data, try ChartIO, iCharts, Looker, Metabase, and Zoomdata.
Sign up for a $300 credit to try Cloud SQL and the rest of GCP. You can start with inexpensive micro instances for testing and development, and scale them up to serve performance-intensive applications when you’re ready.
Cloud SQL for PostgreSQL reaching general availability is a huge milestone and the best is still to come. Let us know what other features and capabilities you need with our Issue Tracker and by joining the Cloud SQL discussion group. We’re glad you’re along for the ride, and look forward to your feedback!
By Manjot Pahwa, Product Manager, Cloud Networking; Ahmet Balkan, Developer Experience Engineer and Bowei Du, Software Engineer, Cloud Networking
Editor’s note: This is the fourth in a series of blog posts on container security at Google. You can find the other posts in the series here.
Security is a crucial factor in deciding which public cloud provider to move to—if at all. Containers have become the standard way to deploy applications both in the public cloud and on-premises, and Google Kubernetes Engine implements several best practices to ensure the security and privacy of your deployments. In this post, we’ll answer some of your questions related to container networking security of Kubernetes Engine, and how it differs from traditional VM networking security.
Kubernetes’ design greatly simplifies networking by abstracting management of load balancer and firewall configurations. In addition, Kubernetes Engine also offers a variety of network security tools to help you lock down your network:
Private Clusters gives your workloads private RFC 1918 IP addresses, taking them off the public internet. Authorized networks let you restrict access to your masters to a specific set of IP address ranges.
Virtual Private Cloud (VPC) Networks provide private global connectivity between your resources, including Kubernetes Engine clusters, offering flexibility in managing your deployment with respect to IP address management, firewalls and routes.
VPC service controls allow you to restrict the access to the data from trusted network sources and mitigate data exfiltration risks.
Kubernetes Network Policies let you restrict pod to pod traffic in your Kubernetes cluster, giving you the ability to isolate your microservices from one another and from the outside world.
Encryption for data in transit as it moves across a physical boundary is standard across Google Cloud Platform (GCP).
Secure access for GCP services from your on-premises deployments using Private Google Access and secure connection to your GCP deployments using our advanced peering capabilities to allow no traffic to transit through the internet.
Layer 7 Protection with support for HTTPS with Ingress on Kubernetes Engine. Protection against DDoS and other layer 4 attacks such as SYN floods through Google Cloud HTTP(S) and TCP load balancers.
Google Cloud offers a wealth of services and functionality to help you lock down the network connected to your Kubernetes Engine clusters. Let’s drill down into each of these offerings a bit further.
Isolate your workload from the public web using Private Clusters (beta)
We recently announced the beta availability of Kubernetes Engine Private Clusters, allowing you to deploy clusters privately as part of your Google VPC and your nodes with only private RFC 1918 IP addresses. Private Clusters ensures network segmentation, reducing the scope and complexity of PCI-DSS compliance. Learn more about the specific segmentation requirements for PCI DSS.
Restrict access to your master using Authorized Networks (beta)
By default, Kubernetes Engine uses both Transport Layer Security (TLS) and IAM authentication to provide secure access to your master endpoint from the public internet. Authorized Networks give you additional protection by allowing a whitelisted range of IP addresses access to your master endpoint, blocking uncontrolled network access. Note that if you’re using a Private Cluster, your master endpoint will use Authorized Networks by default.
Run your Kubernetes Engine cluster in a global Virtual Private Cloud
Traditional VPCs are regional connected silos that must be stitched together through either the public internet or VPN, leading to a sprawl of connections to your on-premises deployment. Google’s VPC offers global connectivity for all your GCP workloads (e.g. Compute Engine VMs and Kubernetes clusters), removing the need for public internet routing or extra VPNs.
Restrict pod-to-pod traffic with a Kubernetes Network Policy
Kubernetes Network Policies allow you to restrict pod-to-pod traffic based on high-level policy specification. In Kubernetes Engine, these are supported using the Calico Network Plugin, created in collaboration with Tigera. Network policies help prevent an attacker from moving laterally. For example, using a network policy, a compromised front-end service can be restricted from communicating with a back-end service such as billing, giving you peace of mind through micro-segmentation of your services in the cloud. By restricting access to your services, this provides a building block to securing access and isolation in a multi-tenant microservices environment.
GCP also allows you to set up firewall rules between your Kubernetes Engine cluster nodes within your VPC network. These rules apply to egress traffic from instances and ingress traffic to instances in the network. Set up firewalls for your deployment today. Learn more about setting up network policies.
Encrypt data in transit when it leaves a physical boundary
Kubernetes Engine, as part of Google Cloud, employs several measures to ensure the authenticity, integrity and privacy of your data in transit. Kubernetes Engine protects communications between your nodes and the master through encryption, or to other services. Kubernetes Engine encrypts all data in transit at one or more network layers when data moves outside physical boundaries not controlled by Google Cloud or on behalf of Google Cloud. We use TLS to encrypt data in transit, and provide authentication, integrity and encryption using the HTTPS protocol with a certificate from a public certificate authority. Find out more in the Encryption in transit whitepaper.
Securely connect to other Google Cloud services and your GCP deployments
For connecting your on-premises infrastructure to GCP, your options include:
Dedicated Interconnect, which offers you enterprise grade connectivity from your on-premises network to your GCP VPC
Google Cloud Platform VPN, lets you securely connect your on-premises cluster to your Kubernetes Engine deployment
Secure your application traffic with Ingress and HTTPS
For encrypted communications between the client to the load balancer, you can specify a TLS private key and certificate to be used by the Ingress controller. You can configure Ingress by specifying a secret or a GCP SSL certificate that contains a TLS private key and certificate.
Learn how to use TLS with Ingress here.
Protect your deployment from DDoS attacks using our HTTP(S) and TCP load balancers
We hope that this gives you a good overview of the security features and techniques at your disposal when configuring network access to your Kubernetes Engine environment. Stay tuned next week for the next post in the container security series discussing how to harden your Kubernetes Engine environment.
We launched BigQuery, our enterprise data warehouse solution, in 2011 so that our customers could leverage the processing power of Google's infrastructure to perform super-fast SQL queries. And although BigQuery is already available to all our customers no matter where they’re located, many enterprises need additional options for storing data and performing analysis in the countries where they operate. That’s why we’re rolling out regional availability for BigQuery. Google Cloud’s Tokyo region is our first expansion site, but it’s only the first step in a globally phased rollout that will continue throughout 2018 and 2019.
By bringing BigQuery availability to places like Tokyo, we’re helping more enterprises analyze and draw actionable insights from their business data at scales prohibitive or impossible with legacy data warehouses. Mizuho Bank—a leading global bank with one of the largest customer bases in Japan and a global network of financial and business centers—is one of many businesses exploring the potential for local BigQuery resources newly at their disposal.
“We believe BigQuery will become a significant driver to transform the way our data analysts work. Mizuho Bank currently runs SQL queries in on-premise data warehouses, but we used to experience issues of long processing time due to a fixed limit on our data-processing resources. We have wanted to move the data to the cloud for some time. Now that BigQuery is available at Google Cloud’s Tokyo region, we were able to conduct a proof of concept (PoC) under the conditions that satisfy Mizuho’s security requirements. We used real-world data to design the PoC to reflect our day-to-day operations.
With BigQuery, we no longer need to worry about limited data-processing resources. We can aggregate processing tasks, perform parallel processing on large queries, and engage multiprocessing in order to substantially reduce working hours of data analysts collaborating across multiple departments. This streamlining can potentially generate more time for our data analysts to work on designing queries and models, and then interpreting the results. BigQuery can not only achieve cost-savings over the existing system but also provides integrated services that are very easy to use.
The PoC has been a great success as we were able to confirm that by using data processing and visualization features like Dataprep and Data Studio with BigQuery, we can conduct all these data analysis processes seamlessly in the cloud.”
—Yoshikazu Kurosu, Senior Manager of Business Development Department,
Mizuho Bank, Ltd.
Financial services organizations are one of several industries that depend on the robust security Google Cloud offers when storing and analyzing sensitive data. Another industry that shares the same challenges is telecom providers. NTT Communications, a global leader in information and communication technology (ICT) solutions, is also looking to BigQuery due to its speed and scale.
“We’ve been using BigQuery on our Enterprise Cloud, a service we provide for enterprises, to detect and analyze anomalies in our network and servers. In our proof of concept (PoC) using BigQuery in Google Cloud’s Tokyo region, we performed evaluations of large-scale log data (cumulative total of 27.8 billion records) streamed real-time from nine regions around the world. Data analytics infrastructure requires real-time handling of extensive log data generated by both equipment and software. Our infrastructure also depends on speed and power to perform ultra-high speed analysis and output of time-series data.
BigQuery achieves high-speed response even in emergency situations, offers an excellent cost-performance ratio, and enables usage and application of large-scale log data that exceeds the capabilities of traditional data warehouses. We will continue to strengthen our cooperation with GCP services, BigQuery included, to provide cloud solutions to support secure data usage on behalf of our customers.”
We hope regional availability will help more enterprises use BigQuery to store and analyze their sensitive data in a way that addresses local requirements.
To learn more about BigQuery, visit our website. And to get started using BigQuery in the US, EU or Tokyo, read our documentation on working with Dataset Locations.
Back in November, we announced the beta of Dialogflow Enterprise Edition. Today, on the heels of introducing Cloud Text-to-Speech and updating Cloud Speech-to-Text, we’re releasing Dialogflow Enterprise Edition for general availability, complete with support and a Service Level Agreement (SLA) that businesses need for their production deployments. It’s been a busy month for Cloud AI and conversational technology!
Hundreds of thousands of developers already use Dialogflow (formerly API.AI) to build voice- and text-based conversational experiences powered by machine learning and natural language understanding. Even if you have little or no experience in conversational interfaces, you can build natural and rich experiences in days or weeks with the easy-to-use Dialogflow platform. Further, Dialogflow's cross-platform capabilities let you build the experience once and launch it across websites, mobile apps and a variety of popular platforms and devices, including the Google Assistant, Amazon Alexa, and Facebook Messenger.
Starting today, Dialogflow API V2 is generally available and is now the default for all new agents, integrating with Google Cloud Speech-to-Text, enabling agent management via API, supporting gRPC and providing an easy transition to Enterprise Edition with no code migration.
We're constantly expanding Dialogflow capabilities to provide you with the best developer experience. Here are some other new features that we added since the beta:
Batch operations that allow you to combine operations that would have required multiple API calls into a single API call, reducing code surface and shortening development time
KLM Royal Dutch Airlines, Domino’s and Ticketmaster have built conversational experiences with Dialogflow, helping them meet their customers where they are and assist them across their journeys. And for DPD, the UK’s leading parcel delivery company, “Dialogflow made it easy to build an AI-powered conversational experience that delights consumers using the resources and skill sets we already have. We estimate that Dialogflow helped us get our conversational interface to market 12 months sooner than planned,” says Max Glaisher, Product Innovation Manager at DPD.
Innovative businesses across industries are adopting Dialogflow Enterprise Edition
Companies are now turning to Dialogflow Enterprise Edition as they scale up to engage with growing numbers of users across multiple platforms.
Ubisoft
Video game publisher Ubisoft uses Dialogflow as part of “Sam,” a personal gaming assistant that delivers personalized information and tips related to its video games and services. “Using Dialogflow Enterprise Edition, Ubisoft has access to a natural language processing system for Sam that can understand text and voice input efficiently out of the box,” says Thomas Belmont, Producer at Ubisoft. He adds that while developing Sam, “The team needed tools that let them iterate quickly and make modifications immediately, and Dialogflow Enterprise Edition was the best choice for those needs.” Dialogflow has also helped ensure a good user experience, with Sam answering 88% of player (user) requests in its first three months as a beta.
(click to enlarge)
Best Buy Canada
To enhance the online shopping experience, Best Buy Canada built a conversational experience to make it quicker and easier for consumers to find the information they need using the Google Assistant. “Using Dialogflow, we've been able to steadily increase user sessions with our agent,” says Chris Rowinski, Product Owner at Best Buy Canada. “In the coming months, we plan on moving to Dialogflow Enterprise Edition so we can continue to scale up as our users and user engagement grow on voice- and screen-based devices."
(click to enlarge)
(Experience available in Canada only)
Ticketmaster
Ticketmaster, the world’s top live-event ticketing company, picked Dialogflow to build a conversational experience for event discovery and ticketing, and is now also developing a solution to optimize interactive voice response (IVR) for customer service. “I remember how excited I was the first time I saw Dialogflow; my mind started racing with ideas about how Ticketmaster could benefit from a cloud-based natural language processing provider,” says Tariq El-Khatib, Product Manager at Ticketmaster. “Now with the launch of Dialogflow Enterprise Edition, I can start turning those ideas into reality. With higher transaction quotas and support levels, we can integrate Dialogflow with our Customer Service IVR to increase our rate of caller intent recognition and improve customer experience.”
Try Dialogflow today using a free credit
See the quickstart to set up a Google Cloud Platform project and quickly create a Dialogflow Enterprise Edition agent. Remember, you get a $300 free credit to get started with any GCP product (good for 12 months).
HashiCorp Vault is a powerful open source tool for secrets management, popular with many Google Cloud Platform (GCP) customers today. HashiCorp Vault provides "secret management as a service," acting as a static secret store for encrypted key-value pairs; a secret generation tool to dynamically generate on-the-fly credentials; and pass-through encryption service so that applications don’t need to roll their own encryption. Today, we're announcing exciting improvements to the existing Google Cloud Storage backend for HashiCorp Vault, including high availability.
As mentioned in our blog post announcing Google Cloud Spanner as a supported HashiCorp Vault storage backend, we strive to make Google Cloud an excellent platform on which to operationalize Vault for all users and use cases. Your feedback from the Cloud Spanner integration was overwhelmingly positive, but many of you are already leveraging the community-supported Cloud Storage backend and don’t want to migrate your existing data to a different storage system. GCP’s wealth of offerings let you choose the best storage options to meet your needs, and now you can choose from both Cloud Spanner and Cloud Storage for HashiCorp Vault storage backends.
The improved Cloud Storage HashiCorp Vault storage backend is completely backwards compatible with the existing solution, but includes a number of new features and benefits:
High availability - In addition to Cloud Storage's built-in multi-region architecture, the improved HashiCorp Vault storage backend also supports running Vault in "high availability" mode. By default, HashiCorp Vault runs as a single tenant, relying on the storage backend to provide distributed locking and leader election. By leveraging object metadata for read-modify-write conditions in Cloud Storage, the improved storage backend allows for a highly available Vault cluster with just a single line of configuration. You can read more about HashiCorp Vault's High Availability model in the documentation.
Support for default application credentials - Previously the Cloud Storage Vault storage backend required you to create a dedicated service account and credentials file. While you can still specify a credentials file, the storage backend now supports pulling default application credentials, such as those from your local gcloud installation or Application Default Credentials if you're running Vault on GCP.
Enterprise-grade security - Cloud Storage follows the same security best practices as other Google products. Objects stored in Cloud Storage are encrypted by default, and it uses IAM to provide granular permission management on buckets and folders. Google’s infrastructure has many security differentiators, including secure boot using Google’s custom-designed security chip Titan, and Google’s private network backbone.
Getting started
To get started, download and install the latest version of HashiCorp Vault. The improvements to the Cloud Storage backend for Vault, including high availability mode, were added in Vault 0.10 (released on April 10, 2018). Please ensure you're running Vault 0.10 or later before continuing.
Next, create a Cloud Storage bucket using the gsutil CLI tool (part of the gcloud CLI) to store the Vault data . You can also create the bucket using the web interface or API directly:
Start Vault with the configuration file. Note that this example uses Vault's built-in development mode, which does not represent best practices or a production installation, but it's the fastest way to try the improved Cloud Storage storage backend for HashiCorp Vault. For more details on a production-grade Vault installation, please read the Vault production hardening guide.
$ export VAULT_ADDR=http://127.0.0.1:8200
$ sudo vault server -dev -config=config.hcl
During this process, Vault authenticates and connects to Cloud Storage to populate and manage objects in the provided bucket. After a few seconds, you can view the objects in the web interface and see that data has been populated.
You can now create, read, update and delete secrets:
With the Cloud Spanner and Cloud Storage Vault storage backends, Vault users can choose which Google-supported storage backend is best for them. In addition to supporting our customers, we are delighted to continue our long-standing relationship with HashiCorp as part of our ongoing partnership. Be sure to follow us on Twitter and open a GitHub issue if you have any questions.
Building images from a standard Dockerfile typically relies upon interactive access to a Docker daemon, which requires root access on your machine to run. This can make it difficult to build container images in environments that can’t easily or securely expose their Docker daemons, such as Kubernetes clusters (for more about this, check out the 16th oldest open Kubernetes issue).
To overcome these challenges, we’re excited to introduce kaniko, an open-source tool for building container images from a Dockerfile even without privileged root access. With kaniko, we both build an image from a Dockerfile and push it to a registry. Since it doesn’t require any special privileges or permissions, you can run kaniko in a standard Kubernetes cluster, Google Kubernetes Engine, or in any environment that can’t have access to privileges or a Docker daemon.
How does kaniko work?
We run kaniko as a container image that takes in three arguments: a Dockerfile, a build context and the name of the registry to which it should push the final image. This image is built from scratch, and contains only a static Go binary plus the configuration files needed for pushing and pulling images.
The kaniko executor then fetches and extracts the base-image file system to root (the base image is the image in the FROM line of the Dockerfile). It executes each command in order, and takes a snapshot of the file system after each command. This snapshot is created in user-space by walking the filesystem and comparing it to the prior state that was stored in memory. It appends any modifications to the filesystem as a new layer to the base image, and makes any relevant changes to image metadata. After executing every command in the Dockerfile, the executor pushes the newly built image to the desired registry.
Kaniko unpacks the filesystem, executes commands and snapshots the filesystem completely in user-space within the executor image, which is how it avoids requiring privileged access on your machine. The docker daemon or CLI is not involved.
Running kaniko in a Kubernetes cluster
To run kaniko in a standard Kubernetes cluster your pod spec should look something like this, with the args parameters filled in. In this example, a Google Cloud Storage bucket provides the build context.
You’ll need to mount a Kubernetes secret that contains the necessary authentication to push the final image to a registry. You can find instructions for downloading the secret here.
steps:
 - name: gcr.io/kaniko-project/executor:latest
   args: ["--dockerfile=<path to Dockerfile>",
          "--context=<path to build context>",
          "--destination=<gcr.io/[PROJECT]/[IMAGE]:[TAG]>"]
The kaniko executor image will both build and push the image in this build step.
Comparison with other tools
Similar tools to kaniko include img and orca-build. Like kaniko, both tools build container images from Dockerfiles, but with different approaches and security trade-offs. The img tool builds as an unprivileged user within a container, while kaniko builds as a root user within a container in an unprivileged environment. The orca-build tool executes builds by wrapping runc, which uses kernel namespacing techniques to execute RUN commands. We're able to accomplish the same thing in kaniko by executing commands as a root user within a container.
Conclusion
You can find more documentation about running kaniko in our GitHub repo. Please open an issue if you run into any bugs! If you have any questions or feedback you can also reach out to us in our Google group.
Ten years ago, we announced Google App Engine with a simple video and a blog post. It is truly humbling to look back at the strides we have made with App Engine, how it’s changed application development, and inspired our customers to develop on the cloud and build their businesses on our platform.
As an early member of the engineering team, there are a few key memories that stand out from the early days. I remember the excitement of seeing the first App Engine app crack the 50 qps barrier, followed by the ensuing “uh oh” moment when we realized that it might keep growing. I remember the time someone wanted to acquire one of our hastily-developed demo apps, and also the team meeting shortly after launch when we decided to figure out a way to let customers pay us money. From those modest roots, it’s amazing to see how far we’ve come and to see App Engine’s DNA throughout Google Cloud Platform (GCP).
A decade of digital transformation
Over the past decade, technology has had an impressive influence on our everyday lives—from mobile experiences and ML/ AI technologies, to blockchains and Quantum computing. Today, businesses reach their customers across a number of different web and mobile platforms, in real time.
This fundamental shift in technology means that application developers have a completely different set of requirements today than they did ten years ago: agility, faster time to market, and zero overhead to name a few. Core App Engine concepts like serverless, zero server management, event-driven programming, and paying only for the resources you use are just as relevant today as they were 10 years ago. Businesses have moved away from owning infrastructure resources on-premises to running virtual machines on the cloud, freeing them from managing infrastructure and allowing them to focus on writing code.
How App Engine has evolved
We introduced App Engine with the goal of empowering developers to be more productive. With App Engine, you have the freedom to focus on building great applications, not managing them. That goal was just as important then as it is today.
App Engine and its associated noSQL storage system Datastore started out as a fully managed platform that let developers access the same building blocks that we use to run our own internal applications, and build applications that run reliably, even under heavy load, with large amounts of data at global scale. I want to highlight some of the key innovations that we’ve added to App Engine in the past decade. Click on the below interactive timeline to view some of the highlights:
App Engine was one of the very first investments for GCP—a fully managed serverless platform before businesses really understood the concept of serverless. In ten years, we shipped a lot of features, learned countless lessons, empowered many businesses such as Best Buy, Idexx laboratories, and Khan Academy—and we’re not done yet! App Engine has an exciting future ahead. We’re working on new features, new runtimes and customer driven capabilities that we’re excited to share with you in the coming months. I’m sure the next ten years will be as exciting as the first ten.
If you haven’t already done so, try out App Engine today and share your feedback and comments with the team.
This week we conclude our whitepaper series on migration with the final installment, “Running Your Modern .NET Application on Kubernetes.” If you’re just tuning in, you may want to read the first and second posts on the series, as well as the corresponding whitepapers.
Using the .NET-based PetShop application as an example, the first paper discusses monoliths versus microservices, and how to think about deconstructing a monolith into microservices using domain driven design. The second paper explores modernization techniques using microservices, including using Firebase for authentication, and Cloud SQL for PostgreSQL for our data layer.
By now, we’ve come a long way towards modernizing PetShop, but we aren’t quite to the point where we can consider it “cloud-native.” In this final paper we dive into the missing components of the equation: containerizing PetShop with Kubernetes, and orchestration, including autoscaling with Kubernetes.
Containerizing the application provides speed and agility. In a traditional development and deployment pipeline, there are usually environmental discrepancies—configuration differences between a software engineer’s laptop, test and staging environments, as well as your production environment. Containers allow you to run code in a consistent way across multiple environments.
All that said, containers are not a panacea, and they can be cumbersome to run at scale. Which is why orchestration is imperative. Kubernetes orchestration tools can help you schedule container instances, monitor the health of containers, automate recovery and even automate scaling containers up and down to help handle load.
Are you ready to get started on the last leg of this .NET application modernization journey? Download the whitepaper, and visit the GitHub repository.