We recently updated the iOS and Android quick starts for IMA to make them more streamlined and informative. The new quick starts are done in the style of a code lab - we first provide a sample video player app with no ad integration, then walk you through the steps of adding the IMA SDK to the app. We also provide a completed example if you just want to follow along. If you haven’t yet tried the IMA SDKs for mobile, give our new quick starts a spin and let us know how you like them via our forum.
 - Shawn Busolits, IMA SDK Team
Category Archives: Google Ads Developer Blog
Life of a DFP Video Line Item Part II
In Part I, Chris showed you how to create and traffic a video ad. In Part II, you’ll learn how to get that ad displayed before your video content in Flash, HTML5, iOS, or Android.
The IMA SDK requires you to have an ad tag that points to your ad. An ad tag is a URL that returns a VAST response. The VAST (or VMAP) response contains information about your ad, including tracking URLs, clickthrough destinations, and the media files for the video ad. For more information about VAST, see the IAB website.
If you’re using DFP, the UI can generate an ad tag for you based on your line item and ad unit criteria. To generate the ad tag for your line item, follow these steps.
Now that you have your ad tag, let’s take a look at some of the parameters. We’ll use one of our standard sample tags for this exercise:
sz
Now that you have a basic understanding of your ad tag, it’s time to plug it into your IMA SDK implementation. If you’d like to use a video player with the SDK pre-integrated, we have pre-baked solutions for HTML5, iOS, and Android. If you want to do your own SDK integration, check out the quick start guide for Flash, HTML5, iOS, or Android. In each of the sample implementations, you’ll find a reference to at least one ad tag.
For example, the HTML5 ad tag reference is in ads.js and looks like this:
As always, if you have any questions feel free to contact us via the support forum.
- Shawn Busolits, IMA SDK Team
The IMA SDK requires you to have an ad tag that points to your ad. An ad tag is a URL that returns a VAST response. The VAST (or VMAP) response contains information about your ad, including tracking URLs, clickthrough destinations, and the media files for the video ad. For more information about VAST, see the IAB website.
If you’re using DFP, the UI can generate an ad tag for you based on your line item and ad unit criteria. To generate the ad tag for your line item, follow these steps.
Now that you have your ad tag, let’s take a look at some of the parameters. We’ll use one of our standard sample tags for this exercise:
http://pubads.g.doubleclick.net/gampad/ads?
sz=640x360&
iu=/6062/iab_vast_samples/skippable&
ciu_szs=300x250,728x90&
impl=s&
env=vp&
gdfp_req=1&
output=xml_vast2&
unviewed_position_start=1&
url=[referrer_url]&
correlator=[timestamp]&
scor=[timestamp]
sz
The size of the video ad that you’re requesting.iu
Your “inventory unit” - the ad unit you created in Part I. This is in the format <network_code>/<ad_unit_code path>.ciu_szs
If your ad unit has associated companion ads, their sizes will be listed here.impl
The request mode. Here, “s” for “sync”.env
The environment. Here, “vp” for “video player”.gdfp_req
Indicates that this is a DFP request rather than the legacy Google Ads Manager.output
The type of output you want from your ad request. Typical values are “vast” or “vmap”.unviewed_position_start
Enables delayed impressions for your ad. This ensures that an impression isn’t counted until the ad starts playing.url
The URL of the page requesting ads. This will also be automatically filled in by the SDK.correlator
This randomly-generated value will be filled in by the SDK. It’s used for a number of things, but they all boil down to detecting ad requests that come from the same instance of a page load.scor
Like the correlator, but refreshed when your video stream changes rather than when the page refreshes. Used to detect ad requests that come from the same video stream instance.For more info on these parameters, see this DFP help center article.
Now that you have a basic understanding of your ad tag, it’s time to plug it into your IMA SDK implementation. If you’d like to use a video player with the SDK pre-integrated, we have pre-baked solutions for HTML5, iOS, and Android. If you want to do your own SDK integration, check out the quick start guide for Flash, HTML5, iOS, or Android. In each of the sample implementations, you’ll find a reference to at least one ad tag.
For example, the HTML5 ad tag reference is in ads.js and looks like this:
adsRequest.adTagUrl = “YOUR_AD_TAG_HERE”;Now fire up the sample and request an ad. Voila! You’ll now see the ad you trafficked in Part I serving as a pre-roll to your video content!
As always, if you have any questions feel free to contact us via the support forum.
Source: Google Ads Developer Blog
Monetize your Cocos2d games with AdMob
With more than $1 billion paid to app developers in the last two years, AdMob is committed to supporting industry growth. So we are happy to announce that Cocos2d developers can now easily monetize their games with AdMob!
AdMob has integrated with the AnySDK platform, which means Cocos2d developers who use the AnySDK Ads System can now easily include AdMob when publishing their Android and iOS apps. If you haven’t checked out Cocos2d before, you can learn more here.
Getting started with the AnySDK Framework and AdMob
- If your app isn’t already integrated with AnySDK, download the AnySDK Framework.
- Follow the getting started guide to import the framework.
- Update your app to integrate the AnySDK Ads System. AdMob supports the AD_TYPE_BANNER and AD_TYPE_FULLSCREEN ad types. The games guide discusses the calls that are relevant for AdMob.
- Use the AnySDK package tool so specify AdMob as your desired ad system.
AnySDK package tool
Once you’ve configured your app for ads, the AnySDK package tool is where the magic happens. In the SDK Management section of your app configuration, specify AdMob as your ad provider.

In the Parameter Config section, configure your ad unit IDs for banners and/or interstitials, as well as the size and position for banner ads.
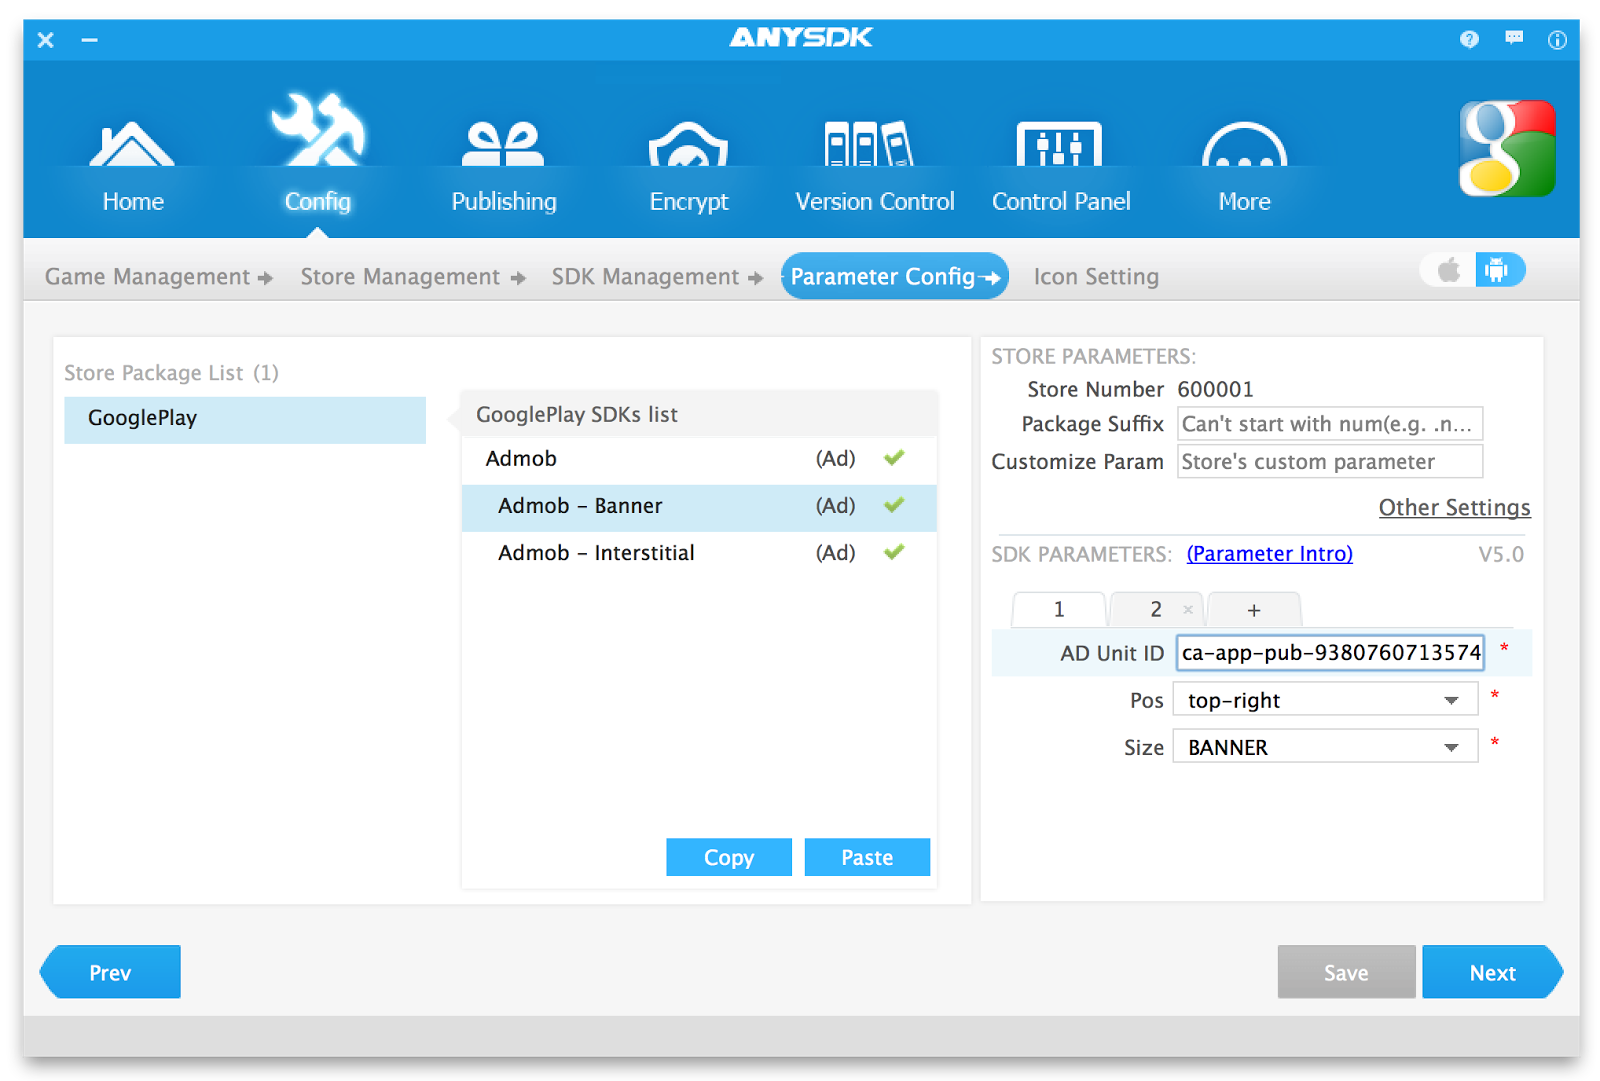
When you reach the Publishing section, simply Browse for your app and select Start.

That’s it! This step will generate the new version of your app with AdMob included!
Where to get help
For help integrating AnySDK into your apps, consult the contact link on AnySDK’s homepage.
We’d also love to get your feedback! Please let us know your experience integrating AdMob into your Cocos2d apps on our developer forum.
![]() - Eric Leichtenschlag, Mobile Ads Developer Relations
- Eric Leichtenschlag, Mobile Ads Developer Relations
Source: Google Ads Developer Blog
AdWords API v201402 Sunset – 2 weeks remaining
We'd like to remind you that the AdWords API v201402 was deprecated on July 9th and will be sunset on November 6th, 2014. With the sunset deadline only a few weeks away, if you haven't already migrated to v201406 or v201409, please do so as soon as possible.
As with each sunset, we have the following resources available for you:
As with each sunset, we have the following resources available for you:
If you have any questions or need help with the migration, please post on the forum or the Ads Developers Plus Page.
 - Danial Klimkin, AdWords API Team.
- Danial Klimkin, AdWords API Team.Source: Google Ads Developer Blog
Life of a DFP Video Line Item Part I
Your DFP network is already serving thousands of image, text, and custom ads. But now you want to start monetizing your video content. This two-part blog post will get you started with video ads. We'll start with creating and trafficking your ad using the DFP API, and then show you how to display it using the IMA SDK.
Before you start
If you're new to video ads, check out this help center article for a little more background. This post shows how to use a VAST redirect creative, so you'll need to host a VAST tag and your video ad before making the creative in DFP. If you just want an example VAST tag to get up and running, you can use the XML here.
Note that this example tag will only return VAST for the first request. Subsequent requests will need to update the correlator timestamp in the URL. The IMA SDK will handle this for you, so there's no problem using this as your example URL.
Creating the video ad unit
If your network doesn't have a video ad unit already, you'll need to create one. Set the fields as you would for any other ad unit, but use a size appropriate for video and the VIDEO_PLAYER environment type.
    Size videoSize = new Size();
    videoSize.setWidth(640);
    videoSize.setHeight(480);
    videoSize.setIsAspectRatio(false);

    AdUnitSize videoAdUnitSize = new AdUnitSize();
    videoAdUnitSize.setSize(videoSize);
    videoAdUnitSize.setEnvironmentType(EnvironmentType.VIDEO_PLAYER);
Making a video creative
Beginning in v201403, you can create and update VAST redirect creatives with the DFP API. If video features are enabled on your network, creating VAST redirect creatives takes just a few lines of code. Let's start by setting some standard creative fields:
    VastRedirectCreative vastRedirectCreative = new VastRedirectCreative();
    vastRedirectCreative.setName("My first VAST redirect creative");
    vastRedirectCreative.setAdvertiserId(advertiserId);
Now set the size of your video to match your AdUnit:
    Size size = new Size();
    size.setWidth(640);
    size.setHeight(480);
    vastRedirectCreative.setSize(size);
Finally, you need to set your VAST XML. For this example, we'll use VAST XML with a linear advertisement. Linear video ads are analogous to television commercials and can play before, after, or in the middle of your content.
    vastRedirectCreative.setVastXmlUrl(vastXmlUrl);
    vastRedirectCreative.vastRedirectType(VastRedirectType.LINEAR);
    Creative[] creatives =  creativeService.createCreatives(new Creative[] {
        vastRedirectCreative});
    Creative masterCreative = creatives[0];
This is your master creative. When working with video, DFP uses CreativeSets which have master and companion creatives. Companion creatives are typically displayed alongside the content video, and tie in with the video ad. The line items you create for video will be associated with a creative set, so you need to create one using your VAST redirect creative as the master. For simplicity, we won't use any companions here.
    CreativeSet creativeSet = new CreativeSet();
    creativeSet.setName("My VAST Redirect Creative Set");
    creativeSet.setMasterCreativeId(masterCreative.getId());
    creativeSet.setCompanionCreativeIds(new long[] {});
    CreativeSet createdCreativeSet =
        creativeSetService.createCreativeSet(creativeSet);
Creating a video line item
Now we need a line item to serve the video creative set. We'll just highlight the differences for video line items here, so if you aren't familiar with creating line items, check out our complete example on GitHub.
In addition to the usual line item fields, you have the option to set position targeting. Using VideoPositionType.PREROLL will target videos where ads can play before the content starts.
    VideoPosition videoPosition = new VideoPosition();
    videoPosition.setPositionType(VideoPositionType.PREROLL);
    VideoPositionTarget videoPositionTarget = new VideoPositionTarget();
    videoPositionTarget.setVideoPosition(videoPosition);
    VideoPositionTargeting videoPositionTargeting = new VideoPositionTargeting();
    videoPositionTargeting.setTargetedPositions(
        new VideoPositionTarget[] {videoPositionTarget});
Video line items can also target content in a variety of ways with ContentTargeting. If your network is connected to a content source you can use your content hierarchies to target a genre, season, or any other hierarchy you configured. If you're unsure of how to get the content metadata hierarchy key IDs, take a look at this example.
    // Create content targeting.
    ContentMetadataKeyHierarchyTargeting contentMetadataTargeting =
        new ContentMetadataKeyHierarchyTargeting();
    contentMetadataTargeting.setCustomTargetingValueIds(
        new long[] {contentCustomTargetingValueId});

    ContentTargeting contentTargeting = new ContentTargeting();
    contentTargeting.setTargetedContentMetadata(
        new ContentMetadataKeyHierarchyTargeting[] {contentMetadataTargeting});
Now add these to the line item's targeting object. Don't forget to set the environment type to VIDEO_PLAYER.
    Targeting targeting = new Targeting();
    targeting.setContentTargeting(contentTargeting);
    targeting.setVideoPositionTargeting(videoPositionTargeting);
    // Target your video AdUnit
    targeting.setInventoryTargeting(inventoryTargeting);

    LineItem lineItem = new LineItem();
    lineItem.setEnvironmentType(EnvironmentType.VIDEO_PLAYER);
    lineItem.setTargeting(targeting);
Make sure to set all the required fields as you would for any other line item, and then create it.
Wrapping things up
Let’s do a quick recap. We now have an AdUnit for a standard video size, our VastRedirectCreative of a matching size in a CreativeSet, and our video LineItem targeted the AdUnit. If your network has a content source connected, you may have targeted certain content as well.
The last step is to create a LineItemCreativeAssociation to connect the CreativeSet with the LineItem.
    LineItemCreativeAssociation lica = new LineItemCreativeAssociation();
    lica.setLineItemId(lineItemId);
    lica.setCreativeSetId(creativeSetId);
    LineItemCreativeAssociation[] licas =
        licaService.createLineItemCreativeAssociations(
            new LineItemCreativeAssociation[] {lica});
Finally, your video ad is ready to serve. The next question is, how do you actually serve it? Stay tuned for the exciting conclusion: Life of a Video Line Item Part II.
![]() - Chris Seeley, DFP API Team
- Chris Seeley, DFP API Team
Source: Google Ads Developer Blog
Improvements to labels in AdWords scripts
We have made the following improvements to labels in AdWords scripts based on your feedback:
 Anash P. Oommen, AdWords Scripts Team
- You can now create and remove account labels using AdWords scripts. You can also apply or remove labels on child accounts under an MCC account.
- You can now retrieve IDs for labels within an AdWords account. This feature comes in handy when you want to limit report results to entities with specific labels, since labels are filtered by label ID. You can see a code snippet here.
Source: Google Ads Developer Blog
IMA SDK for Android Beta 9 Release
Today we're announcing Beta 9 of the IMA Android SDK. This release includes important new API changes to support upcoming alternate IMA SDK ad playback. These changes will prevent your app from compiling so you'll need to make a few code updates using the following guide.
Beta 9 is an optional upgrade; new SDK integrations should use Beta 9 (check out our quick start guide), but your existing apps can upgrade at your discretion. The API changes introduced in Beta 9 will carry over to later IMA Android SDK releases, so if you wish to minimize code changes when the next version of the IMA Android SDK is released, you can make these app code changes now.
Required Changes
- Pause and resume ads with AdsManager
Previously, the SDK did not provide a method to pause/resume the current ad. Beta 9 of the SDK introduces AdsManager.pause() and AdsManager.resume() to control these events. You should no longer directly control the pause/play/resume of ads via your video player. Instead, use the AdsManager methods. In the future, the IMA SDK may play ads with a video player other than your content video player, so utilizing the AdsManager methods now will ensure that ad pause and resume calls are called on the appropriate player. - Change getProgress() to getAdProgress()
The VideoAdPlayer.getProgress() signature has changed; it now explicitly states it's returning the progress of the current ad:
VideoProgressUpdate getAdProgress()
When implementing this method, return VideoProgressUpdate.VIDEO_TIME_NOT_READY if an ad is not playing (for example, if content is playing). Here's a sample getAdProgress method:@Override
public VideoProgressUpdate getAdProgress() {
if (currentVideoIsAd() && currentVideo.getDuration() > 0) {
return new VideoProgressUpdate(
video.getCurrentPosition(), video.getDuration())
} else {
return VideoProgressUpdate.VIDEO_TIME_NOT_READY;
}
} - Return content progress with ContentProgressProvider
For the SDK to automatically schedule ad breaks when ad rules (for DFP) or VMAP playlists are returned in an ad tag, your player should provide the playback progress of your content video. The ContentProgressProvider interface has been introduced to allow the SDK to check on actively playing content. Pass an implementation of ContentProgressProvider to your AdsRequest object via:
AdsRequest.setContentProgressProvider(ContentProgressProvider);
This method should return VideoProgressUpdate.VIDEO_TIME_NOT_READY if content is not playing (for example, if an ad is playing). Here's a sample ContentProgressProvider implementation:@Override
public VideoProgressUpdate getContentProgress() {
if (currentVideoIsContent() && currentVideo.getDuration() > 0) {
return new VideoProgressUpdate(
video.getCurrentPosition(), video.getDuration());
} else {
return VideoProgressUpdate.VIDEO_TIME_NOT_READY;
}
}
Why should I update to Beta 9?
In addition to bug fixes, Beta 9 of the SDK introduces important changes to clarify some API intentions and to, in a later release, allow the SDK to use an SDK-managed video player to play ads when it would improve the ad viewing experience for certain environments and ad types.Beta 9 is an optional upgrade; new SDK integrations should use Beta 9 (check out our quick start guide), but your existing apps can upgrade at your discretion. The API changes introduced in Beta 9 will carry over to later IMA Android SDK releases, so if you wish to minimize code changes when the next version of the IMA Android SDK is released, you can make these app code changes now.
Other changes in Beta 9
- Beta 9 also introduces Ad.getTitle, Ad.getDescription, and Ad.getContentType.
- Adds information about ad pod position to the ad UI; for example, "Ad 1 of 4: (0:13)".
- Bug fixes
Download IMA Android SDK Beta 9
You can get this latest release of the IMA Android SDK from our IMA SDK downloads page.Other questions?
As always, feel free to drop us a line on the IMA SDK forum and follow our Google+ page for other announcements and updates.Source: Google Ads Developer Blog
IMA SDK for iOS Beta 8 Release
This week we released Beta 8 of the IMA SDK for iOS (not to be confused with support for iOS 8 -that was added in the previous release, Beta 7). This release adds a new object, IMAUIElements, which allows you to customize which parts of the ad UI are shown while an ad is playing. Currently, this customization is limited to the countdown timer and ad attribution. By default, all available UI elements will be displayed by the SDK. We anticipate another iOS SDK release shortly; unless you plan on taking advantage of this new functionality immediately, we recommend hold off on upgrading until we release Beta 9 in the coming weeks.
To configure the ad UI, modify the members of the uiElements property on the adsRenderingSettings like so:
This configuration will not always be honored; some ad formats (e.g. AdSense and YouTube-hosted ads) require that certain UI elements be displayed. Also note that displaying the countdown timer requires ad attribution - if you want to display a countdown timer, you must also display ad attribution. You can check which UI elements are being displayed by using the uiElements property of the IMAAd object tied to the STARTED event.
As always, if you have any questions feel free to contact us via the support forum.
To configure the ad UI, modify the members of the uiElements property on the adsRenderingSettings like so:
- (void)adsLoader:(IMAAdsLoader *)loader
    adsLoadedWithData:(IMAAdsLoadedData *)adsLoadedData {
  self.adsManager = adsLoadedData.adsManager;
  // …
  self.adsRenderingSettings = [[IMAAdsRenderingSettings alloc] init];
  // Show no attribution or countdown timer.
  self.adsRenderingSettings.uiElements = @[];
  // Or, show only ad attribution.
  self.adsRenderingSettings.uiElements = @[kIMAUiElements_AD_ATTRIBUTION];
  // Or, show both countdown timer and ad attribution.
  self.adsRenderingSettings.uiElements =
      @[kIMAUiElements_AD_ATTRIBUTION, kIMAUiElements_COUNTDOWN];
  // ...
  [self.adsManager initializeWithContentPlayhead:self.contentPlayhead
                           adsRenderingSettings:self.adsRenderingSettings];
}
This configuration will not always be honored; some ad formats (e.g. AdSense and YouTube-hosted ads) require that certain UI elements be displayed. Also note that displaying the countdown timer requires ad attribution - if you want to display a countdown timer, you must also display ad attribution. You can check which UI elements are being displayed by using the uiElements property of the IMAAd object tied to the STARTED event.
As always, if you have any questions feel free to contact us via the support forum.
Source: Google Ads Developer Blog
Sunset of DFP API v201311 and earlier, and the removal of ClientLogin
This is a friendly reminder that, on February 27, 2015, we will sunset DFP API versions v201311, v201308, and v201306. At that point, requests to these versions will fail. We'll also remove them from our online documentation and the client libraries. If you are currently using one of these versions, this is an excellent time to begin migrating to a supported version. See the release notes for a list of the many new features in our recent API versions.
Going forward, all DFP API versions will follow a consistent deprecation schedule: versions will be supported for one year, deprecated for one quarter, then sunset. This means each of our quarterly API versions will be available for 15 months from the time of release. This deprecation schedule enables us to spend more time improving the latest versions with new features.
Note that v201311 is the last version that supports ClientLogin, which was officially deprecated across all of Google on April 20, 2012. If your application is not yet using OAuth2, you must migrate before Feb 27, 2015.
If this task seems daunting, don't fret, we have you covered. On our Developer page, we have a helpful OAuth2 guide to make sure the transition is as smooth as possible. As an added reason to switch, the DFP API now supports OAuth2 service accounts. You can add service account users directly in the DFP UI. For more information, see here for a guide on how to use a service account user with the DFP API.
If you have any feedback or comments about this deprecation, or the API in general, please feel free to leave them on our forum.
Source: Google Ads Developer Blog
New to the AdWords API: excluding headers and summary data from reports
Do you save your AdWords API reports to a database? Do you have code that detects and skips header and summary rows? If the answer to these questions is "why yes, I do!", then you'll be happy to hear that in AdWords API v201409 you can modify your report requests so that the returned results will not include these rows.
 - Josh Radcliff, AdWords API Team
Excluding the report header
Prior to v201409, the output of each AdWords report included a header that gave the name of the report and the date range in your predicates:"KEYWORDS_PERFORMANCE_REPORT (Sep 21, 2014-Sep 27, 2014)"
If you do not want this row in your report results, include the new skipReportHeader HTTP header with a value of true.
Total, --, --,44700
If you don't want this row in your report results, include the new skipReportSummary HTTP header with a value of true.
Note: If you do not include these headers or specify a value of false for both headers, your report results will include the header and summary rows, just as they did for prior versions of the AdWords API.
For more details, check out our updated Reporting Basics guide. Still have questions? Feel free to visit us on the AdWords API Forum or our Google+ page.
If you do not want this row in your report results, include the new skipReportHeader HTTP header with a value of true.
Excluding the report summary
Similar to the header, each AdWords report for versions prior to v201409 returned a summary row with totals in its final row of output:Total, --, --,44700
If you don't want this row in your report results, include the new skipReportSummary HTTP header with a value of true.
Note: If you do not include these headers or specify a value of false for both headers, your report results will include the header and summary rows, just as they did for prior versions of the AdWords API.
For more details, check out our updated Reporting Basics guide. Still have questions? Feel free to visit us on the AdWords API Forum or our Google+ page.