Author Archives: Maps Devel

Map Tips: Get started with autocomplete


Editor’s note: ‘Map Tips’ are designed to answer frequently asked questions about Google Maps APIs. For important tips on how to deploy Google’s mapping tools, read more from David McClusky, Google Maps Solutions Architect at Google.

One of the most familiar features of Google Maps is autocomplete, Google’s ‘type ahead’ functionality. Autocomplete reduces errors in entries and provides a better search experience for the user. This functionality is included in both our web and mobile Google Places API libraries, however many developers tend to overlook it when building their own mapping applications.
You can greatly enhance your application’s user experience by providing Autocomplete functionality for both address input, points of interest, and search terms. The Google Places Autocomplete API is available in the Places Javascript API, as a web service, in the Places API for Android, and coming soon in the Places API for iOS.

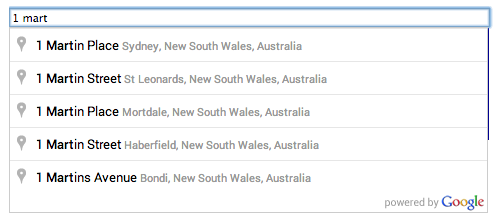
Here are some easy steps to help you get started with Autocomplete on your website, using the Javascript version of the Places API.

Step 1 - You need to specifically include the Places library when loading the Google Maps Javascript API. To do this, you will need to load the Google Places library using the libraries parameter in the bootstrap URL for the Google Maps JavaScript API. Be sure to replace API_KEY in the example with your Maps API key.

<script type="text/javascript"
src="https://maps.googleapis.com/maps/api/js?libraries=places&key=API_KEY">
</script>

Step 2 - Create a text box on your page for the user’s input. After you have a text box, you start the autocomplete service and attach it to that text box. You can set a variety of options, such as restricting the results to cities only, as in this example.

HTML:
<input id="search" type="text">

JavaScript:
var autoComplete = new google.maps.places.Autocomplete(   
document.getElementById(search), {
  types: ['(cities)']
});
Step 3 - Add an event listener to the text box that fires when a result is selected. You can then handle the results. In this example, we pan and zoom the map to the location entered by the user.

JavaScript:
google.maps.event.addListener(autoComplete, 'place_changed', function() {
  var place = autocomplete.getPlace();
  if (place.geometry) {
     map.panTo(place.geometry.location);
     map.setZoom(15);
  } 
});
That’s all there is to it.

Tips for Improving the Autocomplete Experience
There are many additional features to make Autocomplete an even better experience on your website. Here are some tips to make the most out of autocomplete:

  • Improve the experience by biasing the results to a particular geographic area, such as the map viewport, or restricting the search to a particular country. This will insure that the results most relevant to your users are surfaced first.
  • You can style the autocomplete results by defining your own custom styles, to match the look and theme of your website. View the styling documentation here.
  • Combine with other Places API features, such as Nearby Search, to provide an all-in-one local search experience, complete with nearby point of interest listings and business photos.
  • Need to call Autocomplete from a server? Use the Google Places Autocomplete web service.
  • Want to autocomplete on search terms, rather than just place names? Use the Query Autocomplete web service or Javascript SearchBox.

Building a mobile app?
The Google Places API for Android can provide a great Autocomplete experience for address entry in your mobile application. Take a look at the developer documentation as well as a complete sample application on GitHub.

Get Started
We hope you’re able to incorporate the Autocomplete capabilities into your website or mobile application. Get started with Autocomplete today by visiting the following resources:


Posted by David McClusky, Google Maps Solutions Architect

    Arrowpointe Gives Sales Teams Visual Customer Data with Google Maps APIs


    Editor's note: Today’s guest blogger is Scott Hemmeter, CEO and founder of Arrowpointe, a company that creates applications for Salesforce customers. See how Arrowpointe and other developers are using the Google Maps APIs to bring maps and location content to their users.

    Maps and data go well together, and we’ve built our business on that premise. We developed an application called Geopointe to help companies map their Salesforce.com database to visualize location information, gain spatial insights and boost productivity—directly from within Salesforce. For example, a salesperson on the road can connect to the application on her mobile device and view, on a Google Map, all of her highly rated accounts in Salesforce that are within a 30-mile radius of where she’s standing. She can then get directions between these locations to plan her meetings and make most efficient use of her time.

    Geopointe adds a map tab to Salesforce and uses Google Maps as the interface into Salesforce data. Our pages, both web and mobile, are HTML5 based, served by Salesforce’s Visualforce technology and heavily use client-side JavaScript to provide the user experience. The Google Maps JavaScript API is used to interact with the map.

    The flexibility of the Google Maps API enables our users to pull in data from other sources in the KML format and then layer it on the screen. For example, we have an agricultural customer who uses it to pull in drought information. If they’re working with farmers in Arizona, they can see the conditions in any location in the state.

    We also use the drawing tools in the Google Maps APIs to build a shape library that makes the app more useful within specific geographic areas. Users can define a space on their map, then pull information within the confines of that particular area. We collect data — like the boundaries of San Francisco neighborhoods — and host it ourselves in the GeoJSON format. We built an API to get GeoJSON data to Geopointe, which then uses the Google Maps APIs to put it on the map.

    We chose Google Maps because business users rely on it. They want Google’s directions, Street View and Satellite View. Data is a valuable resource for Salesforce customers, and Google Maps is a great way to provide it. Google Maps lets our customers visualize data to make better use of it in their day to day operations. It’s one thing to see information in a list, report or sorting table, but once someone sees data pictured on a map, they say, “Now I know what I need to do.”

    Map Tips: Getting Your App Production Ready with Premium Google Maps APIs


    Editor’s Note: ‘Map Tips’ are designed to answer frequently asked questions about using Google Maps APIs. For important tips on how to deploy Google’s mapping tools, read more from Brad Songer, Google Maps Program Manager.

    We find that when developers are migrating their applications from their development environment to production, many are moving from using our free Maps APIs to Google’s premium APIs. Premium Google Maps APIs are covered by the premium Service Level Agreement which includes higher quota limits and access to premium/live support channels. Here are some important tips to help you get started with our premium products.

    Implementing your Client ID
    Your unique Client ID comes with the Google Maps APIs Welcome Letter. The Welcome Letter is typically sent to your technical contact. If you did not receive your welcome letter, you can also visit the Google for Work Support Portal, which will provide you with your Client ID.

    Your Client ID is how Google identifies you—and your application—as a licensed customer entitled to a premium Service Level Agreement from Google.

    There are only a few, simple steps to make sure your application is leveraging these advantages as it moves into production. Essentially, your Client ID will replace the Project Key previously used in the applications API calls to Google’s servers while in development. The example below illustrates the before-and-after scenario using the Client ID, ‘gme-droidsdonuts'.

    Chrome Developer Tools make it easy to visually review your application’s HTML to check that your Client ID is deployed, or that you haven’t missed replacing any Project Keys in API calls. The Google for Work Support Portal provides another great reference by displaying a record of pageviews and web service calls made by your Client ID. Between Chrome Developer Tools and the Google for Work Support Portal, you have two great ways to verify your application is launching with a premium SLA.

    Authorizing Domains
    To protect your projects and applications, Google will always validate your API calls to ensure only authorized domains are using your Client ID. Any API calls from an unauthorized domain will return an error and not count against your quota.

    You can review authorized domains (e.g. yourbiz.com), and authorize additional domains (e.g. yourpartnerbiz.com) at any time through the Google for Work Support Portal. If you run into authorization problems, check out our troubleshooting guidelines or contact support for help.
    FDc9njsgOw.png
    Authenticating Web Service Requests with a Crypto Key
    In addition to your Client ID, calls to Google Maps Web Service APIs (Geocoding, Directions, Distance Matrix, Elevation, Time Zone, and Roads) require an extra layer of authorization with a cryptographic signing key. The ‘crypto key’ ensures that Web Service API request that include your Client ID and an authorized domain, in fact, are originating from a trusted source.

    Keep in mind the crypto key alone is not a signature, but simply generates signatures. Like a password, it should never be shared or left in a vulnerable area where it can be copied. To learn more, please visit the Authentication and Authorization page.

    You’re All Set
    Now that you've deployed your Client ID, set-up authorized domains, and you’re generating unique signatures using your crypto key, you're ready to launch your app with increased quotas, the confidence of a business friendly SLA and support. If you have more questions, take a look at our developer documentation, where you’ll find product-related FAQs, articles and other resources.

    If you hit a technical snag with our APIs, please file a case with our live support team. We’ll address your deployment problem as quickly as possible. For a step-by-step tutorial on replacing your project key with your Client ID, take a look at our video.

    Interactive Data Layers in the JavaScript Maps API


    Editor's Note: Joshua Lau studies Computer Science and Mathematics at the University of New South Wales, Australia. He has spent the past summer interning on the Google Maps JavaScript API v3 team in Sydney. He’s had lots of fun enabling users to edit, drag and create Data layer Features on Maps.

    Today we’re introducing new features to the Data Layer that will make it easy for you to allow users to input and edit geographic data and get the updated data in GeoJSON format. Geographical data make maps interesting, informative and useful for users. For example, interactive Data Layers can be used to gather user opinions on the best places to visit and easily build heatmaps based on popular hotspots by using a Styling Function on the Data Layer. Or perhaps you could build a real estate site that allow users to draw Polygons to describe the areas that they do and don’t want to live in. The possibilities are endless.

    Previously, we introduced Data Layers in the JavaScript Maps API v3, enabling you to visualize custom geographical data features on your maps and style them based on their attributes. You could also import and export data onto Data Layers in the popular GeoJSON format. For details, see the Developer’s Guide to the Data Layer.

    Graphically Edit a Data Layer
    You can allow users to edit a Data Layer by setting the draggable and editable styling options. Using the existing toGeoJson() method, you’ll also be able to easily extract the updated Data Layer in GeoJSON format.

    Users can also draw new Points, LineStrings and Polygons. You can enable this behaviour by specifying a list of drawing controls. See editing and drawing in action below.

    map.data.setStyle({draggable: true, editable: true});
    map.data.setControls(['Point', 'LineString', 'Polygon']);
    data layer drawing.png
    Editing a polygon
    Use the Simple GeoJSON Editor
    To showcase these new features, we’ve built a Simple GeoJSON Editor that lets users import GeoJSON via drag and drop, edit it, and export. Play with it, and take a look at the source to see how it’s done.
    GeoJSON editor.png
    Adding some extra points using the app

    Display Geodesics in the Data Layer
    As an added bonus, we’re also rolling out the ability to display Line String and Polygon geometries geodesically (their edges follow the curvature of the Earth). This can be enabled by setting the geodesic styling option on the respective Data Layer.
    geodesic.png
    The shortest route from San Francisco to London is via Greenland

    If you’d like to know more, head over to our API Reference. We’d love to hear about the exciting new apps you’re building with the new features in the Data layer. Feel free to share them in the comments below. Have fun!

    Sun Surveyor brings augmented reality to photographers using Google Maps APIs

    Posted by Adam Ratana, developer of Sun Surveyor

    Editor’s note: Today’s guest blogger is Adam Ratana, developer of Sun Surveyor. Read how Sun Surveyor is using Google Maps APIs to help photographers capture the perfect photo.

    I’m a photography enthusiast, and I’m always looking for ways to improve my work. That’s what led me to develop Sun Surveyor, an iOS and Android app that uses Google Maps APIs to visualize the location of the sun and the moon anywhere in the world. The app makes it easy to figure out when the natural lighting will be just right — and get the ideal shot.

    Sun Surveyor uses augmented reality to overlay the paths of the sun and moon on a camera’s view, so you can see where in the sky they’ll be at a specific time and place. Photographers can use it to plan their shots ahead of time, and businesses can use it to gauge things like how best to align solar panels to make the most efficient use of the angle of the sun.

    The app uses multiple Google Maps APIs, including the Elevation API, the Time Zone API, the Google Maps SDK for iOS and the Google Maps Android API. The Android API, which includes Street View, was particularly helpful. It allowed me to overlay the path of the sun and moon on any Street View location anywhere in the world. For programming details, see this blog post.

    The following screen captures give you a sense of how the app works. They show overlays on top of the iconic Half Dome in Yosemite National Park. The first shows the paths of the sun (yellow line) and moon (blue line) over an aerial view of Yosemite Valley. The green line shows the distance between the photographer and the object to be photographed — in this case, Half Dome.
    This next screen capture shows how the app looks when in Street View mode. Again, the yellow line shows the sun’s path, and the blue line shows the moon’s path. The green line represents the horizon. You can see how the app lets you plan the right time to get a shot of the sun behind Half Dome: in this particular instance, 8:06 am.

    Nearly 500,000 people around the world have downloaded the free version of Sun Surveyor, and many have paid for the full edition. They’re taking remarkable photos as a result, and what started as a hobby for me has turned into a business — thanks to Google Maps APIs.

    Map Tips: Build a Great Store Locator


    Editor’s Note: ‘Map Tips’ are designed to answer frequently asked questions about using Google Maps APIs. For important tips on how to deploy Google’s mapping tools, read more from David McClusky, Solutions Architect at Google.

    Since the launch of Google Maps APIs, developers have built useful maps to help consumers find nearby stores. Almost ten years later, store locators continue to be a primary use case for our mapping tools, but we think there’s even more developers can do with our APIs.

    Here are seven helpful tips for building a beautiful, user-friendly store locator for your customers:

    1. Use Autocomplete for address entry. Autocomplete is a feature of the Places library in the Google Maps JavaScript API. You can use autocomplete to give your applications the type-ahead-search behavior of the Google Maps search field. When a user starts typing an address, autocomplete will fill in the rest. The Google Places API provides a search box widget with this functionality so there’s no need to parse inaccurate user entries.

    2. Provide a ‘Signed-in’ experience. With Attributed Save, your visitors can save your store locations to view on other maps throughout the web, such as maps.google.com, and link back to your site when selected. When you enable sign-in with the Google Maps JavaScript API, your users will have a map tailored to them which means their saved locations (e.g. home and work) will show also on your map.

    3. Automatically locate your customers using HTML5 Geolocation. When a user arrives at a store locator page, they typically want to find a store as quickly as possible. HTML5 Geolocation gives you the ability to immediately identify the location of the user and automatically present the nearest store locations within her area. Making store location as efficient and simple as possible means customers can find what they are looking for quickly and ultimately arrive at one of your stores sooner.
    A great example of Geolocation is the 'Find FedEx Locations' on the FedEx website. The closest store locations are automatically displayed when the user starts searching for a FedEx location near them.

    4. Provide a Street View image of your store exterior. Using the Google Street View Image API, you can help guide customers to your door by providing an image of your storefront and adjacent area. The Walgreens App has integrated Google Street View with its Store Locator feature, making it easier than ever for Walgreens customers to get in, get out and get on with their day. With the updated Store Locator feature, customers can easily find a Walgreens, access store details and view the store location up close.

    5. Sort results by actual driving distance. Typically, store locator databases will provide an ‘as the crow flies’ distance when performing a spatial search. In some instances this can be misleading. After performing your database search, you can re-sort the results using the Distance Matrix Service to obtain actual driving distances. In addition, you can provide the actual driving or transit directions right on your map using the Directions Service, so customers do not need to leave your application.

    6. Use a large, stylized map as the focus of your application. People think visually and spatially, so a stylized map should be the focus point of your store locator. To improve the effectiveness of your map visualization, consider using dynamic elements such as automatically highlighting markers of selected stores, or setting the zoom level automatically to capture all your markers. You can also use styled maps to customize the presentation of the standard Google base maps to align with your store brand or visuals.
    When a user selects 'Find Us' on the Tesla website, the first thing he sees is a large map automatically displaying all Tesla locations in his area.

    7. Let the map drive the search experience. Allow your users to find additional store locations as they navigate the map. Introduce an event listener on the map idle event to fetch stores whenever the user pans or zooms the map around. This creates a more interactive and engaging experience for the user by not requiring text input to refine their search.

    To get started quickly with some sample code, take a look at the Store Locator Library for the Google Maps API, which includes a fully-implemented store locator example with many of the above features included.

    We hope you’re able to incorporate some of these store locator tips into your customer experience. Learn more about what Google Maps APIs can do for websites and applications.


    Dash provides real-time diagnostics for your car using Google Maps APIs


    Editor’s note: Today’s guest blogger is Brian Langel, Co-Founder and CTO of Dash. Read how the connected driving company, Dash, is using the Google Maps APIs in their real-time auto diagnostics app.

    Dash provides real-time diagnostics for your car—think of it as Fitbit for automobiles. Our app connects to a car’s on-board diagnostics system and gathers information that can help you become a safer driver while saving you time and money. You can also use it to get accurate estimates for repairs and share your driving experiences with friends.
    We use the Google Maps Roads API to reconstruct and visualize trips, so users can revisit where they’ve driven and share their trips with others. When we launched the Dash app in February 2014, the Roads API wasn’t yet available. We used reverse geocoding to turn GPS coordinates into visual routes. Users had two options: GPS polling every few seconds, which drained phone battery but resulted in better accuracy; or less-frequent polling, which saved battery life at the expense of accuracy.

    Below you can see the reconstruction in action. On the left in blue is the route calculated with GPS information gathered by the app every eight to 30 seconds. On the right in blue is the route reconstructed using the Roads API. Note that the reconstructed route shows that the car took a main road, which Google Maps shows in orange in the left screenshot. The orange isn’t visible in the right screenshot because the blue line sits on top of it.
    We started using the Roads API as soon as it was available. It was a no-brainer, since we’re a small startup without the resources to build a database that matches GPS coordinates to road locations. The comprehensiveness of the Roads API allows us to map all road locations in the US. Now that our app uses data from the Roads API, users don’t need to sacrifice their phone’s battery life to get an accurate route history. The app polls a phone’s GPS once every eight to 30 seconds, then strings the coordinates together using reverse geocoding and the Roads API.

    We do this route reconstruction by telling the Roads API to match a trip’s GPS coordinates to specific road locations. Here’s an example of this code:
    String url = String.format("%s%s&interpolate=true&key=%s", GOOGLE_ROADS_SNAP_URL,
                              pathEncoded, roadsKey);
    ClientResponse response = client.resource(URI.create(url))
                                    .accept(MediaType.APPLICATION_JSON_TYPE)
                                    .get(ClientResponse.class);
    if (!isSuccess(response)) {
     return handleFailure(response);
    }
    SnappedRoute snappedRoute = response.getEntity(SnappedRoute.class);
    if (snappedRoute.getSnappedPoints() == null) {
     return Optional.absent();  
    }
    List snapped = convert(snappedRoute.getSnappedPoints());
    Since launching our app, we’ve tracked millions of trips for our nearly 200,000 users. With the Roads API, we’ve given them more accurate histories of their routes and improved battery life. We’re looking to expand our use of the Roads API by getting speed limit information so drivers can use the app to better manage fuel efficiency and compare their actual speed with the legal limit. This is just one of the new features we’re considering as we think about ways to help people drive smarter.

    Open Google Maps from your iOS app


    If you're an iOS developer, you're probably aware that you have the ability to open some apps directly by taking advantage of their custom URL schemes. (And if you're not aware of that fact, I have an excellent set of videos to recommend to you!)

    Of course, we wouldn't be telling you all of this on the Google Geo Developers blog if it weren't for the fact that you can also use the comgooglemaps:// custom URL scheme to open up a map, Street View, or direction request directly in Google Maps on iOS.
    Constructing these URLs, however, isn't always easy -- I don't know about you, but I don't spend a lot of my time memorizing key/value pairs for URL arguments. And adding x-callback-url support, while super useful for redirecting users back to your app, means adding even more URL arguments and escaping. And because not everybody has Google Maps installed on their iOS device, you may also want to build URLs to open up Apple Maps, which have their own similar-but-slightly different set of URL arguments.

    It was one of those situations that made me say, "Hey, somebody should write a utility to make this easier." And that's how, a few months later, we ended up publishing the OpenInGoogleMapsController for iOS.

    OpenInGoogleMapsController is a class that makes it easy to build links to open a map (or display Street View or directions) directly in Google Maps for iOS. Rather than creating URLs by hand, you can create map requests using Objective-C classes and types, so you can take advantage of all the type-checking and code hinting you've come to expect from Xcode.

    For instance, if you needed biking directions from Sherlock Holmes' apartment on Baker Street to Scotland Yard, your request might look something like this:

    GoogleDirectionsDefinition *definition = [[GoogleDirectionsDefinition alloc] init];
    definition.startingPoint =
           [GoogleDirectionsWaypoint waypointWithQuery:@"221B Baker Street, London"];
    definition.destinationPoint = [GoogleDirectionsWaypoint
           waypointWithLocation:CLLocationCoordinate2DMake(51.498511, -0.133091)];
    definition.travelMode = kGoogleMapsTravelModeBiking;
    [[OpenInGoogleMapsController sharedInstance] openDirections:definition];

    My favorite feature about this utility is that it supports a number of fallback strategies. If, for instance, you want to open up your map request in Google Maps, but then fallback to Apple Maps if the user doesn't have Google Maps installed, our library can do that for you. On the other hand, if it's important that your map location uses Google's data set, you can open up the map request in Google Maps in Safari or Chrome as a fallback strategy. And, of course, it fully supports the x-callback-url standard, so you can make sure Google Maps (or Google Chrome) has a button that points back to your app.

    Sound interesting? Give it a try. Just add a couple of files to your Xcode project, and you're ready to go. Feel free to add issues or enhancements requests you might encounter in the GitHub repository, and let us know if you use it in your app. We'd be excited to check it out.

    Hello Places API for Android and iOS!


    People don’t think of their location in terms of coordinates on a map. They want context on what shops or restaurants they’re at, and what’s around them. To help your apps speak your users’ language, we’re launching the Places API for Android, as well as opening a beta program for the Places API for iOS.

    The Places API web service and JavaScript library have been available for some time. By providing native support for Android and iOS devices, you can optimize the mobile experience with the new APIs by taking advantage of the device’s location signals.

    The Places APIs for Android and iOS bridge the gap between simple geographic locations expressed as latitude and longitude, and how people associate location with a known place. For example, you wouldn’t tell someone you were born at 25.7918359,-80.2127959. You’d simply say, “I was born in Jackson Memorial Hospital in Miami, Florida.” The Places API brings the power of Google’s global places database into your app, providing more than 100 million places, like restaurants, local businesses, hotels, museums, and other attractions.

    Key features include:
    • Add a place picker: a drop-in UI widget that allows your users to specify a place
    • Get the place where the user is right now
    • Show detailed place information, including the place’s name, address, phone number, and website
    • Use autocomplete to save your users time and frustration typing out place names, by automatically completing them as they type
    • Make your app stand out by adding new places that are relevant to your users and seeing the places appear in Google's Places database
    • Improve the map around you by reporting the presence of a device at a particular place.

    To get started with the Places API for Android, watch this DevByte, check out the developer documentation, and play with the demos. To apply for the Places API for iOS beta program, go here.

    UNIT9 brings the world of Kingsman: The Secret Service to life with Google Maps APIs

    Post Text

    Editor’s note: Since the launch of Google Maps ten years ago, maps have come a long way. To celebrate a decade of map innovation, we’re highlighting unique applications built by our developer community. Hear from Dan Edgar, Developer at digital creative production company UNIT9, and see how they’re using the Google Maps APIs to create an interactive experience for the new movie Kingsman: The Secret Service.

    Many people dream about being an undercover agent on a top secret mission. With the help of the Google Maps APIs, our team at Unit 9 is making that possible for the fans of the new movie Kingsman: The Secret Service.

    Become a Kingsman is an immersive online and mobile experience, which challenges players to prove they’re knight-worthy by completing a series of interactive games. Created as a way to promote the movie, players can use their smartphones as multi-purpose spy gadgets and interact directly with the Kingsman characters. In the second mission, which uses the Street View Image API, the phone serves as a compass for navigating King’s Cross. As they explore their surroundings, players locate potential targets and interrogate them for crucial intelligence.


    To blend modern-day London with the film’s universe, we used the Google Maps Javascript API and Street View Image API. We used real images of the King’s Cross railway station from the Street View API, then inserted Kingsman characters for players to discover and interrogate. We created custom Street View panoramas using high-resolution base images of the characters and added these retouched images to views of King’s Cross. To create a full tile set for each panorama, we wrote an export script in Photoshop, allowing players to zoom into the game at different levels without sacrificing quality.


    Our team built a custom user interface, enabling us to design navigation arrows and other visual elements that fit with the Kingsman experience. To achieve this interface, we positioned it over the Street View object using the panorama ID of adjacent Street View imagery and found the IDs by setting a small radius value in google.maps.StreetViewService.getPanoramaByLocation and including the ID in google.maps.StreetViewPanorama.setPano. We then grouped our markers into sets for each stage of the mission — the introduction, search and escape — and positioned each set using data loaded from an external JSON. Finally, we used google.maps.marker.setVisible to hide markers outside the current stage.


    Working with Google Maps APIs opened up new creative possibilities for us. By adding custom elements to Street View, we were able to create a new world — one that people could easily jump into and explore.