Tag Archives: Guest Post

Contributing to the AMP Project

This is a guest post by Adam Silverstein who was recently recognized through the Google Open Source Peer Bonus Program for contributions to the AMP Project. We invited Adam to share about his work on our blog.

I started my web career building websites for small businesses on WordPress, so when I decided to begin contributing to open source, WordPress was a natural place to start.

Now I work at the digital agency 10up, where I am a part of our open source team. We build popular sites like FiveThirtyEight where having the best possible AMP experience is critical. However, bringing FiveThirtyEight’s AMP version up to parity with the site’s responsive mobile experience was challenging, in part because of advanced features that aren’t directly supported in AMP.

One of those unsupported features was MathML, a standard for displaying mathematical formulas on the web. To avoid a clumsy work around (amp-iframe) and improve our presentation of formulas, I proposed a native `amp-mathml` component which could display formulas inline. Contributing improvements “upstream” to open source projects – especially as we encounter friction in real-world projects – is a core value at 10up and important to the health of the web. I expected that I could leverage the same open source MathJax library we used on the responsive website for an AMP implementation. Contributing this component would strengthen my understanding of AMP’s internals while simultaneously improving a client site and enabling the open MathML standard on any AMP page. Win, win, win!

I started by opening an issue on Google’s amphtml repository, describing MathML and proposing a native `amp-mathml` component. Justin Ridgewell from the AMP team immediately responded to the issue and asked Ali Ghassemi to track it. I offered to help write the code and received an enthusiastic response, encouraging me and assuring me that the team would be available on GitHub and in Slack to answer any questions.

This warm welcome gave me the confidence to dive in, but ramp up was daunting. The build tools and coding standards were quite different from other projects I work on and setup required some editor reconfiguring and reflex retraining. Getting the unit test to run on my system required tracking down and installing some missing dependencies.

Fortunately, AMP’s project documentation is thorough, and Ali guided me through the implementation, pointing me to existing, similar samples in the project. I already knew how to use JavaScript to render formulas with MathJax – my challenge was building an AMP component that ran this code and displayed it inline.

After a few days of concerted effort, I built a proof of concept and opened a pull request. The real fun began as I refined the approach and wrote documentation with help from the team. The team’s active engagement helped the process move along rapidly. Amazingly, the pull request was merged one week later, and today amp-mathml is live in the wild. FiveThirtyEight is already using the new, native implementation.

From opening the issue all the way to the merge of my pull request, I was impressed by the support and encouragement I received. Ali and honeybadgerdontcare provided regular reviews and thorough suggestions on the pull request when I pushed iterations. Their engagement throughout the process made me and my work feel valued, and helped me stay motivated to continue working on the feature.

Adding MathML to AMP reminded me why I find so much joy and professional growth in contributing to open source projects. I have a better understanding of AMP from the inside out, and I was welcomed into the project’s community with wide open arms. I'm proud of my contribution, and ready to tackle new challenges after seeing its success!
 
By Adam Silverstein, AMP Project contributor

My first open source project and Google Code-in

This is a guest post from a mentor with coala, an open source tool for linting and fixing code in many different languages, which participated in Google Code-in 2017.

About two years ago, my friend Gyan and I built a small web app which checked whether or not a given username was available on a few popular social media websites. The idea was simple: judge availability of the username on the basis of an HTTP response. Here’s a pseudo-code example:
website_url = form_website_url(website, username)
# Eg: form_website_url('github', 'manu-chroma') returns 'github.com/manu-chroma'

if website_url_response.http_code == 404:
username available
else:
username taken
Much to our delight, it worked! Well, almost. It had a lot of bugs but we didn’t care much at the time. It was my first Python project and the first time I open sourced my work. I always look back on it as a cool idea, proud that I made it and learned a lot in the process.

But the project had been abandoned until John from coala approached me. John suggested we use it for Google Code-in because one of coala’s tasks for the students was to create accounts on a few common coding related websites. Students could use the username availability tool to find a good single username–people like their usernames to be consistent across websites–and coala could use it to verify that the accounts were created.

I had submitted a few patches to coala in the past, so this sounded good to me! The competition clashed with my vacation plans, but I wanted to get involved, so I took the opportunity to become a mentor.

Over the course of the program, students not only used the username availability tool but they also began making major improvements. We took the cue and began adding tasks specifically about the tool. Here are just a few of the things students added:
  • Regex to determine whether a given username was valid for any given website
  • More websites, bringing it to a total of 13
  • Tests (!)
The web app is online so you can check username availability too!

I had such a fun time working with students in Google Code-in, their enthusiasm and energy was amazing. Special thanks to students Andrew, Nalin, Joshua, and biscuitsnake for all the time and effort you put into the project. You did really useful work and I hope you learned from the experience!

I want to thank John for approaching me in the first place and suggesting we use and improve the project. He was an unstoppable force throughout the competition, helping both students and fellow mentors. John even helped me with code reviews to really refine the work students submitted, and help them improve based on the feedback.

Kudos to the Google Open Source team for organizing it so well and lowering the barriers of entry to open source for high school students around the world.

By Manvendra Singh, coala mentor

A galactic experience in Google Code-in 2017

This is a guest post from Liquid Galaxy, one of the organizations that participated in both Google Summer of Code and Google Code-in 2017.

Liquid Galaxy, an open source project that powers panoramic views spanning multiple computers and displays, has been participating in Google Summer of Code (GSoC) since 2011. However, we never applied to participate in Google Code-in (GCI) because we heard stories from other projects about long hours and interrupted holidays in service of mentoring eager young students.

That changed in 2017! And, while the stories are true, we have to say it’s also an amazing and worthwhile experience.

It was hard for our small project to recruit the number of mentors needed. Thankfully, our GSoC mentors stepped up, as did many former GSoC students. We even had forward thinking students who were interested in participating in GSoC 2018 volunteer to mentor! While it was challenging, our team of mentors helped us have a nearly flawless GCI experience.

The Google Open Source team only had to nudge us once, when a student’s task had been pending review for more than 36 hours. We’re pretty happy with that considering we had nearly 500 tasks completed over the 50 days of the contest.

More important than our experience, though, is the student experience. We learned a lot, seeing how they chose tasks, the attention to detail some of them put into their work, and the level of interaction between the students and the mentors. Considering these were young students, ranging in age from 13 to 17, they far exceeded our expectations.

There was one piece of advice the Google Open Source team gave us that we didn’t understand as GCI newbies: have a large number of tasks ready from day one, and leave some unpublished until the halfway point. That ended up being key, it ensured we had enough tasks for the initial flood of students and some in reserve for the second flood around the holidays. Our team of mentors worked hard from the moment we were accepted into GCI to the moment we began to create over 150 tasks in five different categories. Students seemed to think we did a good job and told us they enjoyed the variety of tasks and level of difficulty.

We’re glad we finally participated in Google Code-in and we’ll definitely be applying next time! You can learn more about the project and the students who worked with us on our blog.

By Andreu Ibáñez, Liquid Galaxy org admin

Celebrating open source mentorship with Joomla

Let’s marvel for a moment: as Google Summer of Code (GSoC) 2018 begins, 46 of the participating open source organizations are celebrating a decade or more with the program. There are 586 collective years of mentorship between them, and that’s just through GSoC.

Free and open source software projects have been doing outreach and community building since the beginning. The free software movement has been around for 35 years, and open source has been around for 20.

Bringing new people into open source is necessary for project health and sustainability, but it’s not easy. It takes time and effort to prepare onboarding materials and mentor people. It takes personal dedication, a welcoming culture, and a commitment to institutional knowledge. Sustained volunteerism at this scale is worthy of celebration!

Joomla is one open source project that exemplifies this and Puneet Kala is one such person. Joomla, a web content management system (CMS) that was first released in 2005, is now on their 11th year of GSoC. More than 80 students have participated over the years. Most students are still actively contributing, and many have gone on to become mentors.

Puneet, now Joomla’s GSoC team lead, began with the project as a student five years ago. He sent along this article celebrating their 10th anniversary, which includes links to interviews with other students who have become mentors, and this panel discussion from Joomla World Conference.

It’s always great to hear from the people who have participated in Google Summer of Code. The stories are inspiring and educational. They know a thing or two about building open source communities, so we share what they have to say: you can find guest posts here.

We’d like to extend our heartfelt thanks to the 608 open source organizations and 12,000 organization administrators and mentors who have been a part of GSoC so far. We’d also like to applaud the 46 organizations that have 10+ years under their belts!

Your tireless investment in the future of people and open source is a testament to generosity.

By Josh Simmons, Google Open Source

Coding your way into cinemas

This is a guest post from apertus° and TimVideos.us, open source organizations that participated in Google Summer of Code last year and are back for 2018!

The apertus° AXIOM project is bringing the world’s first open hardware/free software digital motion picture production camera to life. The project has a rich history, exercises a steadfast adherence to the open source ethos, and all aspects of development have always revolved around supporting and utilising free technologies. The challenge of building a sophisticated digital cinema camera was perfect for Google Summer of Code 2017. But let’s start at the beginning: why did the team behind the project embark on their journey?

Modern Cinematography

For over a century film was dominated by analog cameras and celluloid, but in the late 2000’s things changed radically with the adoption of digital projection in cinemas. It was a natural next step, then, for filmmakers to shoot and produce films digitally. Certain applications in science, large format photography and fine arts still hold onto 35mm film processing, but the reduction in costs and improved workflows associated with digital image capture have revolutionised how we create and consume visual content.

The DSLR revolution

Photo by Matthew Pearce
licensed CC SA 2.0.
Filmmaking has long been considered an expensive discipline accessible only to a select few. This all changed with the adoption of movie recording capabilities in digital single-lens reflex (DSLR) cameras. For multinational corporations this “new” feature was a relatively straightforward addition to existing models as most compact digital photo cameras could already record video clips. This was the first time that a large diameter image sensor, a vital component for creating the typical shallow depth of field we consider cinematic, appeared in consumer cameras. In recent times, user groups have stepped up to contribute to the DSLR revolution first-hand, including groups like the Magic Lantern community.

Magic Lantern

Photo by Dave Dugdale licensed CC BY-SA 2.0.
Magic Lantern is a free and open source software add-on that runs from a camera’s SD/CF card. It adds a host of new features to Canon’s DSLRs that weren't included from the factory, such as allowing users to record high-dynamic range (HDR) video or 14-bit uncompressed RAW video. It’s a community project and many filmmakers simply wouldn’t have bought a Canon camera if it weren’t for the features that Magic Lantern pioneered. Because installing Magic Lantern doesn’t replace the stock Canon firmware or modify the read-only memory (ROM) but runs alongside it, it is both easy to remove and carries little risk. Originally developed for filmmaking, Magic Lantern’s feature base has expanded to include tools useful for still photography as well.

Starting the revolution for real 

Of course, Magic Lantern has been held back by the underlying proprietary hardware routines on existing camera models. So, in 2014 a team of developers and filmmakers around the apertus° project joined forces with the Magic Lantern team to lay the foundation for a totally independent, open hardware, free software, digital cinema camera. They ran a successful crowdfunding campaign for initial development, and they completed hardware development of the first developer kits in 2016. Unlike traditional cameras, the AXIOM is designed to be completely modular, and so continuously evolve, thereby preventing it from ever becoming obsolete. How the camera evolves is determined by its user community, with its design files and source code freely available and users encouraged to duplicate, modify and redistribute anything and everything related to the camera.

While the camera is primarily for use in motion picture production, there are many suitable applications where AXIOM can be useful. Individuals in science, astronomy, medicine, aerial mapping, industrial automation, and those who record events or talks at conferences have expressed interest in the camera. A modular and open source device for digital imaging allows users to build a system that meets their unique requirements. One such company for instance, Mavrx Inc, who use aerial imagery to provide actionable insight for the agriculture industry, used the camera because it enabled them to not only process the data more efficiently than comparable camera equivalents, but also to re-configure its form factor so that it could be installed alongside existing equipment configurations.

Google Summer of Code 2017

Continuing their journey, apertus° participated in Google Summer of Code for the first time in 2017. They received about 30 applications from interested students, from which they needed to select three. Projects ranged from field programmable gate array (FPGA) centered video applications to creating Linux kernel drivers for specific camera hardware. Similarly TimVideos.us, an open hardware project for live event streaming and conference recording, is working on FPGA projects around video interfaces and processing.

After some preliminary work, the students came to grips with the camera’s operating processes and all three dove in enthusiastically. One student failed the first evaluation and another failed the second, but one student successfully completed their work.

That student, Vlad Niculescu, worked on defining control loops for a voltage controller using VHSIC Hardware Description Language (VHDL) for a potential future AXIOM Beta Power Board, an FPGA-driven smart switching regulator for increasing the power efficiency and improving flexibility around voltage regulation.
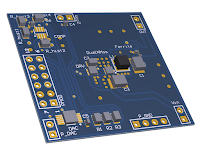
Left: The printed circuit board (PCB) (printed circuit board) for testing the switching regulator FPGA logic. Right: After final improvements the fluctuation ripple in the voltages was reduced to around 30mV at 2V target voltage.
Vlad had this to say about his experience:

“The knowledge I acquired during my work with this project and apertus° was very satisfying. Besides the electrical skills gained I also managed to obtain other, important universal skills. One of the things I learned was that the key to solving complex problems can often be found by dividing them into small blocks so that the greater whole can be easily observed by others. Writing better code and managing the stages of building a complex project have become lessons that will no doubt become valuable in the future. I will always be grateful to my mentor as he had the patience to explain everything carefully and teach me new things step by step, and also to apertus° and Google’s Summer of Code program, without which I may not have gained the experience of working on a project like this one.”

We are grateful for Vlad’s work and congratulate him for successfully completing the program. If you find open hardware and video production interesting, we encourage you to reach out and join the community–both apertus° and TimVideos.us are back for Google Summer of Code 2018.

By Sebastian Pichelhofer, apertus°, and Tim 'mithro' Ansell, TimVideos.us

A year full of new open source at Catrobat

This is a guest post from Catrobat, an open source organization that participated in both Google Summer of Code and Google Code-in last year.


Catrobat was selected to participate in Google Summer of Code (GSoC) for the sixth time and Google Code-in (GCI) for the first time in 2017, which helped us reach new students and keep our mentors busy.

We tried something new in 2017 by steering GSoC students toward refactoring and performance, rather than developing new features. Implementing a crash tracking and analysis system, modularizing existing code, and rewriting our tests resulted in more lines of code being deleted than added – and we’re really happy about that!

This improved the quality and stability of oursoftware and both students and mentors could see progress immediately. The immediacy of the results kept students engaged - some weeks it almost seemed as if they had been working 24/7 (they weren’t :)! And we’re happy to say that most are still motivated to contribute after GSoC, and now they’re adding code more often than they are deleting it.

Although new features are exciting, we found that working on existing code offers a smooth entry for GSoC students. This approach helped students assimilate into the community and project more quickly, as well as receive rapid rewards for their work.

The quality improvements made by GSoC students also made things smoother for the younger, often less experienced GCI students. Several dozen students completed hundreds of tasks, spreading the love of open source and coding in their communities. It was our first time working with so many young contributors and it was fun!

We faced challenges in the beginning – such as language barriers and students’ uncertainty in their work – and quickly learned how to adapt our processes to meet the needs (and extraordinary motivation) of these new young contributors. We introduced them to open source through our project’s app Pocket Code, allowing them to program games and apps with a visual mobile coding framework and then share them under an open license. Students had a lot of fun starting this way and mentors enjoyed reviewing so many colorful and exciting games.

Students even asked how they could improve on quality work that we had already accepted, if they could do more work on it, and if they could share their projects with their friends. This was a great first experience of GCI for our organization and, as one of our mentors mentioned in the final evaluation phase, we would totally be up for doing it again!

By Matthias Mueller, Catrobat Org Admin

Google Apps Script: Tracking add-on usage with Google Analytics

Posted by Romain Vialard, a Google Developer Expert and developer of Yet Another Mail Merge, a Google Sheets add-on.

Google Apps Script makes it easy to create and publish add-ons for Google Sheets, Docs, and Forms. There are now hundreds of add-ons available and many are reaching hundreds of thousands of users. Google Analytics is one of the best tools to learn what keeps those users engaged and what should be improved to make an add-on more successful.

Cookies and User Identification

Add-ons run inside Google Sheets, Docs, and Forms where they can display content in dialogs or sidebars. These custom interfaces are served by the Apps Script HTML service, which offers client-side HTML, CSS, and JS with a few limitations.

Among those limitations, cookies aren’t persistent. The Google Analytics cookie will be recreated each time a user re-opens your dialog or sidebar, with a new client ID every time. So, Analytics will see each new session as if initiated by a new user, meaning the number of sessions and number of users should be very similar.


Fortunately, it’s possible to use localStorage to store the client ID — a better way to persist user information instead of cookies. After this change, your user metrics should be far more accurate.

Add-ons can also run via triggers, executing code at a recurring interval or when a user performs an action like opening a document or responding to a Google Form. In those cases, there’s no dialog or sidebar, so you should use the Google Analytics Measurement Protocol (see policies on the use of this service) to send user interaction data directly to Google Analytics servers via the UrlFetch service in Google Apps Script.

A Client ID is also required in that case, so I recommend using the Apps Script User properties service. Most examples on the web show how to generate a unique Client ID for every call to Analytics but this won’t give you an accurate user count.

You can also send the client ID generated on client side to the server so as to use the same client ID for both client and server calls to Analytics, but at this stage, it is best to rely on the optional User ID in Google Analytics. While the client ID represents a client / device, the User ID is unique to each user and can easily be used in add-ons as users are authenticated. You can generate a User ID on the server side, store it among the user properties, and reuse it for every call to Analytics (both on the client and the server side).

Custom Dimensions & Metrics

In add-ons, we usually rely on event tracking and not page views. It is possible to add different parameters on each event thanks to categories, actions, labels and value, but it’s also possible to add much more info by using custom dimensions & metrics.

For example, the Yet Another Mail Merge add-on is mostly used to send emails, and we have added many custom dimensions to better understand how it is used. For each new campaign (batch of emails sent), we record data linked to the user (e.g. free or paying customer, gmail.com or Google for Work / EDU user) and data linked to the campaign (e.g. email size, email tracking activated or not). You can then reuse those custom dimensions inside custom reports & dashboards.


Once you begin to leverage all that, you can get very insightful data. Until October 2015, Yet Another Mail Merge let you send up to 100 emails per day for free. But we’ve discovered with Analytics that most people sending more than 50 emails in one campaign were actually sending 100 emails - all the free quota they could get - but we failed to motivate them to switch to our paid plan.


As a result of this insight, we have reduced this free plan to 50 emails/day and at the same time introduced a referral program, letting users get more quota for free (they still don’t pay but they invite more users so it’s interesting for us). With this change, we have greatly improved our revenue and scaled user growth.

Or course, we also use Google Analytics to track the efficiency of our referral program.

To help you get started in giving you more insight into your add-ons, below are some relevant pages from our documentation on the tools described in this post. We hope this information will help your apps become more successful!:


Romain Vialard profile | website

Romain Vialard is a Google Developer Expert. After some years spent as a Google Apps consultant, he is now focused on products for Google Apps users, including add-ons such as Yet Another Mail Merge and Form Publisher.

Real-time notifications in add-ons with Firebase

Editor's note: Posted by Romain Vialard, a Google Developer Expert and developer of Yet Another Mail Merge, a Google Sheets add-on.

Yet Another Mail Merge is a Google Sheets add-on that lets users send multiple personalized emails based on a template saved as a draft in Gmail and data in a Google Sheet. It can send hundreds of emails, but this kind of operation usually takes a few minutes to complete. This raises the question: what should be displayed in the user interface while a function is running on server side for a long time?


Real-time notifications in Add-ons

Firebase is all about real-time and became the answer to that issue. Last December, the Apps Script team announced a better version of the HtmlService with far fewer restrictions and the ability to use external JS libraries. With Firebase, we now had a solution to easily store and sync data in real-time.

Combined, users are able to know, in real-time, the number of emails sent by an Apps Script function running server-side. When the user starts the mail merge, it calls the Apps Script function that sends emails and connects to Firebase at the same time. Every time the Apps Script function has finished sending a new email, it increments a counter on Firebase and the UI is updated in real-time, as shown in the following image.


Implementation

Inside the loop, each time an email is sent (i.e. each time we use the method GmailApp.sendEmail()), we use the Apps Script UrlFetch service to write into Firebase using its REST API. Firebase's capabilities makes this easy & secure and there’s no need for an OAuth Authorization Flow, just a Firebase app secret, as shown in the following example:

function addNewUserToFirebase() {
var dbUrl = "https://test-apps-script.firebaseio.com";
var secret = PropertiesService.getScriptProperties().getProperty("fb-secret");
var path = "/users/";
var userData = {
romainvialard:{
firstName:"Romain",
lastName:"Vialard",
registrationDate: new Date()
}
};
var params = {
method: "PUT",
payload : JSON.stringify(userData)
}
UrlFetchApp.fetch(dbUrl + path + ".json?auth=" + secret, params);
}

On the client side, thanks to the improved Apps Script HtmlService, we can use the official JS client library to connect to Firebase and retrieve the data stored previously. Specifically, the on() method in this library can be used to listen for data changes at a particular location in our database. So each time a new task is completed on server side (e.g. new email sent), we notify Firebase and the UI is automatically updated accordingly.

var fb = new Firebase("https://test-apps-script.firebaseio.com");
var ref = fb.child('users/' + UID + '/nbOfEmailsSent');
ref.on("value", function(data) {
if (data.val()) {
document.getElementById("nbOfEmailsSent").innerHTML = data.val();
}
});

More Firebase in Add-ons

In addition to the example above, there are other places where Firebase can be useful in Google Apps Script add-ons.

  • “Yet Another Mail Merge” also offers paid plans and it needs to store our customer list. It turns out, Firebase is perfect for that as well. Each time someone buys a plan, our payment tool calls an Apps Script web app which writes the payment details in Firebase. So right after the purchase, the user can open the add-on and a function on server side will call Firebase and see that premium features should now be enabled for this user.
  • Last but not least, at the end of a mail merge, we also use Firebase to provide real-time reporting of emails opened, directly in the sidebar of the spreadsheet.

Those are just a few examples of what you can do with Apps Script and Firebase. Don’t hesitate to try it yourself or install Yet Another Mail Merge to see a live example. In addition, there is a public Apps Script library called FirebaseApp that can help you start with Firebase; use it like any other standard Apps Script library.

For example, you can easily fetch data from Firebase using specific query parameters:

function getFrenchContacts() {
var firebaseUrl = "https://script-examples.firebaseio.com/";
var base = FirebaseApp.getDatabaseByUrl(firebaseUrl);
var queryParameters = {orderBy:"country", equalTo: "France"};
var data = base.getData("", queryParameters);
for(var i in data) {
Logger.log(data[i].firstName + ' ' + data[i].lastName
+ ' - ' + data[i].country);
}
}

Build your own add-ons via Google Apps Script. Check out the documentation (developers.google.com/apps-script) to get more information as well as try out the Quickstart projects there. We look forward to seeing your add-ons soon!


Romain Vialard profile | website

Romain Vialard is a Google Developer Expert. After some years spent as a Google Apps consultant, he is now focused on products for Google Apps users, including add-ons such as Yet Another Mail Merge and Form Publisher.

Google+ Stories and Movies: memories made easier

(Cross-posted on the Google Official Blog)

A suitcase full of dirty clothes. A sad-looking house plant. And 437 photos and videos on your phone, tablet and camera. This is the typically messy scene after a vacation. And although we can’t do your laundry (thanks but no thanks), or run your errands (well, maybe a few), we’d still like to help. Enter Google+ Stories, which can automatically weave your photos, videos and the places you visited into a beautiful travelogue.

No more sifting through photos for your best shots, racking your brain for the sights you saw, or letting your videos collect virtual dust. We’ll just gift you a story after you get home. This way you can relive your favorite moments, share them with others, and remember why you traveled in the first place. 

Stories will be available this week on Android and the web, with iOS coming soon. In the meantime you can browse my story below (click to start), or explore a few others by paraglider Tom de Dorlodot, and DJ Steve Aoki.
When it’s less about travel, and more about today's events (like a birthday party, or baby’s first steps), Google+ Movies can produce a highlight reel of your photos and videos automatically—including effects, transitions and a soundtrack. Today we’re bringing Movies to Android, iOS and the web, so lots more people will receive these video vignettes.
A movie of my daughter’s first bike ride, created automatically by Google+

To get started with Stories and Movies, simply back up your photos and videos to Google+. And that’s it. Auto Awesome will get to work in the background, and you’ll get notified when a story or movie is ready.

In fact: if your photo library is already online, you may already have stories waiting for you. So look for the new app in Google Play, view the full list of improvements on Google+, and enjoy your walks down memory lane.

Source: Google Travel


Building a Rails based app for Google Apps Marketplace

Editor's note: This is a guest post by Benjamin Coe. Benjamin shares tips and best practices on using Ruby on Rails for integrating with Google Apps and launching on the Marketplace. — Arun Nagarajan

Yesware offers an app in the Google Apps Marketplace which allows our users to schedule reminders, from directly within the Gmail UI. Yesware’s app recently relaunched in the updated Google Apps Marketplace. In prep, we revamped our existing Google Apps Integration:
  • Replacing OpenID with OAuth 2.0 for Single-Sign-On.
  • Replacing 2-legged OAuth with OAuth 2.0 Service Accounts, for delegated account access.
  • Releasing a Gmail Contextual Gadget that worked within these new authentication paradigms.
We should like to share some of the decisions we made, and challenges we faced, upgrading our production Ruby on Rails application to support the improved Google Apps Marketplace.

OAuth 2.0 for SSO

In the revamped Google Apps Marketplace, OAuth 2.0 replaces OpenID for facilitating Single-Sign-On. The flow is as follows:

  1. OAuth 2.0 credentials are created in the Cloud Console, within the same project that has the Google Apps Marketplace SDK enabled.
  2. When accessing your application, a user is put through the standard OAuth 2.0 authentication flow using these credentials.
  3. If the user has the Google Apps Marketplace App installed they will be logged directly into your application, skipping the authorization step.
To implement the OAuth 2.0 authentication flow, you can use the OmniAuth Google OAuth2 Strategy gem. Assuming you're already using OmniAuth, you simply add a line to initializers/omniauth.rb that looks something like this:
Rails.application.config.middleware.use OmniAuth::Builder do
provider :google_oauth2, ENV["GAM_OAUTH_KEY"], ENV["GAM_OAUTH_SECRET"]
end

Yesware already had a Google OAuth 2.0 authentication strategy, so we opted to subclass the Google OAuth 2.0 OmniAuth Strategy. This allowed us to continue supporting our existing OAuth 2.0 credentials, while adding support for Google Apps Marketplace SSO. Our subclassed strategy looked like this:
# Subclass the GoogleOauth2 Omniauth strategy for
# Google Apps Marketplace V2 SSO.
module OmniAuth
module Strategies
class GoogleAppsMarketplace < OmniAuth::Strategies::GoogleOauth2
option :name, 'google_apps_marketplace'
end
end
end
Our final initializers/omniauth.rb file was this:
Rails.application.config.middleware.use OmniAuth::Builder do
provider :google_oauth2, ENV["OAUTH_KEY"],
ENV["OAUTH_SECRET"],
{:scope => ENV["OAUTH_SCOPE"]}
provider :google_apps_marketplace, ENV["GAM_OAUTH_KEY"],
ENV["GAM_OAUTH_SECRET"],
{ :scope => ENV["GAM_OAUTH_SCOPE"],
:access_type => 'online' }end

Note that :access_type is set to online. This is necessary to prevent the authorization prompt from being presented to a SSO user. Omniauth defaults to an :access_type of offline.
That's all it takes. With this OmniAuth strategy in place, when a domain administrator installs your application SSO will be available across the domain.

OAuth 2.0 Service Accounts

To support Yesware's reminder functionality, we needed offline access to a user's email account. In the past, this functionality was supported through 2-legged OAuth. In the new Google Apps Marketplace paradigm, OAuth 2.0 Service Accounts are the replacement.
  • In the Cloud Console, generate a private key for the OAuth 2.0 Service Account associated with your Google Apps Marketplace project. 
  • Download the .p12 private key generated. 
  • Place this key somewhere that will be accessible by your production servers, e.g., a certificates folder in your codebase. 
We used the Google API Ruby Client gem to generate an access token from our Service Account's keys.
Using the deprecated 2-Legged OAuth based approach, our authorization logic looked like this:

Gmail.connect!(:xoauth, '[email protected]', {
token: authentication.token,
secret: authentication.secret,
consumer_key: google.key,
consumer_secret: google.secret,
read_only: true
})
Using the new Service Account Based Approach, it was as follows:
key = Google::APIClient::PKCS12.load_key(
google_apps.service.p12path, # this is a constant value Google uses
# to password protect the key.
'notasecret'
)service_account = Google::APIClient::JWTAsserter.new(
google_apps.service.email,
'https://mail.google.com/',
key
)client = Google::APIClient.new(
:application_name => APPLICATION_NAME,
:version => APPLICATION_VERSION
).tap do |client|
client.authorization = service_account.authorize('[email protected]')end
Google.connect!(:xoauth2, '[email protected]', {
:oauth2_token => client.authorization.access_token,
})
With OAuth 2.0 Service Accounts, the underlying libraries we used to interact with Gmail remained the same. There were simply a few extra steps necessary to obtain an access token.

Contextual Gadgets and SSO

Yesware provides a Gmail Contextual Gadget, for scheduling email reminders. To facilitate this, it's necessary that the gadget interact with a user's email account. To make this a reality, we needed to implement SSO through our contextual gadget. Google provides great reading material on this topic. However, the approach outlined concentrates on the deprecated OpenID-based SSO approach. We used a slightly modified approach.
Rather than OpenID, we used OAuth 2.0 for associating the opensocial_viewer_id with a user. To do this, we needed to modify our OmniAuth strategy to store the opensocial_viewer_id during authentication:
# Subclass the GoogleOauth2 Omniauth strategy for
# Google Apps Marketplace V2 SSO.
module OmniAuth
module Strategies
class GoogleAppsMarketplace < OmniAuth::Strategies::GoogleOauth2

option :name, 'google_apps_marketplace'

def request_phase

# Store the opensocial_viewer_id in the session.
# this allows us to bind the Google Apps contextual
# gadget to a user account.
if request.params['opensocial_viewer_id']
session[:opensocial_viewer_id] = request.params['opensocial_viewer_id']
end

super
end

end
end
end
Once an opensocial_viewer_id was connected to a Yesware user, we could securely make API calls from our contextual gadget. To cut down on the ritual surrounding this, we wrote a Devise Google Apps OpenSocial Strategy for authenticating the OpenSocal signed requests.

Now Go Forth

Once we figured out all the moving parts, we were able to use mostly off the shelf mature libraries for building our Google Apps Marketplace Integration. I hope that this retrospective look at our development process helps other Rails developers hit the ground running even faster than we did.
Benjamin Coe profile

Benjamin Coe cofounded the email productivity company Attachments.me, which was acquired by Yesware, Inc., in  2013. Before starting his own company, Ben was an engineer at FreshBooks, the  world’s #1 accounting solution.
Ben’s in his element when writing scalable cloud-based infrastructure, and loves reflecting on the thought-process that goes into this. A rock-climber, amateur musician, and bagel aficionado, Ben can be found roaming the streets of San Francisco.
[email protected]https://github.com/bcoe@benjamincoe